从入门到放弃(1)-tomcat -spring web.xml
不知不觉,转行已经四年了,感谢当时的选择,开启了我的新的世界。如果没有当初的选择,可能现在在老家工地上搬砖。在这几年里,也渐渐从小白变成所谓中高级后端开发工程师。走过坑 ,趟过泥,写过屎山代码。言归正传,开始从入门到放弃的系列。
最近也在看tomcat源码,也在逐渐理解一个http请求的来龙去脉。现在不写这个,先写tomcat是如何初始化spring。
先理解一下spring ContextLoaderListener的作用
ContextLoaderListener的作用就是启动Web容器时,读取在contextConfigLocation中定义的xml文件,自动装配ApplicationContext的配置信息,并产生WebApplicationContext对象,然后将这个对象放置在ServletContext的属性里,这样我们只要得到Servlet就可以得到WebApplicationContext对象,并利用这个对象访问spring容器管理的bean。
简单来说,就是上面这段配置为项目提供了spring支持,初始化了Ioc容器。
打开tomcat源码找到StandardContext.startInternal(),这个方法里面几千行代码,找到核心的监听部分的代码
//大约5063行,tomcat 版本不一样,可能位置不一样,关键字搜索到这一行即可
 // Notify our interested LifecycleListeners
fireLifecycleEvent(Lifecycle.CONFIGURE_START_EVENT, null);
//进入方法之后完整代码,type=Lifecycle.CONFIGURE_START_EVENT data=null
 protected void fireLifecycleEvent(String type, Object data) {
        LifecycleEvent event = new LifecycleEvent(this, type, data);
        for (LifecycleListener listener : lifecycleListeners) {
            listener.lifecycleEvent(event);
        }
    }
//看到这里估计有跟我有一样的疑问,lifecycleListeners 这个是从哪里来的,在下面类
//org.apache.catalina.util.LifecycleBase有如下代码
private final List<LifecycleListener> lifecycleListeners = new CopyOnWriteArrayList<>();
  // 但是这个集合的内容从哪里来呢?我也纳闷,搜了一下,网上大神有写在哪里
 Digester digester = createStartDigester();
下面是 createStartDigester()部分代码
 /**
     * Create and configure the Digester we will be using for startup.
     * @return the main digester to parse server.xml
     */
    protected Digester createStartDigester() {

        // Initialize the digester
        Digester digester = new Digester();
        digester.setValidating(false);
        digester.setRulesValidation(true);
        Map<Class<?>, List<String>> fakeAttributes = new HashMap<>();
        List<String> objectAttrs = new ArrayList<>();
        objectAttrs.add("className");
        fakeAttributes.put(Object.class, objectAttrs);
        // Ignore attribute added by Eclipse for its internal tracking
        List<String> contextAttrs = new ArrayList<>();
        contextAttrs.add("source");
        fakeAttributes.put(StandardContext.class, contextAttrs);
        digester.setFakeAttributes(fakeAttributes);
        digester.setUseContextClassLoader(true);

 ***************************************************************************
 *       digester.addSetProperties("Server/Service/Connector/Listener");
 *       digester.addSetNext("Server/Service/Connector/Listener",
 *                          "addLifecycleListener",
 *                           "org.apache.catalina.LifecycleListener");
 ***************************************************************************
        return digester;
    }
这段代码的意思就是:在解析的时候要在Server下面创建一个LifecycleListener对象,并调用addLifecycleListener方法,将对象添加到组件的lifecycleListeners集合当中。
除了Server有这个配置,像下面的都有设置对应的规则,所以在解析的时候,只要他们的标签下面子标签设置了,且对应的实现类是org.apache.catalina.LifecycleListener的子类即可。
在众多监听器中,有一个ContextConfig监听器,在监听到"configure_start" 事件后, 会执configureStart()方法. 在configureStart()方法中执行webConfig()开始web.xml解析。
但是ContextConfig 是什么被添加到org.apache.catalina.util.LifecycleBase.lifecycleListeners 集合,再往前解析代码就会找到org.apache.catalina.startup.HostConfig.deployDescriptor(),再往前就不深究了,深究就疯了,deployDescriptor()方法添加监听的几行主要代码:
 Context context = null;
 private String host.configClass =
        "org.apache.catalina.startup.ContextConfig";
 Class<?> clazz = Class.forName(host.getConfigClass());
            LifecycleListener listener = (LifecycleListener) clazz.getConstructor().newInstance();
            context.addLifecycleListener(listener);
            context.setConfigFile(contextXml.toURI().toURL());
 host.addChild(context);
言归正传回到org.apache.catalina.startup.ContextConfig.configureStart(),在这之前先看下其初始化
protected void org.apache.catalina.startup.ContextConfig.init() {
        // Called from StandardContext.init()
        Digester contextDigester = createContextDigester();
        contextDigester.getParser();
        context.setConfigured(false);//设置配置状态,默认设置为失败,以免被误任务成功
        ok = true;
        contextConfig(contextDigester);
    }

    protected Digester createContextDigester() {
        Digester digester = new Digester();
        digester.setValidating(false);
        digester.setRulesValidation(true);
        HashMap<Class<?>, List<String>> fakeAttributes = new HashMap<>();
        ArrayList<String> attrs = new ArrayList<>();
        attrs.add("className");
        fakeAttributes.put(Object.class, attrs);
        digester.setFakeAttributes(fakeAttributes);
        RuleSet contextRuleSet = new ContextRuleSet("", false);
        digester.addRuleSet(contextRuleSet);
        RuleSet namingRuleSet = new NamingRuleSet("Context/");
        digester.addRuleSet(namingRuleSet);
        return digester;
    }

     protected void contextConfig(Digester digester) {
        String defaultContextXml = null;
        // Open the default context.xml file, if it exists 如果存在默认的配置,使用它
        if (context instanceof StandardContext) {
            defaultContextXml = ((StandardContext)context).getDefaultContextXml();
        }
        // set the default if we don't have any overrides
        //如果没有配置默认的,那么是用全局默认配置conf/context.xml
        if (defaultContextXml == null) {
            defaultContextXml = Constants.DefaultContextXml;
        }
        //如果还没有进行解析,那么就会重新解析,默认的全局配置-》configBase下的context.xml.default-》configBase下的配置
        if (!context.getOverride()) {
            File defaultContextFile = new File(defaultContextXml);
            if (!defaultContextFile.isAbsolute()) {
                defaultContextFile =
                        new File(context.getCatalinaBase(), defaultContextXml);
            }
            if (defaultContextFile.exists()) {
                try {
                    URL defaultContextUrl = defaultContextFile.toURI().toURL();
                    //解析方式就是以digester注册的规则进行sax解析
                    processContextConfig(digester, defaultContextUrl);
                } catch (MalformedURLException e) {
                    log.error(sm.getString(
                            "contextConfig.badUrl", defaultContextFile), e);
                }
            }
            //读取host级别的context描述文件context.xml.default,host级别的配置会覆盖
            //全局的配置
            File hostContextFile = new File(getHostConfigBase(), Constants.HostContextXml);
            if (hostContextFile.exists()) {
                try {
                    URL hostContextUrl = hostContextFile.toURI().toURL();
                    processContextConfig(digester, hostContextUrl);
                } catch (MalformedURLException e) {
                    log.error(sm.getString(
                            "contextConfig.badUrl", hostContextFile), e);
                }
            }
        }
        //读取自身配置的context文件,自身的配置文件优先级最高,会覆盖前面两个的设置
        if (context.getConfigFile() != null) {
            processContextConfig(digester, context.getConfigFile());
        }
    }
从代码解析看一看出context.xml优先级:
自身context描述文件优先级最高,再者就是host级别的,最后才是全局的context.xml。上面init主要就是init context.xml,context.xml内容如下:
<?xml version="1.0" encoding="UTF-8"?>

<!-- The contents of this file will be loaded for each web application -->
<Context>
    <!-- Default set of monitored resources. If one of these changes, the    -->
    <!-- web application will be reloaded.                                   -->
    <WatchedResource>WEB-INF/web.xml</WatchedResource>
    <WatchedResource>${catalina.base}/conf/web.xml</WatchedResource>
</Context>
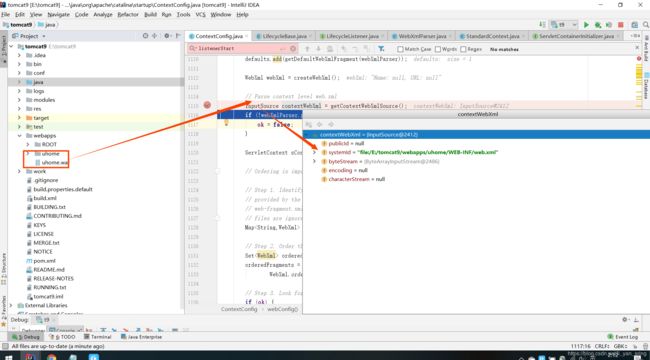
configureStart()–>webConfig(),webConfig核心代码
WebXml webXml = createWebXml();
 InputSource contextWebXml = getContextWebXmlSource();
 webXmlParser.parseWebXml(contextWebXml, webXml, false)
  ServletContext sContext = context.getServletContext();

        // Ordering is important here

        // Step 1. Identify all the JARs packaged with the application and those
        // provided by the container. If any of the application JARs have a
        // web-fragment.xml it will be parsed at this point. web-fragment.xml
        // files are ignored for container provided JARs.
        Map<String,WebXml> fragments = processJarsForWebFragments(webXml, webXmlParser);

        // Step 2. Order the fragments.
        Set<WebXml> orderedFragments = null;
        orderedFragments =
                WebXml.orderWebFragments(webXml, fragments, sContext);

        // Step 3. Look for ServletContainerInitializer implementations
        if (ok) {
            processServletContainerInitializers();
        }

        if  (!webXml.isMetadataComplete() || typeInitializerMap.size() > 0) {
            // Steps 4 & 5.
            processClasses(webXml, orderedFragments);
        }

        if (!webXml.isMetadataComplete()) {
            // Step 6. Merge web-fragment.xml files into the main web.xml
            // file.
            if (ok) {
                ok = webXml.merge(orderedFragments);
            }

            // Step 7. Apply global defaults
            // Have to merge defaults before JSP conversion since defaults
            // provide JSP servlet definition.
            webXml.merge(defaults);

            // Step 8. Convert explicitly mentioned jsps to servlets
            if (ok) {
                convertJsps(webXml);
            }

            // Step 9. Apply merged web.xml to Context
            if (ok) {
                configureContext(webXml);
            }
在webapp下添加war ,最终加载是该项目下的web.xml
configureContext(WebXml webxml)方法开始真正的加载处理web.xml的内容,以加载监听为例,贴一下核心代码
  for (String listener : webxml.getListeners()) {
            context.addApplicationListener(listener);
        }
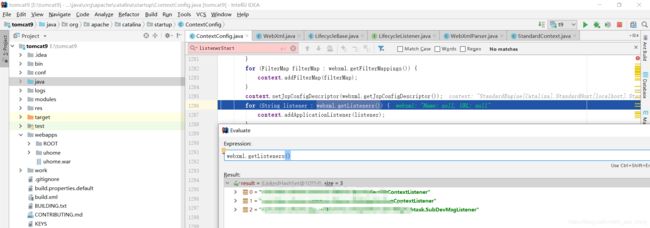
最后调用核心方法org.apache.catalina.core.StandardContext.listenerStart()
//因为我项目用了三个监听i=0,1,2分别启动这三个应用对应的监听
 ServletContextEvent event = new ServletContextEvent(getServletContext());
 ServletContextListener listener =
                (ServletContextListener) instances[i];
                 listener.contextInitialized(event);
我已经搭建好源码包,可以在idea 正常debug源码,下篇讲如何启动tomcat源码