PHY设备驱动综合分析
PHY设备驱动分析
声明:
使用其他作者原创资料较多就不一一列举,冒犯之处望海涵。我原创也不少咯。
MAC和PHY可能是集成在CPU中可能独立,下图介绍典型的MAC集成,PHY独立。两者搭配实现网卡功能。

struct phy_device {
	struct phy_driver *drv;	//PHY设备驱动
	struct mii_bus *bus;	//对应的MII总线
	struct device dev;	//设备文件
	u32 phy_id;	//PHY ID
	enum phy_state state;	//PHY状态
	u32 dev_flags;
	phy_interface_t interface;	//PHY接口
	int addr;	//PHY 总线地址(0~31)
	int speed;	//速度
	int duplex;	//双工模式
	int pause;	//停止
	int asym_pause;	//
	int link;
	u32 interrupts;	//中断使能标志
	u32 supported;
	u32 advertising;
	int autoneg;
	int link_timeout;	//026
	int irq;	//中断号
	void *priv;	//私有数据
	struct work_struct phy_queue;	//PHY工作队列
	struct delayed_work state_queue;	//PHY延时工作队列
	atomic_t irq_disable;
	struct mutex lock;
	struct net_device *attached_dev;	//网络设备
	void (*adjust_link)(struct net_device *dev);
	void (*adjust_state)(struct net_device *dev);
};
struct phy_driver {
	u32 phy_id;		//PHY ID
	char *name;		//PHY名
	unsigned int phy_id_mask;
	u32 features;	//特性
	u32 flags;	//标记
	int (*config_init)(struct phy_device *phydev);	//配置初始化
	int (*probe)(struct phy_device *phydev);	//探测到 probe方法
	int (*suspend)(struct phy_device *phydev);	//唤醒
	int (*resume)(struct phy_device *phydev);	//挂起
	int (*config_aneg)(struct phy_device *phydev);	//支援(Auto-negotiation)配置
	int (*read_status)(struct phy_device *phydev);	//读支援(Auto-negotiation)状态
	int (*ack_interrupt)(struct phy_device *phydev);	//清中断
	int (*config_intr)(struct phy_device *phydev);	//使能/禁用 中断
	int (*did_interrupt)(struct phy_device *phydev);	//判断是否由中断
	void (*remove)(struct phy_device *phydev);	//移除
	int  (*hwtstamp)(struct phy_device *phydev, struct ifreq *ifr);	//时间戳处理
	bool (*rxtstamp)(struct phy_device *dev, struct sk_buff *skb, int type);	//接收时间戳
	void (*txtstamp)(struct phy_device *dev, struct sk_buff *skb, int type);	//发送时间戳
	struct device_driver driver;	//设备驱动文件
};
enum phy_state {
	PHY_DOWN = 0, // PHY芯片和驱动没准备好,一般情况下少发生
	PHY_STARTING, // PHY芯片OK了,但驱动还没有准备好
	PHY_READY,    // 准备好了,在probe中赋值,接下来会切到PHY_UP
	PHY_PENDING,
	PHY_UP,       // phy启动了,可以工作了,接下来会到PHY_AN
	PHY_AN,       // 自动协商
	PHY_RUNNING,  // 正在运行中,在网络连接(插上网线)时会到这个状态
	PHY_NOLINK,   // 断网了
	PHY_FORCING,  // 强制,当自动协商不使能时,就会进行此状态(实际上会读PHY寄存器进行设置速率、双工,等)
	PHY_CHANGELINK, // 变化,这个状态很重要,当连接时,会换到PHY_RUNNING,当断网时,会切到PHY_NOLINK
	PHY_HALTED,
	PHY_RESUMING
};
Mdio设备注册到总线
文件路径:drivers\net\ethernet\ti\davinci_mdio.c
device_initcall(davinci_mdio_init);
–> davinci_mdio_init
–>platform_driver_register(&davinci_mdio_driver);
davinci_mdio_probe
–> mdiobus_regist
Phy设备初始化:
Linux内核通过mdio总线访问、控制PHY , phy_device的注册不依靠设备树(根据上面驱动的名字在设备树中搜不到),该设备的注册在MDIO驱动中调用mdiobus_register中会注册phy_device
文件路径:drivers\net\phy\mdio_bus.c
–> mdiobus_register /* register the mii bus */
–> device_register
–> mdiobus_scan /这个过程就是根据phy id通过mdio的mdiobus_read去读phy芯片的寄存器来检测改id下的phy设备是否存在,如果存在就把该设备使用phy_device_register注册/
–> get_phy_device
–> get_phy_id // 读寄存器
–> phy_device_create // 创建phy设备,创建phy设备时会设置phy的接口,例如PHY_INTERFACE_MODE_GMII,以及从总线上扫描到的设备的信息赋值给phy设备
–> INIT_DELAYED_WORK(&dev->state_queue, phy_state_machine); // !!!初始化状态机函数
–> phy_device_register
在phy_device_create 时会使用mdio_bus_type这个结构体,里面有个匹配函数具体如下
/**
 * mdio_bus_match - determine if given PHY driver supports the given PHY device
 * @dev: target PHY device
 * @drv: given PHY driver
 *
 * Description: Given a PHY device, and a PHY driver, return 1 if
 *   the driver supports the device.  Otherwise, return 0.
 */
static int mdio_bus_match(struct device *dev, struct device_driver *drv)
{
	struct phy_device *phydev = to_phy_device(dev);
	struct phy_driver *phydrv = to_phy_driver(drv);
	return ((phydrv->phy_id & phydrv->phy_id_mask) ==
		(phydev->phy_id & phydrv->phy_id_mask));
}
Phy驱动注册:
nt phy_driver_register(struct phy_driver *new_driver)
{
	int retval;
	new_driver->driver.name = new_driver->name;
	new_driver->driver.bus = &mdio_bus_type;
	new_driver->driver.probe = phy_probe;
	new_driver->driver.remove = phy_remove;
	retval = driver_register(&new_driver->driver);
	if (retval) {
		printk(KERN_ERR "%s: Error %d in registering driver\n",
				new_driver->name, retval);
		return retval;
	}
	pr_debug("%s: Registered new driver\n", new_driver->name);
	return 0;
}
EXPORT_SYMBOL(phy_driver_register);
状态机
phy状态变化主要在phy_state_machine函数,该函数一直在运行(每隔一秒检测一次网络状态),该函数判断不同的网络状态作出不同的动作。其中CHANGELINK是会根据网络连、断来判断是RUNNING还是NOLINK。这样,就知道网络是连接上还是断开。当连接上网络后(注:不断开情况),状态为RUNNING时,之后重新赋值CHANGELINK,到了CHANGELINK又赋值RUNNING,这两种状态之间不断切换。完整代码如下:
/**
 * phy_state_machine - Handle the state machine
 * @work: work_struct that describes the work to be done
 */
void phy_state_machine(struct work_struct *work)
{
	struct delayed_work *dwork = to_delayed_work(work);
	struct phy_device *phydev =
			container_of(dwork, struct phy_device, state_queue);
	bool needs_aneg = false, do_suspend = false, do_resume = false;
	int err = 0;

	mutex_lock(&phydev->lock);

	if (phydev->drv->link_change_notify)
		phydev->drv->link_change_notify(phydev);

	switch (phydev->state) {
	case PHY_DOWN:
	case PHY_STARTING:
	case PHY_READY:
	case PHY_PENDING:
		break;
	case PHY_UP:
		needs_aneg = true;
		phydev->link_timeout = PHY_AN_TIMEOUT; // 超时,自动协商不成功时,则会在超时后强制设置速率等参数
		break;
	case PHY_AN:
		err = phy_read_status(phydev); // 读phy状态,包括link,速率、双工,等等
		if (err < 0)
			break;
		/* If the link is down, give up on negotiation for now */
		if (!phydev->link) {
			phydev->state = PHY_NOLINK; // 没有连接,则状态变成PHY_NOLINK
			netif_carrier_off(phydev->attached_dev); // 通知内核其它网络模块(phy是最底一层)断网了。
			phydev->adjust_link(phydev->attached_dev); // 调整参数(速率、双工)
			break;
		}
		/* Check if negotiation is done.  Break if there's an error */
		err = phy_aneg_done(phydev); // 检测是否完成自动协商
		if (err < 0)
			break;
		/* If AN is done, we're running */
		if (err > 0) {
			phydev->state = PHY_RUNNING; // 完成后,变成PHY_RUNNING状态
			netif_carrier_on(phydev->attached_dev); // 发通知,连接OK
			phydev->adjust_link(phydev->attached_dev); // 打印、调用参数
		} else if (0 == phydev->link_timeout--)
			needs_aneg = true;
		break;
	case PHY_NOLINK:
		err = phy_read_status(phydev); // 读phy状态,包括link,速率、双工,等等
		if (err)
			break;
		if (phydev->link) { // 在断开网络再连接(即拨掉再插上网线),就进入此语句
			if (AUTONEG_ENABLE == phydev->autoneg) {
				err = phy_aneg_done(phydev); // 如果是自动协商使能,就进行自动协商
				if (err < 0)
					break;
				if (!err) {
					phydev->state = PHY_AN;
					phydev->link_timeout = PHY_AN_TIMEOUT;
					break;
				}
			}
			phydev->state = PHY_RUNNING; // 运行时。。。。。
			netif_carrier_on(phydev->attached_dev);
			phydev->adjust_link(phydev->attached_dev);
		}
		break;
	case PHY_FORCING:
		err = genphy_update_link(phydev); // 先更新状态
		if (err)
			break;
		if (phydev->link) {
			phydev->state = PHY_RUNNING; // 运行。。。
			netif_carrier_on(phydev->attached_dev);
		} else {
			if (0 == phydev->link_timeout--)
				needs_aneg = true;
		}
		phydev->adjust_link(phydev->attached_dev);
		break;
	case PHY_RUNNING:
		/* Only register a CHANGE if we are
		 * polling or ignoring interrupts
		 */
		if (!phy_interrupt_is_valid(phydev))
			phydev->state = PHY_CHANGELINK; // 如果是RUNNING,则改变为CHANGELINK。
		break;
	case PHY_CHANGELINK:
		err = phy_read_status(phydev); // 读phy状态,包括link,速率、双工,等等
		if (err)
			break;
		if (phydev->link) {
			phydev->state = PHY_RUNNING; // 连接网络时,则变成RUNNING
			netif_carrier_on(phydev->attached_dev);
		} else {
			phydev->state = PHY_NOLINK;  // 不连网时,变成NOLINK
			netif_carrier_off(phydev->attached_dev);
		}
		phydev->adjust_link(phydev->attached_dev);
		if (phy_interrupt_is_valid(phydev))
			err = phy_config_interrupt(phydev,
						   PHY_INTERRUPT_ENABLED);
		break;
	case PHY_HALTED:
		if (phydev->link) {
			phydev->link = 0;
			netif_carrier_off(phydev->attached_dev);
			phydev->adjust_link(phydev->attached_dev);
			do_suspend = true;
		}
		break;
	case PHY_RESUMING:
		err = phy_clear_interrupt(phydev);
		if (err)
			break;
       err = phy_config_interrupt(phydev, PHY_INTERRUPT_ENABLED);
		if (err)
			break;
		if (AUTONEG_ENABLE == phydev->autoneg) {
			err = phy_aneg_done(phydev);
			if (err < 0)
				break;
			/* err > 0 if AN is done.
			 * Otherwise, it's 0, and we're  still waiting for AN
			 */
			if (err > 0) {
				err = phy_read_status(phydev);
				if (err)
					break;
				if (phydev->link) {
					phydev->state = PHY_RUNNING;
					netif_carrier_on(phydev->attached_dev);
				} else	{
					phydev->state = PHY_NOLINK;
				}
				phydev->adjust_link(phydev->attached_dev);
			} else {
				phydev->state = PHY_AN;
				phydev->link_timeout = PHY_AN_TIMEOUT;
			}
		} else {
			err = phy_read_status(phydev); // 读phy状态,包括link,速率、双工,等等
			if (err)
				break;
			if (phydev->link) {
				phydev->state = PHY_RUNNING;
				netif_carrier_on(phydev->attached_dev);
			} else	{
				phydev->state = PHY_NOLINK;
			}
			phydev->adjust_link(phydev->attached_dev);
		}
		do_resume = true;
		break;
	}

	mutex_unlock(&phydev->lock);

	if (needs_aneg)
		err = phy_start_aneg(phydev);
	else if (do_suspend)
		phy_suspend(phydev);
	else if (do_resume)
		phy_resume(phydev);

	if (err < 0)
		phy_error(phydev);

	queue_delayed_work(system_power_efficient_wq, &phydev->state_queue,
			   PHY_STATE_TIME * HZ);
}
PHY状态变化规律
上电时状态变化:
PHY_READY -> PHY_UP -> PHY_AN -> PHY_RUNNING
拨出网线时状态变化:
PHY_RUNNING ->PHY_NOLINK
插上网线时状态变化:
PHY_NOLINK -> PHY_RUNNING
自动协商过程:
cpsw_ndo_open->cpsw_slave_open -> PHY_UP -> phy_start_aneg -> genphy_config_aneg -> genphy_config_advert -> genphy_restart_aneg -> PHY_AN -> PHY_NOLINK(串口打印Down) -> phy_aneg_done -> PHY_RUNNING(串口打印Up)
注:在AN后出现NOLINK状态,我猜是因为自动协商需要时间,此时间大于1秒,然后执行到状态机判断成NOLINK,然后判断是否完成自动协商,然后再到RUNNING状态。
注意:
调用phy_driver_register去注册驱动,这是phy驱动也会形成一个链表,这里之所以不是树而上面的设备成为树,是因为mii可能挂载在pci总线上,当然pci上可能有其它设备,这些设备和phy设备不在一个链表上,而是通过kobject链接管理的,对应的还有一个kset,kset其实是kobject的一个集合,相同的kobject对象会指向同一个kset,如USB鼠标、键盘就属于同一个kset集。上述的总线,设备,以及驱动(假设驱动已经编写好了,驱动中多半会有一个标示符,暂且将其看作为id,这个id指明了其支持的设备)内;假设不支持热插拔,那么启动时,系统就会扫描设备,并串联进设备树,当驱动注册(register时),驱动就会去设备树中,找id号和其对
应的相等的,如果找到,那么这两个就捆绑在一起了,通常为XXX_attcah函数,应用层对该设备的操作就变为调用驱动中对应的read、write、ioctl等。如果支持热插拔,比上面的就复杂了,因为驱动可能先于设备(总线)存在,所以当有新硬件连接时,内核会调用XXX_probe函数去探测,并注册设备,然后去驱动链表中查找驱动,如果找到,则attach。对其操作方法与上述一样。
运行ifconfig eth0 up命令的过程
进入分支状态机分支
case PHY_UP:	//开启(ifconfig eth0 up)
			needs_aneg = 1;
			phydev->link_timeout = PHY_AN_TIMEOUT;
			break;
相应处理
if (needs_aneg)	//需要自动协商机制(例如ifconfig eth0 up就会调用)
		err = phy_start_aneg(phydev);	//开始自动配置
调用phy_start_aneg函数
int phy_start_aneg(struct phy_device *phydev)
{
	int err;
	mutex_lock(&phydev->lock);
	if (AUTONEG_DISABLE == phydev->autoneg)
		phy_sanitize_settings(phydev);
	err = phydev->drv->config_aneg(phydev);	//调用驱动的config_aneg方法,默认是genphy_config_aneg
	if (err < 0)
		goto out_unlock;
	if (phydev->state != PHY_HALTED) {	//调整修改PHY设备状态
		if (AUTONEG_ENABLE == phydev->autoneg) {
			phydev->state = PHY_AN;
			phydev->link_timeout = PHY_AN_TIMEOUT;
		}
		else {
			phydev->state = PHY_FORCING;
			phydev->link_timeout = PHY_FORCE_TIMEOUT;
		}
	}
out_unlock:
	mutex_unlock(&phydev->lock);
	return err;
}
EXPORT_SYMBOL(phy_start_aneg);
调用默认的自动协商方法genphy_config_aneg

int genphy_config_aneg(struct phy_device *phydev)
{
	int result;
	if (AUTONEG_ENABLE != phydev->autoneg)
		return genphy_setup_forced(phydev);
	result = genphy_config_advert(phydev);
	if (result < 0) /* error */
		return result;
	if (result == 0) {
		int ctl = phy_read(phydev, MII_BMCR);	//获取状态
		if (ctl < 0)
			return ctl;
		if (!(ctl & BMCR_ANENABLE) || (ctl & BMCR_ISOLATE))
			result = 1; /* do restart aneg */
	}
	if (result > 0)
		result = genphy_restart_aneg(phydev);	//重新开启自动协商机制
	return result;
}
EXPORT_SYMBOL(genphy_config_aneg);
接着调用genphy_config_aneg

int genphy_restart_aneg(struct phy_device *phydev)
{
	int ctl;
	ctl = phy_read(phydev, MII_BMCR);	//获取基本状态
	if (ctl < 0)
		return ctl;
	ctl |= (BMCR_ANENABLE | BMCR_ANRESTART);	//使能自动协商机制及支援重启
	/* Don't isolate the PHY if we're negotiating */
	ctl &= ~(BMCR_ISOLATE);
	ctl = phy_write(phydev, MII_BMCR, ctl);	//写命令
	return ctl;
}
EXPORT_SYMBOL(genphy_restart_aneg);
针对PHY芯片RTL8201F的部分寄存器分析


phy_write(phydev, 0x1f, 00000007);
phydev 是phy设备,0x1f是寄存器地址31的十六进制,00000007是第七页
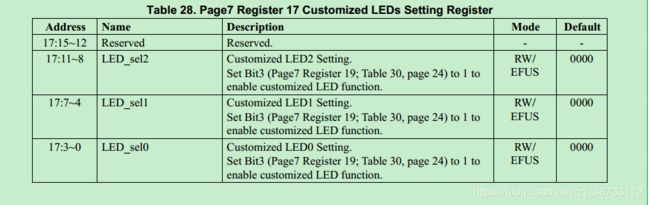
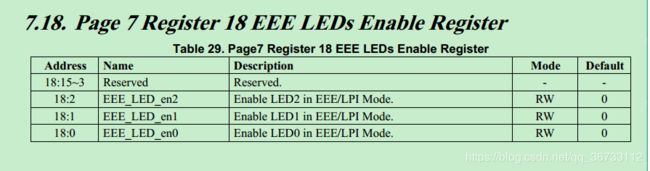
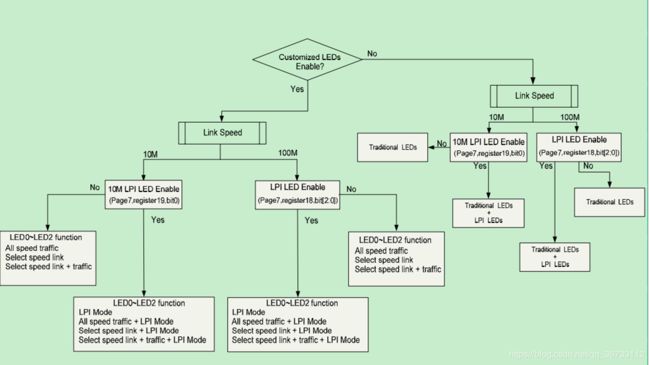
LED定制寄存器,例如0x0088是对LED0和LED1定制,在第19个寄存器使能定制后,定制LED功能就会按照19寄存器的设置,或者后期更新的设置进行工作。
定制的含义就是把使能定制的作为ACT LED使用。

下面这个寄存器由第八章可以知道,改寄存器可以改变网口的speed,测试置1可以实现。

附录:操作LED参考代码(原创咯)和RTL驱动代码
#if RTL8201F
    phy_write(phydev, 0x1f, 0x00000007);
    printk("<0>""____________17:%0x__18:%0x___19:%0x\n", phy_read(phydev, 0x11), phy_read(phydev, 0x12), phy_read(phydev, 0x13));
    phy_write(phydev, 0x11, phy_read(phydev, 0x11) & 0xff00 |0x0080);
    phy_write(phydev, 0x13, phy_read(phydev, 0x13) | 1<<3);
    printk("<0>""____________17:%0x__18:%0x___19:%0x\n", phy_read(phydev, 0x11), phy_read(phydev, 0x12), phy_read(phydev, 0x13));
    phy_write(phydev, 0x1f, 0x00000000);
#endif
针对LED的修改不要放在网卡里,我们操作PHY的LED的寄存器数据LED定制,对不同的芯片寄存器可能不一样,所以尽量把手册中扩展寄存器操作放到PHY芯片所在的设备驱动里
 * drivers/net/phy/realtek.c
 *
 * Driver for Realtek PHYs
 *
 * Author: Johnson Leung
 *
 * Copyright (c) 2004 Freescale Semiconductor, Inc.
 *
 * This program is free software; you can redistribute  it and/or modify it
 * under  the terms of  the GNU General  Public License as published by the
 * Free Software Foundation;  either version 2 of the  License, or (at your
 * option) any later version.
 *
 */
#include
#include
#define RTL821X 0

//#define RTL821x_PHYSR		0x11
//#define RTL821x_PHYSR_DUPLEX	0x2000
//#define RTL821x_PHYSR_SPEED	0xc000
/* 第 0 页,寄存器 30,中断指示,信噪显示寄存器 */
#define RTL8201F_ISR	0x1e
/* 第 0 页,寄存器 31,页选择寄存器 */
#define RTL8201F_PSR	0x1f
/* 第 7 页,寄存器 19,中断,WOL 使能,LED 功能寄存器 */
#define RTL8201F_IER	0x13
#define RTL821x_INER		0x12
#define RTL821x_INER_INIT	0x6400
#define RTL821x_INSR		0x13

MODULE_DESCRIPTION("Realtek PHY driver");
MODULE_AUTHOR("Johnson Leung");
MODULE_LICENSE("GPL");

/* RTL8201F ACK 中断 */
static int rtl8201f_ack_interrupt(struct phy_device *phydev)
{
	int err;
	err = phy_read(phydev, RTL8201F_ISR);
	return (err < 0) ? err : 0;
}

static int rtl821x_ack_interrupt(struct phy_device *phydev)
{
	int err;
	err = phy_read(phydev, RTL821x_INSR);
	return (err < 0) ? err : 0;
}

/* RTL8201F 中断配置 */
static int rtl8201f_config_intr(struct phy_device *phydev)
{
	int err;
	phy_write(phydev, RTL8201F_PSR, 0x0007);	/* select page 7 */
	if (phydev->interrupts == PHY_INTERRUPT_ENABLED)
		err = phy_write(phydev, RTL8201F_IER, 0x3800 |
	               phy_read(phydev, RTL8201F_IER));
	else
		err = phy_write(phydev, RTL8201F_IER, ~0x3800 &
	               phy_read(phydev, RTL8201F_IER));
    phy_write(phydev, 0x11, phy_read(phydev, 0x11) | 1<<3);
   phy_write(phydev, 0x13, phy_read(phydev, 0x13) | 1<<3);
	phy_write(phydev, RTL8201F_PSR, 0x0000);	/* back to page 0 */
	return err;
}

static int rtl821x_config_intr(struct phy_device *phydev)
{
	int err;
	if (phydev->interrupts == PHY_INTERRUPT_ENABLED)
		err = phy_write(phydev, RTL821x_INER,
				RTL821x_INER_INIT);
	else
		err = phy_write(phydev, RTL821x_INER, 0);
	return err;
}

/* RTL8201F 结构体 */
static struct phy_driver rtl8201f_driver = {
	.phy_id	= 0x001cc816,
	.name	= "RTL8201F 10/100Mbps Ethernet",
	.phy_id_mask	= 0x001fffff,
	.features	= PHY_BASIC_FEATURES,
	.flags	= PHY_HAS_INTERRUPT,
	.config_aneg	= &genphy_config_aneg,
	.read_status	= &genphy_read_status,
	.ack_interrupt	= &rtl8201f_ack_interrupt,
	.config_intr	= &rtl8201f_config_intr,
	.driver	= { .owner = THIS_MODULE,},
};

/* RTL8211B */
static struct phy_driver rtl821x_driver = {
	.phy_id		= 0x001cc912,
	.name		= "RTL821x Gigabit Ethernet",
	.phy_id_mask	= 0x001fffff,
	.features	= PHY_GBIT_FEATURES,
	.flags		= PHY_HAS_INTERRUPT,
	.config_aneg	= &genphy_config_aneg,
	.read_status	= &genphy_read_status,
	.ack_interrupt	= &rtl821x_ack_interrupt,
	.config_intr	= &rtl821x_config_intr,
	.driver		= { .owner = THIS_MODULE,},
};

static int __init realtek_init(void)
{
	int ret;
    ret = phy_driver_register(&rtl8201f_driver);
	if(0 != ret)
	   return ret;
#if RTL821X
    ret = phy_driver_register(&rtl821x_driver);
	if(0 != ret)
	   return ret;
#endif
	return ret;
}

static void __exit realtek_exit(void)
{
	phy_driver_unregister(&rtl8201f_driver);

#if RTL821X
	phy_driver_unregister(&rtl821x_driver);

#endif
}

module_init(realtek_init);
module_exit(realtek_exit);

static struct mdio_device_id __maybe_unused realtek_tbl[] = {
	{ 0x001cc816, 0x001fffff },   /* RTL8201F */

#if RTL821X
	{ 0x001cc912, 0x001fffff },
#endif
	{ }
};
MODULE_DEVICE_TABLE(mdio, realtek_tbl);
相关博客:
原文地址:http://blog.chinaunix.net/uid-29287950-id-5566124.html
RMII网络的系统固件制作说明书
- 修改配置文件并使配置文件生效
a. make ARCH=arm CROSS_COMPILE=arm-hisiv100nptl-linux- menuconfig
b. 修改项
Device Drivers —>
[] Network device support —>
[] Ethernet (10 or 100Mbit) —>
<*> hieth(switch fabric) family network device support —>
(1) hieth mii/rmii mode for up port (mii:0/rmii:1)
(1) hieth mii/rmii mode for down port (mii:0/rmii:1) - 修改驱动中网络时钟
a. 修改文件
linux-3.0.y/drivers/net/hieth-sf/net.c
b. 修改点
在函数static void phy_quirk(struct hieth_mdio_local mdio, int phyaddr)中加入以下内容
/ PHY-8201 */
if ((phy_id & 0xFFFFFFF0) == 0x1cc810)
{
if (CONFIG_HIETH_MII_RMII_MODE_U == 1) //1 means rmii mode
{
hieth_mdio_write(mdio, phyaddr, 0x1F, 0x7);
reg = hieth_mdio_read(mdio, phyaddr, 0x10);
reg |= (1 << 12);
hieth_mdio_write(mdio, phyaddr, 0x10, reg);
hieth_mdio_write(mdio, phyaddr, 0x1F, 0x0);
}
}
3. 加入LED闪烁代码
a. 修改文件
drivers/net/hieth-sf/sys-3518.c
b. 修改项
在该文件尾加入以下函数
void config_led_shine(void)
{
#define IO_MDIO_RWCTRL IO_ADDRESS(CONFIG_HIETH_IOBASE + MDIO_RWCTRL)
#define tmp_mdio_ready() (readl(IO_MDIO_RWCTRL) & (0x1 << 15))
unsigned int reg_value = 0;
/* select page 7 /
do {
reg_value = 0x0007215f; //配置LED的寄存器在page7
writel(reg_value, IO_MDIO_RWCTRL);
udelay(10);
} while (!tmp_mdio_ready());
/ enable LED modify function /
do {
reg_value = 0xc00c2153; //写phy的19号寄存器,配置各LED功能:00=LED0:ACTall;LED1:LINK100
writel(reg_value, IO_MDIO_RWCTRL);
udelay(10);
} while (!tmp_mdio_ready());
/ set green LED shine all the while when link up,
- yellow LED blink when data coming
*/
do {
reg_value = 0x00382151; //写phy的17号寄存器,配置LED动作:一个link即亮,一个有数据即闪
writel(reg_value, IO_MDIO_RWCTRL);
udelay(10);
} while (!tmp_mdio_ready());
return;
}
c. 修改文件
drivers/net/hieth-sf/sys.c
d. 修改项
在void hieth_sys_init(void)函数中加入以下行
hieth_reset(0); //前一行
86 config_led_shine(); //加入该行
revise_led_shine(); //后一行
4. 编译
a. make ARCH=arm CROSS_COMPILE=arm-hisiv100nptl-linux- uImage
5. 文件
a. 编译成功后会生成文件arch/arm/boot/zImage(最终系统文件,3M多)