(附代码)详解使用Pytorch和预训练数据(pretrained)进行迁移学习(Transfer Learning)
使用pytorch和预训练数据进行迁移学习——附案例详解
- 介绍
- 迁移学习简介
- 如何选择正确的预训练模型
- 案例研究:紧急与非紧急车辆分类
- 使用CNN构建base-line
- 使用迁移学习解决挑战
- 迁移学习的艺术可能会改变您构建机器学习和深度学习模型的方式
- 了解如何使用PyTorch进行迁移学习以及如何与预训练的模型联系在一起
- 我们将处理一个真实的数据集,并比较使用卷积神经网络(CNN)构建的模型与使用转移学习构建的模型的性能
本文代码源:https://gist.github.com/PulkitS01/
原作者github:https://github.com/PulkitS01
文章所属课程:Computer Vision using Deep Learning 2.0
翻译辛苦,如对您有一些帮助,请不吝赐赞
介绍
去年,我在一个计算机视觉项目中工作,我们必须建立一个强大的人脸检测模型。其背后的概念非常简单–我始终牢记执行部分。
考虑到我们拥有的数据集的大小,从头开始构建模型是一个真正的挑战。这将可能非常耗时,并且会压缩我们的计算资源。我们必须尽快找到解决方案,因为我们的工作期限很紧。
这是强大的迁移学习概念浮出水面的时候。这对您的数据科学家来说是一个非常有用的工具,尤其是在您的时间和计算能力有限的情况下。
因此,在本文中,我们将学习有关转移学习以及如何在使用Python的真实项目中利用转移学习的所有知识。我们还将讨论预训练模型在此领域中的作用,以及它们将如何改变构建机器学习的方式。
本文适合对pytorch有一定了解的人
迁移学习简介
让我用一个例子来说明转移学习的概念。想象一下–您想从一个全新的领域中学习一个主题。选择任何领域和任何主题–您也可以想到深度学习和神经网络。
您将采用什么不同的方法来理解该主题?
- 在线搜索资源
- 阅读文章和博客
- 参考书
- 寻找视频教程,依此类推
所有这些都将帮助您熟悉该主题。在这种情况下,您是唯一投入全部精力的人。
但是还有另一种方法,它可能在短时间内产生更好的结果。
您可以咨询对您要学习的主题有扎实了解的领域/主题专家。此人将把他/她的知识转移给您。从而加快您的学习过程。
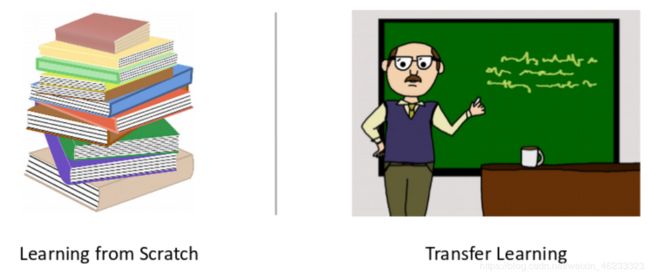
第一种方法,就是您全力以赴,是从头开始学习的一个示例。第二种方法称为转移学习。从该领域的专家到新手的知识转移正在发生。
是的,转移学习背后的想法很简单!
神经网络和卷积神经网络(CNN)是从头开始学习的示例。这两个网络都从给定的一组图像中提取特征(在与图像有关的任务的情况下),然后基于这些提取的特征将图像分类为各自的类别。
在这里,转移学习和预训练模型非常有用。在下一节中,让我们对后一个概念有所了解。
如何选择正确的预训练模型
预训练模型在您将要从事的任何深度学习项目中都非常有用。并非所有人都拥有顶尖科技庞然大物的无限计算能力。比如BERT并非每个人都可以在自己的机器上训练出来
正如您可能已经猜想的那样,预训练模型是由某个人或团队为解决特定问题而设计和训练的模型。
回想一下,我们在训练神经网络和CNN等模型时会学习权重和偏置项。这些权重和偏差与图像像素相乘时,有助于生成特征。
预训练的模型通过将其权重和偏差矩阵传递给新模型来共享他们的学习成果。因此,无论何时进行迁移学习,我们都将首先选择正确的预训练模型,然后将其权重和偏差矩阵传递给新模型。
那里有n个预训练模型。我们需要确定哪种模型最适合我们的问题。现在,让我们考虑一下我们有三个可用的预训练网络-BERT,ULMFiT和VGG16。
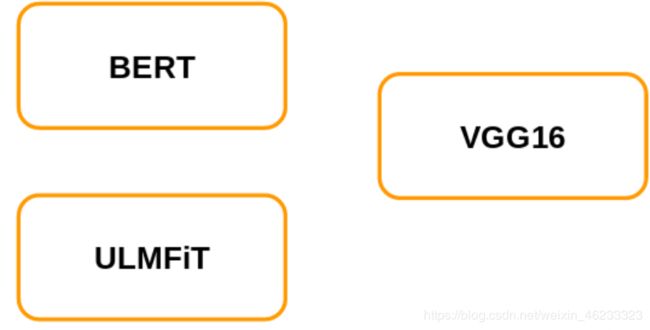
我们的任务是对图像进行分类。那么,您会选择哪些预训练模型?首先让我简要介绍一下这些预训练的网络,这将帮助我们确定正确的预训练模型。
BERT和ULMFiT用于语言建模,而VGG16用于图像分类任务。而且,如果您看一下眼前的问题,那就是图像分类之一。因此,我们选择VGG16是有道理的。
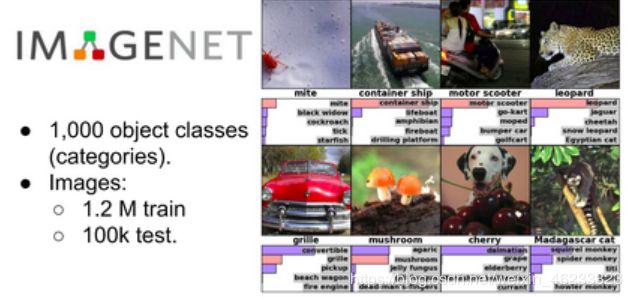
现在,VGG16可以具有不同的权重,即在ImageNet上训练的VGG16或在MNIST上训练的VGG16:

现在,要确定适合我们问题的正确预训练模型,我们应该探索这些ImageNet和MNIST数据集。ImageNet数据集包括1000个类别和总共120万张图像。此数据中的某些类别是动物,汽车,商店,狗,食物,乐器等
我们需要将图像分类为紧急和非紧急车辆。该数据集包含车辆图像,因此在ImageNet数据集上训练的VGG16模型对我们而言将更为有用,因为它具有车辆图像。
简而言之,这就是我们应该根据问题决定正确的预训练模型的方式。
案例研究:紧急与非紧急车辆分类
理想情况下,本文将使用“识别服装”问题。我们在本系列的前两篇文章中已经对此进行了研究,这将有助于比较我们的进度。
不幸的是,这在这里是不可能的,因为VGG16要求图像的形状应为(224,224,3)(另一个问题中的图像的形状应为(28,28))。解决此问题的一种方法可能是将这些(28,28)图像的大小调整为(224,224,3),但这在直观上是没有意义的。
这是很好的部分–我们将致力于一个全新的项目!在这里,我们的目的是将车辆分类为紧急或非紧急车辆。
该项目也是Analytics Vidhya的“使用深度学习的计算机视觉”课程的一部分。要从事更多此类有趣的项目并更详细地学习计算机视觉的概念,请随时查看本课程。
现在让我们开始理解问题并可视化一些示例。您可以使用此链接下载图像。首先,导入所需的库:
# importing the libraries
import pandas as pd
import numpy as np
from tqdm import tqdm

# for reading and displaying images
from skimage.io import imread
from skimage.transform import resize
import matplotlib.pyplot as plt
%matplotlib inline

# for creating validation set
from sklearn.model_selection import train_test_split

# for evaluating the model
from sklearn.metrics import accuracy_score

# PyTorch libraries and modules
import torch
from torch.autograd import Variable
from torch.nn import Linear, ReLU, CrossEntropyLoss, Sequential, Conv2d, MaxPool2d, Module, Softmax, BatchNorm2d, Dropout
from torch.optim import Adam, SGD

# torchvision for pre-trained models
from torchvision import models
接下来,我们将读取包含图像名称和相应标签的.csv文件:
# loading dataset
train = pd.read_csv('emergency_train.csv')
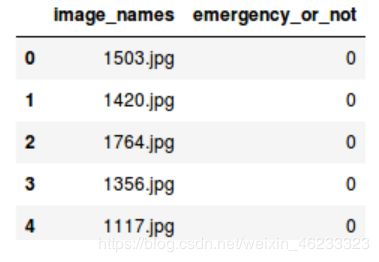
train.head()
- image_names:代表数据集中所有图像的名称
- Emergency_or_no:指定特定图像属于紧急类别还是非紧急类别。0表示图像是非紧急车辆,1表示紧急车辆
接下来,我们将加载所有图像并将其以数组格式存储:
load all the images and store them in an array format
# loading training images
train_img = []
for img_name in tqdm(train['image_names']):
    # defining the image path
    image_path = 'images/' + img_name
    # reading the image
    img = imread(image_path)
    # normalizing the pixel values
    img = img/255
    # resizing the image to (224,224,3)
    img = resize(img, output_shape=(224,224,3), mode='constant', anti_aliasing=True)
    # converting the type of pixel to float 32
    img = img.astype('float32')
    # appending the image into the list
    train_img.append(img)

# converting the list to numpy array
train_x = np.array(train_img)
train_x.shape

加载这些图像大约花费了12秒钟。我们的数据集中有1,646张图像,由于VGG16需要所有此特定形状的图像,因此我们将所有图像重塑为(224,224,3)。现在让我们可视化来自数据集的一些图像:
# Exploring the data
index = 10
plt.imshow(train_x[index])
if (train['emergency_or_not'][index] == 1):
    print('It is an Emergency vehicle')
else:
    print('It is a Non-Emergency vehicle')
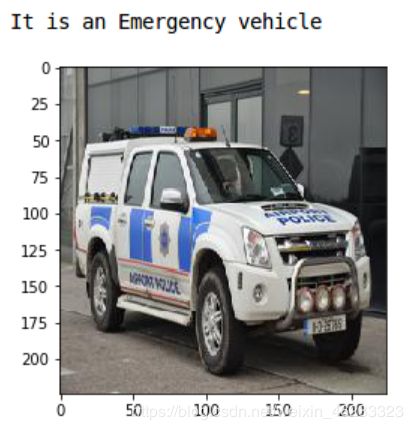
这是一辆警车,因此带有紧急车辆标签。现在,我们将目标存储在单独的变量中:
# defining the target
train_y = train['emergency_or_not'].values
让我们创建一个验证集来评估我们的模型:
# create validation set
train_x, val_x, train_y, val_y = train_test_split(train_x, train_y, test_size = 0.1, random_state = 13, stratify=train_y)
(train_x.shape, train_y.shape), (val_x.shape, val_y.shape)

训练集中有1,481张图像,而验证集中有165张图像。现在,我们必须将数据集转换为torch格式:
# converting training images into torch format
train_x = train_x.reshape(1481, 3, 224, 224)
train_x  = torch.from_numpy(train_x)

# converting the target into torch format
train_y = train_y.astype(int)
train_y = torch.from_numpy(train_y)

# shape of training data
train_x.shape, train_y.shape
# converting validation images into torch format
val_x = val_x.reshape(165, 3, 224, 224)
val_x  = torch.from_numpy(val_x)

# converting the target into torch format
val_y = val_y.astype(int)
val_y = torch.from_numpy(val_y)

# shape of validation data
val_x.shape, val_y.shape
我们的数据已经准备好!在下一部分中,我们将使用预训练模型来解决此问题之前,将建立卷积神经网络(CNN)。
使用CNN构建base-line
我们终于到了模型构建的一部分!在使用迁移学习解决问题之前,让我们使用CNN模型并为自己设置base-line。
我们将构建一个非常简单的CNN架构,该架构具有两个卷积层以从图像中提取特征,最后是一个密集层以对这些特征进行分类:
class Net(Module):
    def __init__(self):
        super(Net, self).__init__()

        self.cnn_layers = Sequential(
            # Defining a 2D convolution layer
            Conv2d(3, 4, kernel_size=3, stride=1, padding=1),
            BatchNorm2d(4),
            ReLU(inplace=True),
            MaxPool2d(kernel_size=2, stride=2),
            # Defining another 2D convolution layer
            Conv2d(4, 8, kernel_size=3, stride=1, padding=1),
            BatchNorm2d(8),
            ReLU(inplace=True),
            MaxPool2d(kernel_size=2, stride=2),
        )

        self.linear_layers = Sequential(
            Linear(8 * 56 * 56, 2)
        )

    # Defining the forward pass
    def forward(self, x):
        x = self.cnn_layers(x)
        x = x.view(x.size(0), -1)
        x = self.linear_layers(x)
        return x
现在,为模型定义优化器,学习率和损失函数,并使用GPU训练模型:
# defining the model
model = Net()
# defining the optimizer
optimizer = Adam(model.parameters(), lr=0.0001)
# defining the loss function
criterion = CrossEntropyLoss()
# checking if GPU is available
if torch.cuda.is_available():
    model = model.cuda()
    criterion = criterion.cuda()

print(model)
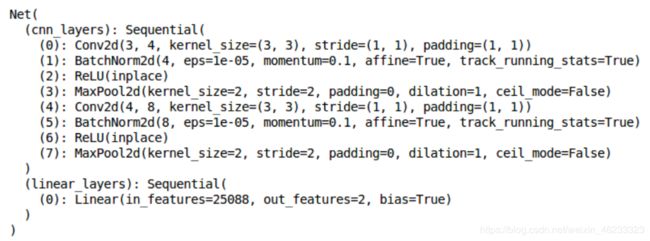
这就是模型的架构。最后,我们将训练模型15个epoch。我将模型的batch_size设置为128
# batch size of the model
batch_size = 128

# number of epochs to train the model
n_epochs = 15

for epoch in range(1, n_epochs+1):

    # keep track of training and validation loss
    train_loss = 0.0

    permutation = torch.randperm(train_x.size()[0])

    training_loss = []
    for i in tqdm(range(0,train_x.size()[0], batch_size)):

        indices = permutation[i:i+batch_size]
        batch_x, batch_y = train_x[indices], train_y[indices]

        if torch.cuda.is_available():
            batch_x, batch_y = batch_x.cuda(), batch_y.cuda()

        optimizer.zero_grad()
        # in case you wanted a semi-full example
        outputs = model(batch_x)
        loss = criterion(outputs,batch_y)

        training_loss.append(loss.item())
        loss.backward()
        optimizer.step()

    training_loss = np.average(training_loss)
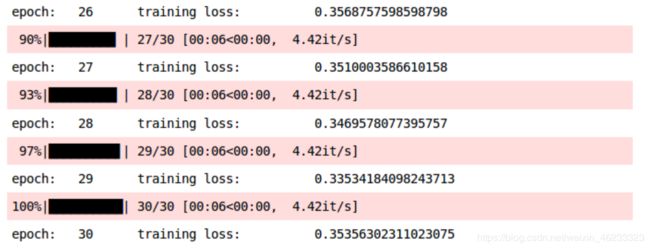
    print('epoch: \t', epoch, '\t training loss: \t', training_loss)
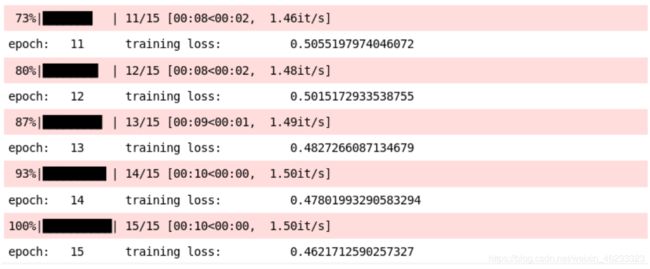
training loss一直在减少,这是个好兆头。
让我们检测一下 training accuracy
# prediction for training set
prediction = []
target = []
permutation = torch.randperm(train_x.size()[0])
for i in tqdm(range(0,train_x.size()[0], batch_size)):
    indices = permutation[i:i+batch_size]
    batch_x, batch_y = train_x[indices], train_y[indices]

    if torch.cuda.is_available():
        batch_x, batch_y = batch_x.cuda(), batch_y.cuda()

    with torch.no_grad():
        output = model(batch_x.cuda())

    softmax = torch.exp(output).cpu()
    prob = list(softmax.numpy())
    predictions = np.argmax(prob, axis=1)
    prediction.append(predictions)
    target.append(batch_y)

# training accuracy
accuracy = []
for i in range(len(prediction)):
    accuracy.append(accuracy_score(target[i],prediction[i]))

print('training accuracy: \t', np.average(accuracy))

还不错,接下来检测一下validation accuracy
# prediction for validation set
prediction_val = []
target_val = []
permutation = torch.randperm(val_x.size()[0])
for i in tqdm(range(0,val_x.size()[0], batch_size)):
    indices = permutation[i:i+batch_size]
    batch_x, batch_y = val_x[indices], val_y[indices]

    if torch.cuda.is_available():
        batch_x, batch_y = batch_x.cuda(), batch_y.cuda()

    with torch.no_grad():
        output = model(batch_x.cuda())

    softmax = torch.exp(output).cpu()
    prob = list(softmax.numpy())
    predictions = np.argmax(prob, axis=1)
    prediction_val.append(predictions)
    target_val.append(batch_y)

# validation accuracy
accuracy_val = []
for i in range(len(prediction_val)):
    accuracy_val.append(accuracy_score(target_val[i],prediction_val[i]))

print('validation accuracy: \t', np.average(accuracy_val))
使用迁移学习解决挑战
让我们看一下将要使用迁移学习训练模型的步骤:
首先,我们将加载预训练模型的权重-在本例中为VGG16
然后我们将根据手头的问题对模型进行微调
接下来,我们将使用这些预先训练的权重并提取图像特征
最后,我们将使用提取的特征来训练微调模型
因此,让我们开始加载模型的权重:
# loading the pretrained model
model = models.vgg16_bn(pretrained=True)
现在,我们将微调模型。我们不会训练VGG16模型的各个层,因此让我们冻结这些层的权重:
# Freeze model weights
for param in model.parameters():
    param.requires_grad = False
由于我们只有2个类别可以预测,并且VGG16在ImageNet上有1000个类别,因此我们需要根据问题更新最后一层:
# Add on classifier
model.classifier[6] = Sequential(
                      Linear(4096, 2))
for param in model.classifier[6].parameters():
    param.requires_grad = True
由于我们将只训练的最后一层,我已经设置了requires_grad为True作为最后一层。让我们将训练设置为GPU:
# checking if GPU is available
if torch.cuda.is_available():
    model = model.cuda()
现在,我们将使用模型并提取训练图像和验证图像的特征。我将batch_size设置为128(同样,您可以根据需要增加或减少该batch_size):
# batch_size
batch_size = 128

# extracting features for train data
data_x = []
label_x = []

inputs,labels = train_x, train_y

for i in tqdm(range(int(train_x.shape[0]/batch_size)+1)):
    input_data = inputs[i*batch_size:(i+1)*batch_size]
    label_data = labels[i*batch_size:(i+1)*batch_size]
    input_data , label_data = Variable(input_data.cuda()),Variable(label_data.cuda())
    x = model.features(input_data)
    data_x.extend(x.data.cpu().numpy())
    label_x.extend(label_data.data.cpu().numpy())
同样,让我们为验证图像提取功能:
# extracting features for validation data
data_y = []
label_y = []

inputs,labels = val_x, val_y

for i in tqdm(range(int(val_x.shape[0]/batch_size)+1)):
    input_data = inputs[i*batch_size:(i+1)*batch_size]
    label_data = labels[i*batch_size:(i+1)*batch_size]
    input_data , label_data = Variable(input_data.cuda()),Variable(label_data.cuda())
    x = model.features(input_data)
    data_y.extend(x.data.cpu().numpy())
    label_y.extend(label_data.data.cpu().numpy())
接下来,我们将这些数据转换为torch格式:
# converting the features into torch format
x_train  = torch.from_numpy(np.array(data_x))
x_train = x_train.view(x_train.size(0), -1)
y_train  = torch.from_numpy(np.array(label_x))
x_val  = torch.from_numpy(np.array(data_y))
x_val = x_val.view(x_val.size(0), -1)
y_val  = torch.from_numpy(np.array(label_y))
我们还必须为模型定义优化器和损失函数:
import torch.optim as optim

# specify loss function (categorical cross-entropy)
criterion = CrossEntropyLoss()

# specify optimizer (stochastic gradient descent) and learning rate
optimizer = optim.Adam(model.classifier[6].parameters(), lr=0.0005)
现在该训练模型了。我们将其训练30个纪元,并将batch_size设置为128:
# batch size
batch_size = 128

# number of epochs to train the model
n_epochs = 30

for epoch in tqdm(range(1, n_epochs+1)):

    # keep track of training and validation loss
    train_loss = 0.0

    permutation = torch.randperm(x_train.size()[0])

    training_loss = []
    for i in range(0,x_train.size()[0], batch_size):

        indices = permutation[i:i+batch_size]
        batch_x, batch_y = x_train[indices], y_train[indices]

        if torch.cuda.is_available():
            batch_x, batch_y = batch_x.cuda(), batch_y.cuda()

        optimizer.zero_grad()
        # in case you wanted a semi-full example
        outputs = model.classifier(batch_x)
        loss = criterion(outputs,batch_y)

        training_loss.append(loss.item())
        loss.backward()
        optimizer.step()

    training_loss = np.average(training_loss)
    print('epoch: \t', epoch, '\t training loss: \t', training_loss)
# prediction for training set
prediction = []
target = []
permutation = torch.randperm(x_train.size()[0])
for i in tqdm(range(0,x_train.size()[0], batch_size)):
    indices = permutation[i:i+batch_size]
    batch_x, batch_y = x_train[indices], y_train[indices]

    if torch.cuda.is_available():
        batch_x, batch_y = batch_x.cuda(), batch_y.cuda()

    with torch.no_grad():
        output = model.classifier(batch_x.cuda())

    softmax = torch.exp(output).cpu()
    prob = list(softmax.numpy())
    predictions = np.argmax(prob, axis=1)
    prediction.append(predictions)
    target.append(batch_y)

# training accuracy
accuracy = []
for i in range(len(prediction)):
    accuracy.append(accuracy_score(target[i],prediction[i]))

print('training accuracy: \t', np.average(accuracy))
# prediction for validation set
prediction_val = []
target_val = []
permutation = torch.randperm(x_val.size()[0])
for i in tqdm(range(0,x_val.size()[0], batch_size)):
    indices = permutation[i:i+batch_size]
    batch_x, batch_y = x_val[indices], y_val[indices]

    if torch.cuda.is_available():
        batch_x, batch_y = batch_x.cuda(), batch_y.cuda()

    with torch.no_grad():
        output = model.classifier(batch_x.cuda())

    softmax = torch.exp(output).cpu()
    prob = list(softmax.numpy())
    predictions = np.argmax(prob, axis=1)
    prediction_val.append(predictions)
    target_val.append(batch_y)

# validation accuracy
accuracy_val = []
for i in range(len(prediction_val)):
    accuracy_val.append(accuracy_score(target_val[i],prediction_val[i]))

print('validation accuracy: \t', np.average(accuracy_val))

模型的验证准确性也相似,即83%。**训练和验证的准确性几乎是同步的,因此可以说该模型是 generalized的。**以下是我们的结果摘要:

参考链接
Deep Learning for Everyone: Master the Powerful Art of Transfer Learning using PyTorch: https://www.analyticsvidhya.com/blog/2019/10/how-to-master-transfer-learning-using-pytorch/
