原文链接:Get Started,Part 2:Containers
预计阅读时间:14分钟
先决条件(Prerequisites)
- 安装Docker 1.13或更高版本
- 阅读第一部分
- 用一个简单的测试来测试你已经全设置好了
docker run hello-world
介绍(Introduction)
是时候开始用Docker的方式来创建一个应用了。我们从一个应用层级的底部开始创建,这是一个容器(container),我们将在整个页面介绍它。在这个层级之上就是服务,它定义了容器在产品中的表现,将在第三部分中介绍。最后,最顶层的是stack,它定义了services之间的交互,将在第五部分讲到。
- Stack
- 服务
- 容器(你在这里)
你的新开发环境(Your new development environment)
在过去,如果你想开发一个Python应用,第一步要做的就是在你的机器上安装Python环境。但是这造成了一种情况,你的环境需要完美支持运行你的应用,同时也要匹配你的生产环境。
用Docker,你不必安装Python,只需要带一个便携的Python运行时镜像就可以了。然后,在构建代码时,你的Python镜像就会在一旁,确保你的应用、依赖和运行时一直都在一起。
这些便携的镜像通通用一个叫Dockerfile的东西来定义。
用Dockerfile来定义一个容器(Define a container with Dockerfile)
Dockerfile定义了容器中的环境里要做什么。对资源的访问如网络接口和硬盘驱动都是虚拟的存在于这个环境中的,而且是与其他系统隔离的,所以你需要配置对外暴露的端口并且明确哪些文件是要“拷贝”到这个环境中。在做完这些操作之后,你可以认为在Dockerfile中构建的项目在任何地方都可以有相同的表现。
Dockerfile
创建一个空的目录并切换目录(cd)到这个新的目录下,创建一个叫Dockerfile的文件,将下面的代码复制粘贴到文件中并保存。代码中的注释解释了每行代码的意义。
# Use an official Python runtime as a parent image
FROM python:2.7-slim

# Set the working directory to /app
WORKDIR /app

# Copy the current directory contents into the container at /app
ADD . /app

# Install any needed packages specified in requirements.txt
RUN pip install --trusted-host pypi.python.org -r requirements.txt

# Make port 80 available to the world outside this container
EXPOSE 80

# Define environment variable
ENV NAME World

# Run app.py when the container launches
CMD ["python", "app.py"]
这个Dockerfile引用了一些我们还没创建的文件,比如app.py和requirements.txt,让我们接下来创建这些文件。
应用本身(The app itself)
在创建两个叫requirements.txt和app.py的文件,并把它们放在和Dockerfile相同的目录下。这完成了我们的应用,你可以看到它很简单。当上述的Dockerfile文件被构建到一个image中时,app.py和requirements.txt将因为Dockerfile中的ADD指令发挥作用,EXPOSE命令则可以让我们通过HTTP请求的方式获取app.py的输出信息。
requirements.txt
Flask
Redis
app.py
from flask import Flask
from redis import Redis, RedisError
import os
import socket
# Connect to Redis
redis = Redis(host="redis", db=0, socket_connect_timeout=2, socket_timeout=2)
app = Flask(__name__)
@app.route("/")
def hello():
try:
visits = redis.incr("counter")
except RedisError:
visits = "cannot connect to Redis, counter disabled"
html = "Hello {name}!
" \
"Hostname: {hostname}
" \
"Visits: {visits}"
return html.format(name=os.getenv("NAME", "world"), hostname=socket.gethostname(), visits=visits)
if __name__ == "__main__":
app.run(host='0.0.0.0', port=80)
现在我们可以看到pip install -r requirements.txt这行指令安装了Python的Flask和Redis的Python库,这个Python应用打印了环境变量Name,和调用socket.gethostname()的输出一样。最后,因为Redis并没有运行(我们只安装了Python的Redis库,并不是Redis),这里我们想要看到的是试图使用Redis但是失败并展现的错误信息。
注意:在容器中检索容器ID时访问主机名,就像正在运行程序的进程ID一样(Accessing the name of the host when inside a container retrieves the container ID, which is like the process ID for a running executable. 机翻 不知道怎么翻)
完成了,并不需要在你的系统安装Python和requirements.txt中的任何东西,也不需要构建运行或者安装这些镜像到你的系统中。看起来你的确没有安装Python环境和Flask框架,但事实上你已经拥有了这些环境。
构建应用(Build the app)
我们已经准备好构建应用了。确认一下你仍在新目录的最顶部。使用ls命令应该看到以下文件:
Dockerfile app.py requirements.txt
现在运行构建命令。下面的命令将会创建Docker镜像,使用-ttag可以让我们自己给镜像起名
docker build -t friendlyhello .
你刚刚构建的镜像在哪儿呢?它已经在你本地的Docker镜像注册中心:
REPOSITORY              TAG                 IMAGE ID            CREATED             SIZE
friendlyhello           latest              cab62a96dfbe        44 hours ago        132MB
运行你的应用(Run the app)
运行应用,使用-ptag来将容器中暴露的80端口映射到本机的4000端口
docker run -p 4000:80 friendlyhello
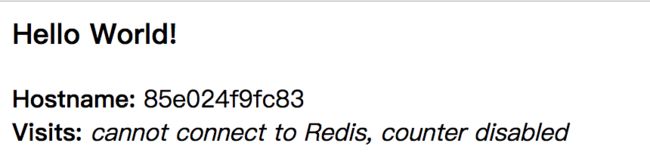
你应该能看到Python已经启动了你的服务http://0.0.0.0:80。但这些信息是来自于容器内部的,它并不知道你已经将它的80端口映射到机器的4000端口,使用正确的URL来访问
http://localhost:4000
通过浏览器来访问URL就能看到服务信息显示在网页上了
注意:如果你在Windows 7上使用Docker Toolbox,请使用Docker Machine IP来替代
localhost。比如: http://192.168.99.100:4000/。可以使用docker-machine ip来查看上述的IP地址。
现在让我们让应用运行在后台,使用分离模式:
docker run -d -p 4000:80 friendlyhello
之后你会得到一个container ID并被踢回终端界面。你的容器正在后台,但你仍可以使用docker container ls来查看缩略的container ID(并且在运行命令时两者都可以互换???and both work interchangeably when running commands)
localhost:myContainer yichen$ docker container ls
CONTAINER ID        IMAGE               COMMAND             CREATED             STATUS              PORTS                  NAMES
3a51a998eed6        friendlyhello       "python app.py"     6 seconds ago       Up 6 seconds        0.0.0.0:4000->80/tcp   angry_bartik
注意这个CONTAINER ID和http://localhost:4000上显示的一样。
现在使用docker container stop和CONTAINER ID来结束进程,如下:
docker container stop 3a51a998eed6
分享你的镜像(Share your image)
让我们把刚刚上传刚刚构建的镜像并在其他地方运行一下来证明刚刚创建的东西是编写的。毕竟当你想要将容器部署到生产环境时需要知道如何将其推到registries。
上面提到的registry是一个仓库的集合,而仓库又是镜像的集合--类似于GitHub,只是代码需要编译一下。一个账号在registry可以创建多个仓库。docker 客户端使用Docker的默认registry。
注意:我们使用Docker公共的registry因为他是免费且是预先配置好的,但还有很多公共的registry可供选择,或者你可以用Docker Trusted Registry
创建自己私有的registry。
使用Docker ID登录(Log in with your Docker ID)
如果你还没有Docker账户,可以去 hub.docker.com
注册一个并记下你的用户名。
在你的本地登录Docker公共registry
docker login
给镜像加一个标签(Tag the image)
username/repository:tag是一个关联本地镜像和registry中仓库的标记。标签(tag)是可选但推荐使用的,因为这是registry记录Dcoker镜像版本的一个机制。为了更好的理解,请给仓库和标签起一个有意义的名字,比如get-started:part2。这样就会将镜像放到get-started仓库并用part2将其标记。
现在讲这些放在一起来标记镜像(tag the image)。执行docker tag image并拼接上你的用户名,仓库名以及标签名,目的是将镜像上传到你期望的地方。命令的语法如下
docker tag image username/repository:tag
举个例子
docker tag friendlyhello gordon/get-started:part2
执行docker image ls来查看新的被标记的镜像
$ docker image ls

REPOSITORY               TAG                 IMAGE ID            CREATED             SIZE
friendlyhello            latest              d9e555c53008        3 minutes ago       195MB
gordon/get-started         part2               d9e555c53008        3 minutes ago       195MB
python                   2.7-slim            1c7128a655f6        5 days ago          183MB
...
发布镜像(Publish the image)
将被标记的镜像上传到仓库:
docker push username/repository:tag
一旦成功,上传的镜像即可被大众使用。如果你登录了Docker Hub,就能看到带有pull命令的新镜像。
从远程仓库拉取并运行镜像(Pull and run the image from the remote repository)
从现在开始,你可以用docker run在任何机器上运行你的应用:
docker run -p 4000:80 username/repository:tag
如果本地的镜像不可用,Docker会从远程仓库拉取可用的镜像
$ docker run -p 4000:80 gordon/get-started:part2
Unable to find image 'gordon/get-started:part2' locally
part2: Pulling from gordon/get-started
10a267c67f42: Already exists
f68a39a6a5e4: Already exists
9beaffc0cf19: Already exists
3c1fe835fb6b: Already exists
4c9f1fa8fcb8: Already exists
ee7d8f576a14: Already exists
fbccdcced46e: Already exists
Digest: sha256:0601c866aab2adcc6498200efd0f754037e909e5fd42069adeff72d1e2439068
Status: Downloaded newer image for gordon/get-started:part2
 * Running on http://0.0.0.0:80/ (Press CTRL+C to quit)
无论docker run在哪里执行,他都会将你的镜像拉取下来,下载的还有Python,requirements.txt中的依赖并运行你的代码。这些都会囊括在这个小巧的保重,你并不用为Docker运行你的镜像安装任何东西。
总了个结(Conclusion of part two)
本部分到这里就结束了。在下一个部分,我们将container运行在service中,以此来学习如何所扩容你的应用。