CA认证-https实现
一.CA认证流程
-
实验环境
| CA认证中心服务端 |
lewis63 |
IP:192.168.1.63 |
| 客户端 |
lewis64 |
IP:192.168.1.64 |
认证中心(CA)的功能有:证书发放、证书更新、证书撤销和证书验证。
CA证书作用:身份认证--->数据的不可否认性
https 监听端口:443
证书请求文件:CSR是Cerificate Signing Request的英文缩写,即证书请求文件,也就是证书申请者在申请数字证书时由CSP(加密服务提供者)在生成私钥的同时也生成证书请求文件,证书申请者只要把CSR文件提交给证书颁发机构后,证书颁发机构使用其根证书的私钥签名就生成了证书文件,也就是颁发给用户的证书。
总结:证书签名过程
(1)生成请求文件
(2)CA确认申请者的身份真实性
(3)CA使用根证书的私钥加密请求文件,生成证书
(4)把证书传给申请者
二.搭建CA认证中心
1.安装CA认证软件包中心
[root@lewis63 ~]# rpm -qf `which openssl`
openssl-1.0.2k-8.el7.x86_64
2.配置一个自己的CA认证中心。生成CA的根证书和私钥。 根证书中包括:CA的公钥
[root@lewis63 ~]# vim /etc/pki/tls/openssl.cnf
改:172 #basicConstraints=CA:FALSE
为:172 basicConstraints=CA:TRUE #让自己成功CA认证中心
3.生成CA的公钥证书和私钥
[root@lewis63 ~]# /etc/pki/tls/misc/CA –h #查看帮助
usage: /etc/pki/tls/misc/CA -newcert|-newreq|-newreq-nodes|-newca|-sign|-verify
选项 :
-newcert 新证书
-newreq 新请求
-newreq-nodes 新请求节点
-newca 新的CA证书
-sign 签证
-verify 验证
[root@lewis63 ~]# /etc/pki/tls/misc/CA -newca
CA certificate filename (or enter to create)


Making CA certificate ...

Generating a 2048 bit RSA private key

...................+++

.+++

writing new private key to '/etc/pki/CA/private/./cakey.pem'

Enter PEM pass phrase:123456           #输入密码,保护私钥

Verifying - Enter PEM pass phrase:123456   #再次输入

-----

You are about to be asked to enter information that will be incorporated

into your certificate request.

What you are about to enter is what is called a Distinguished Name or a DN.

There are quite a few fields but you can leave some blank

For some fields there will be a default value,

If you enter '.', the field will be left blank.

-----

Country Name (2 letter code) [XX]:CN

State or Province Name (full name) []:guangdong

Locality Name (eg, city) [Default City]:shenzhen

Organization Name (eg, company) [Default Company Ltd]:lewis

Organizational Unit Name (eg, section) []:IT

Common Name (eg, your name or your server's hostname) []:lewis63.cn

#指定CA认证中心服务器的名字

Email Address []:[email protected]


Please enter the following 'extra' attributes

to be sent with your certificate request

#添加一个“额外”的属性,让客户端发送CA证书,请求文件时,要输入的密码

A challenge password []:              #直接回车

An optional company name []:           #直接回车

Using configuration from /etc/pki/tls/openssl.cnf  # CA服务器的配置文件。上面修改的       内容会添加到这个配置文件中

Enter pass phrase for /etc/pki/CA/private/./cakey.pem:123456 #输入刚才保护CA私钥的密码

Check that the request matches the signature

Signature ok

Certificate Details:

        Serial Number:

            b2:46:96:13:b3:91:9d:71

        Validity

            Not Before: May 27 03:27:20 2018 GMT

            Not After : May 26 03:27:20 2021 GMT

        Subject:

            countryName               = CN

            stateOrProvinceName       = guangdong

            organizationName          = lewis63

            organizationalUnitName    = IT

            commonName                = lewis63.cn

            emailAddress              = [email protected]

        X509v3 extensions:

            X509v3 Subject Key Identifier:

                24:61:61:37:57:5F:09:6D:67:EA:D6:BD:49:65:99:AF:83:AC:40:B0

            X509v3 Authority Key Identifier:

                keyid:24:61:61:37:57:5F:09:6D:67:EA:D6:BD:49:65:99:AF:83:AC:40:B0


            X509v3 Basic Constraints:

                CA:TRUE

Certificate is to be certified until May 26 03:27:20 2021 GMT (1095 days)


Write out database with 1 new entries

Data Base Updated
到此CA认证中心就搭建完毕
4.查看生成的CA根证书,包括CA公钥
[root@lewis63 ~]# vim /etc/pki/CA/cacert.pem
Certificate:
Data:
Version: 3 (0x2)
Serial Number:
b2:46:96:13:b3:91:9d:71
Signature Algorithm: sha256WithRSAEncryption
Issuer: C=CN, ST=guangdong, O=IT, OU=lewis63.cn, CN=lewis63.cn/[email protected]
5.查看根证书的私钥
[root@lewis63 ~]# vim /etc/pki/CA/private/cakey.pem
-----BEGIN ENCRYPTED PRIVATE KEY-----
MIIFDjBABgkqhkiG9w0BBQ0wMzAbBgkqhkiG9w0BBQwwDgQIFyQBwpjLJTMCAggA
MBQGCCqGSIb3DQMHBAj+7G1jqx8ZJgSCBMivQEd0zmoFnDcDG2Z3LJJdYig4Sig+
AFsrYFOERwK+unK/5KZCYneiXEmXuUKBXNBiznfg566cU+zWWscIGGcRD0c+bUrE
OjkBm9Ea/e28CyL3YtD4zHpRYK8qqI1IBqCVExZSoAANOu0WwJe79hxlJUogIOF8
jk7A1H35akhz3IIaYqesomE3xwHRnEtxL8OTLkjwjxC28e+ZYWOVgV8Hf94NqIs7
mc/efJSLdDf++EKP/y+zl/mTm6W1ZDLAys/sh4TJotg+gSXtjJET9EF9G55A6M7u…
三.使用证书搭建https
安装:httpd在lewis64上配置https 步骤:
(1)安装:httpd web服务器
(2)lewis64生成证书请求文件,发给lewis63 CA认证中心进行签名,lewis63下发证书 给lewis64
(3)把证书和httpd相结合,实现https
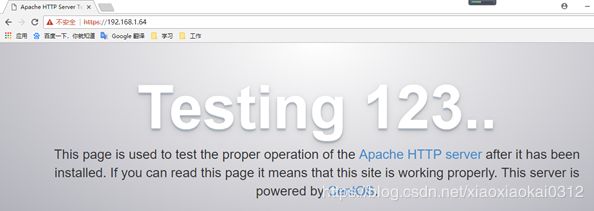
(4)测试https认证效果
1.安装httpd服务器
[root@lewis64 ~]# yum -y install httpd
[root@lewis64 ~]# vim /etc/httpd/conf/httpd.conf
改:#ServerName www.example.com:80
为:ServerName 192.168.1.64:80
[root@lewis64 ~]# systemctl start httpd
[root@lewis64 ~]# iptables –F
2.lewis64生成证书请求文件,获取证书
[root@lewis64 ~]# openssl genrsa –h #查看帮助
生一个私钥密钥(此时还没有生成公钥):
[root@lewis64 ~]# openssl genrsa -des3 -out /etc/httpd/conf.d/server.key
Generating RSA private key, 2048 bit long modulus
...........+++
..................................................................................................................................................................................+++
e is 65537 (0x10001)
Enter pass phrase for /etc/httpd/conf.d/server.key:123456 #输入保护私钥的密码,保护私 钥时,使用的加密算法是 -des3
Verifying - Enter pass phrase for /etc/httpd/conf.d/server.key:123456
注: 有私钥可以推出来公钥。 但是公钥不可以推出私钥。公钥由私钥生成
3. 使用私钥生成证书请求文件
[root@lewis64 ~]# openssl req -new -key /etc/httpd/conf.d/server.key -out /server.csr
#注意后期添加的国家,省,组织等信息要和CA保持一致
Enter pass phrase for /etc/httpd/conf.d/server.key: 123456 #输入私钥的密码
You are about to be asked to enter information that will be incorporated
into your certificate request.
What you are about to enter is what is called a Distinguished Name or a DN.
There are quite a few fields but you can leave some blank
For some fields there will be a default value,
If you enter '.', the field will be left blank.
-----
Country Name (2 letter code) [XX]:CN
State or Province Name (full name) []:guangdong
Locality Name (eg, city) [Default City]:shenzhen
Organization Name (eg, company) [Default Company Ltd]:lewis63
Organizational Unit Name (eg, section) []:IT
Common Name (eg, your name or your server's hostname) []:lewis64.cn
#这里要求输入的CommonName必须与通过浏览器访问您网站的 URL 完全相同,否则用户会发 现您服务器证书的通用名与站点的名字不匹配,用户就会怀疑您的证书的真实性。可以使域名也可以使IP地址。
Email Address []:[email protected]
Please enter the following 'extra' attributes
to be sent with your certificate request
A challenge password []: #不输密码直接回车
An optional company name []:
注:证书请求文件中有lewis64的公钥。 这个公钥是在生成证书请求文件时,通过指定的私钥 /etc/httpd/conf.d/server.key生成的。
通过私钥可以生成公钥的,通过公钥不可以推出来私钥
4. 将证书请求文件发给CA服务器
[root@lewis64 ~]# scp /server.csr 192.168.1.63:/tmp/
5.CA签名
[root@lewis63 ~]# openssl ca -h #查看帮助
[root@lewis63 ~]# openssl ca -keyfile /etc/pki/CA/private/cakey.pem -cert /etc/pki/CA/cacert.pem -in /tmp/server.csr -out /server.crt
Using configuration from /etc/pki/tls/openssl.cnf

Enter pass phrase for /etc/pki/CA/private/cakey.pem:123456

Check that the request matches the signature

Signature ok

Certificate Details:

        Serial Number:

            b2:46:96:13:b3:91:9d:72

        Validity

            Not Before: May 27 04:04:59 2018 GMT

            Not After : May 27 04:04:59 2019 GMT

        Subject:

            countryName               = CN

            stateOrProvinceName       = guangdong

            organizationName          = IT

            organizationalUnitName    = lewis63.cn

            commonName                = lewis64.cn

            emailAddress              = [email protected]

        X509v3 extensions:

            X509v3 Basic Constraints:

                CA:TRUE

            Netscape Comment:

                OpenSSL Generated Certificate

            X509v3 Subject Key Identifier:

                96:E0:4F:10:D7:40:59:B4:6F:99:0E:FF:B7:0B:EE:C4:8F:3E:19:17

            X509v3 Authority Key Identifier:

                keyid:24:61:61:37:57:5F:09:6D:67:EA:D6:BD:49:65:99:AF:83:AC:40:B0


Certificate is to be certified until May 27 04:04:59 2019 GMT (365 days)

#证书有效期是365天。证书进行认证

Sign the certificate? [y/n]:y         #注册证书

1 out of 1 certificate requests certified, commit? [y/n]y       #确认

Write out database with 1 new entries

Data Base Updated
6.将证书复制到lewis64
[root@lewis63 ~]# scp /server.crt 192.168.1.64:/
到此证书签名完毕。
三.实战:使用证书实现https
SSL:(Secure Socket Layer)安全套接字层,通过一种机制在互联网上提供密钥传输。其主要目标是保证两个应用间通信数据的保密性和可靠性,可在服务器端和用户端同时支持的一种加密算法。目前主流版本SSLV2、SSLV3(常用)。
注:SSL作用,可以让你在一个不安全的公网环境中,安全传输你的密钥。
SSL四次握手安全传输:
加密协议: SSL 3.0 或 TLS 1.0
C -------------------------------------------------> S
1. 客户端请求一个安全的会话,协商加密算法
C <------------------------------------------------- S
2. 服务端将自己的证书传给客户端
C -------------------------------------------------> S
3. 客户端用浏览中存放CA的根证书检测lewis64证书,确认xuegod64是我要访问的网站。
客户端使用CA根证书中的公钥解密lewis64的证书,从而得到lewis64的公钥;
然后客户端生成一把对称的加密密钥,用lewis64的公钥加密这个对称加密的密钥发给lewis64。 后期使用对称密钥加密数据
C <------------------------------------------------> S
4. lewis64使用私钥解密,得到对称加密的密钥。从而,使用对称加密密钥来进行安全快速传输数据
注:这里使用对称加密数据,是因为对称加密和解密速度快
1.lewis64配置httpd web服务器
[root@lewis64 ~]# yum -y install mod_ssl 安装:SSL模块
[root@lewis64 ~]# cp /server.crt /etc/httpd/conf.d/ #复制证书
[root@lewis64 ~]# ls /etc/httpd/conf.d/server.key #查看私钥
/etc/httpd/conf.d/server.key
[root@lewis64 ~]# vim /etc/httpd/conf.d/ssl.conf
改:100 SSLCertificateFile /etc/pki/tls/certs/localhost.crt
为:
SSLCertificateFile /etc/httpd/conf.d/server.crt
改:107 SSLCertificateKeyFile /etc/pki/tls/private/localhost.key
为:
SSLCertificateKeyFile /etc/httpd/conf.d/server.key
2.启动服务
[root@lewis64 ~]# systemctl restart httpd
Enter SSL pass phrase for 192.168.1.64:443 (RSA) : 123456 #httpd私钥密码
查看443端口
[root@lewis64 ~]# netstat -anput | grep 443
tcp6 0 0 :::443 :::* LISTEN 1471/httpd

