Android入门(15)——使用ProgressBar实现进度条
1. 简介:

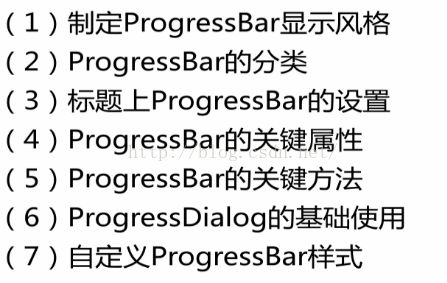
2. 课程目标:
第一部分:
3. 设置ProgressBar显示风格:
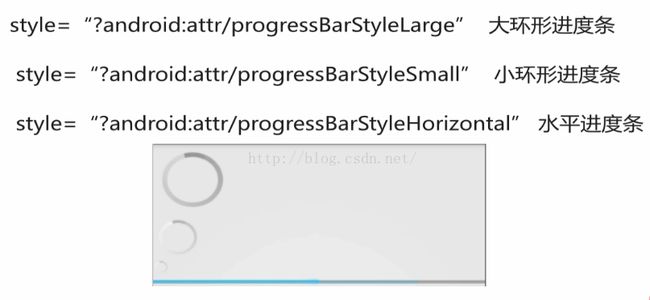
这个style的设置参考:http://blog.csdn.net/zizidemenghanxiao/article/details/50096641,指的是引用系统自带的主题属性。
4. ProgressBar的分类:

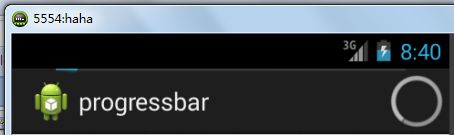
5. 标题栏上的ProgressBar的设置:
package com.example.progressbar;

import android.os.Bundle;
import android.app.Activity;
import android.view.Menu;
import android.view.Window;

public class MainActivity extends Activity {


    @Override
    protected void onCreate(Bundle savedInstanceState) {
        super.onCreate(savedInstanceState);

        /*
         * 启用窗口特征,启用带进度和不带进度的进度条
         * */
        requestWindowFeature(Window.FEATURE_PROGRESS);
        requestWindowFeature(Window.FEATURE_INDETERMINATE_PROGRESS);
        //设置布局文件
        setContentView(R.layout.main);

        /*
         * 显示标题栏上的两种进度条:
         * */
        setProgressBarVisibility(true);
        setProgressBarIndeterminateVisibility(true);
        setProgress(600); // 为带进度的进度条设置刻度。最大进度是一个常量,是10000.
    }
}
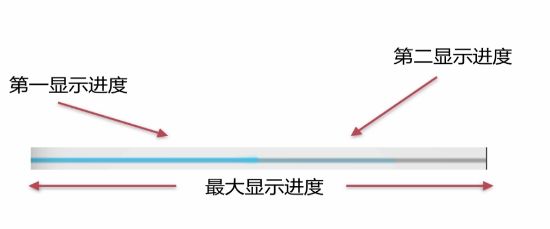
6. 关键属性和方法:
布局文件设置:

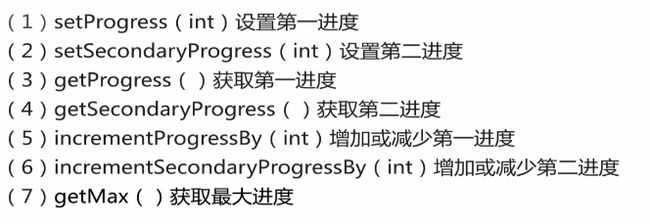
关于ProgressBar的一些方法:
7. 案例:
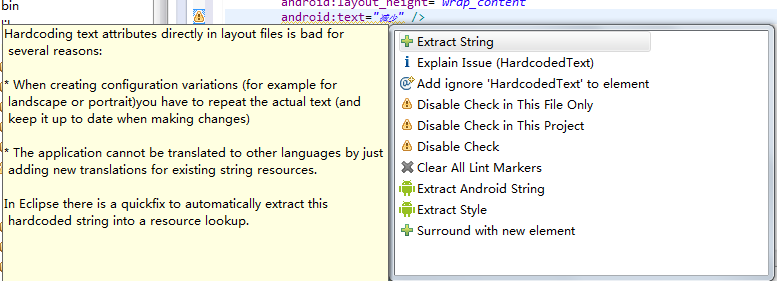
快捷键:ctrl+1:来将text中的文字设置为String串保存。
首先看布局文件main:
package com.example.progressbar;

import android.os.Bundle;
import android.app.Activity;
import android.view.Menu;
import android.view.View;
import android.view.View.OnClickListener;
import android.view.Window;
import android.widget.Button;
import android.widget.ProgressBar;
import android.widget.TextView;

public class MainActivity extends Activity implements OnClickListener {

	private ProgressBar progress;
	private Button add;
	private Button reduce;
	private Button reset;
	private TextView text;

	@Override
	protected void onCreate(Bundle savedInstanceState) {
		super.onCreate(savedInstanceState);

		/*
		 * 启用窗口特征,启用带进度和不带进度的进度条
		 */
		requestWindowFeature(Window.FEATURE_PROGRESS);
		requestWindowFeature(Window.FEATURE_INDETERMINATE_PROGRESS);

		setContentView(R.layout.main);

		/*
		 * 显示标题栏上的两种进度条:
		 */
		setProgressBarVisibility(true);
		setProgressBarIndeterminateVisibility(true);
		setProgress(600); // 为带进度的进度条设置刻度。最大进度是一个常量,是10000.

		init();
	}

	private void init() {
		//
		progress = (ProgressBar) findViewById(R.id.horiz);
		add = (Button) findViewById(R.id.add);
		reduce = (Button) findViewById(R.id.reduce);
		reset = (Button) findViewById(R.id.reset);
		text = (TextView) findViewById(R.id.text);
		// getProgress();获取第一进度条的进度。
		int first = progress.getProgress();
		// 获取第二进度条的进度。
		int second = progress.getSecondaryProgress();
		// 获取进度条的最大进度。
		int max = progress.getMax();
		// 进度的百分比。
		text.setText("第一进度百分比:" + (int) (first / (float) max * 100) + "%"
				+ "   第二进度百分比:" + (int) (second / (float) max * 100) + "%");

		// 设置监听器。
		add.setOnClickListener(this);
		reduce.setOnClickListener(this);
		reset.setOnClickListener(this);
	}

	@Override
	public void onClick(View arg0) {
		//
		switch (arg0.getId()) {
		case R.id.add:
			// 增加第一进度和第二进度10个刻度。
			progress.incrementProgressBy(10);
			progress.incrementSecondaryProgressBy(10);
			break;
		case R.id.reduce:
			// 减少第一进度和第二进度10个刻度。
			progress.incrementProgressBy(-10);
			progress.incrementSecondaryProgressBy(-10);
			break;
		case R.id.reset:
			// 重新设置。
			progress.setProgress(50);
			progress.setSecondaryProgress(80);
			break;
		default:
			break;
		}

		text.setText("第一进度百分比:"
				+ (int) (progress.getProgress() / (float) progress.getMax() * 100)
				+ "%"
				+ "   第二进度百分比:"
				+ (int) (progress.getSecondaryProgress()
						/ (float) progress.getMax() * 100) + "%");

	}
}

第二部分:
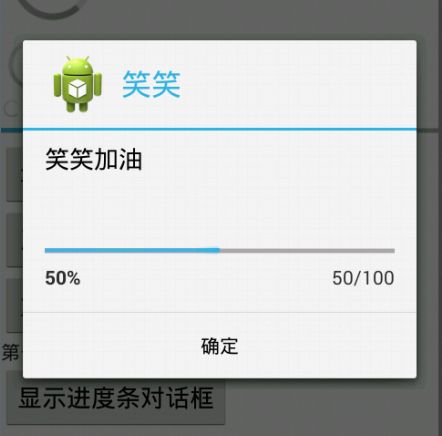
8. 对话框形式的进度条ProgressDialog:
首先在布局文件中添加控件:
这个Dialog本身就是一个ProgressDialog。
package com.example.progressbar;

import android.os.Bundle;
import android.app.Activity;
import android.app.ProgressDialog;
import android.content.DialogInterface;
import android.view.View;
import android.view.View.OnClickListener;
import android.view.Window;
import android.widget.Button;
import android.widget.ProgressBar;
import android.widget.TextView;
import android.widget.Toast;

public class MainActivity extends Activity implements OnClickListener {

	private ProgressBar progress;
	private Button add;
	private Button reduce;
	private Button reset;
	private TextView text;
	private ProgressDialog prodialog;// 注意点,这里添加Progressdialog
	private Button show;

	@Override
	protected void onCreate(Bundle savedInstanceState) {
		super.onCreate(savedInstanceState);

		/*
		 * 启用窗口特征,启用带进度和不带进度的进度条
		 */
		requestWindowFeature(Window.FEATURE_PROGRESS);
		requestWindowFeature(Window.FEATURE_INDETERMINATE_PROGRESS);

		setContentView(R.layout.main);

		/*
		 * 显示标题栏上的两种进度条:
		 */
		setProgressBarVisibility(true);
		setProgressBarIndeterminateVisibility(true);
		setProgress(600); // 为带进度的进度条设置刻度。最大进度是一个常量,是10000.

		init();
	}

	private void init() {
		//
		progress = (ProgressBar) findViewById(R.id.horiz);
		add = (Button) findViewById(R.id.add);
		reduce = (Button) findViewById(R.id.reduce);
		reset = (Button) findViewById(R.id.reset);
		text = (TextView) findViewById(R.id.text);
		show = (Button) findViewById(R.id.show);

		// getProgress();获取第一进度条的进度。
		int first = progress.getProgress();
		// 获取第二进度条的进度。
		int second = progress.getSecondaryProgress();
		// 获取进度条的最大进度。
		int max = progress.getMax();
		// 进度的百分比。
		text.setText("第一进度百分比:" + (int) (first / (float) max * 100) + "%"
				+ "   第二进度百分比:" + (int) (second / (float) max * 100) + "%");

		// 设置监听器。
		add.setOnClickListener(this);
		reduce.setOnClickListener(this);
		reset.setOnClickListener(this);
		show.setOnClickListener(this);
	}

	@Override
	public void onClick(View arg0) {
		//
		switch (arg0.getId()) {
		case R.id.add:
			// 增加第一进度和第二进度10个刻度。
			progress.incrementProgressBy(10);
			progress.incrementSecondaryProgressBy(10);
			break;
		case R.id.reduce:
			// 减少第一进度和第二进度10个刻度。
			progress.incrementProgressBy(-10);
			progress.incrementSecondaryProgressBy(-10);
			break;
		case R.id.reset:
			// 重新设置。
			progress.setProgress(50);
			progress.setSecondaryProgress(80);
			break;
		case R.id.show:// 注意这里:
			/*
			 * 这是一个Dialog基础页面的显示风格:
			 * */
			// 新建ProgressDialog对象:
			prodialog = new ProgressDialog(MainActivity.this);
			// 设置显示风格
			prodialog.setProgressStyle(prodialog.STYLE_HORIZONTAL);
			// 设置标题
			prodialog.setTitle("笑笑");
			// 设定对话框里的文字信息。
			prodialog.setMessage("笑笑加油");
			// 设置图标
			prodialog.setIcon(R.drawable.ic_launcher);

			/*
			 * 下面设置关于Dialog中进度条的一些属性:
			 * */
			// 制定进度条最大刻度。
			prodialog.setMax(100);
			// 设定初始化进度为50.
			prodialog.incrementProgressBy(50);
			// 设定进度条是明确显示进度的
			prodialog.setIndeterminate(false);

			/*
			 * 设定一个确定按钮
			 * */
			// 第一个参数设定按钮是哪种类型
			// 第二个参数按钮文字显示
			// 第三个按钮是点击事件的监听器
			prodialog.setButton(DialogInterface.BUTTON_POSITIVE, "确定", new DialogInterface.OnClickListener() {

				@Override
				public void onClick(DialogInterface dialog, int which) {
					// 点击确定按钮会显示一条toast。
					Toast.makeText(MainActivity.this, "笑笑努力", Toast.LENGTH_SHORT).show();
				}
			});

			// 是否可以通过返回按钮退出对话框
			prodialog.setCancelable(true);

			// 显示ProgressDialog
			prodialog.show();
			break;
		default:
			break;
		}

		text.setText("第一进度百分比:"
				+ (int) (progress.getProgress() / (float) progress.getMax() * 100)
				+ "%"
				+ "   第二进度百分比:"
				+ (int) (progress.getSecondaryProgress()
						/ (float) progress.getMax() * 100) + "%");

	}
}


第三部分:
9. 自定义ProgressBar样式:
首先是怎么查看系统自带样式:
第一步:利用style属性去查看系统自带的关于ProgressBar的样式,然后ctrl+左键去访问style文件。
-
-
-