rtems网络移植-实现网卡驱动
经过两周的调试,终于初步实现网卡的发送功能。
在这里参考了uboot的beaglebone网卡驱动和《tcp/ip详解卷二》
1、在前几篇博文中,讲解了网卡的mdio初始化过程,那么网卡lan8710a是如何与am335x处理器通信的呢?
首先看一张连接图:

我们都知道osi七层协议,最底下的是物理层和数据链路层,也就是mac和phy。有一部分处理器是自带mac层,也就是只需要pyh网卡一个外设就能实现网络功能。还有一部分处理器没有mac,也就是要外设一个mac和一个phy。beaglebone black的处理器是ti的am335x,是自带mac层的,phy网卡采用的是smsc的lan8710A。
上图很好的展现了网卡与处理器的通信:
首先处理器对于网卡寄存器的配置和控制方式采用的是MDIO通信
MDIO是由IEEE通过以太网标准IEEE 802.3的若干条款加以定义。MDIO是一种简单的双线串行接口,和spi类似,甚至不用时钟同步。mdio控制的寄存器主要包括BMCR、BMSR,自适应等模式的配置。
然后是传输数据的通信方式采用MII接口:

MII共有14根线,包括发送和接收的八根线,还有时钟线等。
再回到最上面的图,能够看到处理器控制mac然后以MII的通信方式进行数据传输,这里用到了DMA,好处是不用CPU的干预,传输速度很快。网卡直接把数据传输给
,然后DMA传输给内存DDR,而处理器对网卡的控制和配置则直接通过MDIO。下图是LAN8710网卡官方文档中的MII模式连接图:

2、TI对于网卡设备的通用管理是CPSW方式,分为host和slave,如何配置?
这里给出的代码分析是uboot中cpsw.c代码
首先是cpsw设备的注册:
int cpsw_register(struct cpsw_platform_data *data)
{
	struct cpsw_priv	*priv;
	struct cpsw_slave	*slave;
	void			*regs = (void *)data->cpsw_base;
	struct eth_device	*dev;
  printf("cpsw_register \n");

	dev = calloc(sizeof(*dev), 1);
	if (!dev)
		return -ENOMEM;

	priv = calloc(sizeof(*priv), 1);
	if (!priv) {
		free(dev);
		return -ENOMEM;
	}

	priv->data = *data;
	priv->dev = dev;

	priv->slaves = malloc(sizeof(struct cpsw_slave) * data->slaves);
	if (!priv->slaves) {
		free(dev);
		free(priv);
		return -ENOMEM;
	}

	priv->host_port		= data->host_port_num;
	priv->regs		= regs;
	priv->host_port_regs	= regs + data->host_port_reg_ofs;
	priv->dma_regs		= regs + data->cpdma_reg_ofs;
	priv->ale_regs		= regs + data->ale_reg_ofs;
	priv->descs		= (void *)regs + data->bd_ram_ofs;

	int idx = 0;

	for_each_slave(slave, priv) {
		cpsw_slave_setup(slave, idx, priv);
		idx = idx + 1;
	}

	strcpy(dev->name, "cpsw");
	dev->iobase	= 0;
	dev->init	= cpsw_init;
	dev->halt	= cpsw_halt;
	dev->send	= cpsw_send;
	dev->recv	= cpsw_recv;
	dev->priv	= priv;

	eth_register(dev);

	cpsw_mdio_init(dev->name, data->mdio_base, data->mdio_div);
	priv->bus = miiphy_get_dev_by_name(dev->name);
	for_active_slave(slave, priv)
		cpsw_phy_init(dev, slave);

	return 1;
}
首先是声明几个结构体变量,其中包括cpsw的主:cpsw_priv和从:cpsw_slave,然后是设置cpsw的基础寄存器的地址cpsw_base,然后调用calloc函数为这些结构体分配空间。
分配好后对priv结构体中的成员进行初始化,host_port=0表示主机端口号是0,然后成员的寄存器的偏移地址进行初始化。
priv->host_port		= data->host_port_num;
	priv->regs		= regs;
	priv->host_port_regs	= regs + data->host_port_reg_ofs;
	priv->dma_regs		= regs + data->cpdma_reg_ofs;
	priv->ale_regs		= regs + data->ale_reg_ofs;
	priv->descs		= (void *)regs + data->bd_ram_ofs;
对每个salve进行初始化,这里采用for循环的意义在于可能有多个网卡,am335支持双网卡。
	for_each_slave(slave, priv) {
		cpsw_slave_setup(slave, idx, priv);
		idx = idx + 1;
} eth_register(dev);
cpsw_mdio_init(dev->name, data->mdio_base, data->mdio_div);
priv->bus = miiphy_get_dev_by_name(dev->name);
for_active_slave(slave, priv)
cpsw_phy_init(dev, slave);cpsw_phy_init函数定义:
static int cpsw_phy_init(struct eth_device *dev, struct cpsw_slave *slave)
{
	struct cpsw_priv *priv = (struct cpsw_priv *)dev->priv;
	struct phy_device *phydev;
	u32 supported = PHY_GBIT_FEATURES;
    printf("cpsw_phy_init \n");
     printf("phy_addr:%d \n",slave->data->phy_addr);
	phydev = phy_connect(priv->bus,
			slave->data->phy_addr,
			dev,
			slave->data->phy_if);

	if (!phydev)
		return -1;

	phydev->supported &= supported;
	phydev->advertising = phydev->supported;

	priv->phydev = phydev;
	phy_config(phydev);

	return 1;
}首先分析phy_connect函数:
struct phy_device *phy_connect(struct mii_dev *bus, int addr,
		struct eth_device *dev, phy_interface_t interface)
#endif
{
	struct phy_device *phydev;

	phydev = phy_find_by_mask(bus, 1 << addr, interface);
	if (phydev)
		phy_connect_dev(phydev, dev);
	else
		printf("Could not get PHY for %s: addr %d\n", bus->name, addr);
	return phydev;
}
phy_connect_dev函数实现:
struct phy_device *phy_find_by_mask(struct mii_dev *bus, unsigned phy_mask,
		phy_interface_t interface)
{
	/* Reset the bus */
	if (bus->reset) {
		bus->reset(bus);

		/* Wait 15ms to make sure the PHY has come out of hard reset */
		udelay(15000);
	}

	return get_phy_device_by_mask(bus, phy_mask, interface);
}
该函数主要是调用get_phy_device_by_mask函数进行设备的查找,get_phy_device_by_mask函数的实现至关重要,包含了对于网卡的主要mdio通信
get_phy_device_by_mask函数实现:
static struct phy_device *get_phy_device_by_mask(struct mii_dev *bus,
		unsigned phy_mask, phy_interface_t interface)
{
	int i;
	struct phy_device *phydev;

	phydev = search_for_existing_phy(bus, phy_mask, interface);
	if (phydev)
		return phydev;
	/* Try Standard (ie Clause 22) access */
	/* Otherwise we have to try Clause 45 */
	for (i = 0; i < 5; i++) {
		phydev = create_phy_by_mask(bus, phy_mask,
				i ? i : MDIO_DEVAD_NONE, interface);
		if (IS_ERR(phydev))
			return NULL;
		if (phydev)
			return phydev;
	}
	printf("Phy %d not found\n", ffs(phy_mask) - 1);
	return phy_device_create(bus, ffs(phy_mask) - 1, 0xffffffff, interface);
}
search_for_existing_phy函数实现:
static struct phy_device *search_for_existing_phy(struct mii_dev *bus,
		unsigned phy_mask, phy_interface_t interface)
{
	/* If we have one, return the existing device, with new interface */
	while (phy_mask) {
		int addr = ffs(phy_mask) - 1;
		if (bus->phymap[addr]) {
			bus->phymap[addr]->interface = interface;
			return bus->phymap[addr];
		}
		phy_mask &= ~(1 << addr);
	}
	return NULL;
}static struct phy_device *create_phy_by_mask(struct mii_dev *bus,
unsigned phy_mask, int devad, phy_interface_t interface)
{
u32 phy_id = 0xffffffff;
while (phy_mask) {
int addr = ffs(phy_mask) - 1;
int r = get_phy_id(bus, addr, devad, &phy_id);
/* If the PHY ID is mostly f's, we didn't find anything */
if (r == 0 && (phy_id & 0x1fffffff) != 0x1fffffff)
return phy_device_create(bus, addr, phy_id, interface);
phy_mask &= ~(1 << addr);
}
return NULL;
}该函数调用get_phy_id函数让处理器通过mdio总线查看网卡寄存器存储的ID,如果ID都是f,说明没有ID,就返回空,否则返回phy_device_create函数进行创建一个网卡设备。
get_phy_id函数实现:
int __weak get_phy_id(struct mii_dev *bus, int addr, int devad, u32 *phy_id)
{
	int phy_reg;

	/* Grab the bits from PHYIR1, and put them
	 * in the upper half */
	phy_reg = bus->read(bus, addr, devad, MII_PHYSID1);

	if (phy_reg < 0)
		return -EIO;

	*phy_id = (phy_reg & 0xffff) << 16;

	/* Grab the bits from PHYIR2, and put them in the lower half */
	phy_reg = bus->read(bus, addr, devad, MII_PHYSID2);

	if (phy_reg < 0)
		return -EIO;

	*phy_id |= (phy_reg & 0xffff);

	return 0;
}cpsw_mdio_read实现:
static int cpsw_mdio_read(struct mii_dev *bus, int phy_id,
				int dev_addr, int phy_reg)
{
	int data;
	u32 reg;
    printf("cpsw_mdio_read \n");
    printf("phy_id %d\n",phy_id);
	if (phy_reg & ~PHY_REG_MASK || phy_id & ~PHY_ID_MASK)
		return -EINVAL;

	wait_for_user_access();
	reg = (USERACCESS_GO | USERACCESS_READ | (phy_reg << 21) |
	       (phy_id << 16));
	__raw_writel(reg, &mdio_regs->user[0].access);
	reg = wait_for_user_access();

	data = (reg & USERACCESS_ACK) ? (reg & USERACCESS_DATA) : -1;
	return data;
}
该函数调用wait_for_user_access函数来等待能否读取寄存器信号,当标志位表示能够access时,将reg的值写到&mdio_regs->user[0].access寄存器,reg包含了想要读的寄存器的变量,然后继续调用wait_for_user_access函数等待数据完成,将wait_for_user_access函数的返回值给reg,想要读寄存器的data就等于(reg & USERACCESS_ACK) ? (reg & USERACCESS_DATA) : -1; 然后返回data,就完成了mdio对于网卡寄存器的读取。
看看wait_for_user_access函数的实现:
static inline u32 wait_for_user_access(void)
{
	u32 reg = 0;
	int timeout = MDIO_TIMEOUT;

	while (timeout-- &&
	((reg = __raw_readl(&mdio_regs->user[0].access)) & USERACCESS_GO))
		udelay(10);

	if (timeout == -1) {
		printf("wait_for_user_access Timeout\n");
		return -ETIMEDOUT;
	}
	return reg;
}
可以看出,这里用了一个while循环,等待100个机器周期来读取网卡寄存器的值。
以上就是cpsw的注册和网卡设备的mdio连接。
接下来分析最重要的cpsw_init函数,包含了ALE、DMA、cpsw_slave的初始化和配置。
cpsw.c
cpsw_init函数实现:
static int cpsw_init(struct eth_device *dev, bd_t *bis)
{
	struct cpsw_priv	*priv = dev->priv;
	struct cpsw_slave	*slave;
	int i, ret;
printf("cpsw_init func\n");
	/* soft reset the controller and initialize priv */
	setbit_and_wait_for_clear32(&priv->regs->soft_reset);

	/* initialize and reset the address lookup engine */
	cpsw_ale_enable(priv, 1);
	cpsw_ale_clear(priv, 1);
	cpsw_ale_vlan_aware(priv, 0); /* vlan unaware mode */

	/* setup host port priority mapping */
	__raw_writel(0x76543210, &priv->host_port_regs->cpdma_tx_pri_map);
	__raw_writel(0, &priv->host_port_regs->cpdma_rx_chan_map);

	/* disable priority elevation and enable statistics on all ports */
	__raw_writel(0, &priv->regs->ptype);

	/* enable statistics collection only on the host port */
	__raw_writel(BIT(priv->host_port), &priv->regs->stat_port_en);
	__raw_writel(0x7, &priv->regs->stat_port_en);
    printf("&priv->regs->stat_port_en:%x\n",&priv->regs->stat_port_en);
     printf("priv->regs->stat_port_en:%x\n",priv->regs->stat_port_en);

	cpsw_ale_port_state(priv, priv->host_port, ALE_PORT_STATE_FORWARD);

	//cpsw_ale_add_ucast(priv, priv->dev->enetaddr, priv->host_port, ALE_SECURE);
	//cpsw_ale_add_mcast(priv, net_bcast_ethaddr, 1 << priv->host_port);

	for_active_slave(slave, priv)
		cpsw_slave_init(slave, priv);

	cpsw_update_link(priv);

	/* init descriptor pool */
	for (i = 0; i < NUM_DESCS; i++) {
		desc_write(&priv->descs[i], hw_next,
			   (i == (NUM_DESCS - 1)) ? 0 : &priv->descs[i+1]);
	}
	priv->desc_free = &priv->descs[0];
	printf("&priv->descs[0]:%x\n",&priv->descs[0]);
printf("priv->dma_regs + CPDMA_RXHDP_VER2:%x\n",priv->dma_regs + CPDMA_RXHDP_VER2);
	/* initialize channels */
	if (priv->data.version == CPSW_CTRL_VERSION_2) {
		memset(&priv->rx_chan, 0, sizeof(struct cpdma_chan));
		priv->rx_chan.hdp       = priv->dma_regs + CPDMA_RXHDP_VER2;
		priv->rx_chan.cp        = priv->dma_regs + CPDMA_RXCP_VER2;
		priv->rx_chan.rxfree    = priv->dma_regs + CPDMA_RXFREE;

		memset(&priv->tx_chan, 0, sizeof(struct cpdma_chan));
		priv->tx_chan.hdp       = priv->dma_regs + CPDMA_TXHDP_VER2;
		priv->tx_chan.cp        = priv->dma_regs + CPDMA_TXCP_VER2;
	} else {
		memset(&priv->rx_chan, 0, sizeof(struct cpdma_chan));
		priv->rx_chan.hdp       = priv->dma_regs + CPDMA_RXHDP_VER1;
		priv->rx_chan.cp        = priv->dma_regs + CPDMA_RXCP_VER1;
		priv->rx_chan.rxfree    = priv->dma_regs + CPDMA_RXFREE;

		memset(&priv->tx_chan, 0, sizeof(struct cpdma_chan));
		priv->tx_chan.hdp       = priv->dma_regs + CPDMA_TXHDP_VER1;
		priv->tx_chan.cp        = priv->dma_regs + CPDMA_TXCP_VER1;
	}

	/* clear dma state */
	setbit_and_wait_for_clear32(priv->dma_regs + CPDMA_SOFTRESET);

	if (priv->data.version == CPSW_CTRL_VERSION_2) {
		for (i = 0; i < priv->data.channels; i++) {
			__raw_writel(0, priv->dma_regs + CPDMA_RXHDP_VER2 + 4
					* i);
			__raw_writel(0, priv->dma_regs + CPDMA_RXFREE + 4
					* i);
			__raw_writel(0, priv->dma_regs + CPDMA_RXCP_VER2 + 4
					* i);
			__raw_writel(0, priv->dma_regs + CPDMA_TXHDP_VER2 + 4
					* i);
			__raw_writel(0, priv->dma_regs + CPDMA_TXCP_VER2 + 4
					* i);
		}
	} else {
		for (i = 0; i < priv->data.channels; i++) {
			__raw_writel(0, priv->dma_regs + CPDMA_RXHDP_VER1 + 4
					* i);
			__raw_writel(0, priv->dma_regs + CPDMA_RXFREE + 4
					* i);
			__raw_writel(0, priv->dma_regs + CPDMA_RXCP_VER1 + 4
					* i);
			__raw_writel(0, priv->dma_regs + CPDMA_TXHDP_VER1 + 4
					* i);
			__raw_writel(0, priv->dma_regs + CPDMA_TXCP_VER1 + 4
					* i);

		}
	}

	__raw_writel(1, priv->dma_regs + CPDMA_TXCONTROL);
	__raw_writel(1, priv->dma_regs + CPDMA_RXCONTROL);

	/* submit rx descs */
	for (i = 0; i < PKTBUFSRX; i++) {
		ret = cpdma_submit(priv, &priv->rx_chan, net_rx_packets[i],
				   PKTSIZE);
		if (ret < 0) {
			printf("error %d submitting rx desc\n", ret);
			break;
		}
	}

	return 0;
}ALE:address lookup engine 地址查询引擎,是TI创造的一种对于双网卡选择的方式:
/* initialize and reset the address lookup engine */
	cpsw_ale_enable(priv, 1);
	cpsw_ale_clear(priv, 1);
	cpsw_ale_vlan_aware(priv, 0); /* vlan unaware mode */
这三个函数的实现都在cpsw.c文件中,都是向相应的ale寄存器中写值,目的是为了使能ale引擎,并开启vlan(虚拟局域网)
贴出代码,但不具体解释:
#define cpsw_ale_enable(priv, val)	cpsw_ale_control(priv, 31, val)
#define cpsw_ale_clear(priv, val)	cpsw_ale_control(priv, 30, val)
#define cpsw_ale_vlan_aware(priv, val)	cpsw_ale_control(priv,  2, val)
static inline void cpsw_ale_control(struct cpsw_priv *priv, int bit, int val)
{
u32 tmp, mask = BIT(bit);
tmp = __raw_readl(priv->ale_regs + ALE_CONTROL);
tmp &= ~mask;
tmp |= val ? mask : 0;
__raw_writel(tmp, priv->ale_regs + ALE_CONTROL);
}接下来设置端口的初始mapping,也就是设置内存映射,将硬件DMA通道的发送和接收寄存器的硬件地址映射到内存空间,这样就可通过访问和修改内存地址内容来修改相应硬件配置:
/* setup host port priority mapping */
	__raw_writel(0x76543210, &priv->host_port_regs->cpdma_tx_pri_map);
	__raw_writel(0, &priv->host_port_regs->cpdma_rx_chan_map);

	/* disable priority elevation and enable statistics on all ports */
	__raw_writel(0, &priv->regs->ptype);

	/* enable statistics collection only on the host port */
	__raw_writel(BIT(priv->host_port), &priv->regs->stat_port_en);
	__raw_writel(0x7, &priv->regs->stat_port_en);
接着,初始化cpsw的slave,也就是网卡部分,具体实现在cpsw_slave_init函数,待会再分析。
for_active_slave(slave, priv)
		cpsw_slave_init(slave, priv);
接着是cpsw_update_link函数,该函数是刷新与网卡的连接,确保能够通信
cpsw_update_link(priv);该函数的实现主要是调用cpsw_slave_update_link函数对slave进行重新初始化连接:
函数实现:
static void cpsw_slave_update_link(struct cpsw_slave *slave,
				   struct cpsw_priv *priv, int *link)
{
	struct phy_device *phy;
	u32 mac_control = 0;

	phy = priv->phydev;

	if (!phy)
		return;

	phy_startup(phy);
	*link = phy->link;

	if (*link) { /* link up */
		mac_control = priv->data.mac_control;
		if (phy->speed == 1000)
			mac_control |= GIGABITEN;
		if (phy->duplex == DUPLEX_FULL)
			mac_control |= FULLDUPLEXEN;
		if (phy->speed == 100)
			mac_control |= MIIEN;
	}

	if (mac_control == slave->mac_control)
		return;

	if (mac_control) {
		printf("link up on port %d, speed %d, %s duplex\n",
				slave->slave_num, phy->speed,
				(phy->duplex == DUPLEX_FULL) ? "full" : "half");
	} else {
		printf("link down on port %d\n", slave->slave_num);
	}

	__raw_writel(mac_control, &slave->sliver->mac_control);
	slave->mac_control = mac_control;
}
该函数调用phy_startup(phy)进行设备的开启和连接,然后获得数据进行判断,当link为真时,进入if,判断网卡的工作速率是在10M还是100M,工作模式是双工还是单工。并且通过printf打印信息。
对于phy_startup函数主要是调用phy.c文件下的genphy_update_link函数和genphy_parse_link函数。
genphy_update_link实现如下:
int genphy_update_link(struct phy_device *phydev)
{
	unsigned int mii_reg;

	/*
	 * Wait if the link is up, and autonegotiation is in progress
	 * (ie - we're capable and it's not done)
	 */
	mii_reg = phy_read(phydev, MDIO_DEVAD_NONE, MII_BMSR);

	/*
	 * If we already saw the link up, and it hasn't gone down, then
	 * we don't need to wait for autoneg again
	 */
	if (phydev->link && mii_reg & BMSR_LSTATUS)
		return 0;

	if ((mii_reg & BMSR_ANEGCAPABLE) && !(mii_reg & BMSR_ANEGCOMPLETE)) {
		int i = 0;

		printf("%s Waiting for PHY auto negotiation to complete",
			phydev->dev->name);
		while (!(mii_reg & BMSR_ANEGCOMPLETE)) {
			/*
			 * Timeout reached ?
			 */
			if (i > PHY_ANEG_TIMEOUT) {
				printf(" TIMEOUT !\n");
				phydev->link = 0;
				return 0;
			}

			if (ctrlc()) {
				puts("user interrupt!\n");
				phydev->link = 0;
				return -EINTR;
			}

			if ((i++ % 500) == 0)
				printf(".");

			udelay(1000);	/* 1 ms */
			mii_reg = phy_read(phydev, MDIO_DEVAD_NONE, MII_BMSR);
		}
		printf(" done\n");
		phydev->link = 1;
	} else {
		/* Read the link a second time to clear the latched state */
		mii_reg = phy_read(phydev, MDIO_DEVAD_NONE, MII_BMSR);

		if (mii_reg & BMSR_LSTATUS)
			phydev->link = 1;
		else
			phydev->link = 0;
	}

	return 0;
}
该函数首先调用phy_read函数来获取BMSR寄存器的值
什么是BMSR,这是网卡的状态寄存器,BMCR是网卡的控制寄存器,一般而言,BMSR供我们读取数据进行判断网卡的状态,而BMCR一般是供我们写入数据进行控制。
下图是该网卡的寄存器表:
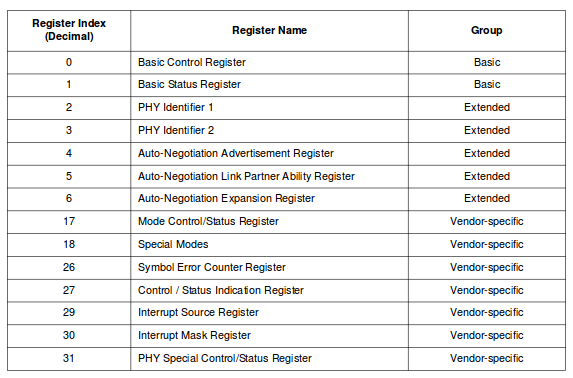
如果想要查看各寄存器的定义和每一位的定义,可以到SMSC官网下载文档。
回到函数,当读取到网卡的状态寄存器的值后,开始进行一系列判断
if ((mii_reg & BMSR_ANEGCAPABLE) && !(mii_reg & BMSR_ANEGCOMPLETE)) 然后是genphy_config函数,该函数是对网卡的信息进行一个读取,比如是否支持千兆网卡,是否支持10M/100M 单工/双工。
函数实现:
int genphy_config(struct phy_device *phydev)
{
	int val;
	u32 features;

	/* For now, I'll claim that the generic driver supports
	 * all possible port types */
	features = (SUPPORTED_TP | SUPPORTED_MII
			| SUPPORTED_AUI | SUPPORTED_FIBRE |
			SUPPORTED_BNC);

	/* Do we support autonegotiation? */
	val = phy_read(phydev, MDIO_DEVAD_NONE, MII_BMSR);

	if (val < 0)
		return val;

	if (val & BMSR_ANEGCAPABLE)
		features |= SUPPORTED_Autoneg;

	if (val & BMSR_100FULL)
		features |= SUPPORTED_100baseT_Full;
	if (val & BMSR_100HALF)
		features |= SUPPORTED_100baseT_Half;
	if (val & BMSR_10FULL)
		features |= SUPPORTED_10baseT_Full;
	if (val & BMSR_10HALF)
		features |= SUPPORTED_10baseT_Half;

	if (val & BMSR_ESTATEN) {
		val = phy_read(phydev, MDIO_DEVAD_NONE, MII_ESTATUS);

		if (val < 0)
			return val;

		if (val & ESTATUS_1000_TFULL)
			features |= SUPPORTED_1000baseT_Full;
		if (val & ESTATUS_1000_THALF)
			features |= SUPPORTED_1000baseT_Half;
		if (val & ESTATUS_1000_XFULL)
			features |= SUPPORTED_1000baseX_Full;
		if (val & ESTATUS_1000_XHALF)
			features |= SUPPORTED_1000baseX_Half;
	}

	phydev->supported = features;
	phydev->advertising = features;

	genphy_config_aneg(phydev);

	return 0;
}
可以看出,该函数和genphy_update_link的实现风格很像,不再详细说明
再回到cpsw_slave_update_link函数,这样就完成了对于网卡的重新连接。
回到cpsw_init 函数,接着初始化DMA通道和DMA描述符
首先初始化描述符池
/* init descriptor pool */
	for (i = 0; i < NUM_DESCS; i++) {
		desc_write(&priv->descs[i], hw_next,
			   (i == (NUM_DESCS - 1)) ? 0 : &priv->descs[i+1]);
	}
	priv->desc_free = &priv->descs[0];
然后初始化DMA通道,am335有8个channel
memset(&priv->rx_chan, 0, sizeof(struct cpdma_chan));
		priv->rx_chan.hdp       = priv->dma_regs + CPDMA_RXHDP_VER2;
		priv->rx_chan.cp        = priv->dma_regs + CPDMA_RXCP_VER2;
		priv->rx_chan.rxfree    = priv->dma_regs + CPDMA_RXFREE;

		memset(&priv->tx_chan, 0, sizeof(struct cpdma_chan));
		priv->tx_chan.hdp       = priv->dma_regs + CPDMA_TXHDP_VER2;
		priv->tx_chan.cp        = priv->dma_regs + CPDMA_TXCP_VER2;
分配好channel的内存地址后,初始化这些通道,方法也很简单,写0即可:
__raw_writel(0, priv->dma_regs + CPDMA_RXHDP_VER2 + 4
					* i);
			__raw_writel(0, priv->dma_regs + CPDMA_RXFREE + 4
					* i);
			__raw_writel(0, priv->dma_regs + CPDMA_RXCP_VER2 + 4
					* i);
			__raw_writel(0, priv->dma_regs + CPDMA_TXHDP_VER2 + 4
					* i);
			__raw_writel(0, priv->dma_regs + CPDMA_TXCP_VER2 + 4
					* i);
		}
以上就完成了对cpsw设备的初始化,网卡的配置也基本完成
3、实现网卡的发送
网卡的发送函数主要是调用cpsw_send函数,比如当输入ping命令时,经过一系列的装包,最后调用cpsw_send函数进行发送,在发送ICMP包之前,会先调用arp发送arp地址解析协议,然后根据收到的rarp的包得知主机的mac地址。然后再发送icmp包,因此在这里首先要看如何实现arp包的发送。
首先了解arp协议的格式:

然后分析cpsw_send函数:
static int cpsw_send(struct eth_device *dev, void *packet, int length)
{
	struct cpsw_priv	*priv = dev->priv;
	void *buffer;
	int len;
	int timeout = CPDMA_TIMEOUT;

	flush_dcache_range((unsigned long)packet,
			   (unsigned long)packet + length);

	/* first reap completed packets */
	while (timeout-- &&
		(cpdma_process(priv, &priv->tx_chan, &buffer, &len) >= 0))
		;

	if (timeout == -1) {
		printf("cpdma_process timeout\n");
		return -ETIMEDOUT;
	}

	return cpdma_submit(priv, &priv->tx_chan, packet, length);
}该函数调用flush_dcache_range函数对数据缓存进行刷新,刷新的地址就是packet的地址,因为要保证缓存和内存的一致性,也就是一致性DMA。
然后调用cpdma_process和cpdma_submit函数将数据传给DMA描述符,再传送给DMA通道,DMA通过MII发送给网卡,网卡再将数据发送出去。
以上就是本人实现网卡驱动的大致过程,最后的描述可能有些不详细,时间太晚了,有问题可以留言交流~。
转载请说明出处。