实验二 直方图均衡
文章目录
- 一、实验目的:
- 二、实验内容:
- 三.实验过程
- (一).1、计算灰度图像的归一化直方图。
- 实现代码:
- 实验结果:
- (二).2、灰度图像直方图均衡处理
- 代码实现:
- 实现效果:
- (三).3、彩色图像直方图均衡处理
- 代码实现:
- 全部代码实现:
- 相关函数应用方法:
一、实验目的:
掌握对图像直方图进行操作,实现图像的直方图均衡算法。 1、掌握求灰度图像归一化直方图方法 2、掌握灰度图像的直方图均衡算法 3、掌握对彩色图像进行直方图均衡的算法
二、实验内容:
1、计算灰度图像的归一化直方图。
具体内容:利用 OpenCV 对图像像素进行操作,计算归一化直方图.并在
窗口中以图形的方式显示出来
2、灰度图像直方图均衡处理
具体内容:通过计算归一化直方图,设计算法实现直方图均衡化处理。
3、彩色图像直方图均衡处理
具体内容: 在灰度图像直方图均衡处理的基础上实现彩色直方图均衡处理。
三.实验过程
(一).1、计算灰度图像的归一化直方图。
具体内容:利用 OpenCV 对图像像素进行操作,计算归一化直方图.并在
窗口中以图形的方式显示出来
实现代码:
首先主函数将图像以灰度图像读入。
int main(int argc,char* argv[]){
    const char* imageName="/Users/Admin/Desktop/myProject/2.jpg";
    Mat img,grayImage;
    img=imread(imageName);
    //以灰度图像读入
    grayImage=imread(imageName,0);
    if (img.empty()||grayImage.empty()){
        fprintf(stderr, "Can't load image %s\n",imageName);
        return -1;
    }
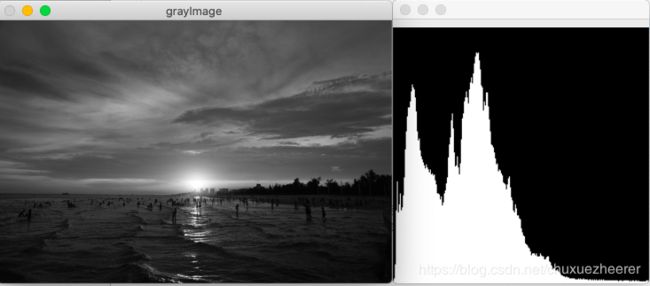
进行实验一相关,计算图像的归一化直方图并显示出来
主函数中写入:
  //实验一:归一化直方图
    Mat result1=grayImage.clone();
    result1=show_histogram(result1);
    imshow("灰度直方图归一化", result1);
    //waitKey(0);
直方图打印:
//打印直方图
Mat show_histogram(Mat img){
    int channels=0;
    MatND dstHist;
    //设定像素取值范围
    int hisSize[]={256};
    float midRanges[]={0,255};
    const float *ranges[]={midRanges};
    //计算直方图
    calcHist(&img, 1, &channels, Mat(), dstHist, 1, hisSize, ranges,true,false);
    Mat drawImage=Mat::zeros(Size(256,256), CV_8UC3);
    double MaxValue;
    minMaxLoc(dstHist,0,&MaxValue,0,0);//图像最小最大值
    for (int i=0;i<256;i++){
        int value=cvRound(dstHist.at<float>(i)*256*0.9/MaxValue);//四舍五入
        //在直方图画布上画出直方图
        line(drawImage, Point(i,drawImage.rows-1), Point(i,drawImage.rows-1-value), Scalar(255,255,255));
    }
    return drawImage;
}
实验结果:
(二).2、灰度图像直方图均衡处理
2、灰度图像直方图均衡处理
具体内容:通过计算归一化直方图,设计算法实现直方图均衡化处理。
首先统计像素总数,每个灰度级别下的像素个数,记录灰度分布密度,然后统计 p r ( r k ) p_r(r_k) pr(rk)灰度级别出现频率
代码实现:
//实验二:均衡化直方图
	int gray_sum=0;//像素总数
    int gray[256]={0};//记录每个灰度级别下的像素个数
    int gray_rate[256]={0};//记录灰度分布密度
    gray_sum=grayImage.rows*grayImage.cols;
    //统计每个灰度下的像素个数
    for(int i=0;i<grayImage.rows;i++){
        uchar* p=grayImage.ptr<uchar>(i);
        for (int j=0;j<grayImage.rows;j++){
            int value=p[j];
            gray[value]++;
        }
    }
    //统计灰度频率
    for(int i=0;i<256;i++){
        gray_rate[i]=((double)gray[i]/gray_sum);
    }
公式变换,得到 result2图像。
    Mat result2=grayImage.clone();
    double gray_distribution[256]={0};//记录累计密度
    int gray_equal[256]={0};//均衡化后的灰度值
    //计算累计密度
    gray_distribution[0]=gray_rate[0];
    for (int i=1;i<256;i++){
        gray_distribution[i]=gray_distribution[i-1]+gray_rate[i];
    }
    //重新计算均衡化后的灰度值,四舍五入。公式=(L-1)*T(这里变换一下公式变换为(L-1)*T+0.5效果会更好)
    for(int i=0;i<256;i++){
        gray_equal[i]=(uchar)(255*gray_distribution[i]+0.5);
    }

    //直方图均衡化,更新原图每个像素点的值
    for(int i=0;i<result2.rows;i++){
        uchar* p=result2.ptr<uchar>(i);
        for(int j=0;j<result2.cols;j++){
            p[j]=gray_equal[p[j]];
        }
    }
    imshow("result2_picture", result2);
    result2=show_histogram(result2);
    imshow("result2", result2);
    //waitKey(0);
实现效果:
(三).3、彩色图像直方图均衡处理
具体内容: 在灰度图像直方图均衡处理的基础上实现彩色直方图均衡处理。
代码实现:
//实验三:彩色直方图均衡
    Mat result3=img.clone();
    if (!result3.data) {
        cout<<"failed to read"<<endl;
        system("pause");
        return -1;
    }
    imshow("pre_color_picture", result3);
    //存储彩色直方图和图像通道向量
    Mat colorImage;
    vector<Mat> BGR_plane;
    //分离BGR通道
    split(result3, BGR_plane);
    //分别对BGR通道进行直方图均衡化
    for(int i=0;i<BGR_plane.size();i++){
        equalizeHist(BGR_plane[i], BGR_plane[i]);
    }
    //合并通道
    merge(BGR_plane, colorImage);
    imshow("after_color_picture", colorImage);
    colorImage=show_histogram(colorImage);
    imshow("colorImage", colorImage);
    waitKey(0);

可以看到最后实现结果并不好,因为均匀直方图是增强了对比度,但颜色有些变化。
所以我们可以将其变化到HSV空间:
//实验三:彩色直方图均衡

    Mat result3=img.clone();
    if (!result3.data) {
        cout<<"failed to read"<<endl;
        system("pause");
        return -1;
    }
    imshow("pre_color_picture", result3);
    //将RBG转到HSV空间中进行变换
    Mat hsvImg;//定义hsv空间
    cvtColor(result3, hsvImg, COLOR_BGR2HSV);//将BGR图片转到HSV空间
    //存储彩色直方图和图像通道向量
    vector<Mat> hsv;
    split(hsvImg, hsv);//分离三个通道并放到hsv向量中
    equalizeHist(hsv[2], hsv[2]);//
    //合并通道
    Mat colorImage;
    merge(hsv, colorImage);
    cvtColor(colorImage, colorImage, COLOR_HSV2BGR);
    imshow("after_color_picture", colorImage);
    colorImage=show_histogram(colorImage);
    imshow("colorImage", colorImage);
    waitKey(0);
全部代码实现:
#include 相关函数应用方法:
(1)image.ptr(5),指的是访问image图片的第6行像素值。
(2)calcHist函数一次只能统计一个通道上的直方图
//! computes the joint dense histogram for a set of images.
CV_EXPORTS void calcHist( const Mat* images, int nimages,
                          const int* channels, InputArray mask,
                          OutputArray hist, int dims, const int* histSize,
                          const float** ranges, bool uniform=true, bool accumulate=false );

//! computes the joint sparse histogram for a set of images.
CV_EXPORTS void calcHist( const Mat* images, int nimages,
                          const int* channels, InputArray mask,
                          SparseMat& hist, int dims,
                          const int* histSize, const float** ranges,
                          bool uniform=true, bool accumulate=false );

CV_EXPORTS_W void calcHist( InputArrayOfArrays images,
                            const vector<int>& channels,
                            InputArray mask, OutputArray hist,
                            const vector<int>& histSize,
                            const vector<float>& ranges,
                            bool accumulate=false );
参数说明:
- images – 源图像数组,它们有同样的位深CV_8U或 CV_32F ,同样的尺寸;图像阵列中的每一个图像都可以有任意多个通道;
- nimages – 源图像的数目。
- channels – 维度通道序列,第一幅图像的通道标号从0~image[0].channels( )-1。Image[0]表示图像数组中的第一幅图像,channels()表示该图像的通道数量。同理,图像阵列中的第二幅图像,通道标号从image[0].channerls( )开始,到image[1].channels( )-1为止;第三、四幅图像的通道标号顺序依此类推;也就是说图像阵列中的所有图像的通道根据图像排列顺序,排成一个通道队列。
- mask – 可选择的mask。如果该矩阵不空的话,它必须是一个8-bit的矩阵,与images[i]同尺寸。在图像中,只有被mask覆盖的区域的像素才参与直方图统计。如果这个参数想用默认值,输入Mat()就可以了。
- hist – 输出直方图, 它是一个稠密或稀疏矩阵,具有dims个维度;
- dims – 直方图的维度,一定是正值, CV_MAX_DIMS(当前OpenCV版本是32个);
- histSize – 数组,即histSize[i]表示第i个维度上bin的个数.每一维的直方图的尺寸大小
- ranges – 直方图每一维的数据大小范围
当uniform=true时,ranges是多个二元数组组成的数组;当uniform=false时,ranges是多元数组组成的数组。当在每个维度(或通道)上每个直方条等宽时,即uniform=true时,灰度值的有效统计范围的下界用L0表示,上界用UhistSize[i]-1表示,角标中的i表示第i个维度(或通道),上下界值可以表示为hrange[i]={ L0, UhistSize[i]-1}, 在统计时, L0和UhistSize[i]-1不在统计范围内。而ranges={ hrange[0], hrange[1], …… , hrange[dims]}。ranges的元素个数由参数dims决定。
其中,L0表示在该通道上第0个直方条(bin)的下边界,UhistSize[i]-1表示最后一个直方条histSize[i]-1的上边界。ranges[i]={ L0 , L1, L2, …… , LhistSize[i]-1 ,UhistSize[i]-1} - uniform – 标识,用于说明直方条bin是否是均匀等宽的。
- accumulate – 累积标识。如果该项设置,当直方图重新分配时,直方图在开始清零。这个特征可以使你通过几幅图像,累积计算一个简单的直方图,或者及时更新直方图。
(3)MatND是多维矩阵(>=3维)
(4)minMaxLoc():
函数原型:
void minMaxLoc( const Mat& src,  double* minVal, double* maxVal=0, Point* minLoc=0, Point* maxLoc=0, const Mat& mask=Mat() );
void minMaxLoc(const MatND& src, double* minVal, double* maxVal, int* minIdx=0, int* maxIdx=0, const MatND& mask=MatND() );
void minMaxLoc(const SparseMat& src, double* minVal, double* maxVal, int* minIdx=0, int* maxIdx=0);
1 minMaxLoc寻找矩阵(一维数组当作向量,用Mat定义) 中最小值和最大值的位置.
2 参数若不需要,则置为NULL或者0,即可.
3 minMaxLoc针对Mat和MatND的重载中 ,第5个参数是可选的(optional),不使用不传递即可.
(5)cvRound()
cvRound():返回跟参数最接近的整数值,即四舍五入;
(6)line()
void line(Mat& img, Point pt1, Point pt2, const Scalar& color, int thickness=1, int lineType=8, int shift=0)
参数:
img: 要绘制线段的图像。
pt1: 线段的起点。
pt2: 线段的终点。
color: 线段的颜色,通过一个Scalar对象定义。
thickness: 线条的宽度。
lineType: 线段的类型。可以取值8, 4, 和CV_AA, 分别代表8邻接连接线,4邻接连接线和反锯齿连接线。默认值为8邻接。为了获得更好地效果可以选用CV_AA(采用了高斯滤波)。
shift: 坐标点小数点位数
(7)equalizeHist()
void equalizeHist(InputArray src, OutputArray dst) 直方图均衡化,用于提高图像的质量.
参考文章:
参考链接1
参考链接2


