基于GNU Radio和USRP的SDR低能耗蓝牙(BLE)转储器
基于GNU Radio和USRP的SDR低能耗蓝牙BLE转储器
- 一、下载ble_dump
- 二、安装gr-osmosdr扩展
- 三、安装gr-osmosdr
- 四、出错及解决方法汇总
- 1. Missing Block **key**:osmosdr source
- 2. gr-osmosdr在cmake时出错:
- 3. gr-osmosdr在make时出错:
本文的前提是已经安装好UHD和GNU Radio,如果还未安装,请参考:双系统安装Ubuntu16.04+uhd+gnuradio USRP B210环境配置
一、下载ble_dump
项目地址:https://github.com/drtyhlpr/ble_dump
cd ~/Downloads
git clone https://github.com/drtyhlpr/ble_dump.git
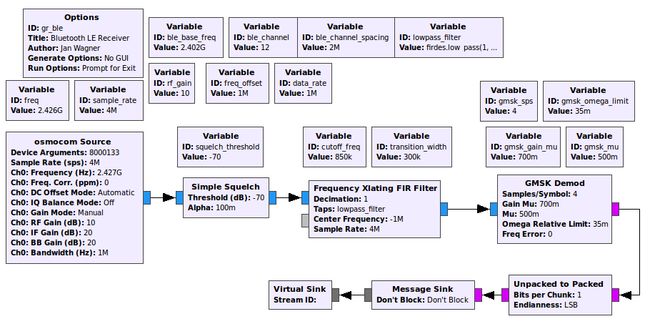
下载后可以在Downloads/ble_dump/grc文件夹中找到.grc流图和.py文件。
直接打开会发现Missing Block,正常使用需要安装gr-osmosdr。

用法:
扫描BLE咨询通道(37、38、39)并将收到的数据包保存到PCAP文件中:
./ble_dump.py -o /tmp/dump1.pcap
扫描BLE咨询通道(37、38、39)并将收到的数据包发送到FIFO:
mkfifo /tmp/fifo1
./ble_dump.py -o /tmp/fifo1
在Wireshark中显示来自FIFO的BLE数据包:
wireshark -S -k -i /tmp/fifo1
二、安装gr-osmosdr扩展
-- ######################################################
-- # Gnuradio enabled components
-- ######################################################
--   * Python support
--   * Osmocom IQ Imbalance Correction
--   * sysmocom OsmoSDR
--   * FUNcube Dongle
--   * FUNcube Dongle Pro+
--   * IQ File Source & Sink
--   * Osmocom RTLSDR
--   * RTLSDR TCP Client
--   * Ettus USRP Devices
--   * Osmocom MiriSDR
--   * HackRF & rad1o Badge
--   * nuand bladeRF
--   * RFSPACE Receivers
--   * AIRSPY Receiver
--   * SoapySDR support
--   * Red Pitaya SDR
--   * FreeSRP support
--
-- ######################################################
-- # Gnuradio disabled components
-- ######################################################
--
-- Building for version: 0.1.5 / 0.1.5
-- Using install prefix: /usr/local
gr-osmosdr有许多的扩展组件,可以根据实际需要安装并启用,这些扩展并不能直接让GNURadio控制硬件,需要安装SDR相应的驱动。以上是所有扩展都安装成功的情况下cmake后的信息。
其中以下5个扩展在安装gr-osmosdr的时候就被启用了:
IQ File Source & Sink
RTLSDR TCP Client
RFSPACE Receivers
Red Pitaya SDR
FUNcube Dongle
由于我们只需要使用USRP,因此只要安装Ettus USRP Devices对应的包即可,其他可以忽略。
下面说明了如何安装及启用每个扩展:
1.Python support
sudo apt-get -y install python-dev
sudo apt-get -y install swig
2.Osmocom IQ Imbalance Correction && FUNcube Dongle Pro+
sudo apt-get -y install gr-fcdproplus
3.sysmocom OsmoSDR
sudo apt install libosmosdr-dev
4.Osmocom RTLSDR
sudo apt install librtlsdr-dev
5.Ettus USRP Devices
sudo apt-get -y install libuhd-dev
6.Osmocom MiriSDR
sudo apt install libmirisdr-dev
7.HackRF & rad1o Badge
sudo apt install libhackrf-dev
8.nuand bladeRF
sudo apt -y install libbladerf-dev
9.AIRSPY Receiver
sudo apt install libairspy-dev
10.SoapySDR support
sudo apt-get -y install libsoapysdr-dev
11.FreeSRP support
#sudo apt-get -y install libboost-all-dev  #已经安装过的不用再安装
sudo apt-get -y install build-essential libusb-1.0-0-dev
git clone https://github.com/FreeSRP/libfreesrp.git
cd libfreesrp && mkdir build && cd build
cmake .. -DCMAKE_BUILD_TYPE=Release && make && sudo make install
三、安装gr-osmosdr
参考:osmocom Gnu Radio Blocks
git clone git://git.osmocom.org/gr-osmosdr
cd gr-osmosdr/
gr-osmosdr的版本需要和gnuradio的版本相同。使用gnuradio-config-info --version查看gunradio的笔记本信息,如果gnuradio版本为3.7,需要切换到gr3.7分支:
git checkout gr3.7
然后对源码进行编译:
mkdir build
cd build/
cmake ../
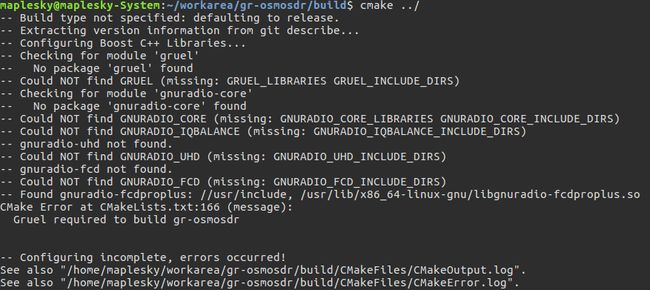
出现以下信息表明编译成功,可以根据需要启用或禁用组件:
然后使用以下命令进行安装:
make
sudo make install
sudo ldconfig
安装完成后原来的Missing Block key:osmosdr source问题解决
直接运行出现警告:

修改osmocom Source的DC Offset Mode,设为Automatic,同时将Bandwidth设为1000000,即1M:

修改完后运行以下命令:
cd ~/Downloads/ble_dump
sed -i -e "s/message_sink_msgq_out,/message_queue,/" -e "s/message_sink_msgq_out = virtual_sink_msgq_in/self.message_queue = message_queue/" ./grc/gr_ble.py
四、出错及解决方法汇总
1. Missing Block key:osmosdr source
参考:gnuradio companion 找不到第三方模块gr-osmosdr的问题
该博客的方法需要修改/etc/gnuradio/conf.d/grc.conf文件,而在我的电脑上不存在/etc/gnuradio/文件夹,查找后发现该文件在我的电脑上的路径为/usr/local/etc/gnuradio/conf.d/grc.conf,找到后使用以下命令修改文件内容:
sudo gedit /usr/local/etc/gnuradio/conf.d/grc.conf
打开文件后发现local_blocks_path 一项为空:
复制上一行global_blocks_path的路径粘贴过来即可:local_blocks_path = /usr/local/share/gnuradio/grc/blocks
2. gr-osmosdr在cmake时出错:
由于我的gnuradio版本为3.7,跟着教程切换到了gr3.6的分支,导致编译出错,使用git checkout gr3.7切换到gr3.7分支即可正常编译。
3. gr-osmosdr在make时出错:
注意到error都跟bladerf有关,检查后发现通过sudo apt-get install libbladerf-dev安装的libbladerf-dev版本为0.2016.01,可能过于老旧,在https://launchpad.net/ubuntu/+source/bladerf下载最新稳定版libbladerf-dev(amd64),使用
sudo dpkg -i libbladerf-dev_0.2019.07-4build1_amd64.deb安装,出错:
根据提示需要先安装libbladerf2,同理在上面的网址下载libbladerf2(amd64),然后使用以下命令先安装libbladerf2再安装libbladerf:
sudo dpkg -i libbladerf2_0.2019.07-4build1_amd64.deb
sudo dpkg -i libbladerf-dev_0.2019.07-4build1_amd64.deb
安装后重新:
cmake ../ && make && sudo make install


