Android ButterKnife框架实现原理
介绍
ButterKnife相信大家都很熟悉了,网上介绍其使用方法的文章很多,还不知道ButterKnife是啥的小伙伴可以先去了解一下。
ButterKnife用一个注解就替代了findViewById方法。用起来非常方便,但是你有没有想过为啥就不用写findViewById方法了呢,难道代码就真的没有跑findViewById了吗。
来来来,我们来自己手写一个ButterKnife,来学习一下他的技术。
效果
先看一下Demo的效果吧,先展示出来效果大家才有看下去的动力,毕竟光说不练假把式。
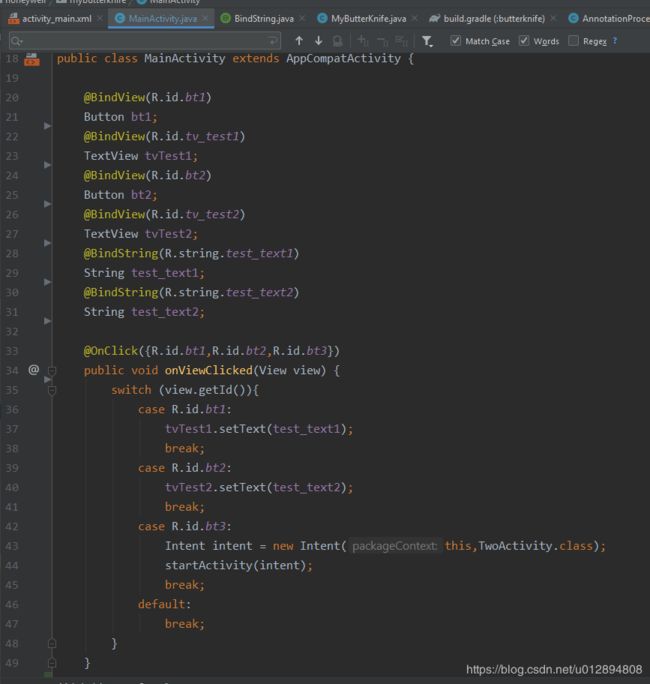
上面代码就是在activity中的使用,是不是跟ButterKnife一样。
@Override
    protected void onCreate(Bundle savedInstanceState) {
        super.onCreate(savedInstanceState);
        setContentView(R.layout.activity_main);
        MyButterKnife.bind(this);
    }
当然同样需要在onCreate中bind一下。
下面是实际的运行效果。
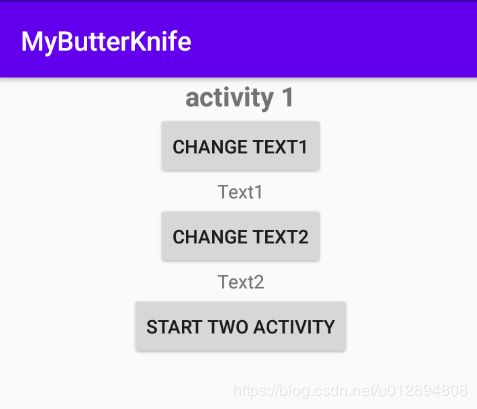
△开始时候TextView显示的是Text1,当点击第一个Button后改变TextView的text。
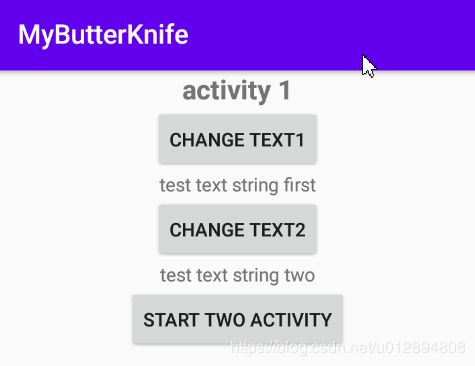
△点击按钮后的结果,字符串发生的改变,Button,TextView,String都是通过我们自己实现的ButterKnife绑定的。
实现
话不多说,动手开干。
个人精力有限仅实现了BindString、BindView、OnClick,其他的小伙伴们可以自己试着实现,原理都是一样的。
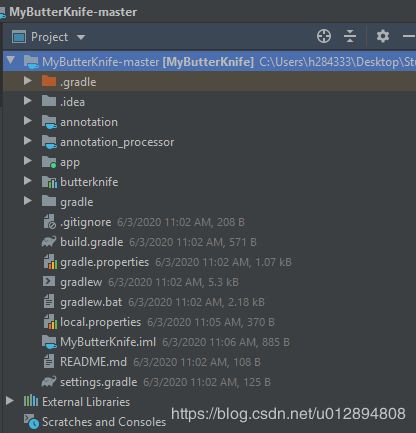
首先看一下Demo的目录结构。
- annotation:声明的注解,java library。
- annotation_processor:注解处理器,java library。
- app:测试用的app,application。
- butterknife:调用findViewById方法,android library。
annotation module
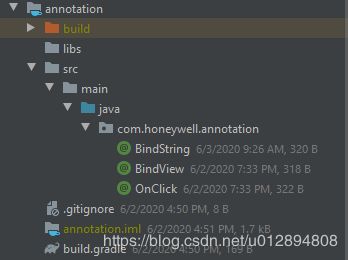
第一步先声明我们自己的注解,这里声明了三个
import java.lang.annotation.ElementType;
import java.lang.annotation.Retention;
import java.lang.annotation.RetentionPolicy;
import java.lang.annotation.Target;

@Retention(RetentionPolicy.CLASS)
@Target(ElementType.FIELD)
public @interface BindString {
    int value();
}
@interface就是声明注解,这个注解有value,如果需要多个value就将int改成数组。
@Retention(RetentionPolicy.CLASS) 可以理解成注解存在的生命周期。有三种:
- @Retention(RetentionPolicy.SOURCE) 注解只存在源码中,编译时将被编译器丢弃,比如我们常见的@Override
- @Retention(RetentionPolicy.CLASS) 编译器将注解记录在类文件中,但不会加载到JVM中。
- @Retention(RetentionPolicy.RUNTIME) 注解信息会保留在源文件、类文件中,在执行的时也加载到Java的JVM中,因此可以反射性的读取。
@Target(ElementType.FIELD)是表明这个注解用来修饰属性,像我们自定义的OnClick注解就要用@Target(ElementType.METHOD)来修饰,因为OnClick是添加到方法上面的。
annotation_processor module
这个模块是重点,主要的操作都是放到了这个模块里面。
它的作用就是在编译的时候根据标签,为activity生成一个activity$$BindView文件,并在构造方法中调用findViewById方法。所以ButterKnife并不是说就不会调用findViewById方法,而是它替我们写好了这些代码。
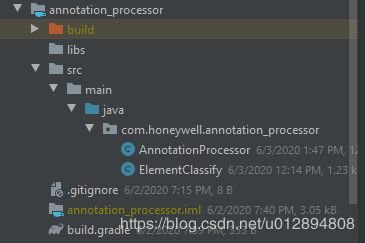
当新建好这个module后第一步修改build.gradle文件,添加相关依赖。
Android Studio 3.4+的版本是以下这种写法。
dependencies {
    implementation fileTree(dir: 'libs', include: ['*.jar'])
    implementation project(path: ':annotation')
    annotationProcessor'com.google.auto.service:auto-service:1.0-rc4'
    compileOnly 'com.google.auto.service:auto-service:1.0-rc3'
}
然后需要封装一个ElementClassify ,作用是将同一个类里面的注解放到一起。然后跟这个类对应起来,方便我们生成新的类时候使用。
import java.util.List;
import javax.lang.model.element.ExecutableElement;
import javax.lang.model.element.VariableElement;

/**
 * 内部包含一个类中的所有带注解的元素
 */
public class ElementClassify {

    //view的节点list
    public List<VariableElement> viewElements;
    //onclick的节点list
    public List<ExecutableElement> methodElements;
    //string的节点list
    public List<VariableElement> stringElements;

    public List<VariableElement> getStringElements() {
        return stringElements;
    }

    public void setStringElements(List<VariableElement> stringElements) {
        this.stringElements = stringElements;
    }

    public List<VariableElement> getViewElements() {
        return viewElements;
    }

    public void setViewElements(List<VariableElement> viewElements) {
        this.viewElements = viewElements;
    }

    public List<ExecutableElement> getMethodElements() {
        return methodElements;
    }

    public void setMethodElements(List<ExecutableElement> methodElements) {
        this.methodElements = methodElements;
    }
}
重点来了,下面就是注解处理器,这里主要是进行分类,把注解的元素和包含它的类用Map对应起来,然后生成一个名叫类名$$ViewBinder的文件。
import com.google.auto.service.AutoService;
import com.honeywell.annotation.BindString;
import com.honeywell.annotation.BindView;
import com.honeywell.annotation.OnClick;

import java.io.IOException;
import java.io.Writer;
import java.util.ArrayList;
import java.util.HashMap;
import java.util.HashSet;
import java.util.Iterator;
import java.util.List;
import java.util.Map;
import java.util.Set;

import javax.annotation.processing.AbstractProcessor;
import javax.annotation.processing.Filer;
import javax.annotation.processing.Messager;
import javax.annotation.processing.ProcessingEnvironment;
import javax.annotation.processing.Processor;
import javax.annotation.processing.RoundEnvironment;
import javax.lang.model.SourceVersion;
import javax.lang.model.element.Element;
import javax.lang.model.element.ExecutableElement;
import javax.lang.model.element.Name;
import javax.lang.model.element.PackageElement;
import javax.lang.model.element.TypeElement;
import javax.lang.model.element.VariableElement;
import javax.lang.model.type.TypeMirror;
import javax.tools.Diagnostic;
import javax.tools.JavaFileObject;

@AutoService(Processor.class)
public class AnnotationProcessor extends AbstractProcessor {

    private Filer filer;

    public void logUtil(String message) {
        Messager messager = processingEnv.getMessager();
        messager.printMessage(Diagnostic.Kind.NOTE, message);
    }

    @Override
    public synchronized void init(ProcessingEnvironment processingEnvironment) {
        super.init(processingEnvironment);
        logUtil("processor init ============================");
        filer = processingEnvironment.getFiler();
    }

    @Override
    public boolean process(Set<? extends TypeElement> set, RoundEnvironment roundEnvironment) {
        logUtil("processor process ============================");
        Map<TypeElement, ElementClassify> parseTargets = classifyElementWithClass(roundEnvironment);
        //如果map为空说明没有注解 什么都不用做
        if (parseTargets.size() <= 0) {
            return false;
        }
        Iterator<TypeElement> iterator = parseTargets.keySet().iterator();
        String newClassName;
        String packageName;
        Writer writer = null;
        //遍历map  为每一个acitvity生成$$ViewBinder文件
        while (iterator.hasNext()) {
            TypeElement classElement = iterator.next();
            ElementClassify elementClassify = parseTargets.get(classElement);
            newClassName = classElement.getSimpleName().toString();
            newClassName = newClassName + "$$ViewBinder";
            packageName = getPackageName(classElement);
            try {
                JavaFileObject javaFileObject = filer.createSourceFile(packageName + "." + newClassName);
                writer = javaFileObject.openWriter();
                StringBuffer stringBuffer = getStringBuffer(packageName, newClassName, classElement, elementClassify);
                writer.write(stringBuffer.toString());
            } catch (IOException e) {
                e.printStackTrace();
            } finally {
                if (writer != null) {
                    try {
                        writer.close();
                    } catch (IOException e) {
                        e.printStackTrace();
                    }
                }
            }
        }
        return false;
    }

    /**
     * 生成新的class文件
     * @param packageName
     * @param newClassName
     * @param classElement
     * @param elementClassify
     * @return
     */
    private StringBuffer getStringBuffer(String packageName, String newClassName, TypeElement classElement,
                                         ElementClassify elementClassify) {
        StringBuffer stringBuffer = new StringBuffer();
        stringBuffer.append("package " + packageName + ";\n");
        stringBuffer.append("import android.view.View;\n");
        stringBuffer.append("import android.util.Log;\n");
        stringBuffer.append("public class " + newClassName + "{\n");
        stringBuffer.append("\tpublic " + newClassName + "(final " + classElement.getQualifiedName() + " target){\n");
        stringBuffer.append("\t\tLog.d(\"gsy\",\"constractor\");\n");
        if (elementClassify != null && elementClassify.getViewElements() != null && elementClassify.getViewElements().size() > 0) {
            List<VariableElement> viewElements = elementClassify.getViewElements();
            for (VariableElement variableElement : viewElements) {
                TypeMirror typeMirror = variableElement.asType();
                Name name = variableElement.getSimpleName();
                int resId = variableElement.getAnnotation(BindView.class).value();
                stringBuffer.append("\t\ttarget." + name + " =(" + typeMirror + ")target.findViewById(" + resId + ");\n");
            }
        }
        if (elementClassify != null && elementClassify.getMethodElements() != null && elementClassify.getMethodElements().size() > 0) {
            List<ExecutableElement> methodElements = elementClassify.getMethodElements();
            for (ExecutableElement executableElement : methodElements) {
                int[] resIds = executableElement.getAnnotation(OnClick.class).value();
                String methodName = executableElement.getSimpleName().toString();
                for (int id : resIds) {
                    stringBuffer.append("\t\t(target.findViewById(" + id + ")).setOnClickListener(new View.OnClickListener() {\n");
                    stringBuffer.append("\t\t\tpublic void onClick(View p0) {\n");
                    stringBuffer.append("\t\t\t\ttarget." + methodName + "(p0);\n");
                    stringBuffer.append("\t\t\t}\n\t\t});\n");
                }
            }
        }

        if(elementClassify != null && elementClassify.getStringElements() != null && elementClassify.getStringElements().size() > 0){
            List<VariableElement> stringElements = elementClassify.getStringElements();
            for (VariableElement variableElement:stringElements){
                int id = variableElement.getAnnotation(BindString.class).value();
                Name name = variableElement.getSimpleName();
                stringBuffer.append("\t\ttarget."+name+" = target.getResources().getString("+id+");\n");
            }
        }
        stringBuffer.append("\t}\n}\n");
        return stringBuffer;
    }

    /**
     * 获取包名
     * @param classElement
     * @return
     */
    private String getPackageName(Element classElement) {
        PackageElement packageElement = processingEnv.getElementUtils().getPackageOf(classElement);
        return packageElement.getQualifiedName().toString();
    }

    /**
     * 声明注解器支持的java版本
     * @return
     */
    @Override
    public SourceVersion getSupportedSourceVersion() {
        return processingEnv.getSourceVersion();
    }

    /**
     * 声明要处理的注解
     * @return
     */
    @Override
    public Set<String> getSupportedAnnotationTypes() {
        Set<String> annotationSet = new HashSet<>();
        annotationSet.add(BindView.class.getCanonicalName());
        annotationSet.add(OnClick.class.getCanonicalName());
        annotationSet.add(BindString.class.getCanonicalName());
        return annotationSet;
    }

    //TypeElement 对应class ElementClassify 对应class中的注解元素对应的方法或者变量
    private Map<TypeElement, ElementClassify> classifyElementWithClass(RoundEnvironment roundEnvironment) {
        //建立类和方法、变量的对应关系 便于生成新的class文件
        Map<TypeElement, ElementClassify> classElementMap = new HashMap<>();
        //通过roundEnvironment获取到添加了BindView注解的所有元素
        Set<? extends Element> viewElementsAnnotatedWith = roundEnvironment.getElementsAnnotatedWith(BindView.class);
        //通过roundEnvironment获取到添加了OnClick注解的所有方法
        Set<? extends Element> methodElementsAnnotatedWith = roundEnvironment.getElementsAnnotatedWith(OnClick.class);
        //通过roundEnvironment获取到添加了BindString注解的所有元素
        Set<? extends Element> stringElementsAnnotatedWith = roundEnvironment.getElementsAnnotatedWith(BindString.class);

        //处理view 首先遍历view元素 然后封装到ElementClassify中
        for (Element viewElement : viewElementsAnnotatedWith) {
            //VariableElement可以理解为一个变量元素
            VariableElement variableElement = (VariableElement) viewElement;
            //获取到变量所在的class节点
            TypeElement classElement = (TypeElement) variableElement.getEnclosingElement();
            //先从map中取ElementClassify
            ElementClassify elementClassify = classElementMap.get(classElement);
            //List用来存放注解的对象节点
            List<VariableElement> viewElements;
            if (elementClassify != null) {
                //取出
                viewElements = elementClassify.getViewElements();
                logUtil("view list size="+viewElements.size());
                //如果list为空 新建一个 并放入ElementClassify
                if (viewElements == null) {
                    viewElements = new ArrayList<>();
                    elementClassify.setViewElements(viewElements);
                }
            } else {
                elementClassify = new ElementClassify();
                viewElements = new ArrayList<>();
                elementClassify.setViewElements(viewElements);
                if (!classElementMap.containsKey(classElement)) {
                    //将activity节点和list对应起来
                    logUtil("viewlist size ="+elementClassify.getViewElements().size());
                    classElementMap.put(classElement, elementClassify);
                }
            }
            logUtil(variableElement.getSimpleName().toString());
            //将节点放入List
            viewElements.add(variableElement);
        }

        //处理method
        for (Element methodElement : methodElementsAnnotatedWith) {
            //ExecutableElement元素对应method
            ExecutableElement executableElement = (ExecutableElement) methodElement;
            TypeElement typeElement = (TypeElement) methodElement.getEnclosingElement();
            List<ExecutableElement> methodList;
            ElementClassify elementClassify = classElementMap.get(typeElement);
            if (elementClassify != null) {
                methodList = elementClassify.getMethodElements();
                if (methodList == null) {
                    methodList = new ArrayList<>();
                    elementClassify.setMethodElements(methodList);
                }
            } else {
                elementClassify = new ElementClassify();
                methodList = new ArrayList<>();
                elementClassify.setMethodElements(methodList);
                if (!classElementMap.containsKey(typeElement)) {
                    classElementMap.put(typeElement, elementClassify);
                }
            }
            methodList.add(executableElement);
        }

        //处理string
        for (Element stringElement : stringElementsAnnotatedWith) {
            //VariableElement
            VariableElement variableElement = (VariableElement) stringElement;
            //获得所在的类
            TypeElement typeElement = (TypeElement) stringElement.getEnclosingElement();
            List<VariableElement> stringList;
            ElementClassify elementClassify = classElementMap.get(typeElement);
            if (elementClassify != null) {
                stringList = elementClassify.getStringElements();
                if (stringList == null) {
                    stringList = new ArrayList<>();
                    elementClassify.setStringElements(stringList);
                }
            } else {
                stringList = new ArrayList<>();
                elementClassify = new ElementClassify();
                elementClassify.setStringElements(stringList);
                if(!classElementMap.containsKey(typeElement)){
                    classElementMap.put(typeElement,elementClassify);
                }
            }
            stringList.add(variableElement);
        }

        return classElementMap;
    }

}
代码中都添加了注释,大家自己看一下就行,最好是可以自己动手撸一遍。我自己写时候踩了个坑,这个类要添加注解@AutoService(Processor.class),因为自动补全的功能给我写成了@AutoService(Processo.class),找了好久才发现。
butterknife module
这个module作用就是调用上一步生成的$$ViewBinder中的构造方法。
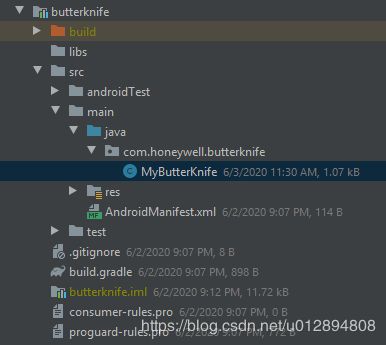
MyButterKnife就一个方法,bind方法,通过反射机制运行ViewBind中的 构造方法
import java.lang.reflect.Constructor;
import java.lang.reflect.InvocationTargetException;

public class MyButterKnife {

    /**
     * 通过反射的方式运行***$$ViewBinder
     * 达到运行findViewById方法
     * @param activity
     */
    public static void bind(Object activity){
        String name = activity.getClass().getName();
        String bindName = name+"$$ViewBinder";
        try {
            Class<?> clazz = Class.forName(bindName);
            Constructor<?> constructor = clazz.getConstructor(activity.getClass());
            constructor.newInstance(activity);
        } catch (ClassNotFoundException e) {
            e.printStackTrace();
        } catch (NoSuchMethodException e) {
            e.printStackTrace();
        } catch (IllegalAccessException e) {
            e.printStackTrace();
        } catch (InstantiationException e) {
            e.printStackTrace();
        } catch (InvocationTargetException e) {
            e.printStackTrace();
        }
    }
}
app module
app就不用贴了吧,就是一些简单的布局,再啰嗦一下依赖方法,在build.gradle的dependencies下面添加上对刚才三个模块的引用,注意注解处理器模块要用annotationProcessor project。
	implementation project(path: ':annotation')
    annotationProcessor project(path: ':annotation_processor')
    implementation project(path: ':butterknife')
总结
当所有代码写完后先build一下。如果代码没有问题会有中间文件$$ViewBinder.class文件生成。路径在build/intermediates/javac下面,举个栗子:
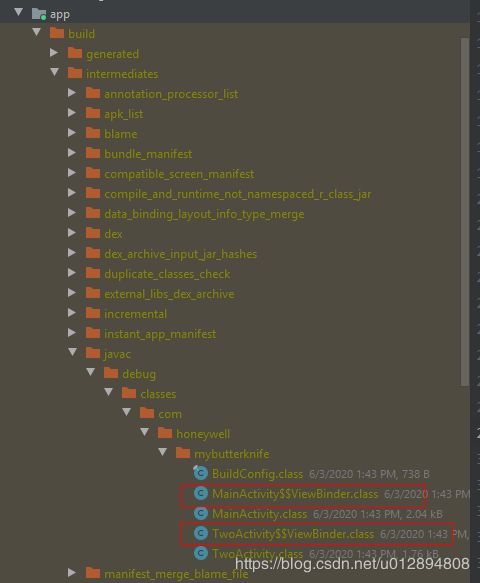
红框中就是注解处理器生成的中间文件,它们是在编译时生成的,我们看一下它的内容:
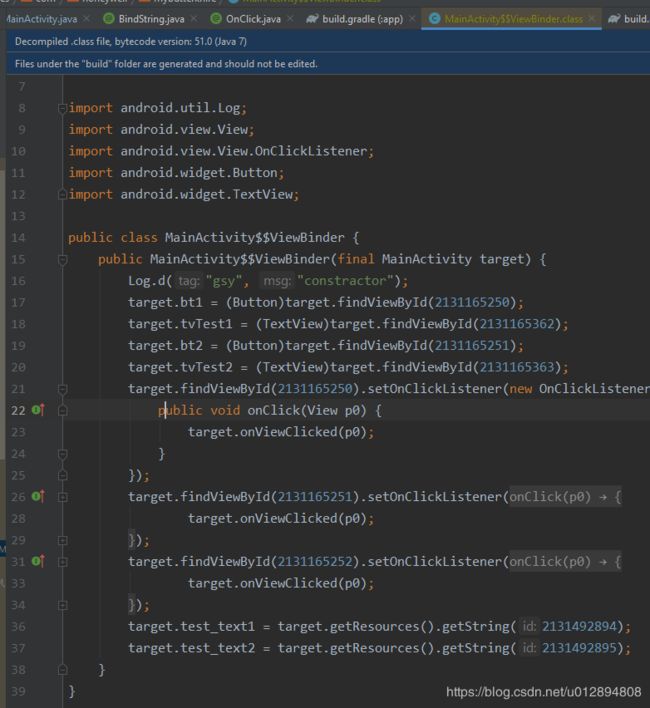
是不是恍然大悟,写了那么多就是为了生成这些findViewById、setOnClickListener代码。本文只是讲述了一下实现过程,对于注解、apt、反射等知识点没有过多讲解,小伙伴要是想学习可以网上搜一下,各种博客一大把。
最后奉上源码,github:源码路径
csdn下载:csdn下载路径
水平有限,如有错误欢迎指正讨论。

