使用stm32cubemx的usb-host-cdc库驱动EC20模块
使用stm32cubemx的usb-host-cdc库驱动EC20模块
- 开发环境:
- 实现功能:
- 开始
- 1、使用STM32CubeMX配置工程,生成基础代码
- 2、修改cubemx生成的代码
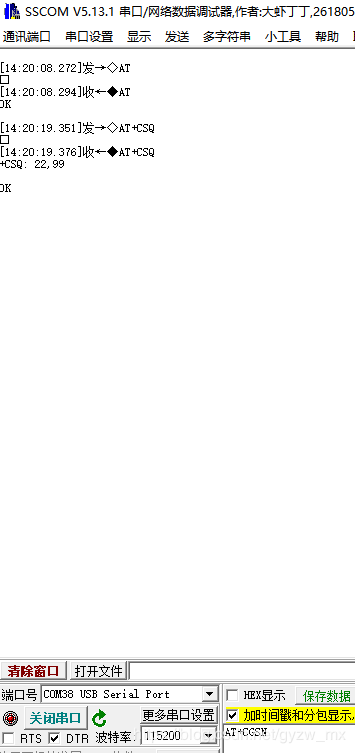
- 3、 编译下载运行,成功发送at并接收到at指令回复。
- 总结
开发环境:
- 开发板:正点原子F407探索者
- 代码生成工具:STM32CubeMX v5.4.0
- IDE: eclipse + ac6工具链
实现功能:
- 单片机可以通过usb接口和EC20的AT指令虚拟串口通讯。
- 为了方便测试,配置串口2,将 模块->单片机 方向的数据通过串口2发送到电脑,将电脑通过串口工具发送到单片机的数据,转发给模块。
开始
1、使用STM32CubeMX配置工程,生成基础代码
1.1.1 配置晶振
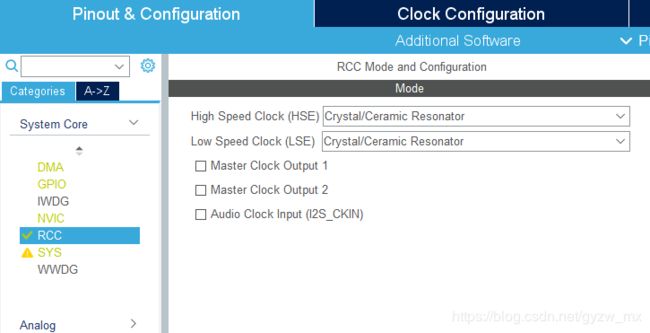
1.1.2 配置时钟

1.2.1 配置串口2
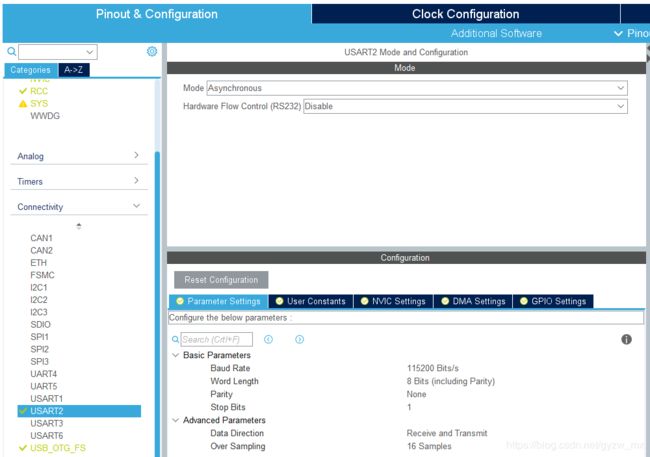
1.2.2 配置DMA

1.2.3 开串口中断

1.3.1 配置USB Host_Only,不使用VBUS SOF

1.3.2 在Middleware中选择USB_HOST
将Class for FS IP 配置为 Communication Host Class (Virtual Port Com)
因为移远EC20模块连接后,配置描述符下一共有5个 Interface , 并且 Interface 中至多有3个Endpoint(下面简称Ep)。所以 注意: USBH_MAX_NUM_ENDPOINTS 需配置 >3 , USBH_MAX_NUM_INTERFACES 需配置 >5 。
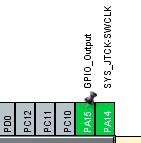
查询探索者F4开发板原理图可知USB-HOST供电引脚为 PA15 ,在右侧双击芯片引脚配置为输出模式。
1.5 在左侧GPIO中进一步将 PA15 配置为高电平输出。并对 串口2 和 usb 引脚进行配置。

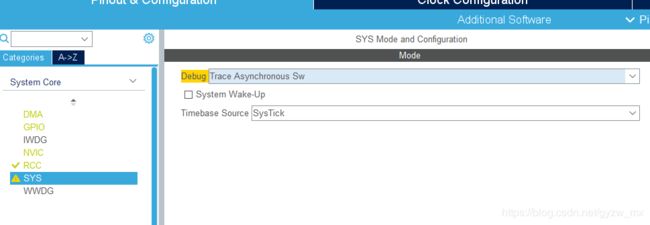
1.6 sys->debug方式,选择 Trace Asynchronous Sw 。
1.7 点击Project Manager 配置项目名称,生成代码。

如果使用MDK5 或 其他IDE可以在 Toolchain / IDE 中切换。
1.8 配置完成,点击右上角 GENERATE CODE 。
2、修改cubemx生成的代码
2.1 修改CDC_Class结构体,将 USB_CDC_CLASS 修改为 0xFF
USBH_ClassTypeDef  CDC_Class =
{
  "CDC",
  0xFF,
  USBH_CDC_InterfaceInit,
  USBH_CDC_InterfaceDeInit,
  USBH_CDC_ClassRequest,
  USBH_CDC_Process,
  USBH_CDC_SOFProcess,
  NULL,
};
2.2 修改usbh_cdc.c 中的 USBH_CDC_InterfaceInit 函数
static USBH_StatusTypeDef USBH_CDC_InterfaceInit(USBH_HandleTypeDef *phost)
{

	USBH_StatusTypeDef status = USBH_FAIL;
	uint8_t interface;
	CDC_HandleTypeDef *CDC_Handle;

	// 默认系统配置标准CDC接口
//  interface = USBH_FindInterface(phost,
//  															 USB_CDC_CLASS,
//                                 ABSTRACT_CONTROL_MODEL,
//                                 COMMON_AT_COMMAND);

	/**
	 * 注:
	 * cubemx生成的例程中,标准的CDC类设备,1个配置描述符中需要2接口
	 * 其中一个为Communication Interface Class, 该接口需要一个方向为in的Ep
	 * 另外一个为Data Interface Class, 该接口需要一个方向为in的Ep和一个方向为out的Ep
	 * 所以USBH_CDC_InterfaceInit函数,调用了两次USBH_FindInterface函数
	 * 查找两个匹配的Interface, 分别进行配置
	 *
	 * USB-TTL串口工具,debug状态下查询设备描述符结构体中,只有一个接口
	 * 但是该接口拥有3个Ep, 2个方向为in, 1个方向为out.
	 * 由此猜测,串口工具并没有将Interface分开
	 * 经测试, Communication Interface使用的Ep为2, Data Interface使用Ep0,1
	 *
	 * Ec20模块,可以读到5个Interface,但是只有Interface 1 2 3 有3个Ep,0 和 4 只有2个Ep
	 * 经测试,接口AT指令的串口Interface为 2.
	 * Interface 2中,Communication Interface使用的Ep为0
	 * Data Interface使用的Ep为1 和 2
	 */

	// USB-TTL串口工具接口配置
//	interface = USBH_FindInterface(phost,
//	USER_USB_CDC_CLASS,
//	DIRECT_LINE_CONTROL_MODEL, 02);
	// 移远4G模块接口配置
	interface = USBH_FindInterfaceIndex(phost, 2, 0);

	if (interface == 0xFFU) /* No Valid Interface */
	{
		USBH_DbgLog("Cannot Find the interface for Communication Interface Class.",
				phost->pActiveClass->Name);
	}
	else
	{
		USBH_SelectInterface(phost, interface);
		phost->pActiveClass->pData = (CDC_HandleTypeDef*) USBH_malloc(
				sizeof(CDC_HandleTypeDef));
		CDC_Handle = (CDC_HandleTypeDef*) phost->pActiveClass->pData;

		/*Collect the notification endpoint address and length*/
		if (phost->device.CfgDesc.Itf_Desc[interface].Ep_Desc[0].bEndpointAddress
				& 0x80U)
		{
			CDC_Handle->CommItf.NotifEp =
					phost->device.CfgDesc.Itf_Desc[interface].Ep_Desc[0].bEndpointAddress;
			CDC_Handle->CommItf.NotifEpSize =
					phost->device.CfgDesc.Itf_Desc[interface].Ep_Desc[0].wMaxPacketSize;
		}

		/*Allocate the length for host channel number in*/
		CDC_Handle->CommItf.NotifPipe = USBH_AllocPipe(phost,
				CDC_Handle->CommItf.NotifEp);

		/* Open pipe for Notification endpoint */
		USBH_OpenPipe(phost, CDC_Handle->CommItf.NotifPipe,
				CDC_Handle->CommItf.NotifEp, phost->device.address, phost->device.speed,
				USB_EP_TYPE_INTR, CDC_Handle->CommItf.NotifEpSize);

		USBH_LL_SetToggle(phost, CDC_Handle->CommItf.NotifPipe, 0U);

		// 默认系统配置标准CDC接口
//		interface = USBH_FindInterface(phost,
//		DATA_INTERFACE_CLASS_CODE,
//		RESERVED,
//		NO_CLASS_SPECIFIC_PROTOCOL_CODE);

		if (interface == 0xFFU) /* No Valid Interface */
		{
			USBH_DbgLog("Cannot Find the interface for Data Interface Class.",
					phost->pActiveClass->Name);
		}
		else
		{
			/*Collect the class specific endpoint address and length*/
			if (phost->device.CfgDesc.Itf_Desc[interface].Ep_Desc[2].bEndpointAddress
					& 0x80U)
			{
				CDC_Handle->DataItf.InEp =
						phost->device.CfgDesc.Itf_Desc[interface].Ep_Desc[2].bEndpointAddress;
				CDC_Handle->DataItf.InEpSize =
						phost->device.CfgDesc.Itf_Desc[interface].Ep_Desc[2].wMaxPacketSize;
			}
			else
			{
				CDC_Handle->DataItf.OutEp =
						phost->device.CfgDesc.Itf_Desc[interface].Ep_Desc[2].bEndpointAddress;
				CDC_Handle->DataItf.OutEpSize =
						phost->device.CfgDesc.Itf_Desc[interface].Ep_Desc[2].wMaxPacketSize;
			}

			if (phost->device.CfgDesc.Itf_Desc[interface].Ep_Desc[1].bEndpointAddress
					& 0x80U)
			{
				CDC_Handle->DataItf.InEp =
						phost->device.CfgDesc.Itf_Desc[interface].Ep_Desc[1].bEndpointAddress;
				CDC_Handle->DataItf.InEpSize =
						phost->device.CfgDesc.Itf_Desc[interface].Ep_Desc[1].wMaxPacketSize;
			}
			else
			{
				CDC_Handle->DataItf.OutEp =
						phost->device.CfgDesc.Itf_Desc[interface].Ep_Desc[1].bEndpointAddress;
				CDC_Handle->DataItf.OutEpSize =
						phost->device.CfgDesc.Itf_Desc[interface].Ep_Desc[1].wMaxPacketSize;
			}

			/*Allocate the length for host channel number out*/
			CDC_Handle->DataItf.OutPipe = USBH_AllocPipe(phost,
					CDC_Handle->DataItf.OutEp);

			/*Allocate the length for host channel number in*/
			CDC_Handle->DataItf.InPipe = USBH_AllocPipe(phost,
					CDC_Handle->DataItf.InEp);

			/* Open channel for OUT endpoint */
			USBH_OpenPipe(phost, CDC_Handle->DataItf.OutPipe,
					CDC_Handle->DataItf.OutEp, phost->device.address, phost->device.speed,
					USB_EP_TYPE_BULK, CDC_Handle->DataItf.OutEpSize);
			/* Open channel for IN endpoint */
			USBH_OpenPipe(phost, CDC_Handle->DataItf.InPipe, CDC_Handle->DataItf.InEp,
					phost->device.address, phost->device.speed,
					USB_EP_TYPE_BULK, CDC_Handle->DataItf.InEpSize);

			CDC_Handle->state = CDC_IDLE_STATE;

			USBH_LL_SetToggle(phost, CDC_Handle->DataItf.OutPipe, 0U);
			USBH_LL_SetToggle(phost, CDC_Handle->DataItf.InPipe, 0U);
			status = USBH_OK;
		}
	}
	return status;
}
修改原因请参见代码中的注释
2.3 修改 USBH_CDC_ClassRequest 函数
static USBH_StatusTypeDef USBH_CDC_ClassRequest(USBH_HandleTypeDef *phost)
{
	USBH_StatusTypeDef status = USBH_FAIL;
	CDC_HandleTypeDef *CDC_Handle =
			(CDC_HandleTypeDef*) phost->pActiveClass->pData;
//	/*Issue the get line coding request*/
//	status = GetLineCoding(phost, &CDC_Handle->LineCoding);
	CDC_Handle->data_rx_state = CDC_IDLE;
	CDC_Handle->data_tx_state = CDC_IDLE;
	CDC_Handle->LineCoding.b.bCharFormat = 0;
	CDC_Handle->LineCoding.b.bDataBits = 8;
	CDC_Handle->LineCoding.b.bParityType = 0;
	CDC_Handle->LineCoding.b.dwDTERate = 115200;
	status = USBH_OK;
	if (status == USBH_OK)
	{
		phost->pUser(phost, HOST_USER_CLASS_ACTIVE);
	}
	return status;
}
因为读取不到LineCoding相关参数,所以在这里进行相关参数的手动设置。
具体读不到的原因,我也不是很清楚。因为串口连接电脑之后,也是通过串口工具手动选择的波特率。所以猜测这里也是同样的道理,需要自己手动设置。希望各位指正。
2.4 在 usb_host.c 中添加接收代码。
在 MX_USB_HOST_Process 函数中添加接收代码。
// RecData.buf 为数据缓存区首地址
// UART_BUF_LEN 为数据缓存区长度
// 可以根据自己的需要自定义
void MX_USB_HOST_Process(void)
{
	CDC_HandleTypeDef *CDC_Handle = hUsbHostFS.pActiveClass->pData;
  /* USB Host Background task */
  USBH_Process(&hUsbHostFS);
  if (hUsbHostFS.gState == HOST_CLASS)
  {
  	if (CDC_Handle->data_rx_state == CDC_IDLE)
  	{
  		USBH_CDC_Receive(&hUsbHostFS, RecData.buf, UART_BUF_LEN);
  	}
  }
}
2.5 在 main.c 或者其他需要的位置,添加 USBH_CDC_ReceiveCallback 函数。(原函数为弱函数,用户添加后会将原函数覆盖)
// 这里我设置了一个read_flag表示数据未读,别处代码有用到
// uart_send是我封装的一个串口发送函数,将数据通过串口2转发电脑
void USBH_CDC_ReceiveCallback(USBH_HandleTypeDef *phost)
{
	RecData.len_rec = USBH_CDC_GetLastReceivedDataSize(phost);
	RecData.read_flag = 0;
	uart_send(&uart2, Recbuff.buf, len);
}
2.6 在 main() while(1) 中等待接收串口2发过来的数据,长度不为0就调用usb发送函数,将数据发送出去。
while (1)
	{
		/* USER CODE END WHILE */
		MX_USB_HOST_Process();

		/* USER CODE BEGIN 3 */
		switch (Appli_state)
		{
		case APPLICATION_READY:

			len_rec = uart_receive(&uart2, main_buf, 1);

			if (len_rec != 0)
			{
				USBH_CDC_Transmit(&hUsbHostFS, main_buf, len_rec);
			}
			break;
		case APPLICATION_DISCONNECT:
			ec20.init_flag = 0;
			break;
		default:

			break;
		}
3、 编译下载运行,成功发送at并接收到at指令回复。
总结
整个USB-HOST配置过程,难点在于对 usbh_cdc.c 文件的修改。网上做stm32
usb-host-cdc的资料很少。我是先配置连接usb串口工具成功以后,对usb通讯的配置描述符、接口描述符、端点描述符有了一定的了解。之后才进行的 ec20 模块配置。希望可以对跟我一样的新手有所帮助。
因为 EC20 模块 at指令 配置部分还没写完,就先不放工程上来了。

