Android绘图机制与处理技巧(二)——Android图像处理之色彩特效处理
Android对于图片处理,最常使用到的数据结构是位图——Bitmap,它包含了一张图片所有的数据。整个图片都是由点阵和颜色值组成的,所谓点阵就是一个包含像素的矩阵,每一个元素对应着图片的一个像素。而颜色值——ARGB,分别对应透明图、红、绿、蓝这四个通道分量,它们共同决定了每个像素点显示的颜色。
色彩矩阵分析
在色彩处理中,通常使用以下三个角度来描述一个图像。
- 色调——物体传播的颜色
- 饱和度——颜色的纯度,从0(灰)到100%(饱和)来进行描述
- 亮度——颜色的相对明暗程度
而在Android中,系统使用一个颜色矩阵——ColorMatrix,来处理图像的这些色彩效果。Android中颜色矩阵是一个4x5的数字矩阵,它用来对图片的色彩进行处理。而对于每个像素点,都有一个颜色分量矩阵用来保存颜色的RGBA值,如下图所示:
图中矩阵A就是一个4x5的颜色矩阵。在Android中,它会以一维数组的形式来存储[a,b,c,d,e,f,g,h,i,j,k,l,m,n,o,p,q,r,s,t],而C则是一个颜色分量矩阵。在处理图像时,使用矩阵乘法运算AC来处理颜色分量矩阵,如下图所示:
其中计算过程如下:
R1 = axR + bxG + cxB + dxA + e;
G1 = fxR + gxG + hxB + ixA + j;
B1 = kxR + lxG + mxB + nxA + o;
A1 = pxR + qxG + rxB + sxA + t;
从这个公式可以发现,对于颜色矩阵A是按以下方式划分的。
- 第一行的abcde值决定新的颜色值中的R——红色
- 第二行的fghij值决定新的颜色值中的G——绿色
- 第一行的klmno值决定新的颜色值中的B——蓝色
- 第一行的pqrst值决定新的颜色值中的A——透明度
- 矩阵A中的第五列——ejot值分别用来决定每个分量中的offset,即偏移量
现在我们重新看一下矩阵变换的计算公式,以R分量为例。如果令a=1,b、c、d、e都等于0,那么计算结果为R1=R。因此,可以构造出一个矩阵,如下图所示:
如果把这个矩阵带入公式D=AC,那么根据矩阵乘法运算法则,可以得到R1=R。因此这个矩阵通常被用来作为初始的颜色矩阵来使用,它不会对原有颜色值进行任何变化。
当要变换颜色值的时候,通常有两种方法。一种是直接改变颜色的offset,即偏移量的值来修改颜色分量,另一种方法是直接改变对应RGBA值的系数来调整颜色分量的值。
改变偏移量
要修改R1的值,只要将第五列的值进行修改即可。即改变颜色的偏移量,其他值保持初始矩阵的值,如下图所示:
在上面这个矩阵中,修改了R、G所对应的颜色偏移量,那么最后的处理结果就是图像的红色、绿色分量增加了100。而红色混合绿色会得到黄色,所以最终的颜色处理结果就是让整个图像的色调偏黄色。
改变颜色系数
如果修改颜色分量中的某个系数值,而其他值依然保持初始矩阵的值,如下图所示:
在上面这个矩阵中,改变了G分量所对应的系数g,这样在矩阵运算后G分量会变为以前的两倍,最终结果就是图像的色调更加偏绿。
改变色光属性
图像的色调、饱和度、亮度这三个属性在图像处理中的使用非常之多。在Android中,系统封装了一个类——ColorMatrix,也就是颜色矩阵。通过这个类,可以很方便地通过改变矩阵值来处理颜色效果。创建一个ColorMatrix对象非常简单,代码如下:
ColorMatrix colorMatrix = new ColorMatrix();下面处理不同的色光属性。
- 色调
Android提供了setRotate(int axis, float degrees)来设置颜色的色调。第一个参数,系统分别使用0、1、2来代表Red、Green、Blue三种颜色的处理;而第二个参数,就是需要处理的值,代码如下:
        ColorMatrix hueMatrix = new ColorMatrix();
        hueMatrix.setRotate(0, hue1);
        hueMatrix.setRotate(1, hue2);
        hueMatrix.setRotate(2, hue3);
通过这样的方法,可以为RGB三种颜色分量分别重新设置了不同的色调值。
- 饱和度
Android系统提供了setSaturation(float sat)方法来设置颜色的饱和度值,代码如下:
        //设置颜色的饱和度
        ColorMatrix saturationMatrix = new ColorMatrix();
        //saturation参数即代表设置颜色的饱和度的值,当饱和度为0时,图像就变成灰度图像了
saturationMatrix.setSaturation(saturation);- 亮度
Android系统提供了setScale(float rScale, float gScale, float bScale, float aScale)方法来设置颜色的亮度值。当三原色以相同的比例进行混合时,就会显示出白色。系统也正是根据这个原理来改变一个图像的亮度的。当亮度为0时,图像就变为全黑了,代码如下所示:
        //设置颜色的亮度
        ColorMatrix lumMatrix = new ColorMatrix();
        lumMatrix.setScale(lum, lum, lum, 1);
除了单独使用上面三种方式进行颜色效果的处理之外,Android系统还封装了矩阵的乘法运算。它提供了postConcat(ColorMatrix postmatrix)方法来将矩阵的作用效果混合,从而叠加处理效果,代码如下所示:
        //将矩阵的作用效果混合,从而叠加处理效果
        ColorMatrix imageMatrix = new ColorMatrix();
        imageMatrix.postConcat(hueMatrix);
        imageMatrix.postConcat(saturationMatrix);
        imageMatrix.postConcat(lumMatrix);
在下面的例子中,通过滑动三个SeekBar来改变不同色光属性的数值,并将这些数值作用到对应的矩阵中。最后通过postConcat()方法来显示混合的处理效果。
滑动SeekBar获取输入值的代码如下所示:
package com.huangfei.example;

import android.app.Activity;
import android.graphics.Bitmap;
import android.graphics.BitmapFactory;
import android.os.Bundle;
import android.widget.ImageView;
import android.widget.SeekBar;

/**
 * 通过滑动三个SeekBar来改变不同色光属性的数值,并将这些数值作用到对应的矩阵中
 */
public class PrimaryColorActivity extends Activity implements SeekBar.OnSeekBarChangeListener {

    private static final int MAX_VALUE = 255;
    private static final int MID_VALUE = 127;

    private ImageView mImageView;
    private float mHue, mSaturation, mLum;
    private Bitmap mBitmap;

    @Override
    protected void onCreate(Bundle savedInstanceState) {
        super.onCreate(savedInstanceState);
        setContentView(R.layout.activity_primary_color);
        mBitmap = BitmapFactory.decodeResource(getResources(), R.mipmap.test3);

        mImageView = (ImageView) findViewById(R.id.imageview);
        SeekBar seekBarHue = (SeekBar) findViewById(R.id.seekbarHue);
        SeekBar seekBarSaturation = (SeekBar) findViewById(R.id.seekbarSaturation);
        SeekBar seekBarLum = (SeekBar) findViewById(R.id.seekbarLum);

        seekBarHue.setOnSeekBarChangeListener(this);
        seekBarSaturation.setOnSeekBarChangeListener(this);
        seekBarLum.setOnSeekBarChangeListener(this);

        //设置最大值
        seekBarHue.setMax(MAX_VALUE);
        seekBarSaturation.setMax(MAX_VALUE);
        seekBarLum.setMax(MAX_VALUE);

        //设置进度
        seekBarHue.setProgress(MID_VALUE);
        seekBarSaturation.setProgress(MID_VALUE);
        seekBarLum.setProgress(MID_VALUE);

        mImageView.setImageBitmap(mBitmap);
    }


    @Override
    public void onProgressChanged(SeekBar seekBar, int progress, boolean fromUser) {
        switch (seekBar.getId()) {
            case R.id.seekbarHue://色调
                mHue = (progress - MID_VALUE) * 1.0f / MID_VALUE * 180;
                break;
            case R.id.seekbarSaturation://饱和度
                mSaturation = progress * 1.0f / MID_VALUE;
                break;
            case R.id.seekbarLum://亮度
                mLum = progress * 1.0f / MID_VALUE;
                break;
        }
        mImageView.setImageBitmap(ImageHelper.handleImageEffect(mBitmap, mHue, mSaturation, mLum));
    }

    @Override
    public void onStartTrackingTouch(SeekBar seekBar) {

    }

    @Override
    public void onStopTrackingTouch(SeekBar seekBar) {

    }
}
设置图像矩阵的代码如下:
    /**
     *改变图像色光属性
     * @param bm
     * @param hue 色调
     * @param saturation 饱和度
     * @param lum 亮度
     * @return
     */
    public static Bitmap handleImageEffect(Bitmap bm, float hue, float saturation, float lum) {
        //设置颜色的色调
        ColorMatrix hueMatrix = new ColorMatrix();
        //第一个参数,系统分别使用0、1、2来代表Red、Green、Blue三种颜色的处理;而第二个参数,就是需要处理的值
        hueMatrix.setRotate(0, hue);
        hueMatrix.setRotate(1, hue);
        hueMatrix.setRotate(2, hue);

        //设置颜色的饱和度
        ColorMatrix saturationMatrix = new ColorMatrix();
        //saturation参数即代表设置颜色的饱和度的值,当饱和度为0时,图像就变成灰度图像了
        saturationMatrix.setSaturation(saturation);

        //设置颜色的亮度
        ColorMatrix lumMatrix = new ColorMatrix();
        lumMatrix.setScale(lum, lum, lum, 1);

        //将矩阵的作用效果混合,从而叠加处理效果
        ColorMatrix imageMatrix = new ColorMatrix();
        imageMatrix.postConcat(hueMatrix);
        imageMatrix.postConcat(saturationMatrix);
        imageMatrix.postConcat(lumMatrix);

        /**
         * 设置好处理的颜色矩阵后,通过使用Paint类的setColorFilter()方法,将通过imageMatrix构造的
         * ColorMatrixColorFilter对象传递进去,并使用这个画笔来绘制原来的图像,从而将颜色矩阵作用到原图中
         */
        Paint paint = new Paint();
        paint.setColorFilter(new ColorMatrixColorFilter(imageMatrix));
        /**
         * Android系统也不允许直接修改原图,类似Photoshop中的锁定,必须通过原图创建一个同样大小的Bitmap,并将
         * 原图绘制到该Bitmap中,以一个副本的形式来修改图像。
         */
        Bitmap bitmap = Bitmap.createBitmap(bm.getWidth(), bm.getHeight(), Bitmap.Config.ARGB_8888);
        Canvas canvas = new Canvas(bitmap);
        canvas.drawBitmap(bm, 0, 0 ,paint);
        return bitmap;
    }
效果图如下:
Android颜色矩阵——ColorMatrix
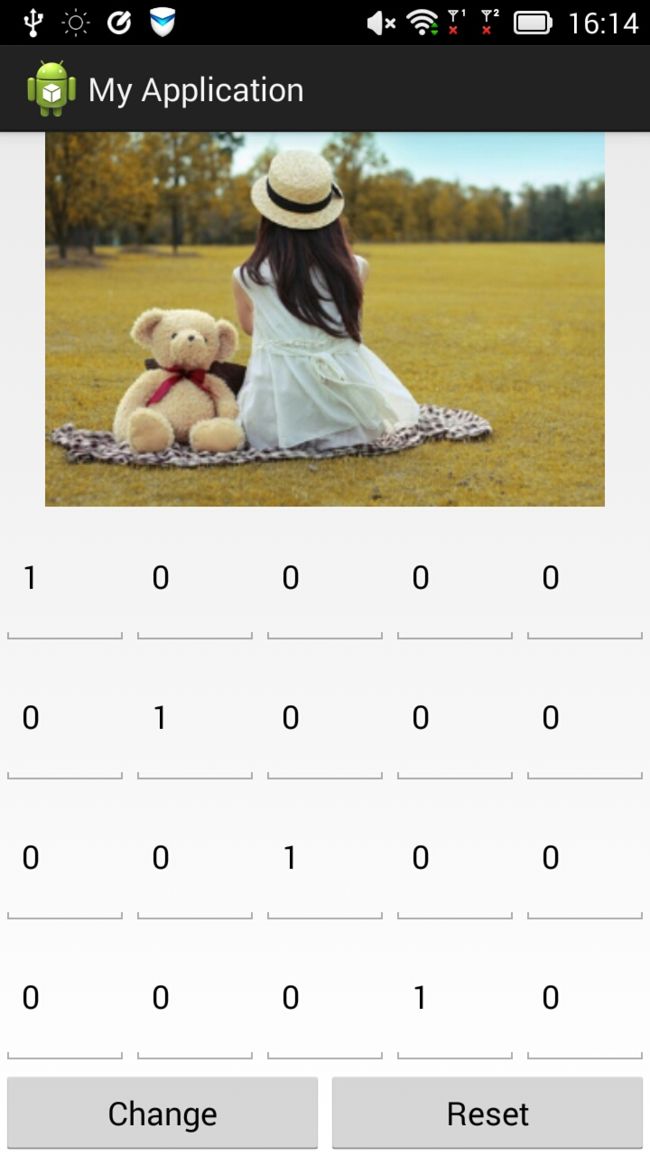
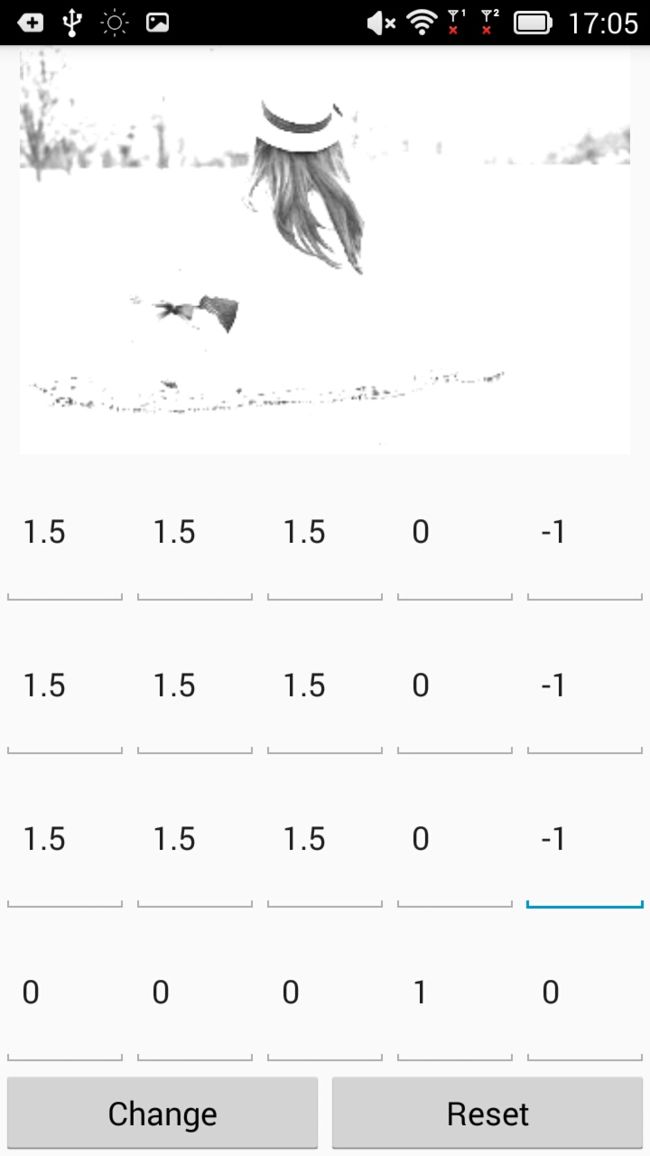
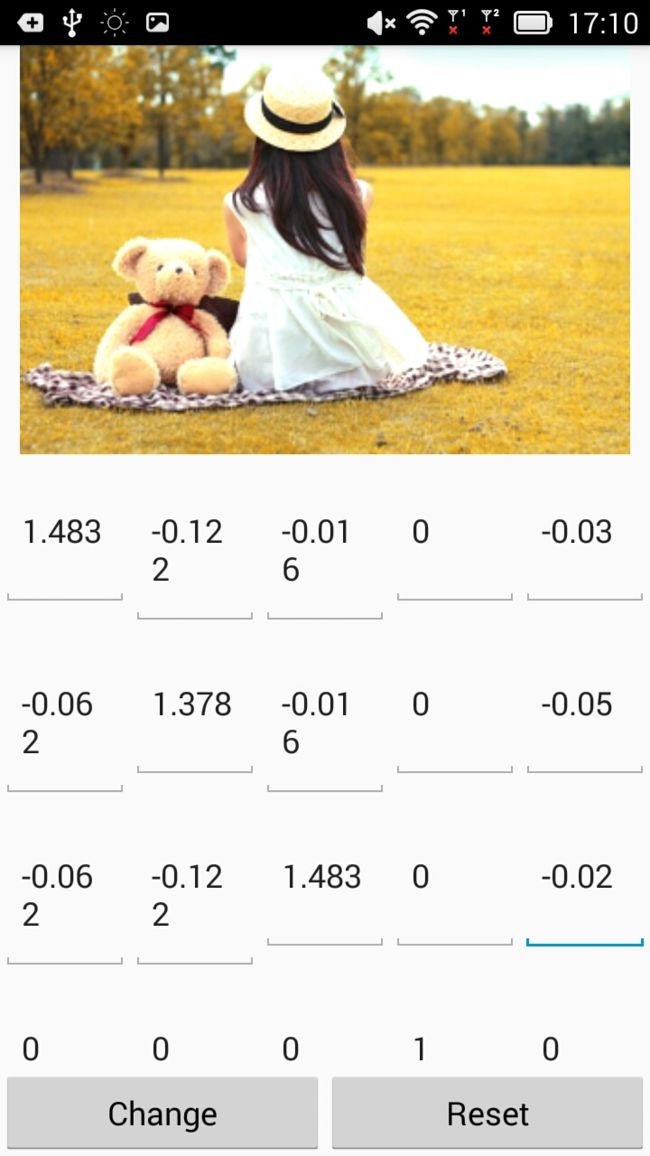
通过调整颜色矩阵可以改变一副图像的色彩效果,图像处理很大程度上就是在寻找处理图像的颜色矩阵。不仅仅可以通过Android系统提供的API来进行ColorMatrix的修改,同样可以精确地修改矩阵的值来实现颜色效果的改变。下面模拟一个4x5的颜色矩阵,通过修改矩阵中的值,来观察图片的效果,程序运行后的效果如下图:
通过GridLayout来进行布局,动态添加20个EditText来创建4x5的矩阵,GridLayout布局代码如下:
    <GridLayout
        android:id="@+id/group"
        android:layout_width="match_parent"
        android:layout_height="0dp"
        android:layout_weight="3"
        android:columnCount="5"
        android:rowCount="4" />
动态创建EditText,添加到GridLayout并初始化矩阵的代码如下所示:
package com.huangfei.example;

import android.app.Activity;
import android.graphics.Bitmap;
import android.graphics.BitmapFactory;
import android.graphics.Canvas;
import android.graphics.ColorMatrix;
import android.graphics.ColorMatrixColorFilter;
import android.graphics.Paint;
import android.os.Bundle;
import android.view.View;
import android.widget.EditText;
import android.widget.GridLayout;
import android.widget.ImageView;

/**
 * Created by Administrator on 2016/5/26.
 * 模拟一个4x5的颜色矩阵
 */
public class ColorMatrixActivity extends Activity {
    private ImageView mImageView;
    private GridLayout mGroup;
    private Bitmap bitmap;
    private int mEtWidth, mEtHeight;
    private EditText[] mEts = new EditText[20];
    private float[] mColorMatrix = new float[20];

    @Override
    protected void onCreate(Bundle savedInstanceState) {
        super.onCreate(savedInstanceState);
        setContentView(R.layout.activity_color_matrix);
        bitmap = BitmapFactory.decodeResource(getResources(), R.mipmap.test1);
        mImageView = (ImageView) findViewById(R.id.imageview);
        mGroup = (GridLayout) findViewById(R.id.group);
        mImageView.setImageBitmap(bitmap);

        mGroup.post(new Runnable() {
            @Override
            public void run() {
                // 获取宽高信息
                mEtWidth = mGroup.getWidth() / 5;
                mEtHeight = mGroup.getHeight() / 4;
                addEts();
                initMatrix();
            }
        });
    }

    // 初始化颜色矩阵为初始状态
    private void initMatrix() {
        for (int i = 0; i < 20; i++) {
            if (i % 6 == 0)
                mEts[i].setText(String.valueOf(1));
            else
                mEts[i].setText(String.valueOf(0));
        }
    }

    // 添加EditText
    private void addEts() {
        for (int i = 0; i < 20; i++) {
            mEts[i] = new EditText(this);
            mGroup.addView(mEts[i], mEtWidth, mEtHeight);
        }
    }

    // 获取矩阵值
    private void getMatrix() {
        for (int i = 0; i < 20; i++) {
            mColorMatrix[i] = Float.valueOf(mEts[i].getText().toString());
        }
    }

    // 将矩阵值设置到图像
    private void setImageMatrix() {
        Bitmap bmp = Bitmap.createBitmap(bitmap.getWidth(), bitmap.getHeight(), Bitmap.Config.ARGB_8888);
        ColorMatrix colorMatrix = new ColorMatrix();
        colorMatrix.set(mColorMatrix);
        Canvas canvas = new Canvas(bmp);
        Paint paint = new Paint();
        paint.setColorFilter(new ColorMatrixColorFilter(colorMatrix));
        canvas.drawBitmap(bitmap, 0, 0, paint);
        mImageView.setImageBitmap(bmp);
    }

    // 作用矩阵效果
    public void btnChange(View view) {
        getMatrix();
        setImageMatrix();
    }

    // 重置矩阵效果
    public void btnReset(View view) {
        initMatrix();
        getMatrix();
        setImageMatrix();
    }
}
常用图像颜色矩阵处理效果
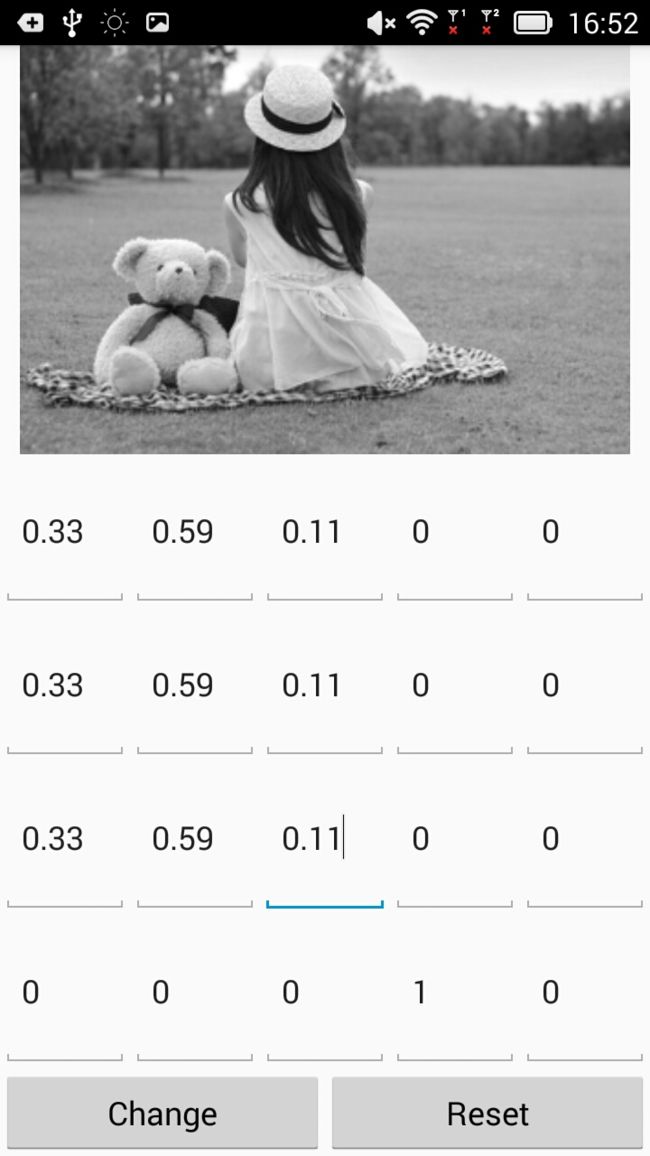
灰度效果
颜色矩阵如下所示:
处理效果如下所示:
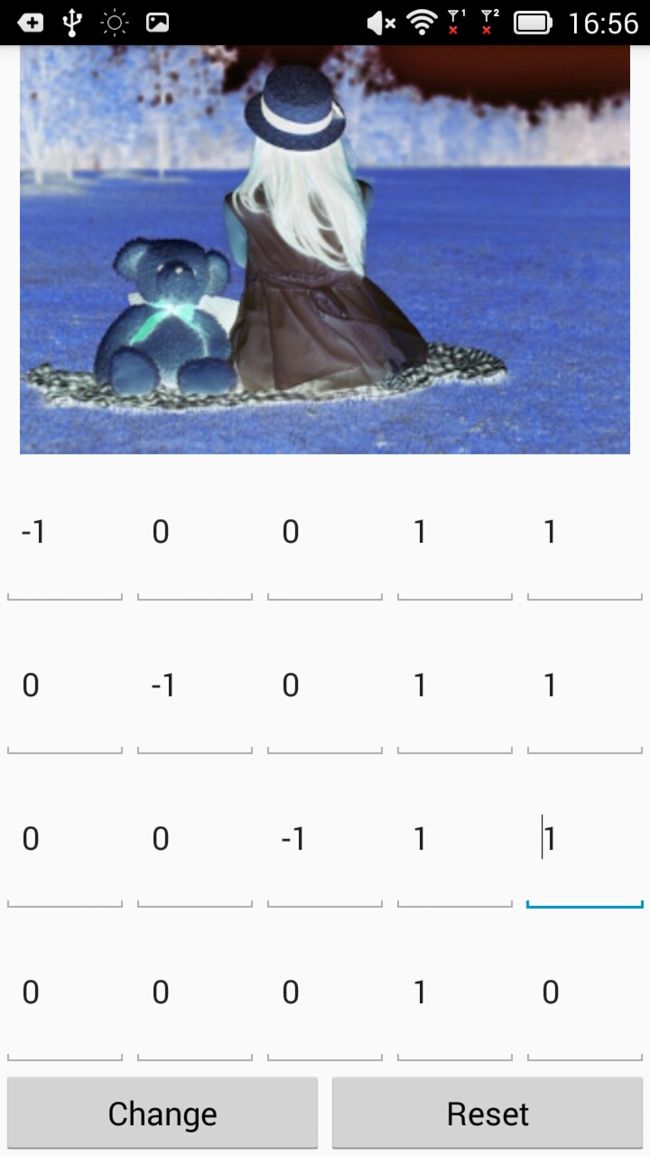
图像反转
颜色矩阵如下所示:
处理效果如下所示:
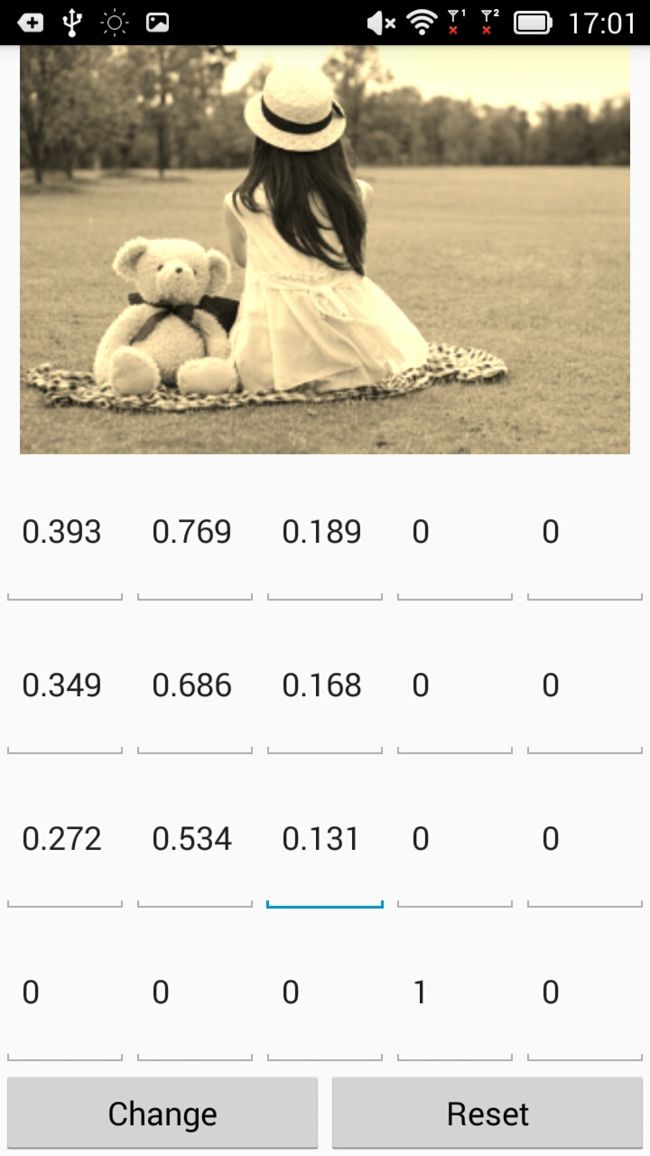
怀旧效果
颜色矩阵如下所示:
处理效果如下所示:
去色效果
颜色矩阵如下所示:
处理效果如下所示:
高饱和度
颜色矩阵如下所示:
处理效果如下所示:
像素点分析
可以通过改变每个像素点的具体ARGB值,来达到处理一张图像效果的目的。但要注意的是,传递进来的原始图片是不能修改的,一般根据原始图片生成一张新的图片来修改。
在Android中,系统提供了Bitmap.getPixels()方法来帮我们提取整个Bitmap中的像素点,并保存到一个数组中,该方法如下所示:
getPixels(int[] pixels, int offset, int stride, int x, int y, int width, int height)参数含义如下:
- pixels——接收位图颜色值的数组
- offset——写入到pixels[]中的第一个像素索引值
- stride——用来表示pixels[]数组中每行的像素个数,用于行与行之间区分,绝对值必须大于参数width,但不必大于所要读取图片的宽度w(在width < w 时成立).(stride负数有何作用不知,存疑).另,pixels.length >= stride * height,否则会抛出ArrayIndexOutOfBoundsException异常。 stride > width时,可以在pixels[]数组中添加每行的附加信息,可做它用.
- x——从位图中读取的第一个像素的x坐标值
- y——从位图中读取的第一个像素的y坐标值
- width——从每一行中读取的像素宽度
- height——读取的行数
通常情况下,可以使用如下代码:
        int width = bm.getWidth();
        int height = bm.getHeight();
        int[] oldPx = new int[width * height];
        bm.getPixels(oldPx, 0, width, 0, 0, width, height);
接下来,就可以获取到每个像素具体的ARGB值了,代码如下所示:
            color = oldPx[i];
            r = Color.red(color);
            g = Color.green(color);
            b = Color.blue(color);
            a = Color.alpha(color);
当获取到具体的颜色值之后,就可以通过相应的算法来修改它的ARGB值,从而来重构一张新的图像,例如进行如下处理:
            r1 = (int) (0.393 * r + 0.769 * g + 0.189 * b);
            g1 = (int) (0.349 * r + 0.686 * g + 0.168 * b);
            b1 = (int) (0.272 * r + 0.534 * g + 0.131 * b);
再通过如下所示代码将新的RGBA值合成像素点:
newPx[i] = Color.argb(a, r1, g1, b1);最后将处理之后的像素点数组重新set给Bitmap。从而达到图像处理的目的:
bmp.setPixels(newPx, 0, width, 0, 0, width, height);常用图像像素点处理效果
底片效果
若存在ABC3个像素点,要求B点对应的底片效果算法,代码如下:
B.r = 255 - B.r;
B.g = 255 - B.g;
B.b = 255 - B.b;
实现代码如下:
    //底片效果
    public static Bitmap handleImageNegative(Bitmap bitmap) {
        int width = bitmap.getWidth();
        int height = bitmap.getHeight();
        int color;
        int r, g, b, a;

        Bitmap btm = Bitmap.createBitmap(width, height, Bitmap.Config.ARGB_8888);

        int[] oldPx = new int[width * height];
        int[] newPx = new int[width * height];
        bitmap.getPixels(oldPx, 0, width, 0, 0, width, height);

        for (int i = 0; i < width * height; i++) {
            color = oldPx[i];
            r = Color.red(color);
            g = Color.green(color);
            b = Color.blue(color);
            a = Color.alpha(color);

            r = 255 - r;
            g = 255 - g;
            b = 255 - b;

            if (r > 255)
                r = 255;
            else if (r < 0)
                r = 0;
            if (g > 255)
                g = 255;
            else if (g < 0)
                g = 0;
            if (b > 255)
                b = 255;
            else if (b < 0)
                b = 0;
            newPx[i] = Color.argb(a, r, g, b);
        }
        btm.setPixels(newPx, 0, width, 0, 0, width, height);
        return btm;
    }
老照片效果
求某像素点的老照片效果算法,代码如下:
for (int i = 0; i < width * height; i++) {
            color = oldPx[i];
            a = Color.alpha(color);
            r = Color.red(color);
            g = Color.green(color);
            b = Color.blue(color);

            r1 = (int) (0.393 * r + 0.769 * g + 0.189 * b);
            g1 = (int) (0.349 * r + 0.686 * g + 0.168 * b);
            b1 = (int) (0.272 * r + 0.534 * g + 0.131 * b);

            if (r1 > 255) {
                r1 = 255;
            }
            if (g1 > 255) {
                g1 = 255;
            }
            if (b1 > 255) {
                b1 = 255;
            }

            newPx[i] = Color.argb(a, r1, g1, b1);
        }
浮雕效果
求某像素点的浮雕效果算法,代码如下:
        for (int i = 1; i < width * height; i++) {
            colorBefore = oldPx[i - 1];
            a = Color.alpha(colorBefore);
            r = Color.red(colorBefore);
            g = Color.green(colorBefore);
            b = Color.blue(colorBefore);

            color = oldPx[i];
            r1 = Color.red(color);
            g1 = Color.green(color);
            b1 = Color.blue(color);

            r = r - r1 + 127;
            g = g - g1 + 127;
            b = b - b1 + 127;
            if (r > 255) {
                r = 255;
            }
            if (g > 255) {
                g = 255;
            }
            if (b > 255) {
                b = 255;
            }
            newPx[i] = Color.argb(a, r, g, b);
        }
效果如下所示:
代码地址

