Android Tint的使用及源码分析
-
-
- 背景
- 使用Tint实现
- 背景着色
- 使用selector进行着色
- 着色原理
- 如何兼容低版本
- 参考链接
-
背景
在菜单栏改版开发中,发现需要引入大量图片,其中像设置开关部分差异仅在颜色,但是需要两张图片。这样包体随着图片的添加也会变大。有没有更好的办法呢?
使用Tint实现
Android在5.0的时候推出Tint可以很方便的将一张图片”着色”为任何颜色。这样我们只需要放一张图片即可。
- 使用 android:tint 以及 android:tintMode 属性设置您的布局中的着色颜色和模式。
    <ImageView
            android:id="@+id/img_tint_1"
            android:layout_width="50dp"
            android:layout_height="50dp"
            android:background="@android:color/darker_gray"
            android:scaleType="center"
            android:src="@drawable/icon_test_tint"/>

        <ImageView
            android:id="@+id/img_tint_2"
            android:layout_width="50dp"
            android:layout_height="50dp"
            android:background="@android:color/darker_gray"
            android:scaleType="center"
            android:src="@drawable/icon_test_tint"
            android:tint="@color/blue"/>
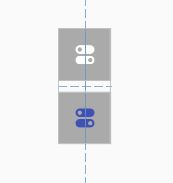
两个imageView是一样的,为了好展现结果,都添加了一个灰色背景。第二个添加了 android:tint属性,结果如下:

我们发现,我们的白色图标被“着色”为我们自己设置的蓝色。是不是很方便呢?
- 使用 setTint() 方法为 BitmapDrawable 或 NinePatchDrawable 对象着色。
使用代码方式也比较简单
    ImageView imageView = (ImageView) findViewById(R.id.img_tint_2);
        Drawable drawable = getResources().getDrawable(R.drawable.icon_test_tint);
        drawable.setTint(getResources().getColor(R.color.colorPrimary));
        imageView.setImageDrawable(drawable);
背景着色
其实除了android:tint之外还有android:backgroundTint熟悉,可以将背景进行“着色”
    <ImageView
            android:id="@+id/img_tint_1"
            android:layout_width="50dp"
            android:layout_height="50dp"
            android:background="@android:color/darker_gray"
            android:scaleType="center"
            android:src="@drawable/icon_test_tint"/>

        <ImageView
            android:id="@+id/img_tint_2"
            android:layout_width="50dp"
            android:layout_height="50dp"
            android:background="@android:color/darker_gray"
            android:backgroundTint="@color/blue"
            android:scaleType="center"
android:src="@drawable/icon_test_tint"/>我们在第二个imageView上添加了android:backgroundTint="@color/blue"属性,我们看下效果:

背景颜色按照我们设置的颜色被“着色”了。代码实现也类似。
使用selector进行着色
android:tint=”“属性不仅可以是颜色值,还可以是一个selector 文件引用,在res目录下新建一个color目录,其中新建一个selector文件,引用该资源即可。
<selector xmlns:android="http://schemas.android.com/apk/res/android">
    <item android:state_selected="true" android:color="@color/blue" />
    <item android:state_pressed="true" android:color="@color/blue" />
    <item android:color="@android:color/white"/>
selector>
这样我们就能根据状态进行相应的着色。
着色原理
既然Tint这么神奇,那我们看看是怎么实现的呢?我们看源码
// BitmapDrawable.java

private PorterDuffColorFilter mTintFilter;

@Override
// 设置tint,参数ColorStateList可以由color值或者selector xml构建
    public void setTintList(ColorStateList tint) {
        final BitmapState state = mBitmapState;
        if (state.mTint != tint) {
            state.mTint = tint;
            // 生成PorterDuffColorFilter
            mTintFilter = updateTintFilter(mTintFilter, tint, mBitmapState.mTintMode);
            // 调用draw刷新view
            invalidateSelf();
        }
    }

    @Override
    public void draw(Canvas canvas) {
        ...
     final boolean clearColorFilter;
        // 将生成的mTintFilter设置到paint上
        if (mTintFilter != null && paint.getColorFilter() == null) {
            paint.setColorFilter(mTintFilter);
            clearColorFilter = true;
        } else {
            clearColorFilter = false;
        }
        updateDstRectAndInsetsIfDirty();
        final Shader shader = paint.getShader();
        final boolean needMirroring = needMirroring();
        if (shader == null) {
            if (needMirroring) {
                canvas.save();
                // Mirror the bitmap
                canvas.translate(mDstRect.right - mDstRect.left, 0);
                canvas.scale(-1.0f, 1.0f);
            }

            canvas.drawBitmap(bitmap, null, mDstRect, paint);

            if (needMirroring) {
                canvas.restore();
            }
        } else {
            updateShaderMatrix(bitmap, paint, shader, needMirroring);
            canvas.drawRect(mDstRect, paint);
        }
    if (clearColorFilter) {
            paint.setColorFilter(null);
        }
        ...
    }
// Drawable.java
/**
* Ensures the tint filter is consistent with the current tint color and
* mode.
*/
@Nullable PorterDuffColorFilter updateTintFilter(@Nullable PorterDuffColorFilter tintFilter,
@Nullable ColorStateList tint, @Nullable PorterDuff.Mode tintMode) {
if (tint == null || tintMode == null) {
return null;
}
// 根据view状态取出当前设置color
final int color = tint.getColorForState(getState(), Color.TRANSPARENT);
if (tintFilter == null) {
// 根据color与tintMode生成PorterDuffColorFilter
return new PorterDuffColorFilter(color, tintMode);
}
tintFilter.setColor(color);
tintFilter.setMode(tintMode);
return tintFilter;
}我们通过以上代码可以知道,“着色”的实现其实就是在绘制时给画笔paint设置了一个ColorFilter,在drawable绘制时根据ColorFilter产生不同的渲染结果。对 PorterDuff不熟悉的同学可以看看我上次分享的文章:
Android PorterDuffXfermode使用中的一些坑
如何兼容低版本
因为tint 是Android 5.0(API 21)添加的,所以必须在minSdkVersion>=21以上才能使用,为了兼容低版本有以下两种方式:
- android提供了DrawableCompat,使用DrawableCompat包装drawable
/**
     * drawable 着色器,兼容低版本
     *
     * @param drawable drawable图片,避免引用同一资源需调用drawable.mutate()
     * @param colors 着色颜色,可使用selector xml 文件
     * @return
     */
    public static Drawable tintDrawable(Drawable drawable, ColorStateList colors) {
        final Drawable wrappedDrawable = DrawableCompat.wrap(drawable);
        DrawableCompat.setTintList(wrappedDrawable, colors);
        return wrappedDrawable;
}- 我们已经知道了tint的实现原理,所以我们可以使用setColorFilter代替tint实现同样的效果
ImageView image = ...

image.setColorFilter(color, PorterDuff.Mode.SRC_ATOP);
参考链接
- HOW TO TINT A DRAWABLE
- Drawable mutations
- Tinting drawables