int main(int argc, char * argv[]) {
    @autoreleasepool {
        return UIApplicationMain(argc, argv, nil, NSStringFromClass([AppDelegate class]));
    }
}
当我们用Xcode创建一个工程时,就会自动为我们生成这样一个main函数,我们通常把它认为是程序的入口函数,但事实真的如此吗?
我们在其他一个类中写一个load方法,然后打上断点,在main函数上也打上断点,运行程序,你会发现,先运行到了load方法,然后才是main函数。
事实上,在我们运行程序,再到main方法被调用之间,程序已经做了许许多多的事情,比如我们熟知的runtime的初始化就发生在main函数调用前,还有程序动态库的加载链接也发生在这阶段,本文主要对从程序启动到main函数中发生的主要事情进行简单介绍。
其实简单总结起来就是:
系统先读取App的可执行文件(Mach-O文件),从里面获得dyld的路径,然后加载dyld,dyld去初始化运行环境,开启缓存策略,加载程序相关依赖库(其中也包含我们的可执行文件),并对这些库进行链接,最后调用每个依赖库的初始化方法,在这一步,runtime被初始化。当所有依赖库的初始化后,轮到最后一位(程序可执行文件)进行初始化,在这时runtime会对项目中所有类进行类结构初始化,然后调用所有的load方法。最后dyld返回main函数地址,main函数被调用,我们便来到了熟悉的程序入口。
下面我们将结合代码对整个过程进行分析:
dyld加载
在上一片文章认识MachO中,我们已经大概知道MachO是什么,以及其结构。
系统加载程序MachO文件后,通过分析文件来获得dyld所在路径来加载dyld,然后就将后面的事情甩给dyld了。
从dyld开始
dyld: (the dynamic link editor)动态链接器,其源码是开源的。
ImageLoader: 用于辅助加载特定可执行文件格式的类,程序中对应实例可简称为image(如程序可执行文件,Framework库,bundle文件)。
dyld接手后得做很多事情,主要负责初始化程序环境,将可执行文件以及相应的依赖库与插入库加载进内存生成对应的ImageLoader类的image(镜像文件)对象,对这些image进行链接,调用各image的初始化方法等等(注:这里多数事情都是递归的,从底向上的方法调用),其中runtime也是在这个过程中被初始化,这些事情大多数在dyld:_mian方法中被发生,我们可以看段"简洁"的代码:
uintptr_t
_main(const macho_header* mainExecutableMH, uintptr_t mainExecutableSlide,
        int argc, const char* argv[], const char* envp[], const char* apple[],
        uintptr_t* startGlue)
{
        ………………
        sMainExecutable = instantiateFromLoadedImage(mainExecutableMH, mainExecutableSlide, sExecPath);
      if    ( sEnv.DYLD_INSERT_LIBRARIES != NULL ) {
            for (const char* const* lib = sEnv.DYLD_INSERT_LIBRARIES; *lib != NULL; ++lib)
                loadInsertedDylib(*lib);
        }
        // record count of inserted libraries so that a flat search will look at
        // inserted libraries, then main, then others.
        sInsertedDylibCount = sAllImages.size()-1;

        // link main executable
        gLinkContext.linkingMainExecutable = true;
      ………………
      link(sMainExecutable, sEnv.DYLD_BIND_AT_LAUNCH, true, ImageLoader::RPathChain(NULL, NULL), -1);
        sMainExecutable->setNeverUnloadRecursive();
      if ( sInsertedDylibCount > 0 ) {
            for(unsigned int i=0; i < sInsertedDylibCount; ++i) {
                ImageLoader* image = sAllImages[i+1];
                link(image, sEnv.DYLD_BIND_AT_LAUNCH, true, ImageLoader::RPathChain(NULL, NULL), -1);
                image->setNeverUnloadRecursive();
            }
            // only INSERTED libraries can interpose
            // register interposing info after all inserted libraries are bound so chaining works
            for(unsigned int i=0; i < sInsertedDylibCount; ++i) {
                ImageLoader* image = sAllImages[i+1];
                image->registerInterposing(gLinkContext);
            }
        }
      ………………
      initializeMainExecutable();
      ………………

  return result;
}
这里的_main函数是dyld的函数,并非我们程序里的main函数。
- sMainExecutable = instantiateFromLoadedImage(....)与loadInsertedDylib(...)
这一步dyld将我们可执行文件以及插入的lib加载进内存,生成对应的image。
sMainExecutable对应着我们的可执行文件,里面包含了我们项目中所有新建的类。
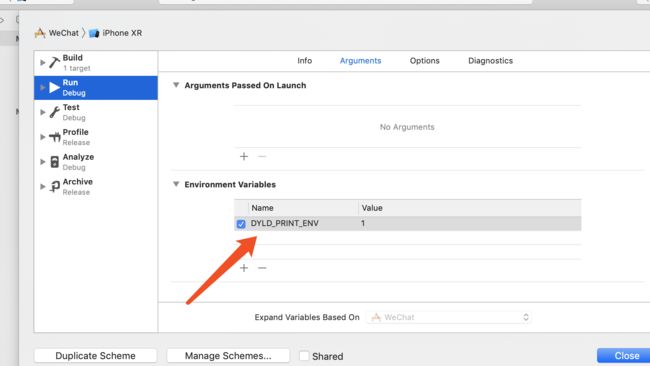
InsertDylib一些插入的库,他们配置在全局的环境变量sEnv中,我们可以在项目中设置环境变量DYLD_PRINT_ENV为1来打印该sEnv的值。
运行后打印如下:
TMPDIR=/Users/a123/Library/Developer/CoreSimulator/Devices/67AD8C57-9304-49B8-AA20-F1D6BD52B2BA/data/Containers/Data/Application/54FA8E15-B04C-4B53-B2BA-9C120C8D53C3/tmp
CA_DEBUG_TRANSACTIONS=0
DYLD_FRAMEWORK_PATH=/Users/a123/Library/Developer/Xcode/DerivedData/WeChat-beoysufqwgvfjaheuqhcnrtbrbnk/Build/Products/Debug-iphonesimulator
OS_ACTIVITY_DT_MODE=YES
__XPC_DYLD_FRAMEWORK_PATH=/Users/a123/Library/Developer/Xcode/DerivedData/WeChat-beoysufqwgvfjaheuqhcnrtbrbnk/Build/Products/Debug-iphonesimulator
HOME=/Users/a123/Library/Developer/CoreSimulator/Devices/67AD8C57-9304-49B8-AA20-F1D6BD52B2BA/data/Containers/Data/Application/54FA8E15-B04C-4B53-B2BA-9C120C8D53C3
SQLITE_ENABLE_THREAD_ASSERTIONS=1
SIMULATOR_VERSION_INFO=CoreSimulator 572.2 - Device: iPhone XR - Runtime: iOS 12.0 (16A366) - DeviceType: iPhone XR
SIMULATOR_UDID=67AD8C57-9304-49B8-AA20-F1D6BD52B2BA
SIMULATOR_MAINSCREEN_SCALE=2.000000
SIMULATOR_EXTENDED_DISPLAY_PROPERTIES=/Users/a123/Library/Developer/CoreSimulator/Devices/67AD8C57-9304-49B8-AA20-F1D6BD52B2BA/data/Library/Application Support/Simulator/extended_display.plist
SIMULATOR_DEVICE_NAME=iPhone XR
SIMULATOR_AUDIO_SETTINGS_PATH=/Users/a123/Library/Developer/CoreSimulator/Devices/67AD8C57-9304-49B8-AA20-F1D6BD52B2BA/data/var/run/simulatoraudio/audiosettings.plist
CFFIXED_USER_HOME=/Users/a123/Library/Developer/CoreSimulator/Devices/67AD8C57-9304-49B8-AA20-F1D6BD52B2BA/data/Containers/Data/Application/54FA8E15-B04C-4B53-B2BA-9C120C8D53C3
DYLD_FALLBACK_LIBRARY_PATH=/Applications/Xcode.app/Contents/Developer/Platforms/iPhoneOS.platform/Developer/Library/CoreSimulator/Profiles/Runtimes/iOS.simruntime/Contents/Resources/RuntimeRoot/usr/lib
SIMULATOR_RUNTIME_VERSION=12.0
SIMULATOR_PRODUCT_CLASS=N84
SIMULATOR_MODEL_IDENTIFIER=iPhone11,8
SIMULATOR_MAINSCREEN_WIDTH=828
SIMULATOR_MAINSCREEN_PITCH=326.000000
SIMULATOR_LEGACY_ASSET_SUFFIX=iphone
SIMULATOR_CAPABILITIES=/Applications/Xcode.app/Contents/Developer/Platforms/iPhoneOS.platform/Developer/Library/CoreSimulator/Profiles/DeviceTypes/iPhone XR.simdevicetype/Contents/Resources/capabilities.plist
SIMULATOR_BOOT_TIME=1544492876
IPHONE_TVOUT_EXTENDED_PROPERTIES=/Users/a123/Library/Developer/CoreSimulator/Devices/67AD8C57-9304-49B8-AA20-F1D6BD52B2BA/data/Library/Application Support/Simulator/extended_display.plist
IPHONE_SHARED_RESOURCES_DIRECTORY=/Users/a123/Library/Developer/CoreSimulator/Devices/67AD8C57-9304-49B8-AA20-F1D6BD52B2BA/data
CUPS_SERVER=/private/tmp/com.apple.launchd.4AHLLEkczr/Listeners
NSUnbufferedIO=YES
__XPC_DYLD_LIBRARY_PATH=/Users/a123/Library/Developer/Xcode/DerivedData/WeChat-beoysufqwgvfjaheuqhcnrtbrbnk/Build/Products/Debug-iphonesimulator
SIMULATOR_ROOT=/Applications/Xcode.app/Contents/Developer/Platforms/iPhoneOS.platform/Developer/Library/CoreSimulator/Profiles/Runtimes/iOS.simruntime/Contents/Resources/RuntimeRoot
SIMULATOR_HOST_HOME=/Users/a123
PATH=/Applications/Xcode.app/Contents/Developer/Platforms/iPhoneOS.platform/Developer/Library/CoreSimulator/Profiles/Runtimes/iOS.simruntime/Contents/Resources/RuntimeRoot/usr/bin:/Applications/Xcode.app/Contents/Developer/Platforms/iPhoneOS.platform/Developer/Library/CoreSimulator/Profiles/Runtimes/iOS.simruntime/Contents/Resources/RuntimeRoot/bin:/Applications/Xcode.app/Contents/Developer/Platforms/iPhoneOS.platform/Developer/Library/CoreSimulator/Profiles/Runtimes/iOS.simruntime/Contents/Resources/RuntimeRoot/usr/sbin:/Applications/Xcode.app/Contents/Developer/Platforms/iPhoneOS.platform/Developer/Library/CoreSimulator/Profiles/Runtimes/iOS.simruntime/Contents/Resources/RuntimeRoot/sbin:/Applications/Xcode.app/Contents/Developer/Platforms/iPhoneOS.platform/Developer/Library/CoreSimulator/Profiles/Runtimes/iOS.simruntime/Contents/Resources/RuntimeRoot/usr/local/bin
DYLD_ROOT_PATH=/Applications/Xcode.app/Contents/Developer/Platforms/iPhoneOS.platform/Developer/Library/CoreSimulator/Profiles/Runtimes/iOS.simruntime/Contents/Resources/RuntimeRoot
XPC_SERVICE_NAME=UIKitApplication:com.jingying.WeChat[0x43a7][87777]
DYLD_FALLBACK_FRAMEWORK_PATH=/Applications/Xcode.app/Contents/Developer/Platforms/iPhoneOS.platform/Developer/Library/CoreSimulator/Profiles/Runtimes/iOS.simruntime/Contents/Resources/RuntimeRoot/System/Library/Frameworks
__XCODE_BUILT_PRODUCTS_DIR_PATHS=/Users/a123/Library/Developer/Xcode/DerivedData/WeChat-beoysufqwgvfjaheuqhcnrtbrbnk/Build/Products/Debug-iphonesimulator
RWI_LISTEN_SOCKET=/private/tmp/com.apple.launchd.gljLoJQqm6/com.apple.webinspectord_sim.socket
DYLD_INSERT_LIBRARIES=/Applications/Xcode.app/Contents/Developer/Platforms/iPhoneOS.platform/Developer/Library/CoreSimulator/Profiles/Runtimes/iOS.simruntime/Contents/Resources/RuntimeRoot/usr/lib/libBacktraceRecording.dylib:/Applications/Xcode.app/Contents/Developer/Platforms/iPhoneOS.platform/Developer/Library/CoreSimulator/Profiles/Runtimes/iOS.simruntime/Contents/Resources/RuntimeRoot/usr/lib/libMainThreadChecker.dylib:/Applications/Xcode.app/Contents/Developer/Platforms/iPhoneOS.platform/Developer/Library/CoreSimulator/Profiles/Runtimes/iOS.simruntime/Contents/Resources/RuntimeRoot/Developer/Library/PrivateFrameworks/DTDDISupport.framework/libViewDebuggerSupport.dylib
CLASSIC=0
SIMULATOR_RUNTIME_BUILD_VERSION=16A366
SIMULATOR_LOG_ROOT=/Users/a123/Library/Logs/CoreSimulator/67AD8C57-9304-49B8-AA20-F1D6BD52B2BA
SIMULATOR_AUDIO_DEVICES_PLIST_PATH=/Users/a123/Library/Developer/CoreSimulator/Devices/67AD8C57-9304-49B8-AA20-F1D6BD52B2BA/data/var/run/com.apple.coresimulator.audio.plist
IOS_SIMULATOR_SYSLOG_SOCKET=/tmp/com.apple.CoreSimulator.SimDevice.67AD8C57-9304-49B8-AA20-F1D6BD52B2BA/syslogsock
DYLD_PRINT_ENV=1
TESTMANAGERD_SIM_SOCK=/private/tmp/com.apple.launchd.IQNoAmSfs1/com.apple.testmanagerd.unix-domain.socket
SIMULATOR_MEMORY_WARNINGS=/Users/a123/Library/Developer/CoreSimulator/Devices/67AD8C57-9304-49B8-AA20-F1D6BD52B2BA/data/var/run/memory_warning_simulation
SIMULATOR_MAINSCREEN_HEIGHT=1792
SIMULATOR_HID_SYSTEM_MANAGER=/Library/Developer/PrivateFrameworks/CoreSimulator.framework/Resources/Platforms/iphoneos/Library/Frameworks/SimulatorHID.framework
IPHONE_SIMULATOR_ROOT=/Applications/Xcode.app/Contents/Developer/Platforms/iPhoneOS.platform/Developer/Library/CoreSimulator/Profiles/Runtimes/iOS.simruntime/Contents/Resources/RuntimeRoot
XPC_FLAGS=0x1
CA_ASSERT_MAIN_THREAD_TRANSACTIONS=0
DYLD_LIBRARY_PATH=/Users/a123/Library/Developer/Xcode/DerivedData/WeChat-beoysufqwgvfjaheuqhcnrtbrbnk/Build/Products/Debug-iphonesimulator:/Applications/Xcode.app/Contents/Developer/Platforms/iPhoneOS.platform/Developer/Library/CoreSimulator/Profiles/Runtimes/iOS.simruntime/Contents/Resources/RuntimeRoot/usr/lib/system/introspection
XPC_SIMULATOR_LAUNCHD_NAME=com.apple.CoreSimulator.SimDevice.67AD8C57-9304-49B8-AA20-F1D6BD52B2BA
SIMULATOR_SHARED_RESOURCES_DIRECTORY=/Users/a123/Library/Developer/CoreSimulator/Devices/67AD8C57-9304-49B8-AA20-F1D6BD52B2BA/data
其中通DYLD_INSERT_LIBRARIES字段可以看到插入的库为:libBacktraceRecording.dylib和libViewDebuggerSupport.
有时我们会在三方App的Mach-O文件中通过修改DYLD_INSERT_LIBRARIES的值来加入我们自己的动态库,从而注入代码,hook别人的App
- link(sMainExecutable,...)和link(image,....)
对上面生成的Image进行进行链接。其主要做的事有对image进行load(加载),rebase(基地址复位),bind(外部符号绑定),我们可以查看源码:
void ImageLoader::link(const LinkContext& context, bool forceLazysBound, bool preflightOnly, bool neverUnload, const RPathChain& loaderRPaths, const char* imagePath)
{
      ......
      this->recursiveLoadLibraries(context, preflightOnly, loaderRPaths, imagePath);
      ......
      __block uint64_t t2, t3, t4, t5;
    {
        dyld3::ScopedTimer(DBG_DYLD_TIMING_APPLY_FIXUPS, 0, 0, 0);
        t2 = mach_absolute_time();
        this->recursiveRebase(context);
        context.notifyBatch(dyld_image_state_rebased, false);

        t3 = mach_absolute_time();
        if ( !context.linkingMainExecutable )
            this->recursiveBindWithAccounting(context, forceLazysBound, neverUnload);

        t4 = mach_absolute_time();
        if ( !context.linkingMainExecutable )
            this->weakBind(context);
        t5 = mach_absolute_time();
    }
      ......
      this->recursiveGetDOFSections(context, dofs);
      ......

}
-
recursiveLoadLibraries(context, preflightOnly, loaderRPaths)
递归加载所有依赖库进内存。 -
recursiveRebase(context)
递归对自己以及依赖库进行复基位操作。在以前,程序每次加载其在内存中的堆栈基地址都是一样的,这意味着你的方法,变量等地址每次都一样的,这使得程序很不安全,后面就出现ASLR(Address space layout randomization,地址空间配置随机加载),程序每次启动后地址都会随机变化,这样程序里所有的代码地址都是错的,需要重新对代码地址进行计算修复才能正常访问。 -
recursiveBindWithAccounting(context, forceLazysBound, neverUnload)
对库中所有nolazy的符号进行bind,一般的情况下多数符号都是lazybind的,他们在第一次使用的时候才进行bind。
- initializeMainExecutable()
这一步主要是调用所有image的Initalizer方法进行初始化。这里的Initalizers方法并非名为Initalizers的方法,而是C++静态对象初始化构造器,atribute((constructor))进行修饰的方法,在LmageLoader类中initializer函数指针所指向该初始化方法的地址。
typedef void (*Initializer)(int argc, const char* argv[], const char* envp[], const char* apple[]);
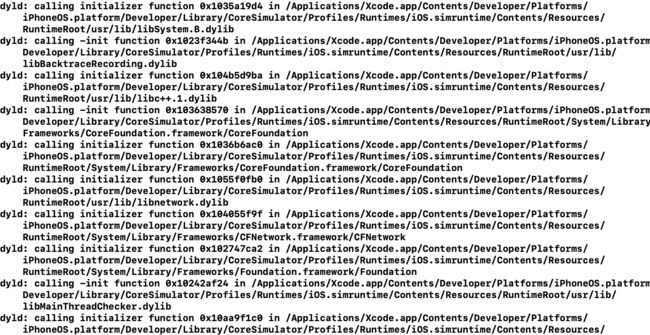
我们可以在程序中设置环境变量DYLD_PRINT_INITIALIZERS为1来打印出程序的各种依赖库的initializer方法:
运行程序,系统Log打印如下:
(由于打印的比较长,这样就截取开头的log)可以看到每个依赖库对应着一个初始化方法,名称各有不同。
这里最开始调用的libSystem.dylib的initializer function比较特殊,因为runtime初始化就在这一阶段,而这个方法其实很简单,我们可以在这里看到 init.c源码,主要方法如下:
/*
 * libsyscall_initializer() initializes all of libSystem.dylib
 */
static __attribute__((constructor))
void libSystem_initializer(int argc, const char* argv[], const char* envp[], const char* apple[], const struct ProgramVars* vars)
{
    _libkernel_functions_t libkernel_funcs = {
        .get_reply_port = _mig_get_reply_port,
        .set_reply_port = _mig_set_reply_port,
        .get_errno = __error,
        .set_errno = cthread_set_errno_self,
        .dlsym = dlsym,
    };

    _libkernel_init(libkernel_funcs);

    bootstrap_init();
    mach_init();
    pthread_init();
    __libc_init(vars, libSystem_atfork_prepare, libSystem_atfork_parent, libSystem_atfork_child, apple);
    __keymgr_initializer();
    _dyld_initializer();
    libdispatch_init();
    _libxpc_initializer();

    __stack_logging_early_finished();

    /*
     * C99 standard has the following in section 7.5(3):
     * "The value of errno is zero at program startup, but is never set
     * to zero by any library function."
     */
    errno = 0;
}
其中libdispatch_init里调用了到了runtime初始化方法_objc_init.我们可以、在程序中打个符号断点来验证:
运行程序我们可以看到调用栈:
这里可以看到_objc_init调用的顺序,先libSystem_initializer调用libdispatch_init再到_objc_init初始化runtime。
runtime初始化后不会闲着,在_objc_init中注册了几个通知,从dyld这里接手了几个活,其中包括负责初始化相应依赖库里的类结构,调用依赖库里所有的laod方法。
就拿sMainExcuatable来说,它的initializer方法是最后调用的,当initializer方法被调用前dyld会通知runtime进行类结构初始化,然后再通知调用load方法,这些目前还发生在main函数前,但由于lazy bind机制,依赖库多数都是在使用时才进行bind,所以这些依赖库的类结构初始化都是发生在程序里第一次使用到该依赖库时才进行的。
总结
- dyld 加载所有的库和可执行文件
- dyld加载流程:
- 配置一些环境
- 加载共享缓存库
- 实例化主程序
- 加载动态库
- 链接主程序
- 最关键的:初始化函数
- 经过一系列初始化函数的调用
notifiySingle函数- 此函数执行了一个回调
- 通过断点调试:此函数是被
objc_init初始化时赋值的一个函数load_images-
load_images里面执行call_load_methods函数- 循环各个类的load方法
-
-
doModInitFunctions函数- 内部会调用全局C++对象的构造函数 带
__attribubute__(constructor)的c函数
- 内部会调用全局C++对象的构造函数 带
- 返回主程序的入口函数。开始进入主程序的main函数
- 经过一系列初始化函数的调用
main函数被调用
当所有的依赖库库的lnitializer都调用完后,dyld::main函数会返回程序的main函数地址,main函数被调用,从而代码来到了我们熟悉的程序入口。


