Imx283 Uboot2017+Linux3/4/5系统内核移植
Imx283 Uboot2017+Linux3/4/5系统内核移植
前言
用的周立功的EasyArm283,实习的时候买的,一直没咋弄,前几天突然看到了想玩一下(其实最近一直再画板子,想玩一下软件了哈哈),感觉2.34的内核有点老所以就移植了4.13,其实就是搬砖哈哈,主要记录下坑把
开始
工具链:arm-fsl-linux-gnueabi- arm-linux-gnueabihf-
编译Linux
首先到linux找到官方demo的config文件,然后这里是mxs_defconfig,将其拷贝到linux源码根目录下:
 先修改MakeFile,添加如下:
ARCH = arm
CROSS_COMPILE = arm-linux-gnueabihf-
执行:
make mxs_defconfig
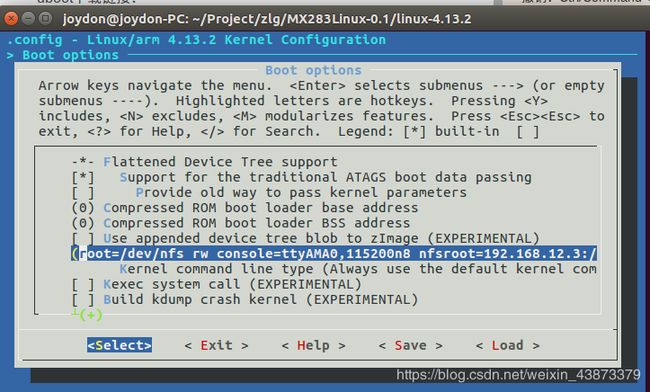
然后make menuconfig选择自己配置项,这里看网上和自己选择,这里调试的时候可以直接定死kernel启动参数,从nfs启动,调试方便。

然后make zImage dtbs -j8
如果用uImage这里要加上启动地址make uImage LOADADDR=42000000 -j8
编译Uboot
其次编译Uboot,这里的先讲一下他的Nand flash下载原理,先用usb传输一个稳定的linux镜像到ddr然后执行,然后通过usb传输指令,板子上linux执行,把镜像,rootfs,dts写到nandflash上,所以nand flash的分区跟你的官方镜像一样,这里看官方的uboot2009中的uboot/include/configs/mx28-evk.h分区如下:

仿照这个修改uboot2017/8/9等吧,反正你移植那个版本uboot就修改那个的这个文件,另外启动指令改了如下:

上面注释的原来官方的,现在修改成自己的,继续修改启动参数,因为我们文件系统位置变了,所以修改如下:

然后复制配置文件,路径如下,这里复制nand版本,因为从nand启动

然后make -j8,注意之前要修改Makefile配置ARCH=arm CROSS_COMPILE=arm-linux-gnueabi-
打包uboot、zImage、rootfs
把uboot和zImage复制到imx_xXX_bootlets文件夹下面,然后执行./build
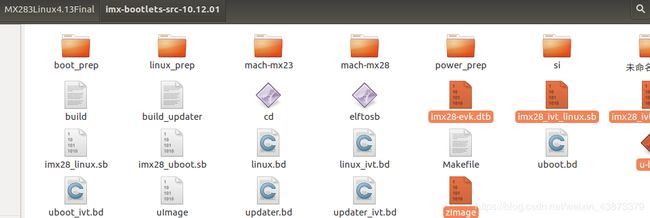
然后把linux的dtb,和刚才生成的一堆文件复制自己的文件夹下面备用,这里贴图:

最后还差一个文件系统,这里要配置一个环境多的太麻烦了,所以直接用周立功的,环境都不用配置了,哈哈,复制imx28xxx_rootfs.tar.bz2,然后解压,修改/etc/inittab,把ttyAM0修改为ttyAMA0,am0是显示屏,ama0是串口,如下:

然后修改/etc/hostname文件,将板子修改成自己想要的名字!
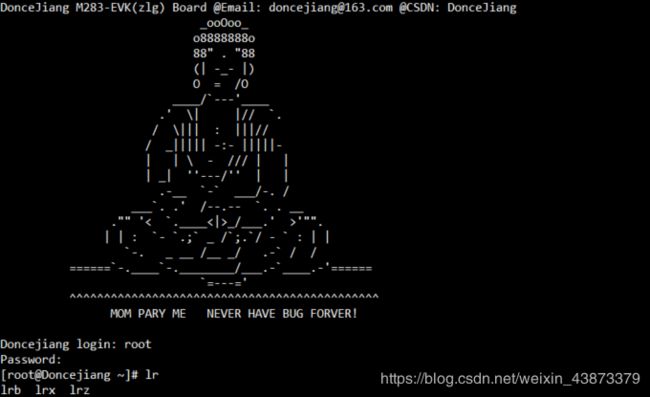
然后修改issue,这里修改称自己想要的开机打印信息,我的是佛祖哈哈!
下载
然后把文件系统复制到自己备用文件夹里面,复制到win10主机上的MGTool的files中,这里不会去看周立功的教程,用飞思卡尔工具USB下载,这里给上下载配置文件,如下:
<LIST name="NAND uboot-kernel-rootfs-dtb(128MB)" desc="Install on singlechip NAND">
<CMD type="boot" body="Recovery" file="imx28_BootCfg.sb" if="HabDisable">Enable unencrypted boot modes.</CMD>
<CMD type="boot" body="Recovery" file="imx28_BootCfg_ivt.sb" if="HabEnable">Enable unencrypted boot modes.</CMD>
<CMD type="wait" body="ResetToRecovery" timeout="3">Waiting for Reset to Recovery.</CMD>
<CMD type="boot" body="Recovery" file="updater.sb" timeout="60" if="HabDisable">Booting update firmware.</CMD>
<CMD type="boot" body="Recovery" file="updater_ivt.sb" timeout="60" if="HabEnable">Booting update firmware.</CMD>
<CMD type="find" body="Updater" timeout="180"/>
<CMD type="push" body="mknod class/mtd,mtd0,/dev/mtd0" timeout="180" />
<CMD type="push" body="mknod class/mtd,mtd1,/dev/mtd1" timeout="180" />
<CMD type="push" body="mknod class/mtd,mtd2,/dev/mtd2" timeout="180" />
<CMD type="push" body="mknod class/mtd,mtd3,/dev/mtd3" timeout="180" />
<CMD type="push" body="mknod class/mtd,mtd4,/dev/mtd4" timeout="180" />
<CMD type="push" body="mknod class/mtd,mtd5,/dev/mtd5" timeout="180" />
<CMD type="push" body="mknod class/mtd,mtd6,/dev/mtd6" timeout="180" />
<CMD type="push" body="mknod class/misc,ubi_ctrl,/dev/ubi_ctrl"/>
<CMD type="push" body="$ flash_eraseall /dev/mtd0">Erasing partition0</CMD>
<CMD type="push" body="$ flash_eraseall /dev/mtd1">Erasing partition1</CMD>
<CMD type="push" body="$ flash_eraseall /dev/mtd2">Erasing partition2</CMD>
<CMD type="push" body="$ flash_eraseall /dev/mtd3">Erasing partition3</CMD>
<CMD type="push" body="$ flash_eraseall /dev/mtd4">Erasing partition4</CMD>
<CMD type="push" body="$ flash_eraseall /dev/mtd5">Erasing partition5</CMD>
<CMD type="push" body="$ flash_eraseall /dev/mtd6">Erasing partition5</CMD>
<CMD type="push" body="send" file="files/imx28_ivt_uboot.sb">Sending uboot</CMD>
<CMD type="push" body="$ kobs-ng init -v $FILE">Flashing uboot firmware</CMD>
<CMD type="push" body="$ flash_erase /dev/mtd0 0x800000 32">Erasing 0x800000 32</CMD>
<CMD type="push" body="send" file="files/imx28-evk.dtb">Sending dtb</CMD>
<CMD type="push" body="$ mtdwrite -d /dev/mtd0 -f $FILE -a 0x800000">Flashing dtb firmware</CMD>
<CMD type="push" body="$ flash_erase /dev/mtd0 0x400000 32">Erasing 0x00400000 32</CMD>
<CMD type="push" body="send" file="files/zImage">Sending zImage</CMD>
<CMD type="push" body="$ mtdwrite -d /dev/mtd0 -f $FILE -a 0x400000">Flashing zImage firmware</CMD>
<CMD type="push" body="$ ubiattach /dev/ubi_ctrl -m 5 -d 0">Attaching UBI partition</CMD>
<CMD type="push" body="mknod class/ubi,ubi0,/dev/ubi0"/>
<CMD type="push" body="$ ubimkvol /dev/ubi0 -n 0 -N filesystem -m">Creating UBI volumes</CMD>
<CMD type="push" body="$ mkdir -p /mnt/ubi0; mount -t ubifs ubi0_0 /mnt/ubi0" />
<CMD type="push" body="pipe tar -jxv -C /mnt/ubi0"  timeout="180" file="files/rootfs.tar.bz2">Transfer rootfs</CMD>
<CMD type="push" body="frf">Finish Flashing rootfs</CMD>
<CMD type="push" body="$ umount /mnt/ubi0">Unmounting</CMD>
<CMD type="push" body="$ echo Update Complete!">Done</CMD>
</LIST>
下载完毕开机
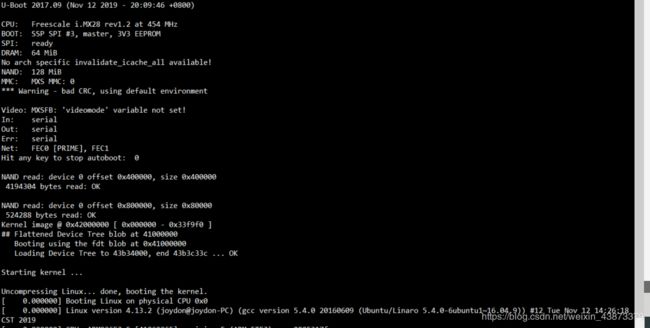
然后下载完毕开机,打印消息如下:

可以看出uboot2017和linux4.13启动啦,屏幕的小企鹅也出现了,然后登陆:

因为用的zlg的文件系统,修改了一下,哈哈,但可以看到这里linux内核已经是4.13哈哈,注意上面的lrz、lsz是串口传输文件的app,自己编译的,然后,执行zlg的界面程序如下:

上面我瞎敲得,此时qt的启动界面出现了,ok大功告成
结束语
虽然成功,但是其实中间大概四五天把,踩坑,学习,踩坑,学习,终于成功啦。
又下雪了,真好!