windows下配置redis集群+整合springboot+解决各种配置时的疑难杂症
前言
今天花了两三个小时终于把redis集群在Windows系统下配好了,Windows你都搞定了,Linux那还不是随随便便嘛。
我绝对不是因为懒得搞一台服务器才这么干的。
需要用到的东西
1、ruby 需要用到版本较高的ruby,建议直接去官网下载2.7版本的就好。不需要下载Devkit。另一个好处是2.7版本的ruby不再需要你重新配置一个源了,会自动配置成国内的源,很方便。
https://rubyinstaller.org/downloads/
2、redis3.2.100版本,这个版本是Windows所支持的最高版本(必须要3.x以上版本的redis才支持集群),在GitHub有。
https://github.com/MicrosoftArchive/redis/tags
3、一款自己的搭建好的springboot应用——关于redis的starter,直接在pom引入即可。
            org.springframework.boot
            spring-boot-starter-data-redis
4、最好能安装一个RedisDesktopManager。安装和使用完全没有难度。
网盘:https://pan.baidu.com/s/1xcfH14LhW9KXN_vUtZ3VFg
提取码:e0hl
5、一个供ruby使用的证书
链接: http://pan.baidu.com/s/1gfzAJKZ 密码: ithw
SSL_CERT_FILE 为用户自定义的环境变量名;
C:\Ruby27-x64\lib\ca-bundle.crt 为指向的证书所在的位置。需要自己修改。
如果不安装这个证书,在执行gem install redis的时候可能会出现错误。
正式开始搭建集群
第一步:
复制六份你已经安装好的redis,把redis里面所有的文件都复制一份到上面这六个文件夹中。
第二步:
修改上面六个集群的配置文件中的属性
1、端口号,每一份redis建议分别改成7001~7006。
2、cluster-enabled yes;cluster-config-file nodes-7001.conf;cluster-node-timeout 15000;appendonly yes
(注意,cluster-config-file nodes-7001.conf这一个属性要和你当前的redis端口号相同。)
第三步:
编写六个个脚本,分别放在你的每一份redis下,命名为:start.bat。内容如下:
title redis-7001
redis-server.exe redis.windows.conf
第四步:
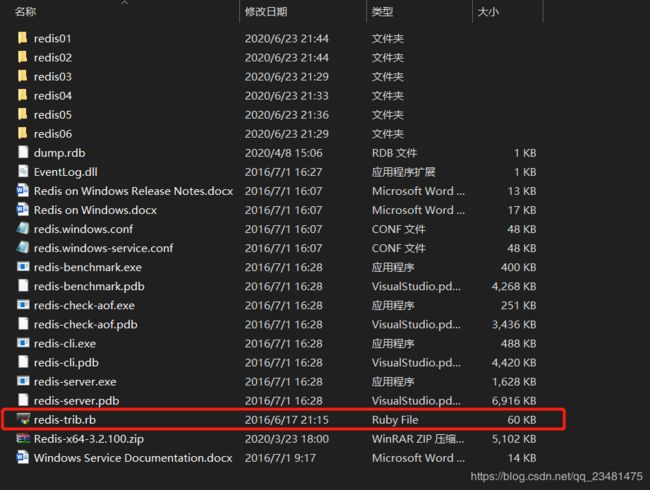
下载redis-trib.rb,具体怎么下载,直接去redis的官网,找到Linux相同版本的redis(3.2.100),找到里面的src目录,里面就有redis-trib.rb。然后直接粘贴到你的最外层redis下。像这样:
第五步:
打开你的cmd,输入命令 gem install redis
如果前面没有下载到2.7版本的ruby或者没有下载证书并配置环境变量,那么到了这一步就很可能出问题。
如果安装成功了,会有提示。
第六步:
第七步:
先启动端口号为6379的redis;
然后挨个双击脚本(刚刚写的start.bat),依次启动每个redis(7001~7006);
最后一步,打开命令提示符,cd到你的redis目录下,输入如下指令
ruby redis-trib.rb create --replicas 1 127.0.0.1:7006 127.0.0.1:7001 127.0.0.1:7002 127.0.0.1:7003 127.0.0.1:7004 127.0.0.1:7005如果发现输入指令后有警告,那就说明你前面没有安装正确的redis-trib.rb;
如果发现提示找不到文件或目录,则说明你可能没有执行gem install redis 或者ruby出现问题,可以尝试重新安装。
如果没有发现警告,而是
Can I set the above configuration? (type 'yes' to accept): 输入yes即可,这个时候就应该已经搭建完毕了。
Can I set the above configuration? (type 'yes' to accept): yes
>>> Nodes configuration updated
>>> Assign a different config epoch to each node
>>> Sending CLUSTER MEET messages to join the cluster
Waiting for the cluster to join.....
>>> Performing Cluster Check (using node 127.0.0.1:7006)
M: b17aef2d27d3ec2ff56cfd9688e6c1ccc6555892 127.0.0.1:7006
   slots:0-5460 (5461 slots) master
M: 8c3d9ec6aeff64ce70273965a7c74dbef83d9cc4 127.0.0.1:7001
   slots:5461-10922 (5462 slots) master
M: dc3b48453954e3434ab01391dc17ebe6ac273148 127.0.0.1:7002
   slots:10923-16383 (5461 slots) master
M: 57f4b003d6c47dfeebe878ff86fca1f0e78fd764 127.0.0.1:7003
   slots: (0 slots) master
   replicates b17aef2d27d3ec2ff56cfd9688e6c1ccc6555892
M: 34022863d1f5a88a8619c05e2de9b5512a8300ea 127.0.0.1:7004
   slots: (0 slots) master
   replicates 8c3d9ec6aeff64ce70273965a7c74dbef83d9cc4
M: 7530148b1c42aa4fc4c8a233be4ffb005bc9ff3b 127.0.0.1:7005
   slots: (0 slots) master
   replicates dc3b48453954e3434ab01391dc17ebe6ac273148
[OK] All nodes agree about slots configuration.
>>> Check for open slots...
>>> Check slots coverage...
[OK] All 16384 slots covered.
测试工作
注意,如果使用的是springboot,需要在application.properties中添加如下配置。否则测试的时候可能会出现异常。
spring.redis.cluster.nodes=127.0.0.1:7006,127.0.0.1:7001,127.0.0.1:7002,127.0.0.1:7003,127.0.0.1:7004,127.0.0.1:7005
单元测试如下
@RunWith(SpringRunner.class)
@SpringBootTest
public class TestRedis {
    @Autowired
    private RedisTemplate redisTemplate;

    @Test
    public void testRedisConnect() {
        redisTemplate.opsForValue().set("myKey", "myValue111");
        System.out.println(redisTemplate.opsForValue().get("myKey"));
    }
}
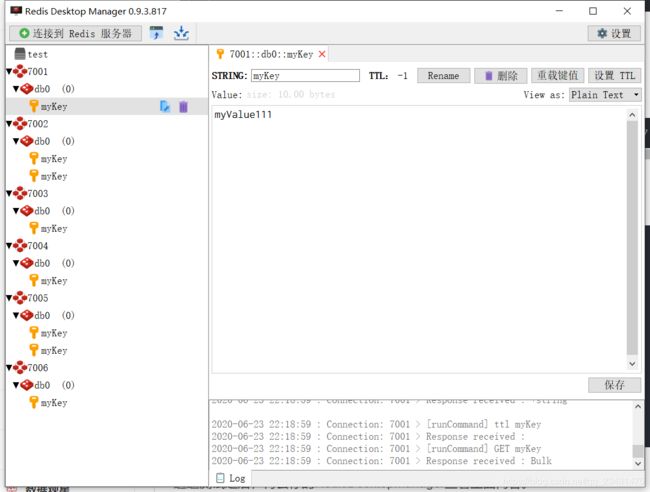
通过测试之后,再去你的RedisDesktopManager查看里面内容。
就会发现每一个redis都已经存在一份备份了。
至此,redis集群配置圆满结束。


