opencv mat格式数据与数组的转化
参考网址 mat→数组
OpenCV中Mat与二维数组的相互转换
在OpenCV中将Mat(二维)与二维数组相对应,即将Mat中的每个像素值赋给一个二维数组。
全部代码如下:
![]()
#include
#include
#include  //包含imread, imshow等标识符
#include "opencv2/imgproc/imgproc.hpp" //包含cvtColor等

using namespace std;
using namespace cv;

//测试Mat
void main5(){
    //读入图像
    Mat mat = imread("trabeculae.jpg");
    //判断读入图片是否有误
    if(mat.empty())
    {
        if (!mat.data) {
            printf("Oh,no,读取图片文件错误~! \n");
        }
        cout << "error" << endl;
    }

    // 进行图像灰度化操作
    cvtColor(mat, mat, CV_BGR2GRAY);
    //获取 mat 的行和列
    int row = mat.rows;
    int col = mat.cols;
    cout << "  mat.rows : " << mat.rows << endl;
    cout << "  mat.cols : " << mat.cols << endl;

   //动态创建二维数组,row行col列
    int **La = new int *[row];
    for (int i = 0; i < row; i ++){
        La[i] = new int[col];
    }
    // 循环二维数组和mat,并将mat对应值赋给二维数组对应值,
    for (int i = 0; i < row; i ++){
        for (int j = 0; j < col; j ++){
            La[i][j] = mat.at(i, j);
        }
    }
    // 释放分配空间
    for (int i = 0; i < row; i ++){
        delete []La[i];
    }
    delete [] La;

    cout << endl;
    waitKey(0);
    system("pause");
} ![]()
分析:
1. 读入一幅图像
![]()
    //读入图像
    Mat mat = imread("trabeculae.jpg");
    //判断读入图片是否有误
    if(mat.empty())
    {
        if (!mat.data) {
            printf("Oh,no,读取图片文件错误~! \n");
        }
        cout << "error" << endl;
} ![]()
2. 对图像进行灰度化操作,将Mat转为二维。
    // 进行图像灰度化操作
    cvtColor(mat, mat, CV_BGR2GRAY);
3. Mat有rows和cols属性,rows表示对应矩阵行数,cols表示对应矩阵列数:
    //保存mat的行和列
    int row = mat.rows;
    int col = mat.cols;
4. Mat还具有size () 方法,该方法可以得到width宽度和height高度:
    Size s = mat.size();
    int width = s.width;
    int height = s.height;
5. rows,cols,width,height 之间的关系:
    cout << "  s.width : " << s.width << endl;
    cout << "  s.height : " << s.height << endl;

    cout << "  mat.rows : " << mat.rows << endl;
    cout << "  mat.cols : " << mat.cols << endl;
6. 打印结果:
7. 结论:
由第5步和第6步可得:
mat.size().width = mat.cols;
mat.size().height = mat.rows;
8. 动态创建二维数组:
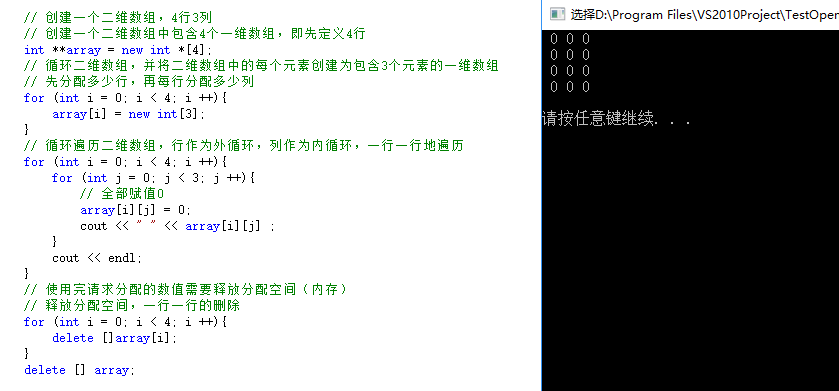
例:创建一个4行3列的二维数组,如下:
{ { 0, 0, 0 }, { 0, 0, 0 }, { 0, 0, 0 }, { 0, 0, 0 } }
即:{ { 0, 0, 0 },
{ 0, 0, 0 },
{ 0, 0, 0 },
{ 0, 0, 0 }
}
![]()
    // 创建一个二维数组中包含4个一维数组,即先定义4行
    int **array = new int *[4];
    // 循环二维数组,并将二维数组中的每个元素创建为包含3个元素的一维数组
    // 先分配多少行,再每行分配多少列
    for (int i = 0; i < 4; i ++){
        array[i] = new int[3];
    }
    // 循环遍历二维数组,行作为外循环,列作为内循环,一行一行地遍历
    for (int i = 0; i < 4; i ++){
        for (int j = 0; j < 3; j ++){
            array[i][j] = 0;
            cout << " " << array[i][j] ;
        }
        cout << endl;
    }
    // 使用完请求分配的数值需要释放分配空间(内存)
    // 释放分配空间,一行一行的删除
    for (int i = 0; i < 4; i ++){
        delete []array[i];
    }
delete [] array;![]()
结果:
9. 使用Mat图像的宽度和高度进行动态创建二维数组,Height(row)代表具有多少行,width(col)代表具有多少列。
![]()
    // 创建一个二维数组,height(row)行width(col)列
    int **La = new int *[height];
    for (int i = 0; i < height; i ++){
        La[i] = new int[width];
    }

    // 循环将Mat中对应的值赋给La二维数组
    for (int i = 0; i < row; i ++){
        for (int j = 0; j < col; j ++){
            La[i][j] = mat.at(i, j);
            //cout << " " << La[i][j] ;
        }
        //cout << endl;
    }

    // 释放分配空间
    for (int i = 0; i < height; i ++){
        delete []La[i];
    }
delete [] La; ![]()
10. 创建一个和二维数组行列大小的Mat:
当知道二维数组的大小,需要将二维数组中的值赋给同样大小的Mat,使用Mat显示。
![]()
    //创建一个Mat变量  height(row)行width(col)列
    Mat temp = Mat(height, width, CV_8U, Scalar::all(0));
    // 循环赋值
    for (int i = 0; i < height; i ++){
        for (int j = 0; j < width; j ++){
            mat.at(i, j) = La[i][j];
        }
} ![]()
openCV图像矩阵Mat和二维数组的互相转换
目的
在openCV的应用中,我们获取图像的矩阵信息很简单。但是我们可能想调用其他的矩阵运算库(比如Eigen库)来进行计算。那么我们就需要把openCV读取到的类型(比如Mat类型)的矩阵信息传递到另外类型(比如Eigen库的MatrixXd类型)的矩阵。这该怎么办呢?由于目前在网络上搜不到特别符合楼主意愿的答案,故写此博客,希望能够帮助到同楼主一样徜徉在信息海洋里的各位!1
代码
只要您配置了openCV库,那么直接拷贝下面这段代码,稍加修改读取图片路径即可马上运行。
参考以下代码:
//2018.1.19_21:09 by Cooper Liu
//Questions? Contact me: [email protected]
//本程序为C++工程,编译环境需要配置openCV
#include
#include
#include
//#include//如果要包含所有库

using namespace cv;

void main()
{
	//这一段程序实现:图像img -> ptr[][] -> 图像img2 的传递过程,即图像->二维数组->图像
	int i = 0, j = 0;
	Mat img = imread("F:\\photoCollection\\flowergirl.png", 0);//读取图像img。0表示转换为灰度图像读入
	int row = img.rows;
	int col = img.cols;
	namedWindow("原图");
	imshow("原图", img);

	Mat img2 = Mat(row, col, CV_8UC1);//图像img2:row*col大小

	uchar **ptr = (uchar **)malloc(row*sizeof(uchar *));//二维数组ptr[][]
	for (i = 0; i < row; i++)
		ptr[i] = (uchar *)malloc(col*sizeof(uchar));

	uchar *ptmp = NULL;//这是关键的指针!!

	for (i = 0; i < row; i++)
	{
		ptmp = img2.ptr(i);//指针指向img2的第i行
		for (j = 0; j < col; j++)
		{
			ptr[i][j] = img.at(i, j);//img的矩阵数据传给二维数组ptr[][]
			ptmp[j] = ptr[i][j];//二维数组数据传给img2的第i行第j列
		}
	}
	namedWindow("新图");
	imshow("新图", img2);

	// 等待100000 ms后窗口自动关闭
	waitKey(100000);
}
以上代码部分的关键在于指针ptmp的应用,在openCV的配置下,目前是不允许直接用 .at 去给Mat类型的数据赋值的。
数组转mat
Mat Vec2Mat(uchar **array, int row, int col)
{

    Mat img(row ,col,  CV_8UC1);
    uchar *ptmp = NULL;
    for (int i = 0; i (i);

        for (int j = 0; j < col; ++j)
        {
            ptmp[j] = array[i][j];
        }
    }

    return img;

}
mat转数组
uchar** Mat2Vec(Mat mat)
{

	uchar **array = new uchar*[mat.rows];
	for (int i = 0; i(i, j);
		}
	}

	return array;
}

