Linux——nfs远程挂载文件系统
#1 关于nfs
Cifs挂载samba共享文件,是永久挂载,但是在实际生活中,这样有点浪费资源,我们想实现用的时候自动挂载,不用的时候自动卸载,这时候nfs就派上用场了
NFS(Network File System)即网络文件系统,是FreeBSD支持的文件系统中的一种,它允许网络中的计算机之间通过TCP/IP网络共享资源
在NFS的应用中,本地NFS的客户端应用可以透明地读写位于远端NFS服务器上的文件,就像访问本地文件一样
NFS体系至少有两个主要部分
一台NFS服务器和若干台客户机
客户端通过TCP/IP网络远程访问存放在NFS服务器上的数据。
在NFS服务器正式启用前,需要根据实际环境和需求,配置一些NFS参数。
#2 NFS优点
节省本地存储空间,将常用的数据存放在一台NFS服务器上且可以通过网络访问,那么本地终端将可以减少自身存储空间的使用。
用户不需要在网络中的每个机器上都建有Home目录,Home目录可以放在NFS服务器上且可以在网络上被访问使用。
一些存储设备如软驱、CDROM和Zip(一种高储存密度的磁盘驱动器与磁盘)等都可以在网络上被别的机器使用。
这可以减少整个网络上可移动介质设备的数量。
nfs共享的原理(客户端通过网络共享服务器磁盘中的数据)
NFS 是Network File System的缩写,即网络文件系统,一种使用于分散式文件系统的协定,由Sun公司开发,于1984年向外公布
功能是通过网络让不同的机器、不同的操作系统能够彼此分享个别的数据,让应用程序在客户端通过网络访问位于服务器磁盘中的数据
是在类Unix系统间实现磁盘文件共享的一种方法
NFS 的基本原则是“容许不同的客户端及服务端通过一组RPC分享相同的文件系统”
它是独立于操作系统,容许不同硬件及操作系统的系统共同进行文件的分享
NFS在文件传送或信息传送过程中依赖于RPC协议
RPC,远程过程调用 (Remote Procedure Call) 是能使客户端执行其他系统中程序的一种机制
NFS本身是没有提供信息传输的协议和功能的,但NFS却能让我们通过网络进行资料的分享,这是因为NFS使用了一些其它的传输协议
而这些传输协议用到这个RPC功能的,可以说NFS本身就是使用RPC的一个程序,或者说NFS也是一个RPC SERVER
所以只要用到NFS的地方都要启动RPC服务,不论是NFS SERVER或者NFS CLIENT
这样SERVER和CLIENT才能通过RPC来实现PROGRAM PORT的对应
可以这么理解RPC和NFS的关系:NFS是一个文件系统,而RPC是负责负责信息的传输
NFS服务依赖与于PRC(Remote Process Call,远程过程调用)机制,以完成远程到本地的映射过程
RPC服务,主要是在nfs共享时候负责通知客户端,服务器的nfs端口号的。简单理解rpc就是一个中介服务
#3 搭建基础实验环境
实验环境:
| 主机信息 | 功能 |
|---|---|
| desktop | nfs服务器 |
| server | 客户端 |
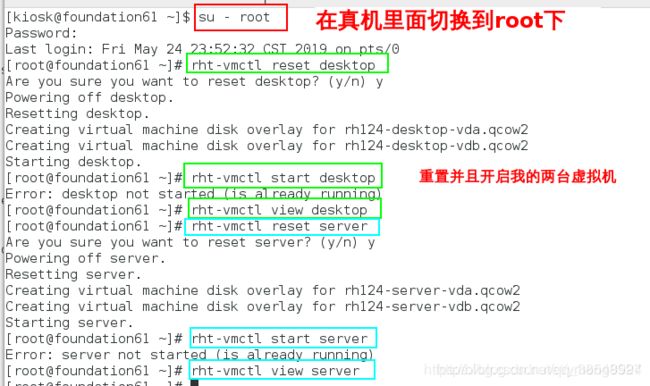
(1)在真机开启desktop虚拟机和server虚拟机
[root@foundatio61 ~]# rht-vmctl reset desktop重置desktop虚拟机
[root@foundatio61 ~]# rht-vmctl start desktop开启desktop虚拟机
[root@foundatio61 ~]# rht-vmctl view  desktop图形化开启desktop虚拟机
(2)配置desktop虚拟机的网络
[root@localhost Desktop]# cd /etc/sysconfig/network-scripts切换到网络配置的路径
[root@localhost network-scripts]# ls查看网络配置文件
[root@localhost network-scripts]# vim ifcfg-eth0编辑网络配置文件
[root@localhost network-scripts]# systemctl restart network重启网络
[root@localhost network-scripts]# hostnamectl set-hostname server.westos.com(服务端)
[root@localhost network-scripts]# vim /etc/hosts
172.25.254.111 server.westos.com
![]()

(5)在desktop主机中配置本地yum源


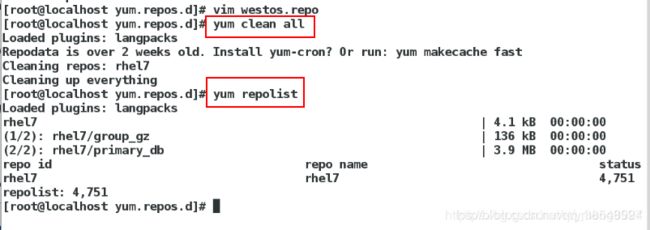
(6)给server虚拟机配置网络
[root@localhost Desktop]# cd /etc/sysconfig/network-scripts切换到网络配置路径下
[root@localhost network-scripts]# ls查看网络配置文件
[root@localhost network-scripts]# vim ifcfg-eth0编辑网络配置文件
[root@localhost network-scripts]# systemctl restart network重启网络
(7)改server主机名称
[root@localhost network-scripts]# hostnamectl set-hostname client.westos.com(测试端)
(8)给server主机做本地解析
[root@localhost network-scripts]# vim /etc/hosts
172.25.254.211 client.westos.com
(9)给server主机配置本地yum源
[root@localhost network-scripts]# cd /etc/yum.repos.d
[root@localhost network-scripts]# ls
#4搭建一个基本的NFS服务器,实现本地可以挂载
(1)实验目的
搭建一个nfs服务器,使nfs服务器的目录可以挂载在客户端本地,并且在本地修改
在desktop主机上面搭建nfs服务器
(2)关于NFS共享的常用参数:
ro                       # 只读访问
rw                       # 读写访问
sync                     # 所有数据在请求时写入共享
async                    # NFS在写入数据前可以相应请求
secure                   # NFS通过1024以下的安全TCP/IP端口发送
insecure                 # NFS通过1024以上的端口发送
wdelay                   # 如果多个用户要写入NFS目录,则归组写入(默认)
no_wdelay                # 如果多个用户要写入NFS目录,则立即写入,当使用async时,无需此设置。
hide                     # 在NFS共享目录中不共享其子目录
no_hide                  # 共享NFS目录的子目录
subtree_check            # 如果共享/usr/bin之类的子目录时,强制NFS检查父目录的权限(默认)
no_subtree_check         # 和上面相对,不检查父目录权限
all_squash               # 共享文件的UID和GID映射匿名用户
no_all_squash            # 保留共享文件的UID和GID(默认)
root_squash              # root用户的所有请求映射成如anonymous用户一样的权限(默认)
no_root_squash           # root用户具有根目录的完全管理访问权限
anonuid=xxx              # 指定NFS服务器/etc/passwd文件中匿名用户的UID
anongid=xxx              # 指定NFS服务器/etc/passwd文件中匿名用户的GID
(3)实验步骤
在desktop主机上面搭建NFS服务器
[root@localhost yum.repos.d]# yum install nfs-utils 安装服务
[root@localhost yum.repos.d]# vim /etc/exports编辑该服务的配置文件
/mnt 172.25.254.0/24(ro,sync)
表示将这台nfs服务器的/mnt这个目录挂载在本地这个网段的任何一个主机上面,并且只读,而且同步
[root@localhost yum.repos.d]# exportfs -rv 刷新
[root@localhost yum.repos.d]# man 5 exports查看这个文件里面的书写格式
[root@localhost yum.repos.d]# systemctl status nfs-server 查看服务是否开启
[root@localhost yum.repos.d]# exportfs -rv 刷新查看远程共享的目录
[root@localhost yum.repos.d]# yum install nfs-utils -y ## 在本地安装可以使用网络文件系统的软件
[root@localhost yum.repos.d]# showmount -e 172.25.254.111快速查看desktop远程服务器共享出来的东西(错误),因为服务端的火墙开着
在desktop主机上面
[root@localhost yum.repos.d]# systemctl status firewalld
[root@localhost yum.repos.d]# systemctl stop firewalld    #关闭防火墙
在server主机上面
[root@localhost yum.repos.d]# showmount -e 172.25.254.111快速查看desktop远程服务器共享出来的东西(正确)
但是看不到/mnt这个目录, 因为服务器的nfs服务没有开启
[root@localhost yum.repos.d]# systemctl start nfs-server
[root@localhost yum.repos.d]# exportfs -rv刷新
[root@localhost yum.repos.d]# showmount -e 172.25.254.111可以看到/mnt
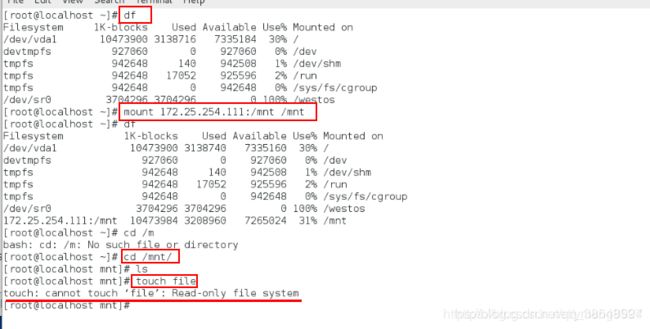
[root@localhost yum.repos.d]# mount 172.25.254.111:/mnt/  /mnt/挂载服务端的目录到本地
[root@localhost yum.repos.d]# df查看挂载
[root@localhost yum.repos.d]# cd /mnt/进入这个目录, 实际上进入了服务器的目录
[root@localhost mnt]# ls查看服务器的这个目录里面的内容
[root@localhost mnt]# touch file失败,因为只读(其实就是对远程主机操作)比较慢
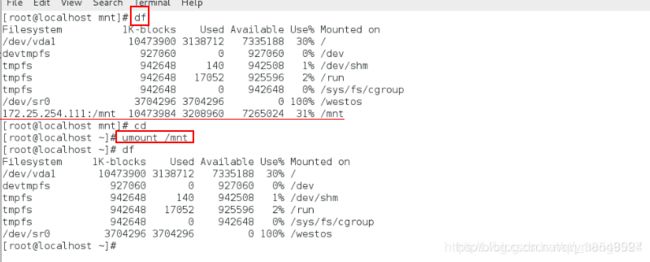
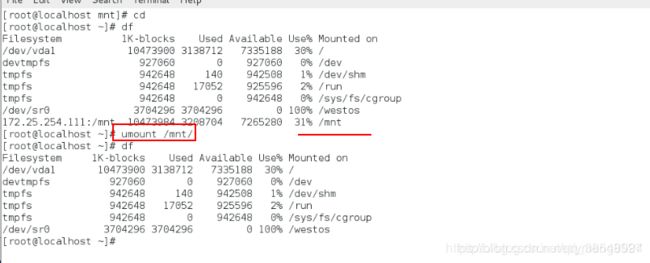
[root@localhost mnt]# umount /mnt卸载
[root@localhost mnt]# df查看是否卸载
在desktop主机上面
[root@localhost yum.repos.d]# vim /etc/exports编辑改服务的配置文件
/mnt 172.25.254.0/24(ro,async)使修改不同步
[root@localhost yum.repos.d]# exportfs -rv刷新
[root@localhost ~]# mount 172.25.254.111:/mnt/ /mnt/
[root@localhost ~]# df
[root@localhost ~]# cd /mnt
[root@localhost ~]# ls
[root@localhost ~]# touch file(虽然服务不允许,但是响应比较快)
#5 使nfs服务器的目录可以在本地挂载的同时也可以在本地对它修改(ro—>rw)
在desktop主机上面
将其只读改为读写:/mnt 172.25.254.0/24(rw,async)(可以写)
[root@localhost ~]#exportfs -rv刷新更改
在serve主机(客户端测试)上面
[root@localhost ~]# mount 172.25.254.111:/mnt/ /mnt/将远程文件系统挂载到本地
[root@localhost ~]# df查看挂碍
[root@localhost ~]# cd /mnt切换到挂载目录下
[root@localhost mnt]# touch file不行(虽然服务允许了,但是文件系统的权限不允许)
![]()
在desktop主机上面
[root@localhost ~]#  ls -ld /mnt/查看nfs服务器的这个目录的权限
[root@localhost ~]#  chmod 777 /mnt/改文件系统的权限
[root@localhost ~]#  cd /mnt/
[root@localhost mnt]#ls 什么都没有
在serve主机(客户端测试)上面
[root@localhost mnt]# touch file
[root@localhost mnt]# ls
有了
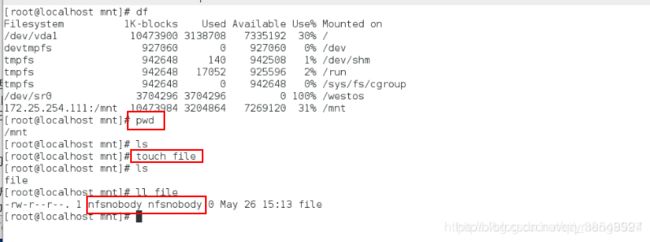
[root@localhost mnt]#ll ## 查看文件的属性,属于nfs服务器的匿名用户
在desktop主机上面
[root@localhost mnt]#  ls 有了
[root@localhost mnt]#  ls -l file(文件属于服务端匿名用户的)查看属性
先第一次建立文件,查看文件的所有人所有组,属于nfs服务器的匿名用户
#6 本地对nfs服务器进行修改的文件的所有人所有组的设置
以下是在本地建立东西所属用户的身份设置:
anonuid=1001(指定客户端的用户身份为服务端已经存在的用户身份)
就是客户端建立文件的身份是服务端指定的服务端自己存在的用户,客户端不存在这个用户
no_root_squash (指定沿用客户端挂载的用户身份)
客户端以哪个身份建立文件,文件就属于客户端哪个用户的
all_squash(转变所有的客户端的用户身份为服务端的用户身份)
不管客户端以哪个身份建立文件,文件的所有人所有组均为服务器指定转换为服务器自己存在的用户身份
都会被映射成服务端匿名用户,如果指定了,就是指定的1001的用户
优先级由低到高
在serve主机上面
[root@localhost ~]# cd切换到家目录
[root@localhost ~]# df
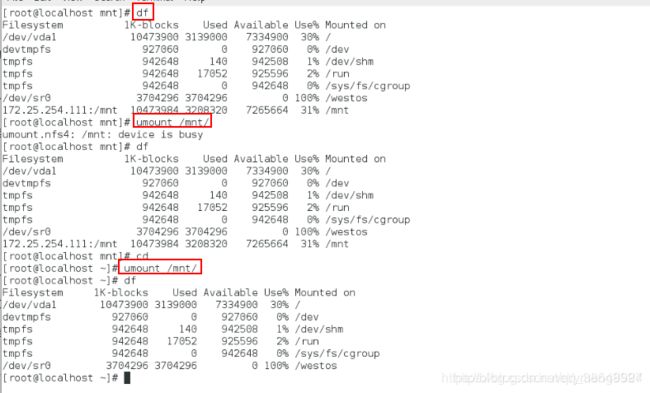
[root@localhost ~]# umount /mnt将上一个实验的挂载先卸载掉
在desktop主机上面
[root@localhost mnt]# useradd westos新建一个普通用户
[root@localhost mnt]# id westos查看他的id
[root@localhost mnt]#  vim /etc/exports 编辑nfs服务的配置文件
/mnt 172.25.254.0/24(rw,async,anonuid=1001,anonugid=1001)使得在客户端本地建立文件属于服务端的指定的用户
[root@localhost mnt]# exportfs -rv刷新
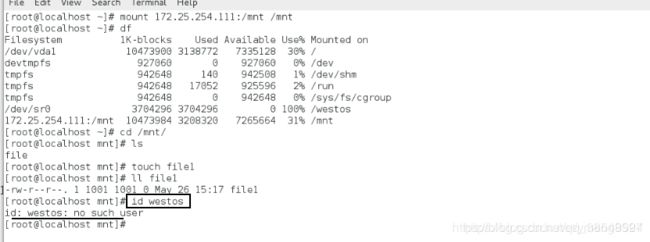
[root@localhost ~]# mount 172.25.254.111:/mnt/ /mnt
[root@localhost ~]# df
[root@localhost ~]#  cd /mnt
[root@localhost mnt]#  ls
[root@localhost mnt]#  touch file1
[root@localhost mnt]#  ls -l ##  发现file1的文件的属于1001的
[root@localhost mnt]# id westos 发现客户端westos不存在
[root@localhost mnt]#   ll      ##发现file1属于westos
[root@localhost mnt]#  vim /etc/exports
/mnt 172.25.254.0/24(rw,async,anonuid=1001,anonugid=1001,no_root_squash)让文件属于客户端谁建立就属于谁
[root@localhost mnt]# exportfs -rv
[root@localhost mnt]#  touch file2
[root@localhost mnt]#  ll    ## 发现file2 属于root(客户端的root)
[root@localhost mnt]# chmod 777 /mnt      ## 使用本地的root身份给一个满权限
[root@localhost mnt]# ls -ld /mnt    ## 查看年属性,如果和给的权限一致,就说明此时的root是客户端的root
[root@localhost mnt]# su - student     ##切换用户
[root@localhost mnt]# cd /mnt     ##进入nfs服务器的目录
[root@localhost mnt]# ls
[root@localhost mnt]# touch file3 ##建立文件
[root@localhost mnt]# ll     ##发现file3属于student属于student自己
在desktop主机上面
[root@localhost mnt]# ll ##发现file3属于student
[root@localhost mnt]#  useradd meng
[root@localhost mnt]#  su - meng
[root@localhost mnt]#  cd /mnt
[root@localhost mnt]#  touch file4
[root@localhost mnt]#  ll    ##属于meng
在desktop主机上面
[root@localhost mnt]#  ll file4属于westos
因为westos和meng的id一样
在desktop主机上面
[root@localhost mnt]#  vim /etc/exports
/mnt 172.25.254.0/24(rw,async,anonuid=1001,anonugid=1001,no_root_squash,all_squash)使得客户端建立的文件均属于服务端的用户
[root@localhost mnt]# exportfs -rv
在serve主机(客户端)上面
[root@localhost mnt]#   touch file5
[root@localhost mnt]#   ll 发现属于haha(1001)
在desktop主机上面
[root@localhost mnt]#   ll 发现属于westos(1001)
[root@localhost mnt]#  useradd westos1
[root@localhost mnt]#   su - westos1
[root@localhost mnt]#  cd /mnt
[root@localhost mnt]#  touch file6
[root@localhost mnt]#  ls -l file6
#7 实现nfs服务器在本地的自动挂载和自动卸载
以下的操作都在客户端进行
df查看上一个实验有没有卸载
umount /mnt卸载
[root@localhost ~]# yum install autofs -y ##安装可以实现自动挂载文件系统的服务
[root@localhost ~]# systemctl start autofs     ##开启服务
[root@localhost ~]# systemctl enable autofs   ##设置开机启动
[root@localhost ~]# systemctl stop autofs.service   ##关闭这个服务
[root@localhost ~]# ls -l /net     ##没有这个目录
[root@localhost ~]# systemctl start autofs.setvice     ##开启这个服务
[root@localhost ~]# ls -l /net     ##有这个目录
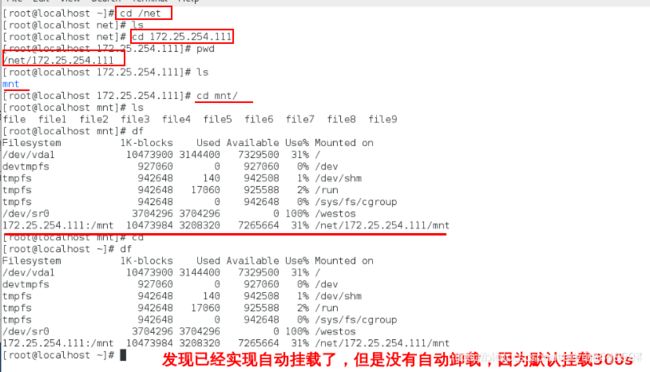
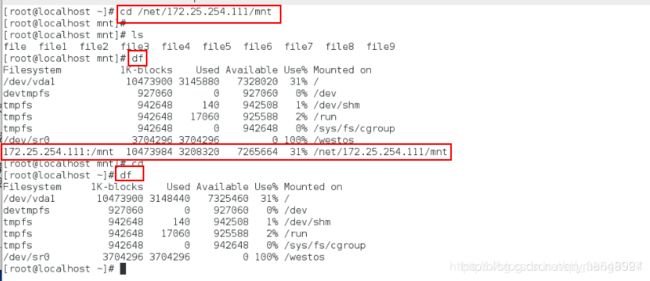
[root@localhost ~]# cd /net 进入
[root@localhost ~]# ls查看什么都没有
[root@localhost ~]# cd  172.25.254.111进入服务器
[root@localhost ~]# pwd
[root@localhost ~]# ls
[root@localhost ~]# cd /mnt进入修改目录
[root@localhost ~]# df查看有没有自动挂载
(cd /net/172.25.254.111/mnt ls也可以,这样不容易出错)
[root@localhost ~]# cd退出
[root@localhost ~]# df 依然挂载,没有自动卸载,因为默认停留时间是300s
[root@localhost ~]# rpm -qc autofs 查看配置文件,版本不一样,配置文件不一样
[root@localhost ~]# rpm -qa | grep autofs
[root@localhost ~]# vim /etc/sysconfig/autofs
改等待时间
[root@localhost ~]# systemctl restart autofs.services
[root@localhost ~]# df
[root@localhost ~]# cd /net/172.25.254.111/mnt
[root@localhost mnt]#  df
[root@localhost mnt]# cd
[root@localhost mnt]# df
注意:不要一直df查看,查看一次就会被读取一次
#8 下面想改变自动挂载的目录,现在不想通过/net 这个目录自动挂载
172.25.254.111:/mnt/ /mnt/westos想挂载到/mnt/westos上面
现在想改变挂载策略,将服务端的目录 挂载到 我的客户端我想挂载的任何目录上
实际上客户端/mnt/westos是不存在的
以下所有的实验都在客户端进行
cd /mnt/westos不存在
172.25.254.111:/mnt /mnt/westos 想自动挂载在/mnt/westos上面
vim /etc/auto.master

写入:/mnt(目的挂载目录的上一级目录) /etc/auto.nfs(在这个文件里面编写)

vim /etc/auto.nfs
westos(目的挂载目录) 172.25.254.111:/mnt服务端被挂载的目录
![]()
systemctl restart autofs
cd /mnt/westos
ls
df
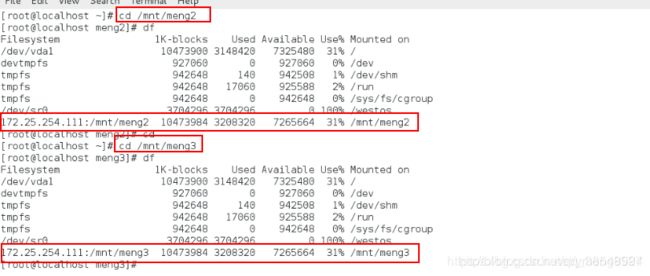
可以看到:172.25.254.111:/mnt挂载在我指定的/mnt/westos上面
cd
df 自动卸载
![]()
cd /mnt/westos
mount 查看挂载类型
cd
手动指定挂载类型;
mount -o vers=3,ro 172.25.254.111:/mnt/ /media/
mount   查看,读写类型
#9 现在想设置实现自动设置挂载类型
vim /etc/auto.nfs
westos -ro,vers=3 172.25.254.111:/mnt
systemctl restart autofs
cd /mnt/westos
mount
#10 现在想实现客户端被挂载的目录和服务端的名字匹配
在服务端
cd /mnt
rm -rf *
mkdir westos{1..3}
ls
想让172.25.254.111:/mnt/westos1挂载到/mnt/westos1
showmount -e 172.25.254.111
ls
cd meng1/
df
依然挂载在/mnt/meng上面
cd
mount 172.25.254.111:/mnt/westos1 /media/
df
umount /media/
cd /mnt/westos1不存在
vim /etc/auto.nfs
写入* -ro,vers=3 172.25.254.100:/mnt/&
systemctl restart autofs
cd /mnt/meng1
df看172.25.254.111:/mnt/westos1是否挂载在/mnt/westos1上面
cd
cd /mnt/westos2
df
cd
cd /mnt/westos3
df
cd
cd /mnt/westoshaha不存在
在服务端
cd /mnt
mkdir westoshaha
cd /mnt/westos11
df
就可以
nfs永久挂载
在服务端
[root@shareserver ~]# yum install -y nfs-utils
[root@shareserver ~]# systemctl start nfs-server
[root@shareserver ~]# vim /etc/exports
1 /linuxfile  *(sync,ro)
[root@shareserver ~]# exportfs -rv        # 不需要重启服务,扫描即可
exporting *:/linuxfile
(1) exportfs [-aruv]参数说明如下:
 -a           # 全部挂载(或卸载)/etc/exports文件内的设定。
 -r           # 重新挂载/etc/exports中的设置,此外同步更新/etc/exports及/var/lib/nfs/xtab中的内容。
 -u           # 卸载某一目录。
 -v           # 在export时将共享的目录显示在屏幕上。
在客户端
[root@client ~]# showmount -e 172.25.254.142   # 识别共享
Export list for 172.25.254.142:/linuxfile *
[root@client ~]# mount 172.25.254.142:/linuxfile   /mnt   # 使用共享
[root@client ~]# df
[root@client ~]# cd /mnt
[root@client mnt]# ls
file1  file2  file3  file4  file5  rootfile
自动挂载autofs服务
自动挂载器是一个监视目录的守护进程,并在目标子目录被引用时,自动执行预定义的挂载自动挂载器由autofs服务脚本管理自动挂载器由auto.master配置文件进行配置,该文件引用了一个按惯例称作/etc/auto.misc
客户端
[root@client ~]# yum install -y autofs
[root@client ~]# ls -ld /net    # 服务没开启之前,这个目录不存在
ls: cannot access /net: No such file or directory
[root@client ~]# systemctl start autofs.service
 [root@client ~]# ls -ld /net   # 服务开启之后,目录自动生成
 drwxr-xr-x. 2 root root 0 Nov 25 10:10 /net
 [root@client ~]# cd /net/
 [root@client net]# ls
 [root@client net]# cd 172.25.254.142
 [root@client 172.25.254.142]# ls
 linuxfile
 [root@client 172.25.254.142]# cd linuxfile/
 [root@client linuxfile]# ls
 file1  file2  file3  file4  file5  rootfile[
 root@client linuxfile]# pwd
 /net/172.25.254.142/linuxfile
 [root@client linuxfile]# df    # 进入到共享目录之后,可以看到自动挂载
[root@client linuxfile]# cd   # 退出去之后,默认300秒之后自动卸载
[root@client ~]# vim /etc/sysconfig/autofs  # 修改自动卸载时间
14 TIMEOUT=5
[root@client ~]# systemctl restart autofs.service
[root@client ~]# umount /mnt   # 先手动卸载
[root@client ~]# cd /net/172.25.254.142/linuxfile/  # 再次测试
[root@client linuxfile]# df
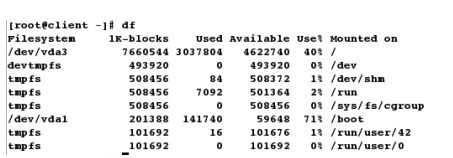
[root@client linuxfile]# cd
[root@client ~]# df    # 等待3秒,再次查看挂载情况
![]()
设定自动挂载点的位置
[root@client ~]# vim /etc/auto.master     # 编辑策略文件,自定义挂载点,写入最终挂载点的上层目录以及子文件
8 /pub   /etc/auto.pub
[root@client ~]# ls -l  /etc/auto.pub  # 指定的子文件是不存在的,需要自己建立
ls: cannot access /etc/auto.put: No such file or directory
[root@client ~]# vim /etc/auto.pub   # 子文件里写的是最终挂载点和挂载参数
1 linux  -ro  172.25.254.142:/linuxfile
[root@client ~]# ll /etc/auto.pub
-rw-r--r--. 1 root root 38 Nov 25 10:45 /etc/auto.pub
[root@client ~]# systemctl restart autofs.service
[root@client pub]# cd linux   # 进入到共享目录
[root@client linux]# ls
file1  file2  file3  file4  file5  rootfile
[root@client linux]# df   # 自动挂载
[root@client linux]# cd
[root@client ~]# df    # 等待3秒,自动卸载
更改共享权限
(1)更改挂载参数
在客户端
[root@client linux]# ls
file1  file2  file3  file4  file5  rootfile
[root@client linux]# mount
[root@client linux]# cd
[root@client ~]# vim /etc/auto.pub
linux  -ro,vers=3  172.25.254.142:/linuxfile   # vers=3是挂载参数,表示版本3,默认是版本4
[root@client ~]# cd /pub/linux
[root@client linux]# mount   # 更改成功
[root@client linux]# rm file1
rm: remove regular empty file ‘file1’? y
rm: cannot remove ‘file1’: Read-only file system
服务端
[root@shareserver ~]# vim /etc/exports
1 /linuxfile  *(sync,rw)
[root@shareserver ~]# exportfs -rv
在客户端
[root@client linux]# cd
[root@client ~]# vim /etc/auto.pub
linux  -rw,vers=3  172.25.254.142:/linuxfile
[root@client ~]# systemctl restart autofs.service
[root@client ~]# cd /pub/linux
[root@client linux]# ls
file1  file2  file3  file4  file5  rootfile
[root@client linux]# rm -fr file1    # 成功删除
[root@client linux]# ls
file2  file3  file4  file5  rootfile
(3)更改挂载用户
[root@client ~]# cd /pub/linux
[root@client linux]# touch file7
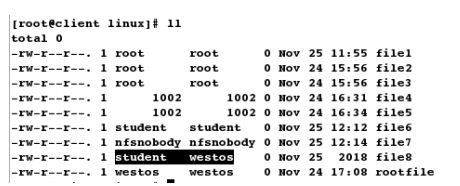
[root@client linux]# ll   # 没改之前,用匿名用户身份挂载时,建立的文件属于nfs的匿名用户
服务端
[root@shareserver ~]# vim /etc/exports
1 /linuxfile  *(sync,rw,no_root_squash)
sync表示实时同步
no_root_squash表示当客户端用匿名用户挂载的时候,使用超级用户身份
[root@shareserver ~]# exportfs -rv
在客户端
[root@client ~]# cd /pub/linux
[root@client linux]# ll
[root@client linux]# touch file1
[root@client linux]# ll
在服务端
[root@shareserver ~]#vim /etc/exports
/linuxfile     *(sync,rw,anonuid=1000,anongid=1000)   # 挂载时将客户端的用户映射到指定的本地id为1000的用户
[root@shareserver ~]# exportfs -rv
在客户端
[root@client ~]# cd /pub/linux[
root@client linux]# touch file6
[root@client linux]# ll
[root@client ~]#  id student   # 查看到1000这个id就是student
uid=1000(student) gid=1000(student) groups=1000(student),10(wheel)
将客户端的用户映射到指定的本地id为1000的用户,用户组映射到指定的本地id组为1001的用户
在服务端
[root@shareserver ~]# vim /etc/exports
1 /linuxfile  *(sync,rw,anonuid=1000,anongid=1001)
[root@shareserver ~]# exportfs -rv
在客户端
[root@client ~]# cd /pub/linux
[root@client linux]# touch file8
[root@client linux]# ll
[root@client ~]# id westos
uid=1001(westos) gid=1001(westos) groups=1001(westos)
[root@client ~]# id student
uid=1000(student) gid=1000(student) groups=1000(student),10(wheel)

