Android开发ListView的两种实现方法
Android开发ListView的两种实现方法
在Android开发中,我们既可以在.xml文件中直接布局ListView,也可以在在.java文件中编码实现ListView,这两种方法各有利弊,不过推荐使用的是在.java文件中编码实现ListView。
在.xml文件中直接布局ListView
我们可以直接在.xml文件中使用android:entries属性来直接添加list的内容。
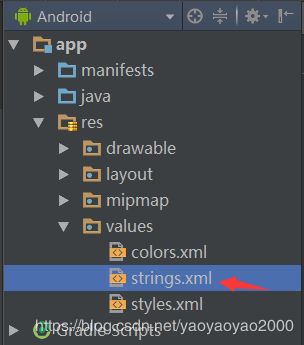
首先,在strings.xml文件中添加如下数组

strings.xml中内容
<resources>
	<string name="app_name">项目名称</string>
    <string-array name="book_values">
        <item>第一行代码Android</item>
        <item>Android开发与实践</item>
        <item>疯狂Android讲义</item>
        <item>精通Android Studio</item>
    </string-array>
</resources>
然后在.xml文件中修改成如下
<?xml version="1.0" encoding="utf-8"?>
<LinearLayout android:layout_width="match_parent"
    android:layout_height="match_parent"
    android:orientation="vertical"
    android:gravity="center"
    xmlns:android="http://schemas.android.com/apk/res/android">

    <TextView
        android:id="@+id/textViewBook"
        android:layout_width="match_parent"
        android:layout_height="wrap_content"
        android:text="我喜欢的教科书"
        android:textColor="@android:color/black"
        android:textSize="18sp" />

    <ListView
        android:id="@+id/listViewBook"
        android:entries="@array/book_values"
        android:layout_width="match_parent"
        android:layout_height="match_parent"
        android:scrollbars="horizontal" />
</LinearLayout>
在.java文件中不需要添加任何代码,也不需要做任何修改,就可以实现listView的一个实例了。
在.java文件中编码实现ListView
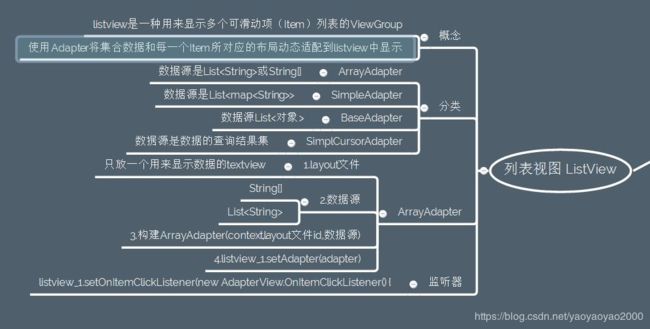
在.java文件中编码实现ListView有两种不同的途径,我们既可以在对应java文件的Activity中继承ListActivity来实现,也可以直接继承自AppCompatActivity或者Activity来实现。前者只能在该Activity中实现ListActivity的方法,如果使用不当则容易造成闪退;后者则比较通用。无论这两者,都需要使用到适配器。而适配器,又分为ArrayAdapter和SimpleAdapter,前者是数组适配器,后者不仅仅可以适配string还可以适配图片。(参考博客)

继承ListActivity
如果程序的窗口仅仅需要显示一个列表,则可以让Activity继承自ListActivity来实现。如果不调用setContentView()函数的话,则只能显示一个ListView,其他的textView之类的组件则无法显示。
有一点要十分注意,ListView的id必须被设置成
android:id="@android:id/list
否则就会闪退,并且logcat报
java.lang.RuntimeException: Unable to start activity ComponentInfo{com.example.dell.ch5_3/com.example.dell.ch5_3.ListViewActivity}: java.lang.RuntimeException: Your content must have a ListView whose id attribute is 'android.R.id.list'
<?xml version="1.0" encoding="utf-8"?>
<LinearLayout
    android:layout_width="match_parent"
    android:layout_height="match_parent"
    android:orientation="vertical"
    android:gravity="center"
    xmlns:android="http://schemas.android.com/apk/res/android">

    <TextView
        android:id="@+id/textView1"
        android:layout_width="match_parent"
        android:layout_height="wrap_content"
        android:text="我喜欢的水果"
        android:textColor="@android:color/black"
        android:textSize="28sp" />

    <ListView
        android:id="@android:id/list"
        android:layout_width="match_parent"
        android:layout_height="match_parent"
        android:scrollbars="horizontal" />
</LinearLayout>
.java文件中内容
其中simple_list_item_single_choice是指list只可以单选,更多选项,请看参考链接。
package com.example.dell.ch5_3;

import android.app.ListActivity;
import android.os.Bundle;
import android.view.View;
import android.widget.ArrayAdapter;
import android.widget.ListView;
import android.widget.Toast;

public class ListViewActivity extends ListActivity {

    @Override
    protected void onCreate(Bundle savedInstanceState) {
        super.onCreate(savedInstanceState);
        setContentView(R.layout.activity_list_view);
        /*创建用于为ListView指定列表项的适配器*/
        String[] cType = new String[]{"apple","banana","blueberry","lemon",
                "pear","pineapple","watermelon"};
        ArrayAdapter<String> adapter = new ArrayAdapter<>(this,
                android.R.layout.simple_list_item_single_choice, cType);
        setListAdapter(adapter);
    }
    /**重写单击监听事件*/
    @Override
    protected void onListItemClick(ListView l, View v, int position, long id) {
        super.onListItemClick(l,v, position,id);
        String result = l.getItemAtPosition(position).toString();//获取选项的值
        Toast.makeText(ListViewActivity.this,"我喜欢:"+result,Toast.LENGTH_SHORT).show();
    }
}
继承AppCompatActivity
AppCompatActivity是Android Studio2.3.3自动创建项目的MainActivity所继承自的类。AppCompatActivity主要是为了兼容低版本的一些问题(参考链接),所以实现ListView的时候就不需要考虑很多。
.xml文件中内容
<?xml version="1.0" encoding="utf-8"?>
<LinearLayout android:layout_width="match_parent"
    android:layout_height="match_parent"
    android:orientation="vertical"
    android:gravity="center"
    xmlns:android="http://schemas.android.com/apk/res/android">

    <TextView
        android:id="@+id/textViewBook"
        android:layout_width="match_parent"
        android:layout_height="wrap_content"
        android:text="我喜欢的教科书"
        android:textColor="@android:color/black"
        android:textSize="18sp" />

    <!-- android:entries="@array/book_values" -->

    <ListView
        android:id="@+id/listViewBook"
        android:layout_width="match_parent"
        android:layout_height="match_parent"
        android:scrollbars="horizontal" />
</LinearLayout>
.java文件中内容
package com.example.dell.ch5;

import android.os.Bundle;
import android.support.v7.app.AppCompatActivity;
import android.view.View;
import android.widget.AdapterView;
import android.widget.ArrayAdapter;
import android.widget.ListView;
import android.widget.Toast;

public class MainActivity extends AppCompatActivity {
    private ListView listView;
    private ArrayAdapter<String> adapter;

    @Override
    protected void onCreate(Bundle savedInstanceState) {
        super.onCreate(savedInstanceState);
        setContentView(R.layout.activity_main);
        //1.获取ListView对象
        listView = (ListView) findViewById(R.id.listViewBook);
        //2.构造数据源
        final String[] ctype = new String[]{
        	"第一行代码Android", "Android开发与实践", "疯狂Android讲义", "精通Android Studio"};
        //3.为适配器添加数据源
        adapter = new ArrayAdapter<>(this,
        	android.R.layout.simple_list_item_multiple_choice, ctype);
        //4.将适配器关联到listView
        listView.setAdapter(adapter);
        listView.setChoiceMode(ListView.CHOICE_MODE_MULTIPLE); /*设置多选模式*/
        listView.setOnItemClickListener(new AdapterView.OnItemClickListener() {
            @Override
            public void onItemClick(AdapterView<?> parent, View view, int position, long id) {
                int i = position;
                i++;
                Toast.makeText(MainActivity.this, "选择了第" + i + "个:" + ctype[position], Toast.LENGTH_SHORT).show();
            }
        });
    }
}
继承Activity
Activity类的一个对象其实就一个窗口。虽然Android Studio2.3.3里MainActivity是继承自类AppCompatActivity的,但是AppCompatActivity也是继承Activity类的(参考链接)。所以这一部分的代码和“继承AppCompatActivity”部分大体一样,就是需要把
public class MainActivity extends AppCompatActivity
改成
public class MainActivity extends Activity
并且导入相应的包
import android.app.Activity;
