深度学习系列2:框架tensorflow
1. 背景
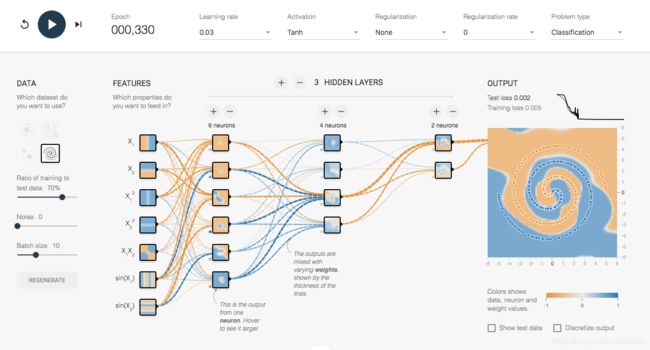
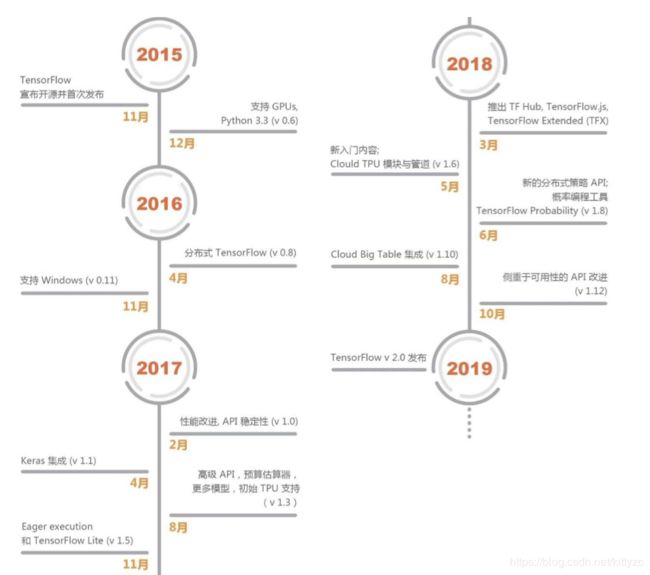
tensorflow是一套可以通过训练数据的计算结果来反馈修改模型参数的一套框架,由谷歌公司于2015年11月开源,可以点击playground来可视化的尝试操作tensorflow,随便试了一下,挺好玩:

使用如下语句进行安装:
pip install tensorflow
tensorflow近期发布了2.0预览版本,改动极大,在第4部分介绍。TensorFlow再这么完善下去,都可以不用再学pytorch和caffe了。
2. 现有版本使用方法
现有版本的TensorFlow是静态计算图的模式,需要使用session来执行图graph的计算。
Session(会话)的定义和使用方式如下:
	with tf.Session() as sess:
		merged = tf.summary.merge_all()
		writer = tf.summary.FileWriter("/tmp/variable_logs", graph=g)
		#随后可以使用tensorboard --logdir=/tmp 启动tensorboard
graph的定义和使用方式如下:
g = tf.Graph()
with g.as_default()
计算图的基本数据结构是tensor,基于tensor又分为两大类别:placeholder和variable。其中variable是进行优化的参数,可以自动反向求微分,placeholder用于传递训练数据。
这个框架比较逆天的地方在于自己定义了一套数据结构和函数方法,与python的使用习惯非常不一样,因此有不少人用不习惯改用了pytorch、caffe等。
言归正传,计算图定义包括参数、预测函数、损失函数、优化函数等,例如
A = tf.Variable(rf.random_normal(shape = [1,1]))
b = tf.Variable(rf.random_normal(shape = [1,1]))
def pred(x):
	output = tf.add(tf.mul(x, A), b)
	return output

def loss(x, y):
	loss = tf.reduce_mean(tf.square(y – pred(x)))
	return loss

def opt(loss)
	learningRate = 0.001
	opt = tf.train.GradientDescentOptimizer(learningRate)
	trainingStep = opt.minimize(loss)
	return trainingStep
新建Session,使用数据训练模型:
with tf.Session() as sess:
	sess.run(tf.global_variables_initializer())
	#接下来是常见的训练手法:
	#1. 定义训练集和测试集,并正则化
	[sourceData] = ...
	data = tf.nn.batch_norm_with_global_normalization([sourceData])
	#2. 按照批次随机选取训练数据
	[x_train_data] = ...
	[x_evaluate_data] = ...
	[y_train_data] = ...
	[y_evaluate_data] = ...
	#3. 定义训练图,定义迭代条件
	x_input = tf.placeholder(tf.float32, [None, input_size])
	y_target = tf.placeholder(tf.float32, [None, input_size])
	train_opt = opt(loss(x_input,y_target))
	for [stop rule]:
		#4. 给训练图喂数据,优化器会根据placeholder传入的值优化variable的值。
		sess.run(loss,feed_dict={x_input:x_train_data,y_target:y_train_data})
		#5. 每隔一定迭代次数将损失和计算值保存下来,并绘制图
从下图可以看出tensorflow的流程:训练数据从placeholder进入训练图,通过pred计算出output,然后通过loss计算损失函数,然后通过opt调整variable的值。迭代这个过程直至满足一定的条件。

4. 不断更新的TensorFlow

即使是在1.0版本中,TensorFlow也在不断发生变化,比如变量初始化的tf.initialize_all_variables变为tf.global_variables_initializer,summary相关的都放入了一个包中,所以XX_summary都变为了summary.XX,数学函数sub、mul等被补全为substract、multiply等。
下面简单介绍一下2.0的重要改变:删除支持 tf.data 的队列运行程序、移除图集合
变量处理方式的更改、API 符号的移动和重命名、tf.contrib 将从核心 TensorFlow 存储库和构建过程中删除。
在我看来,2.0版本有如下重要的特点:
4.1 动态图机制Eager模式
在传统的TensorFlow开发中,我们需要首先通过变量和Placeholder来定义一个计算图,然后启动一个Session,通过TensorFlow引擎来执行这个计算图,最后给出我们需要的结果。相信大家在入门阶段,最困惑的莫过于想要打印某些向量或张量的值,在Session之外或未执行时,其值不可打印的问题。
在新版本中,tensorflow向pytorch看齐,默认开启eager模式。我们可以尝试一下:
import tensorflow as tf
print(tf.executing_eagerly())
print(tf.reduce_sum([1, 2, 3, 4, 5]))
输出为:tf.Tensor(15, shape=(), dtype=int32),而不是以前的Tensor(“Sum:0”, shape=(), dtype=int32)
4.2 动态图下的dataset焕发新生
tf.data.Dataset提供了强大的数据预处理流水线,例如数据自动shuffle、划分batch等。在静态图模式中,tf.data.Dataset的数据预处理可以被看做静态图的一部分,在动态图模式中,tf.data.Dataset可以被当做强大的Generator,例如我们可以直接用python的for in语句来获取每个batch的数据。
dataset = tf.data.Dataset.list_files("/data/*").
		map(decode_image).shuffle(SHUFFLE_SIZE).batch(BATCH_SIZE)
4.3 Keras已加入TesorFlow豪华套餐
在以前,我们需要单独安装与使用Keras:
# keras.io code:
from keras.layers import Dense
output_layer = Dense(10)
现在,我们安装完tensorflow,就可以直接使用keras了:
# corresponding tf.keras code:
from tensorflow import keras
Dense = keras.layers.Dense
output_layer = Dense(10)
没什么好多说的,用法一样,下面举个例子:
from tensorflow import keras
model = keras.models.Sequential()
model.add(keras.layers.Flatten(input_shape=[28, 28]))
model.add(keras.layers.Dense(300, activation="relu"))
model.add(keras.layers.Dense(100, activation="relu"))
model.add(keras.layers.Dense(10, activation="softmax"))
model.summary()
model.compile(loss="sparse_categorical_crossentropy",
              optimizer="sgd", metrics=["accuracy"])
history = model.fit(X_train, y_train, epochs=10,
      validation_data=(X_valid, y_valid))
n_new = 10
X_new = X_test[:n_new]
y_proba = model.predict(X_new)
print(y_proba.round(2))
y_pred = model.predict_classes(X_new)
print(y_pred)
Keras的封装层级比较高,在Keras中,可以调整的地方包括:
- 模型:增加隐藏层个数;增加每一层的神经元个数;增加dropout层;修改层模型(dense、SimpleRNN、LSTM、GRU)
- 优化器:调整学习率;使用不同的优化器;
- 目标函数:在目标函数中加入复杂度的正则(乘以一个超参 λ \lambda λ),L1正则也称为lasso,权重的绝对值之和;L2正则也称为ridge,权重的平方和。在keras层中使用kernel_regularizers
- 训练:增加训练轮数;修改batch_size;BatchNormalization:常用的提升效率的方法。
下面介绍一下keras的一些小技巧
- 保存和加载模型:调用to_json()或to_yaml()函数保存;调用model_from_json、model_from_yaml进行加载;
- 自定义回调函数:可以通过keras.callbacks.EarlyStopping来提前停止训练。
- 检查点设置:调用keras.callbacks.ModelCheckpoint。
- 使用tensorboard:调用keras.callbacks.TensorBoard。图形化结果可以用过tensorboard --logdir=…来启用
- 使用quiver:使用pip install quiver_engine安装之后。
4.4 即可训练,亦可部署
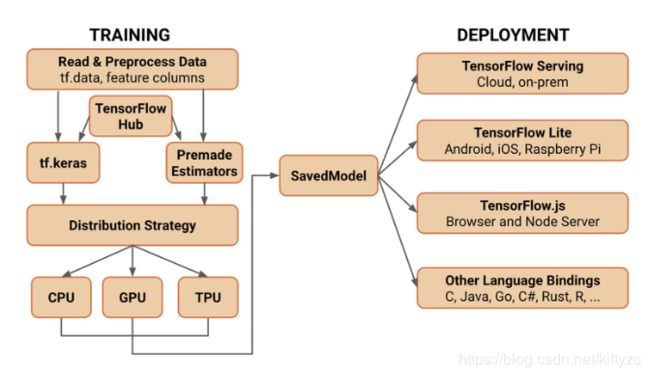
TensorFlow 将在 SavedModel 上作为 TensorFlow 服务、TensorFlow Lite、TensorFlow.js、TensorFlow Hub 等的交换格式进行标准化。无论是在服务器、边缘设备还是网络上,使用何种语言或平台,TensorFlow 都可以让您轻松地训练和部署模型。在 TensorFlow 2.0 中,通过标准化交换格式和调整 API 来改进平台和组件之间的兼容性和奇偶性:
- TensorFlow 服务:允许模型通过 HTTP/REST 或 GRPC/协议缓冲区提供服务的 TensorFlow 库构建。
- TensorFlow Lite:TensorFlow 针对移动和嵌入式设备的轻量级解决方案提供了在 Android、iOS 和嵌入式系统上部署模型的能力。
- tensorflow.js:支持在 Java 环境中部署模型,例如在 Web 浏览器或服务器端通过 Node.js 部署模型。TensorFlow.js 还支持在 Java 中定义模型,并使用类似于 Kera 的 API 直接在 Web 浏览器中进行训练。
TensorFlow 还支持其他语言(一些由更广泛的社区维护),包括 C、Java、Go、C#、Rust、Julia、R 等。
5. 其他资源
5.1 TensorBoard
TensorBoard是一个可视化工具,能够有效地展示Tensorflow在运行过程中的计算图、各种指标随着时间的变化趋势以及训练中使用到的数据信息。在然后在命令行输入:
tensorboard --logdir=/tmp
即可启动Tensorboard。只需要在浏览器下输入127.0.0.1:6006就可以进入TensorBoard。
5.2 TensorFlow.js和TensorFlow Lite
谈到 JavaScript ,自从有了 TensorFlow.js,你就可以在浏览器中训练并运行你的模型。你可以在官方社区中看到各种酷毙了的 demo。可以试试这个在浏览器中可以实时识别人动作的小应用:
https://storage.googleapis.com/tfjs-models/demos/posenet/camera.html
此外,TensorFlow Lite 版使模型可以在多种设备上运行,包括移动设备和物联网设备,它的运行速度达到了原版 TensorFlow 的3倍。
5.3 TensorFlow Hub
TensorFlow Hub(https://tensorflow.google.cn/hub/) 是一个平台,主要被用于发布、发现和重用机器学习模块。可以从 URL(或从文件系统路径)实例化 TensorFlow Hub模块,常见的图像、文本、语音问题都有不错的发布模块了。通过重用模块,开发人员可以使用较小的数据集训练模型,提升泛化能力或简单地加速训练。
下面是个官方例子:
import tensorflow as tf
import tensorflow_hub as hub

with tf.Graph().as_default():
	module_url = "https://tfhub.dev/google/nnlm-en-dim128-with-normalization/1"
	embed = hub.Module(module_url)
	embeddings = embed(["A long sentence.", "single-word","http://example.com"])
	with tf.Session() as sess:
		sess.run(tf.global_variables_initializer())
		sess.run(tf.tables_initializer())
		print(sess.run(embeddings))
5.4 各种链接
5.4.1 在线文档
- TensorFlow Python API
- TensorFlow on Github
- TensorFlow Tutorials
- Udacity Deep Learning Class
- TensorFlow Playground
5.4.2 Github Tutorials and Examples
- Tutorials by pkmital
- Tutorials by nlintz
- Examples by americdamien
- TensorFlow Workshop by amygdala
5.4.3 Deep Learning Resources
- Efficient Back Prop by Yann LeCun, et. al.
- Online Deep Learning Book, MIT Press
- An Overview of Gradient Descent Algorithms by Sebastian Ruder
- Stochastic Optimization by John Duchi, et. al.
- ADADELTA Method by Matthew Zeiler
- A Friendly Introduction to Cross-Entropy Loss by Rob DiPietro
5.4.4 Additional Resources
- A Curated List of Dedicated TensorFlow Resources
5.4.5 Arxiv Papers
- TensorFlow: Large-Scale Machine Learning on Heterogeneous Distributed Systems
- TensorFlow: A system for large-scale machine learning
- Distributed TensorFlow with MPI
- Comparative Study of Deep Learning Software Frameworks
- Wide & Deep Learning for Recommender Systems
