Java爬虫 -- HttpClient的使用说明
在第一个爬虫的基础上继续(主要是配置maven和日志)
GET请求(无参数)
新建HttpGetTest类
第一个爬虫中写的就是无参数的GET请求方法
不同的是第一个爬虫里处理异常是直接抛出,这里用了try…catch…
同时还增加了释放资源
public static void main(String[] args) {
	CloseableHttpClient httpClient = HttpClients.createDefault();
	HttpGet httpGet = new HttpGet("https://csdn.net");
	CloseableHttpResponse response = null;
	try {
	    response = httpClient.execute(httpGet);

	    if (response.getStatusLine().getStatusCode() == 200) {
	        String content = EntityUtils.toString(response.getEntity(), "utf8");
	        System.out.println(content.length());
	    }
	} catch (IOException e) {
	    e.printStackTrace();
	}finally {
	    try {
	        response.close();
	    } catch (IOException e) {
	        e.printStackTrace();
	    }
	    try {
	        httpClient.close();
	    } catch (IOException e) {
	        e.printStackTrace();
	    }
	}
}
GET请求(有参数)
新建HttpGetParamTest类
先创建HttpClient对象,然后
设置请求地址
String url = "https://so.csdn.net/so/search/s.do";
URIBuilder uriBuilder = new URIBuilder(url);
设置参数
uriBuilder.setParameter("q", "爬虫");
这里有一个参数就一个.setParameter
有多个参数就有多个.setParameter
比如
uriBuilder.setParameter("q", "爬虫").setParameter("t", "blog").setParameter("u", "");//我不知道他这个参数干啥的
发送GET请求
HttpGet httpGet = new HttpGet(uriBuilder.build());
剩下的就和上面不带参数的一样了
贴上main方法
public static void main(String[] args) throws URISyntaxException {
    CloseableHttpClient httpClient = HttpClients.createDefault();
    //设置请求地址
    String url = "http://www.itheima.com/search";
    URIBuilder uriBuilder = new URIBuilder(url);
    //设置参数
    //多个参数就在后面写多个.setParameter
    uriBuilder.setParameter("keys", "Java");
    HttpGet httpGet = new HttpGet(uriBuilder.build());
    System.out.println(httpGet);
    CloseableHttpResponse response = null;
    try {
        response = httpClient.execute(httpGet);

        if (response.getStatusLine().getStatusCode() == 200) {
            String content = EntityUtils.toString(response.getEntity(), "utf8");
            System.out.println(content.length());
        }
    } catch (IOException e) {
        e.printStackTrace();
    }finally {
        try {
            response.close();
        } catch (IOException e) {
            e.printStackTrace();
        }
        try {
            httpClient.close();
        } catch (IOException e) {
            e.printStackTrace();
        }
    }
}
POST请求(无参数)
这个和GET请求的区别仅仅是GET中的HttpGet,httpGet都换成HttpPost,httpPost
POST请求(有参数)
这个是在POST无参数请求的基础上加点东西即可

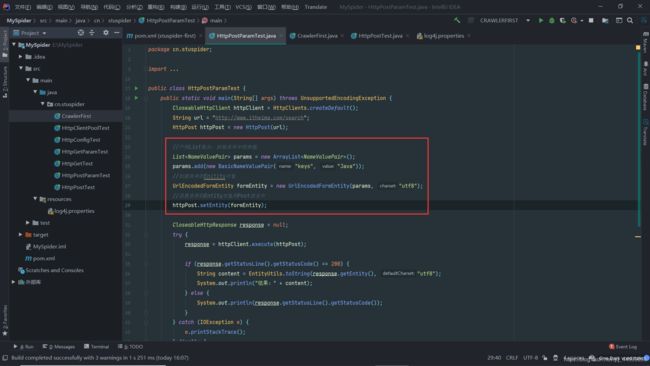
在这里加上下面的内容
//声明List集合,封装表单中的参数
List<NameValuePair> params = new ArrayList<NameValuePair>();
params.add(new BasicNameValuePair("keys", "Java"));
//创建表单的Enitity对象
UrlEncodedFormEntity formEntity = new UrlEncodedFormEntity(params, "utf8");
//设置表单的Entity对象到Post请求中
httpPost.setEntity(formEntity);
剩下的就和前面一样了
public static void main(String[] args) throws UnsupportedEncodingException {
    CloseableHttpClient httpClient = HttpClients.createDefault();
    String url = "http://www.itheima.com/search";
    HttpPost httpPost = new HttpPost(url);

    //声明List集合,封装表单中的参数
    List<NameValuePair> params = new ArrayList<NameValuePair>();
    params.add(new BasicNameValuePair("keys", "Java"));
    //创建表单的Enitity对象
    UrlEncodedFormEntity formEntity = new UrlEncodedFormEntity(params, "utf8");
    //设置表单的Entity对象到Post请求中
    httpPost.setEntity(formEntity);

    CloseableHttpResponse response = null;
    try {
        response = httpClient.execute(httpPost);

        if (response.getStatusLine().getStatusCode() == 200) {
            String content = EntityUtils.toString(response.getEntity(), "utf8");
            System.out.println("结果:" + content);
        } else {
            System.out.println(response.getStatusLine().getStatusCode());
        }
    } catch (IOException e) {
        e.printStackTrace();
    } finally {
        try {
            response.close();
        } catch (IOException e) {
            e.printStackTrace();
        }
        try {
            httpClient.close();
        } catch (IOException e) {
            e.printStackTrace();
        }
    }
}
HttpClient连接池
先将上面的代码封装成了一个doGet方法
这里要注意开始时创建HttpClient对象要从连接池中获取
最后面不要关闭HttpClient
private static void doGet(PoolingHttpClientConnectionManager cm) {
        //不是每次创建新的HttpClient,而是从连接池中获取HttpClient
   CloseableHttpClient httpClient = HttpClients.custom().setConnectionManager(cm).build();

    String url = "http://www.itcast.cn";
    HttpGet httpGet = new HttpGet(url);

    CloseableHttpResponse response = null;

    try {
        response = httpClient.execute(httpGet);

        if (response.getStatusLine().getStatusCode() == 200) {
            String content = EntityUtils.toString(response.getEntity(),"utf8");
            System.out.println(content);
        }
    } catch (IOException e) {
        e.printStackTrace();
    }finally {
        if (response != null) {
            try {
                response.close();
            } catch (IOException e) {
                e.printStackTrace();
            }
            //不能关闭HttpClient,由连接池管理HttpClient
        }
    }
}
然后在man方法中创建连接池管理器
PoolingHttpClientConnectionManager cm = new PoolingHttpClientConnectionManager();
然后设置最大连接数和每个主机的最大连接数
//设置最大连接数
cm.setMaxTotal(100);
//设置每个主机的最大连接数
cm.setDefaultMaxPerRoute(10);
最后调用doGet方法即可
doGet(cm);
doGet(cm);
HttpCLient配置
配置应该在response = httpClient.execute(httpGet);前面写
配置信息用RequestConfig config来接
RequestConfig config = RequestConfig.custom()
在这后面写上需要设置的配置就行了,最后用build()构建成RequestConfig类型的confiig
比如
RequestConfig config = RequestConfig.custom().setConnectTimeout(1000)     //创建连接最长时间,单位是毫秒
	.setConnectionRequestTimeout(500)      //设置获取连接的最长时间
	.setSocketTimeout(10 * 1000)             //设置传输的最长时间
	.build();
然后给请求设置上请求信息
httpGet.setConfig(config);
这样就配置成功了