【Android】ListAdapter的常用的子类
文章目录
- 一、ListAdapter
- 1.继承关系
- 2.用于
- 二、ArrayAdapter(数组适配器)
- 1.原型
- 2.ArrayAdapter构建例子
- (1)String数组
- (2)List泛型容器
- (3)自定义
- 三、SimpleAdapter
- 1.原型
- 2.SimpleAdapter构建
- (1)定义Item的布局
- (2)创建
一、ListAdapter
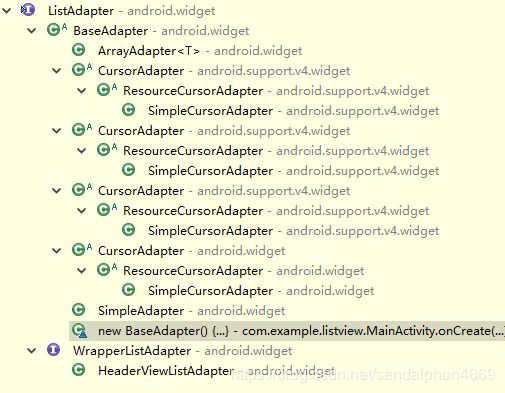
1.继承关系

常用的子类是ArrayAdapter、SimpleAdapter、BaseAdapter。
PS:RecyclerAdapter不是继承的子类,老搞混。
2.用于
- 用在ListView控件上,
listview.setAdapter(adapter);。 - 用在AlertDialog上,
builder.setAdapter()。
二、ArrayAdapter(数组适配器)
1.原型
ArrayAdapter(
	Context context,
	@LayoutRes int resource,
	Object[] objects
)
ArrayAdapter()参数:
-
context:context上下文对象
-
resource:每一个item的样式。
可以使用系统提供的布局样式,也可以使用自定义的布局样式。 -
objects:要显示的数据
可以是String数组,也可以List泛型容器。
系统提供的item的样式,可以试一试
-
simple_list_item1:单独的一行文本框
-
simple_list_item2:有两个文本框组成
-
simple_list_item_checked:每项都是由一个已选中的列表项
-
simple_list_item_multiple_choice:都带有一个复选框
-
simple_list_item_single_choice:都带有一个单选框
2.ArrayAdapter构建例子
(1)String数组
String[] str={"Just","do","it"};
ArrayAdapter<String> arrayAdapter=new ArrayAdapter<>(
	MainActivity.this,
	android.R.layout.simple_list_item_1,
	str);
(2)List泛型容器
List<String> data = new ArrayList<>();
data.add("Just");
data.add("do");
data.add("it");
ArrayAdapter<String> arrayAdapter=new ArrayAdapter<>(
	MainActivity.this,
	android.R.layout.simple_list_item_1,
	data);
(3)自定义
四步:
- 定义Fruit类
- 定义Item的布局
- 定义继承ArrayAdapter的FruitAdapter
- MainActivity.java中创建(之后就是绑到谁身上)
定义Fruit类
package com.example.hello;

public class Fruit {
    private String mName;
    private int mImageId;

    public Fruit(String name,int ImageId)
    {
        mName=name;
        mImageId=ImageId;
    }

    public String getmName()
    {
        return mName;
    }

    public int getmImageId()
    {
        return mImageId;
    }
}
定义Item的布局:layout.xml
<LinearLayout xmlns:android="http://schemas.android.com/apk/res/android"
    android:layout_width="match_parent"
    android:layout_height="wrap_content"
    android:orientation="vertical">

    <TextView
        android:layout_width="match_parent"
        android:layout_height="wrap_content"
        android:id="@+id/fruit_name"/>

    <ImageView
        android:layout_width="wrap_content"
        android:layout_height="wrap_content"
        android:id="@+id/fruit_image"/>

LinearLayout>
定义继承ArrayAdapter的FruitAdapter
package com.example.hello;

import android.content.Context;
import android.view.LayoutInflater;
import android.view.View;
import android.view.ViewGroup;
import android.widget.ArrayAdapter;
import android.widget.ImageView;
import android.widget.TextView;

import java.util.List;

public class FruitAdapter extends ArrayAdapter<Fruit> {
    private int mresource;

    public FruitAdapter(Context context, int resource, List<Fruit> objects) {
        super(context, resource, objects);
        mresource=resource;
    }

    @Override
    public View getView(int position, View convertView, ViewGroup parent) {
        Fruit fruit=getItem(position);
        View view= LayoutInflater.from(getContext()).inflate(mresource,parent,false);
        ImageView fruitImage=view.findViewById(R.id.fruit_image);
        TextView fruitText=view.findViewById(R.id.fruit_name);
        fruitImage.setImageResource(fruit.getmImageId());
        fruitText.setText(fruit.getmName());
        return view;
    }
}
MainActivity.java中创建
List<Fruit> data = new ArrayList<>();
data.add(new Fruit("banana",R.drawable.banana));
data.add(new Fruit("watermelon",R.drawable.watermelon));
FruitAdapter fruitAdapter=new FruitAdapter(
	MainActivity.this,
	R.layout.layout,
	data);
三、SimpleAdapter
1.原型
SimpleAdapter(
	Context context ,
	List<?extends<Map<String,?>> data,
	int resource ,
	String[] from ,
	int[] to
)
五个参数:
-
context:上下文对象
-
data:数据源,一个含有Map的List容器
Map中的Key是自己给每个条目中几个控件随便起的名字,控件A,控件B,控件C
Map中的Value是对应的资源内容,如控件中图片的R索引id,控件中文字的内容 -
resource:每一个item的布局文件
-
from:每个值就是data中的存入map集合的的key值
new String[]{}数组。 -
to:每个值就是引用resource布局文件中的控件R.id。
new int[]{}数组。
2.SimpleAdapter构建
两步:
- 定义Item的布局
- MainActivity.java中创建SimpleAdapter(之后就是绑到控件上)
(1)定义Item的布局
listview_item.xml用来自定义条目的样式。
<LinearLayout xmlns:android="http://schemas.android.com/apk/res/android"
    android:layout_width="match_parent"
    android:layout_height="wrap_content"
    android:orientation="vertical">

    <TextView
        android:layout_width="match_parent"
        android:layout_height="wrap_content"
        android:id="@+id/fruit_name"/>

    <ImageView
        android:layout_width="wrap_content"
        android:layout_height="wrap_content"
        android:id="@+id/fruit_image"/>

LinearLayout>
(2)创建
final List<Map<String,Object>> list=new ArrayList<>();
final int price[]={R.drawable.banana,R.drawable.watermelon};
final String[] name={"banana","watermelon"};
for(int i=0;i<name.length;i++)
{
    Map<String,Object> map=new HashMap<>();
    map.put("name",name[i]);
    map.put("price",price[i]);
    list.add(map);
}
SimpleAdapter simpleAdapter=new SimpleAdapter(
        MainActivity.this,
        list,
        R.layout.layout,
        new String[]{"name","price"},
        new int[]{R.id.fruit_name,R.id.fruit_image}
);
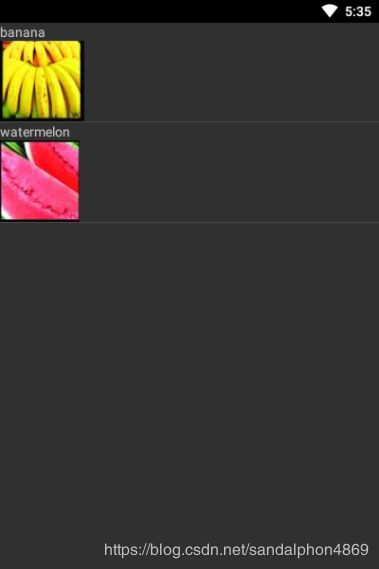
绑定到AlertDialog上的效果:
![]()
