Spring Cloud系列 Spring Cloud Eureka注册中心(双注册中心)
Spring Cloud spiEureka主要是服务的注册发现,本人博客主要类似操作文档。将项目搭建步骤记录下来。至于如何深刻理解Spring Cloud Eureka需要各自查找学习资料。
Spring Cloud是基于spring boot的。其中最主要的问题就是版本的问题。本人用的sping boot 2.0.0。Spring Cloud用的是
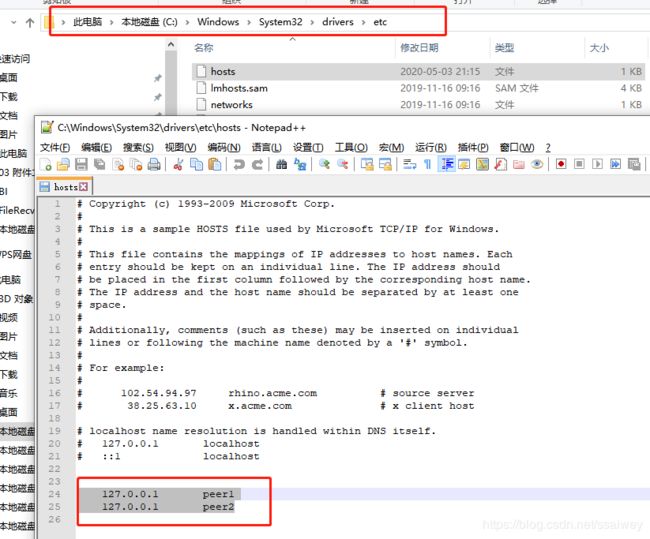
Finchley.RELEASE本文要实现的是在一台主机上双注册中心,如果不同的物理机器上此步骤可忽略。首先要在电脑上的C:\Windows\System32\drivers\etc\hosts文件添加如下内容,
127.0.0.1 peer1
127.0.0.1 peer2
如下图
项目结构
下面我们就开始直接搭建步骤
1.引入需要的jar包。pom.xml
	4.0.0

		org.springframework.boot
		spring-boot-starter-parent
		2.0.0.RELEASE


	com.winning
	eureka-app
	0.0.1-SNAPSHOT
	eureka-app
	Demo project for Spring Boot


		1.8


			org.springframework.boot
			spring-boot-starter-web


			org.springframework.boot
			spring-boot-starter-test
			test


					org.junit.vintage
					junit-vintage-engine


			org.springframework.cloud
			spring-cloud-starter-netflix-eureka-server


				org.springframework.cloud
				spring-cloud-dependencies
				Finchley.RELEASE
				pom
				import


				org.springframework.boot
				spring-boot-maven-plugin
2.添加配置。application.properties
server.port=1111
spring.application.name=eureka-server
#eureka配置
#关闭保护机制
eureka.server.enable-self-preservation=false
eureka.instance.hostname=peer1
#由于该应用是注册中心,false:代表不向注册中心注册自己;true:代表注册自己
eureka.client.register-with-eureka=false
#是否启动检测服务,由于注册中心的职责是维护服务实例,所以它不需要检服务
eureka.client.fetch-registry=false
eureka.client.service-url.defaultZone=http://peer2:1112/eureka/
3.在启动类加入注解
import org.springframework.boot.SpringApplication;
import org.springframework.boot.autoconfigure.SpringBootApplication;
import org.springframework.cloud.netflix.eureka.server.EnableEurekaServer;

@EnableEurekaServer
@SpringBootApplication
public class EurekaAppApplication {
	public static void main(String[] args) {
		SpringApplication.run(EurekaAppApplication.class, args);
	}
}
4.到此我们已经完成了注册中心的搭建,下面我们需要搭建第二个注册中心,我们只需要将上面实现的代码拷贝一份。直接修改配置文件即可。application.properties
server.port=1112
spring.application.name=eureka-server-bak
#eureka配置
#关闭保护机制
eureka.server.enable-self-preservation=false
eureka.instance.hostname=peer2
#由于该应用是注册中心,false:代表不向注册中心注册自己;true:代表注册自己
eureka.client.register-with-eureka=false
#是否启动检测服务,由于注册中心的职责是维护服务实例,所以它不需要检服务
eureka.client.fetch-registry=false
eureka.client.service-url.defaultZone=http://peer1:1111/eureka/
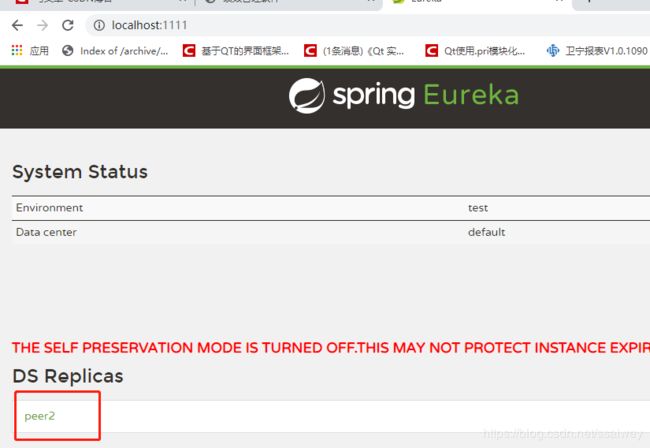
5.以上便完成了两个注册中心的搭建,下面测试,启动两个注册中心,并在浏览器中输入:http://localhost:1111/如下图:表明注册中心搭建完成
接下来我们需要实现一个服务注册到注册中心去,确认注册中心是否真正的起作用,并关闭一个注册中心服务是否正常访问
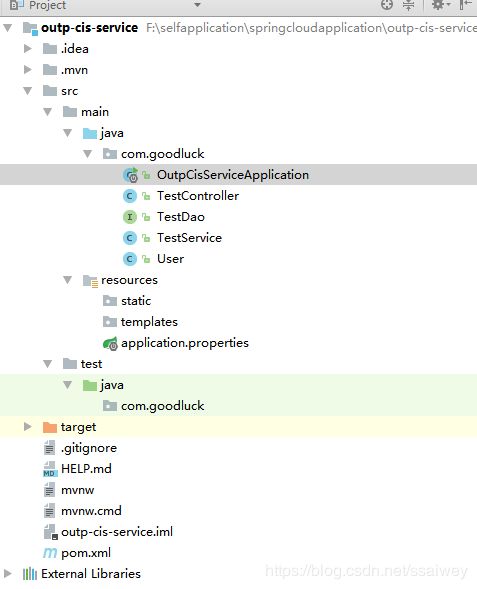
1.新建maven一个新项目。项目结构为
2.引入需要得jar包。pom.xml
	4.0.0

		org.springframework.boot
		spring-boot-starter-parent
		2.0.0.RELEASE


	com.goodluck
	outp-cis-service
	0.0.1-SNAPSHOT
	outp-cis-service
	Demo project for Spring Boot


		1.8


			org.springframework.boot
			spring-boot-starter-jdbc


			org.springframework.boot
			spring-boot-starter-web


			org.mybatis.spring.boot
			mybatis-spring-boot-starter
			2.1.3


			com.microsoft.sqlserver
			mssql-jdbc
			runtime


			org.springframework.cloud
			spring-cloud-starter-netflix-eureka-client


			org.springframework.boot
			spring-boot-starter-test
			test


					org.junit.vintage
					junit-vintage-engine


				org.springframework.cloud
				spring-cloud-dependencies
				Finchley.RELEASE
				pom
				import


				org.springframework.boot
				spring-boot-maven-plugin
3.启动类添加注解@EnableDiscoveryClient
import org.springframework.boot.SpringApplication;
import org.springframework.boot.autoconfigure.SpringBootApplication;
import org.springframework.cloud.client.discovery.EnableDiscoveryClient;

@EnableDiscoveryClient
@SpringBootApplication
public class OutpCisServiceApplication {

	public static void main(String[] args) {
		SpringApplication.run(OutpCisServiceApplication.class, args);
	}

}
4.添加配置。application.properties
spring.application.name=outp-cis-service
server.port=9091
eureka.client.service-url.defaultZone=http://peer1:1111/eureka/,http://peer2:1112/eureka/

#数据库连接
spring.datasource.url=jdbc:sqlserver://localhost:1433;DatabaseName=UI_MMS
spring.datasource.driverClassName=com.microsoft.sqlserver.jdbc.SQLServerDriver
spring.datasource.username=sa
spring.datasource.password=123
#连接池配置
spring.datasource.initialSize=5
spring.datasource.maxActive=50
spring.datasource.minIdle=5
#连接等待超时时间
spring.datasource.maxWait=60000
#spring.datasource.validationQuery=select 1
# 打开PSCache,并且指定每个连接上PSCache的大小
#spring.datasource.poolPreparedStatements=true
#spring.datasource.maxOpenPreparedStatements: 20
#配置隔多久进行一次检测(检测可以关闭的空闲连接)
#spring.datasource.timeBetweenEvictionRunsMillis: 60000
#配置连接在池中的最小生存时间
#spring.datasource.minEvictableIdleTimeMillis: 300000
#spring.datasource.validationQuery=SELECT 1 FROM DUAL
#spring.datasource.testWhileIdle=true
#spring.datasource.testOnBorrow=true
#spring.datasource.testOnReturn=true
# 配置监控统计拦截的filters,去掉后监控界面sql无法统计,'wall'用于防火墙
#spring.datasource.filters=stat,wall,log4j
# 通过connectProperties属性来打开mergeSql功能;慢SQL记录
#pring.datasource.connectionProperties=druid.stat.mergeSql=true;druid.stat.slowSqlMillis=5000
5.添加测试类TestController,TestDao,TestService,User
package com.goodluck;

import org.slf4j.Logger;
import org.slf4j.LoggerFactory;
import org.springframework.beans.factory.annotation.Autowired;
import org.springframework.web.bind.annotation.*;

/**
 * Created by 76706 on 2020/6/18.
 */
@RestController
public class TestController {

    @Autowired
    private TestService testService;


    @RequestMapping("/test")
    public String getId(){
        return testService.getIdd()+"";
    }


    Logger logger= LoggerFactory.getLogger(getClass());

    @RequestMapping("/hello")
    public String hello(){
        // ServiceInstance instance = client.getLocalServiceInstance();
        return "hello2";
    }

    @RequestMapping(value = "/hello1",method = RequestMethod.GET)
    public String hello(@RequestParam String name){
        // ServiceInstance instance = client.getLocalServiceInstance();
        return "hello2"+name;
    }

    @RequestMapping(value = "/hello2",method = RequestMethod.GET)
    public User hello(@RequestHeader String name, @RequestHeader Integer age){
        // ServiceInstance instance = client.getLocalServiceInstance();
        return new User(name,age);
    }

    @RequestMapping(value = "/hello3",method = RequestMethod.POST)
    public String hello(@RequestBody User user){
        // ServiceInstance instance = client.getLocalServiceInstance();
        return "hello2"+user.getName()+","+user.getAge();
    }


}
package com.goodluck;

import org.apache.ibatis.annotations.Mapper;
import org.apache.ibatis.annotations.Select;

/**
 * Created by 76706 on 2020/6/18.
 */
@Mapper
public interface TestDao {

        /**
         * 测试连接
         */
        @Select(" select name from sstable ")
        String testSqlConnent();

}
package com.goodluck;

import org.springframework.beans.factory.annotation.Autowired;
import org.springframework.stereotype.Service;

/**
 * Created by 76706 on 2020/6/18.
 */
@Service
public class TestService {

    @Autowired
    private TestDao testDao;


    public String getIdd(){
        return testDao.testSqlConnent();
    }
}
package com.goodluck;

/**
 * Created by Administrator on 2020-05-19.
 */
public class User {
    private String name;
    private Integer age;

    public User() {
    }

    public User(String name, Integer age) {
        this.name = name;
        this.age = age;
    }

    public String getName() {
        return name;
    }

    public void setName(String name) {
        this.name = name;
    }

    public Integer getAge() {
        return age;
    }

    public void setAge(Integer age) {
        this.age = age;
    }
}
6.以上便完成了服务得搭建,启动该服务。刷新http://localhost:1111/网页。查看一下多了一个服务,服务名为outp-cis-service
7.测试服务是否正常能够访问http://localhost:9091/test,并正确连接数据库,本人数据库为sqlserver。如下则表示测试成功。数据库也连接成功


