自定义View常用细节性集合
简述:
在自定义View的过程中我们经常会用到一些相同的但是又是必须要主要的细节,今天分享一些细节行东西。
1、字体属性及宽高测量
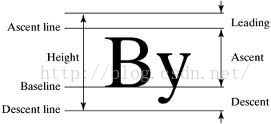
我们先来了解一下FontMetrics这个类:
这是Paint的内部类我直接Copy过来看一下,接下来再通过一张图具体描述一下其各个参数的意义:
/**
     * Class that describes the various metrics for a font at a given text size.
     * Remember, Y values increase going down, so those values will be positive,
     * and values that measure distances going up will be negative. This class
     * is returned by getFontMetrics().
     */
    public static class FontMetrics {
        /**
         * The maximum distance above the baseline for the tallest glyph in
         * the font at a given text size.
         */
        public float   top;
        /**
         * The recommended distance above the baseline for singled spaced text.
         */
        public float   ascent;
        /**
         * The recommended distance below the baseline for singled spaced text.
         */
        public float   descent;
        /**
         * The maximum distance below the baseline for the lowest glyph in
         * the font at a given text size.
         */
        public float   bottom;
        /**
         * The recommended additional space to add between lines of text.
         */
        public float   leading;
    }
然后字体的高度就是descent-ascent,我们直接代码实现如下:
 /**
     * 方法描述:获取文本字符的高度
     *
     * @param mPaint 画文本字符的画笔
     * @return 文本字符的高度
     */
    private double getTxtHeight(Paint mPaint) {
        Paint.FontMetrics fm = mPaint.getFontMetrics();
        return Math.ceil(fm.descent - fm.ascent);
} /**
* 方法描述:获取文本的宽度
*/
private float getTxtWidth(Paint paint, String txt) {
return paint.measureText(txt);
}2、重置图片的宽高
对于2.2以后版本可以直接调用下面的函数:
    /**
     * Creates a centered bitmap of the desired size.
     *
     * @param source original bitmap source
     * @param width targeted width
     * @param height targeted height
     */
ThumbnailUtils.extractThumbnail(Bitmap source, int width, int height)/**
* 方法描述:重置图片的宽高
*/
private Bitmap zoomImg(Bitmap bm, int width, int height) {
int originWidth = bm.getWidth();
int originHeight = bm.getHeight();
float scaleWidth = ((float) width) / originWidth;
float scaleHeight = ((float) height) / originHeight;
Matrix matrix = new Matrix();
matrix.postScale(scaleWidth, scaleHeight);
return Bitmap.createBitmap(bm, 0, 0, originWidth, originHeight, matrix, true);
}3、判断触摸事件是否在View内
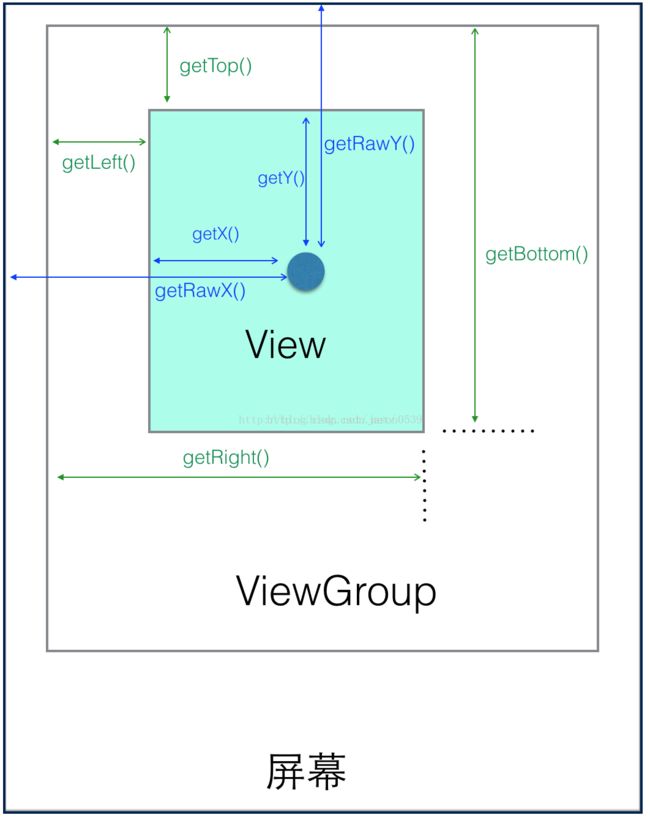
弄明白这个事情之前我们先来学习一下View坐标系,先来卡一张图(图片来源于网络):
所以我们要想判断我们的触摸事件是否在View内只需要判断当前点坐标(getRawX(),getRawY())是否在View这个矩形区域内就OK啦,那现在缕清了思路接下来代码实现:
① 首先我们先确定我们的View所处的矩形区域的获取:
 /**
     * 方法描述:计算指定的 View 在屏幕中的坐标(矩形区域)
     */
    private RectF calcViewScreenLocation(View view) {
        int[] location = new int[2];
        view.getLocationOnScreen(location);
        return new RectF(location[0], location[1], location[0] + view.getWidth(),
                location[1] + view.getHeight());
}(event.getRawX(), event.getRawY()) RectF rectF = calcViewScreenLocation(this);
boolean contains = rectF.contains(event.getRawX(), event.getRawY());
