接口文档管理系列 Spring MVC框架整合Swagger
接口文档管理系列 Spring MVC框架整合Swagger
- 环境
- 引入依赖
- 配置web.xml
- 修改spring MVC应用上下文配置文件
- 码代码
- Swagger配置类
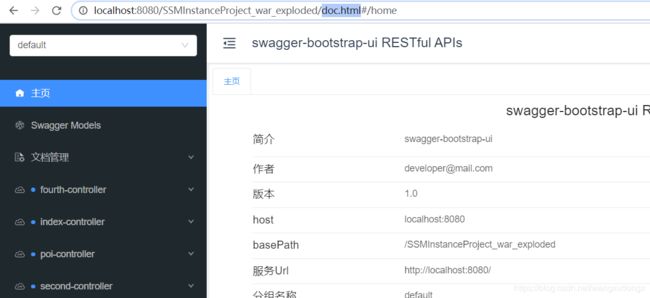
- 启动测试
- swagger注解
- @Api
- @ApiImplicitParams
- @ApiResponses
- @ApiModel
- 一个OpenAPI的接口
- 导读
环境
| 组件 | 版本 |
|---|---|
| java | 1.8 |
| maven | 3.6.3 |
| idea | 2020.1 |
| springfox-swagger | 2.9.2 |
| knife4j | 2.0.2 |
引入依赖
pom.xml
        <dependency>
            <groupId>io.springfoxgroupId>
            <artifactId>springfox-swagger2artifactId>
            <version>2.9.2version>
        dependency>

        <dependency>
            <groupId>io.springfoxgroupId>
            <artifactId>springfox-swagger-uiartifactId>
            <version>2.9.2version>
        dependency>

        <dependency>
            <groupId>com.github.xiaoymingroupId>
            <artifactId>knife4j-spring-boot-starterartifactId>
            <version>2.0.2version>
        dependency>
配置web.xml
WEB-INF/web.xml修改Spring MVC Servlet配置项
    <servlet>
        <servlet-name>spring-web-mvcservlet-name>
        <servlet-class>org.springframework.web.servlet.DispatcherServletservlet-class>
        <init-param>
            <param-name>contextConfigLocationparam-name>
            <param-value>classpath:applicationContext-MVC.xmlparam-value>
        init-param>
        <load-on-startup>1load-on-startup>
    servlet>
    <servlet-mapping>
        <servlet-name>spring-web-mvcservlet-name>
        <url-pattern>/url-pattern>
        <url-pattern>/v2/api-docsurl-pattern>
        <url-pattern>/swagger-resourcesurl-pattern>
        <url-pattern>/swagger-resources/configuration/securityurl-pattern>
        <url-pattern>/swagger-resources/configuration/uiurl-pattern>

    servlet-mapping>
修改spring MVC应用上下文配置文件
我这里是src\main\resources\applicationContext-MVC.xml
    <mvc:default-servlet-handler/>

    <mvc:resources location="classpath:/META-INF/resources/" mapping="swagger-ui.html"/>
    <mvc:resources location="classpath:/META-INF/resources/" mapping="doc.html"/>
    <mvc:resources location="classpath:/META-INF/resources/webjars/" mapping="/webjars/**"/>

    <bean id="SwaggerConfig" class="cn.Swagger.SwaggerConfiguration">bean>
码代码
Swagger配置类
/**
 * Swagger配置类
 */
@Component
@Configuration
@EnableSwagger2
@EnableWebMvc
/*
  这个注解是在SpringBoot项目中使用的AutoConfig
   @EnableKnife4j
    在Spring MVC项目中不要使用
 */
@ComponentScan("cn.Controller")
public class SwaggerConfiguration {

    @Bean
    public Docket createRestApi() {
        return new Docket(DocumentationType.SWAGGER_2)
                .apiInfo(apiInfo())
                .select()
                .apis(RequestHandlerSelectors.basePackage("cn.Controller"))
//              .apis(RequestHandlerSelectors.withClassAnnotation(Api.class))//这是注意的代码 在Action上加注解@Api
                .paths(PathSelectors.any())
                .build();
    }

    private ApiInfo apiInfo() {
        return new ApiInfoBuilder()
                .title("swagger-bootstrap-ui RESTful APIs")
                .description("swagger-bootstrap-ui")
                .termsOfServiceUrl("http://localhost:8080/")
                .contact("[email protected]")
                .version("1.0")
                .build();
    }
}
启动测试
swagger注解
@Api
@Api(tags = {"pet操作"})
class

@ApiOperation(value = "新增一个pet" , tags = {"pet操作","新增pet"})
function
标签,可以是多个
接口按照标签归类,也就是说接口可能会在多个标签归类中出现
@ApiImplicitParams
声明接口请求的信息
参数类型,说明,实例
    @ApiImplicitParams(value =@ApiImplicitParam(example = "{id: 1 , name: 白猫}"))
function
@ApiResponses
    @ApiResponses(value = {
            @ApiResponse(code = 405, message = "Invalid input" ,
                    examples = @Example({@ExampleProperty(mediaType = "String",value = "抱歉,你请求失败了")})),
            @ApiResponse(code = 200 ,  message = "接口请求完成" ,
                    examples = @Example({@ExampleProperty(mediaType = "Integer" , value = "1") ,
                               @ExampleProperty(mediaType = "String",value = "tom") })
            )})
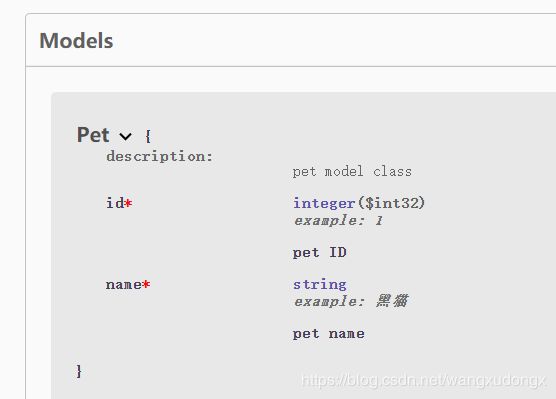
@ApiModel
@ApiModel(description = "pet model class")
public class Pet implements Serializable {
  @JsonProperty("id")
  @ApiModelProperty(notes = "pet编号,请输入数字",value = "pet ID",name = "pet 编号",required = true,example = "00001")
  private Integer id = null;

  @ApiModelProperty(notes = "pet名字,请输入中文",value = "pet name" , name = "pet 名字" , required = true , example = "黑猫")
  @JsonProperty("name")
  private String name = null;

  public String getName() {
    return name;
  }

  public void setName(String name) {
    this.name = name;
  }

  public Integer getId() {
    return id;
  }

  public void setId(Integer id) {
    this.id = id;
  }
}
model上的声明信息会应用在接口上面
一个OpenAPI的接口
使用ResponseEntity来包装返回数据
    @ApiOperation(value = "新增一个pet" , tags = {"pet操作","新增pet"})
    @ApiImplicitParams(value =@ApiImplicitParam(example = "{id: 1 , name: 白猫}"))
    @PostMapping("add")
    public ResponseEntity<Pet> add(Pet model){

        return new ResponseEntity(model, HttpStatus.OK);
    }
springdoc官网
导读
接口文档管理系列 OpenAPI规范及Swagger工具集
接口文档管理系列 Springboot集成springdoc


