简易android通讯录
android通讯录
文章目录
- android通讯录
- (1)初步实现的功能:
- (2)主界面布局
- (3)设计思路
- (4)开发技术
- (5)核心方面
- 5.1数据库设计方面
- 5.2JavaBean
- 5.3ArrayList
- 5.4 ListView(设置适配器)
- 5.5添加联系人
- 5.6点击联系人
- 5.7编辑联系人
- 5.8删除联系人
- (6)总结
(1)初步实现的功能:
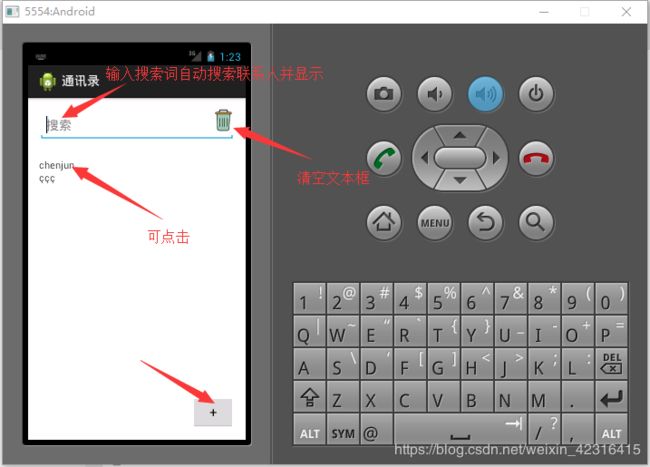
- 显示所有联系人
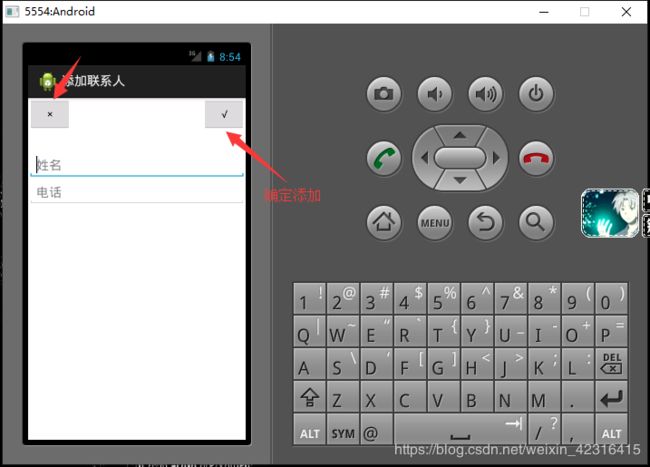
- 添加联系人
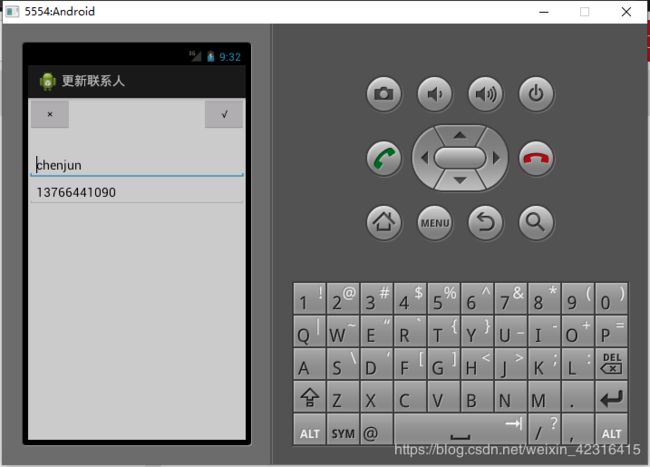
- 修改联系人
- 删除联系人
(2)主界面布局
 <EditText
        android:id="@+id/et_query"
        android:layout_width="match_parent"
        android:layout_height="wrap_content"
        android:hint="搜索"
        android:padding="10dp" />
         <LinearLayout
        android:layout_width="match_parent"
        android:layout_height="wrap_content"
        android:layout_below="@+id/delete_Text"
        android:orientation="vertical" >
 <TextView
            android:id="@+id/tv1"
            android:layout_width="wrap_content"
            android:layout_height="wrap_content"
            android:text="" />
               <ListView
            android:id="@+id/lv1"
            android:layout_width="wrap_content"
            android:layout_height="wrap_content"
            android:divider="#ff2222"
            android:fastScrollEnabled="true"
            android:footerDividersEnabled="true"
            android:headerDividersEnabled="true"
            android:listSelector="#ff55ff" >
        ListView>
         LinearLayout>
          <Button
        android:id="@+id/button1"
        android:layout_width="wrap_content"
        android:layout_height="wrap_content"
        android:layout_alignParentBottom="true"
        android:layout_alignParentRight="true"
        android:layout_marginEnd="10dp"
        android:onClick="add"
        android:text="+"
        android:textSize="20dp" />
        <ImageView
        android:id="@+id/delete_Text"
        android:layout_width="wrap_content"
        android:layout_height="wrap_content"
        android:layout_alignRight="@+id/et_query"
        android:layout_alignTop="@+id/et_query"
        android:background="@drawable/delete"
        android:clickable="true"
        android:paddingRight="20dp"
        android:visibility="visible" />
(3)设计思路
- 主界面设计 搜索框 ListView(显示所有联系人)
- 此次设计简便联系人中只有 姓名 电话号码两个字段
- 主界面有添加按钮可 添加联系人
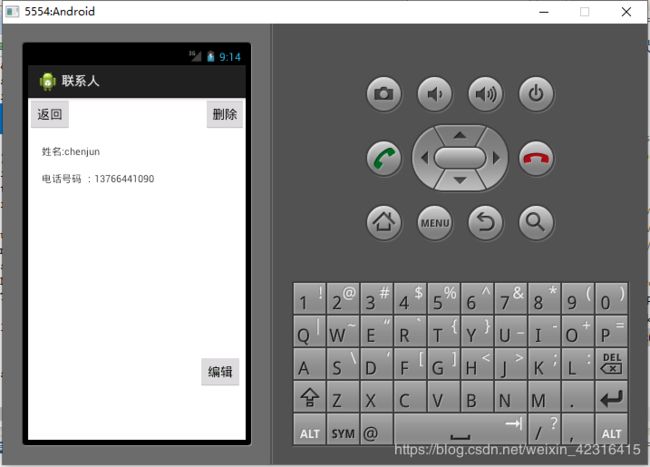
- 通过 item的点击事件 点击联系人可进行显示联系人详细信息并支持修改和删除当前联系人操作
- 调用系统打电话挺简单的就没有做
(4)开发技术
- Sqlite数据库
- Intent
- Adapt(适配器)
(5)核心方面
5.1数据库设计方面
自定义 数据库 继承SQLiteOpenHelper
构造方法中 创建数据库/font>
onCreat方法中创建表 创建数据库
创建了一个person表 姓名 电话 (设为主键)两个字段
public class DataBase extends SQLiteOpenHelper {
public DataBase(Context context) {

  super(context,"person.db",null,2);
  // TODO Auto-generated constructor stub
 }
 @Override//onCreat方法中创建表
 public void onCreate(SQLiteDatabase arg0) {
  // TODO Auto-generated method stub
     arg0.execSQL("create table person(name varchar(20),tel varchar(20) primary key )");
5.2JavaBean
封装从数据库中取出的的字段
public class Person {
private String name;
private String tel;
public String getName() {
 return name;
}
public void setName(String name) {
 this.name = name;
}
public String getTel() {
 return tel;
}
public void setTel(String tel) {
 this.tel = tel;
}
5.3ArrayList
此处用到了ArrayList数组和泛型知识
初始化ArrayList<> mlist=new Arraylist<>() 类型为 Person
public void ViewPerson()用于查找数据库所有联系人
1将每一个联系人的数据用Person 保存
2将每一个person 加入到ArrayList<> 数组
3在适配器中设置item遍历ArrayList中所有Person
public void ViewPerson(){
   SQLiteDatabase sqLiteDatabase =db.getWritableDatabase();
   Cursor cursor=sqLiteDatabase.query("person", null, null,null,null,null, null, null);
   PersonInfo =new ArrayList<Person>();
    if(cursor!=null&&cursor.getCount()>0){
    while (cursor.moveToNext()) {
     Person person=new Person();
     person.setName(cursor.getString(0).toString());
     person.setTel(cursor.getString(1).toString());
        PersonInfo.add(person);
        person=null;
    }
     sqLiteDatabase.close();
    cursor.close();
注意 每次用完SqLiteDatabase Cursor记得关闭
5.4 ListView(设置适配器)
注意 在oncreat()方法中设置(ListView)view_all.setAdapt(); 不通过单击事件显示 而是一进入程序自动查找所有联系人
     Adapt adapt=new Adapt(MainActivity.this,PersonInfo,R.layout.item);
     view_all.setAdapter(adapt);
//自定义适配器 Adapt继承BaseAdapt 有四个未实现方法
//其中getview()最重要
//用户保存联系人的数组
private ArrayList<Person> mlistList;
 class Adapt extends BaseAdapter   {
    public int getCount() {
   // TODO Auto-generated method stub
   return mlistList.size();
   @Override
  public Object getItem(int position) {
   // TODO Auto-generated method stub
   return  mlistList.get(position) ;
  }
  @Override
  public long getItemId(int arg0) {
   // TODO Auto-generated method stub
   return arg0;
  }
  @Override
  public View getView(int arg0, View arg1, ViewGroup arg2) {
   // TODO Auto-generated method stub
   if(mlistList.size()==0){
    text_1.setText("无联系人");
   }
   ViewHolder holder;
   if(arg1==null){
    holder =new ViewHolder();
    arg1=View.inflate(getApplicationContext(),l, null);
    holder.textView_name=(TextView)arg1.findViewById(R.id.tv_name);
    arg1.setTag(holder);//设置arg1和holder 关联
   }
   else
   {
    holder=(ViewHolder)arg1.getTag();
   }
   if(PersonInfo.size()!=0){
    holder.textView_name.setText(mlistList.get(arg0).getName());
   }
   return arg1;
  }
  //借鉴其他博客的  自定义一个设置item中控件 方便使用
   class ViewHolder{
   private TextView textView_name;
  }
 }
 }
5.5添加联系人
点击取消按钮(取消添加)返回主界面
public void cancle(View view){
 Intent intent =new Intent(this,MainActivity.class);
    startActivity(intent);
}
点击确认按钮(确认添加)返回主界面
public void correct(View view)
{
  String name =ed_name.getText().toString().trim();
  String tel =ed_tel.getText().toString().trim();
  SQLiteDatabase db=dbBase.getWritableDatabase();
   ContentValues values=new ContentValues();
         values.put("name",name);
         values.put("tel", tel);
       db.insert("person", null, values);
       Toast.makeText(getApplicationContext(), "成功添加", 1).show();
       db.close();
       Intent intent =new Intent(this,MainActivity.class);
         startActivity(intent);
        }
        }
5.6点击联系人
此处用到了ListView的单击事件 由于item设计简单没有受其他Butoon类控件影响 ,若item中有button控件需让button失去焦点。
参考博客:ListView实现Item
思路:
- 点击联系人跳转至联系人详情界面
- 需要用到intent
- intent传送数据
- 联系人界面接受数据并显示
public void ItemClick(final ArrayList<Person> mArrayListlist){
view_all.setOnItemClickListener(new OnItemClickListener() {
@Override
   public void onItemClick(AdapterView<?> arg0, View arg1, int arg2,
     long arg3) {
    // TODO Auto-generated method stub
             Bundle bundle =new Bundle();
             bundle.putString("name",  mArrayListlist.get(arg2).getName());
             bundle.putString("tel", mArrayListlist.get(arg2).getTel());
             Intent intent=new Intent();
             intent.putExtras(bundle);
             intent.setClassName("com.example.addresslist","com.example.addresslist.PersonViewActivity");
             startActivity(intent);
               }
  });
 }
联系人界面接收数据并显示在界面
Bundle bundle=getIntent().getExtras();
        Personname=bundle.getString("name");
        String PersonTel=bundle.getString("tel");
        tv_nameTextView=(TextView)findViewById(R.id.name);
        tv_telTextView=(TextView)findViewById(R.id.tel);
5.7编辑联系人
接收待更改联系人的信息:
public void init(){
      Intent intent=getIntent();
      //oldString中间变量按照原来联系人名字修改信息
      oldString=intent.getStringExtra("name");
      ed_name.setText(intent.getStringExtra("name"));
      ed_tel.setText(intent.getStringExtra("tel"));
 }
取消按钮
 public void cancle_update(View view){
  Intent intent=new Intent(this,MainActivity.class);
  startActivity(intent);
 }
确认按钮
public void correct_update(View view){
     SQLiteDatabase db=new DataBase(getApplicationContext()).getWritableDatabase();
     ContentValues values=new ContentValues();
     values.put("name", ed_name.getText().toString().trim());
     values.put("tel", ed_tel.getText().toString().trim());
     db.update("person", values, "name=?", new String[]{oldString});
     db.close();
     Intent intent=new Intent(this,MainActivity.class);
  startActivity(intent);
    }
}
5.8删除联系人
思路:
1.点击删除弹出一个提示框
2.若点击提示框中确认 确认删除联系人
3.若点击提示框中取消 取消删除联系人
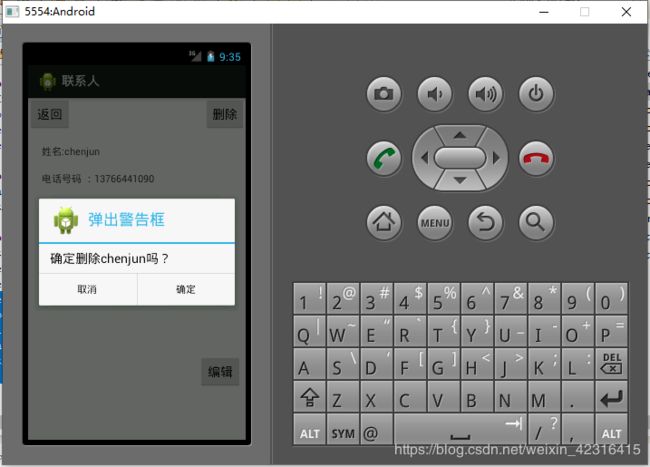
Dilog提示框的使用:
在提示框中的确定和取消按钮中动态选择是否删除该联系人
bt_delete.setOnClickListener(new OnClickListener() {
   @Override
   public void onClick(View arg0) {
    // TODO Auto-generated method stub
      //    通过AlertDialog.Builder这个类来实例化我们的一个AlertDialog的对象
       AlertDialog.Builder builder = new AlertDialog.Builder(PersonViewActivity.this);
       //    设置Title的图标
        builder.setIcon(R.drawable.ic_launcher);
       //    设置Title的内容
       builder.setTitle("弹出警告框");
       //    设置Content来显示一个信息
       builder.setMessage("确定删除"+Personname+"吗?");
       //    设置一个PositiveButton
        builder.setPositiveButton("确定", new DialogInterface.OnClickListener()
       {
           @Override
           public void onClick(DialogInterface dialog, int which)
           {
             SQLiteDatabase db=new DataBase(getApplicationContext()).getWritableDatabase();
            long id=db.delete("person", "name=?",new String[]{Personname});
             if(id>0){
              Toast.makeText(getApplicationContext(), "删除"+Personname+"成功", 1).show();
             }
              Intent intent =new Intent();
               intent.setClassName("com.example.addresslist","com.example.addresslist.MainActivity");
               startActivity(intent);

           }
       });
       //    设置一个NegativeButton
       builder.setNegativeButton("取消", new DialogInterface.OnClickListener()
       {
       @Override
           public void onClick(DialogInterface dialog, int which)
           {
               Intent intent =new Intent();
               intent.setClassName("com.example.addresslist","com.example.addresslist.MainActivity");
               startActivity(intent);
           }
       });
       //    显示出该对话框
        builder.show();
   }
  });
(6)总结
心路历程:
此次设计应老师要求,自己设计的通讯录,其中很多通讯录该有的功能都没有完成出来,其中看了很多博客受益匪浅,帮助我解决了很多问题,看到他们写的博客受益匪浅收获很多。
不足之处:
- 搜索框动态自动搜寻并显示联系人还没实现
- 代码很简陋设计的很糟糕
参考博客 :文本框清除 ListView内部点击事件 EditText搜索框ListView动态显示数据
