NVIDIA A100 GPUs上硬件JPEG解码器和NVIDIA nvJPEG库
NVIDIA A100 GPUs上硬件JPEG解码器和NVIDIA
nvJPEG库
Leveraging the Hardware JPEG Decoder and NVIDIA nvJPEG Library on NVIDIA A100 GPUs
根据调查,平均每个人产生1.2万亿张图片,这些图片是由手机或数码相机拍摄的。这种图像的存储,特别是以高分辨率的原始格式存储,占用了大量的内存。
JPEG指的是联合摄影专家组(Joint Photography Experts Group),该组于2017年庆祝了25岁生日。JPEG标准指定了编解码器,它定义如何将图像压缩成字节的比特流并将其解压缩回图像。
JPEG编解码器的主要目的是最小化照片图像文件的文件大小。JPEG是一种有损压缩格式,这意味着它不存储原始图像的完整像素数据。JPEG的优点之一是它允许您微调所使用的压缩量。这将在正确使用时产生良好的图像质量,同时也会产生最小的合理文件大小。 JPEG压缩的关键组成部分如下:
颜色空间转换允许您分离亮度(Y)和色度(Cb,Cr)组件。降采样的Cb和Cr允许您减少文件大小,几乎不明显的质量损失,因为人类的感知是不太敏感的这些图像组成部分。这不是核心标准的一部分,但定义为JFIF格式的一部分。
基于块的离散余弦变换(DCT)允许在较低的频率下压缩数据。
量化允许高频细节的舍入系数。失去这些细节通常是可以的,因为人眼通常无法轻易区分高频内容。
渐进式编码允许您在对其位流进行部分解码后预览整个图像的低质量版本。
以下照片(图1)演示了JPEG压缩的图像质量损失。原始蝴蝶图像为BMP格式(512×512,24位,769kb,无压缩),然后以JPEG格式显示相同的图像,质量压缩系数为50%,子采样4:2:0,24位,图像大小为33kb。

Figure 1a. Original butterfly image (no compression, Size 512×512, 24-bit), 769 KB.
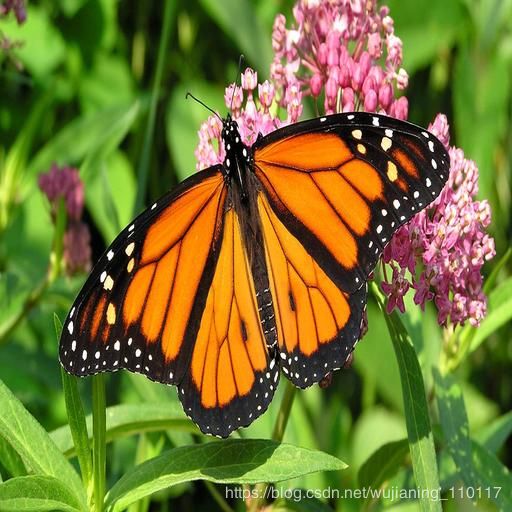
Figure 1b. Compressed butterfly image (quality compression coefficient 50%, subsampling 4:2:0, 24-bit), 33 KB.
How JPEG works
图2显示了JPEG编码器的一种常见配置。
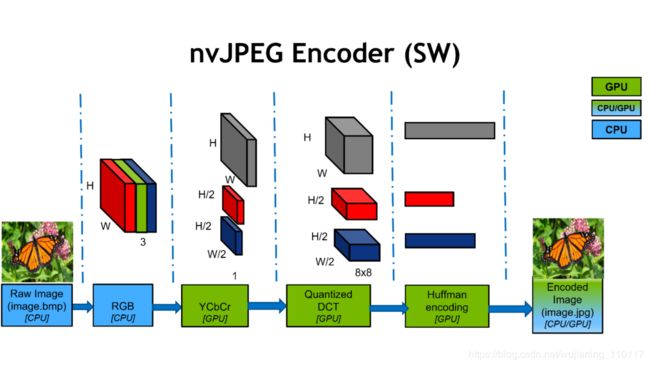
Figure 2. Diagram of the JPEG encoding process employing a parallel utilization of GPU CUDA software and CPU.
首先,JPEG编码从RGB彩色图像开始。
第二步涉及到颜色转换到表示亮度(亮度)的Y Cb Cr颜色空间Y和表示色度(红色和蓝色投影)的Cb和Cr通道。然后,Cb和Cr信道被预定因子(通常是2或3)降采样。这个下采样给你第一阶段的压缩。
在下一阶段,每个信道被分成8×8个块并计算DCT,这是频率空间中类似于Fourier变换的变换。DCT本身是无损和可逆的,它将一个8×8的空间块转换成64个信道。
然后对DCT系数进行量化,这是一个有损的过程,包括第二压缩级。量化由JPEG质量参数控制,较低的质量设置对应于更严重的压缩并导致较小的文件。
量化阈值是特定于每个空间频率的,并且经过精心设计。低频压缩比高频压缩少,因为人眼比高频信号的幅度变化更敏感于大范围内的细微误差。
最后一步是用哈夫曼编码对量化后的DCT系数进行无损压缩并存储在JPEG文件中,如image.jpg如图2所示。
图3显示了NVIDIA GPU上的JPEG解码过程。
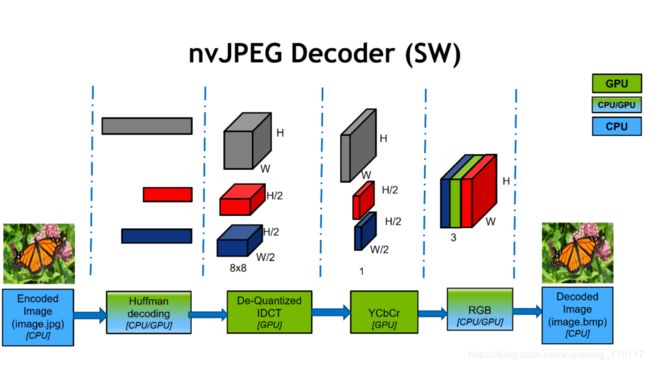
Figure 3. The JPEG decoding process employs a parallel utilization of GPU CUDA and software. A hybrid (CPU/GPU) approach for Huffman decoding overcomes the serial process stall.
JPEG解码过程从压缩的JPEG比特流开始,提取头部信息。
然后,Huffman解码处理串行处理,因为DCT系数从比特流一次解码一个。
下一步处理去量化和反DCT为8×8块。
上采样步骤处理YCbCr转换并生成解码的RGB图像。
NVIDIA使用基于CUDA技术的nvJPEG库加快了JPEG编解码器的速度。我们开发了JPEG算法的完整并行实现。JPEG编解码器工作流程中典型的GPU加速部分如图2和图3所示。
New JPEG hardware decoder最近,我们介绍了NVIDIA A100 GPU,它有一个专用的硬件JPEG解码器。以前,在数据中心GPU上没有这样的硬件单元,JPEG解码是一个纯软件CUDA解决方案,它同时使用CPU和GPU。
现在,硬件解码器与GPU的其余部分同时运行,GPU可以执行各种计算任务,如图像分类、目标检测和图像分割。与NVIDIA Tesla V100相比,它在4-8x JPEG解码速度方面以多种方式大幅提高了吞吐量。
它是通过nvJPEG库(CUDA工具包的一部分)公开的。
nvJPEG library overview
nvJPEG是用于JPEG编解码器的GPU加速库。与NVIDIA
DALI(一个数据增强和图像加载库)一起,通过加速数据的解码和增强,可以加速对图像分类模型的深度学习训练。A100包括一个5核硬件JPEG解码引擎。nvJPEG利用硬件后端对JPEG图像进行批量处理。
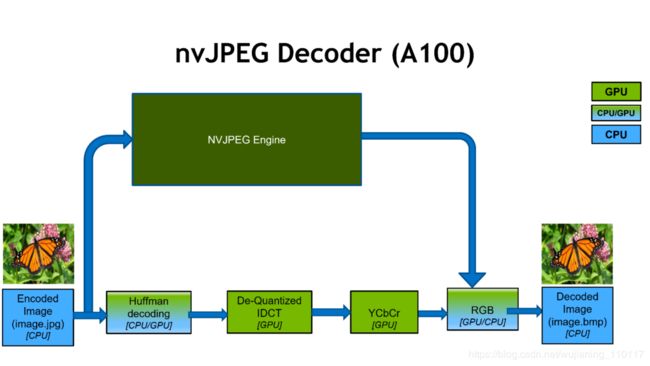
Figure 4. The JPEG hardware decoding process employs a parallel utilization of hardware decoder and GPU CUDA software. The HW decoder is independent of the CUDA SMs so that software GPU
decoders can be used simultaneously.
通过使用nvjpegCreateEx init函数选择硬件解码器,nvJPEG提供了基线JPEG解码的加速和各种颜色转换格式(例如,YUV 420、422、444)。如图4所示,这使得图像解码速度比仅使用CPU的处理速度快20倍。DALI的用户可以直接受益于这种硬件加速,因为nvJPEG是抽象的。nvJPEG库支持以下操作:
· nvJPEG Encoding
· nvJPEG Transcoding转码
· nvJPEG Decoding (includes HW (A100) support)
库支持以下JPEG选项:
基线和渐进式JPEG编码和解码,仅适用于A100的基线解码
每像素8位
哈夫曼比特流解码
多达四通道JPEG比特流
8位和16位量化表
三个颜色通道Y、Cb、Cr(Y、U、V)的以下色度子采样:
· 4:4:4
· 4:2:2
· 4:2:0
· 4:4:0
· 4:1:1
· 4:1:0
该库具有以下功能:
使用CPU和GPU的混合解码。
库的输入在主机内存中,输出在GPU内存中。
单图像和成批图像解码。
用户为设备提供的内存管理器和固定主机内存分配。
Performance numbers
对于本节中的性能图,我们使用以下测试设置和GPU/CPU硬件:
· NVIDIA V100 GPU: CPU – E5-2698 v4@2GHz 3.6GHz Turbo (Broadwell) HT On GPU – Tesla V100-SXM2-16GB(GV100) 116160 MiB 180 SM GPU Video Clock 1312 Batch 128 and Single Thread
· NVIDIA A100 GPU CPU – Platinum 8168@2GHz 3.7GHz Turbo (Skylake) HT On GPU – A100-SXM4-40GB(GA100) 140557 MiB 1108
SM GPU Video Clock 1095 Batch 128 and Single Thread
· CPU: CPU – Platinum 8168@2GHz 3.7GHz Turbo (Skylake) HT On TurboJPEG decode for CPU testing
· Image dataset: 2K FHD = 1920 x 1080 4K UHD = 3840 x 2160 CUDA Toolkit 11.0 CUDA driver r450.24
接下来的两个图表显示了硬件JPEG解码器的解码速度。
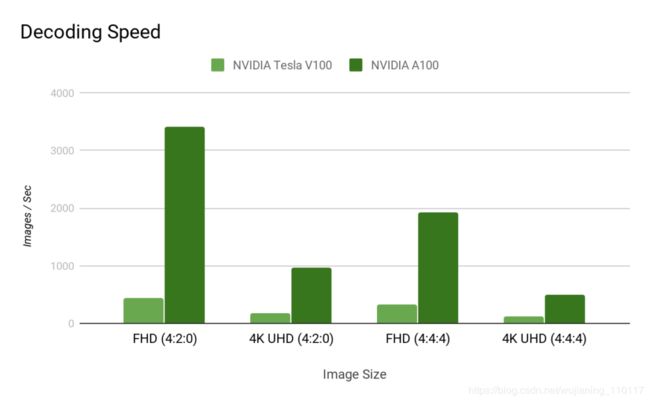
Figure 5. Graph showing the speed up achieved by hardware decode on A100 over the CUDA hybrid decode on V100.
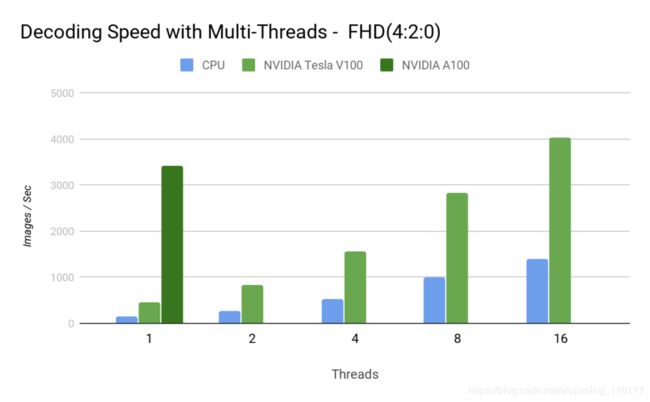
Figure 6. The number of CPU threads required by the hybrid decoder on V100 to keep up with hardware decoder throughput on A100.
通过将解码卸载到硬件,您可以释放宝贵的CPU周期,以便更好地使用。
图7显示了编码加速。
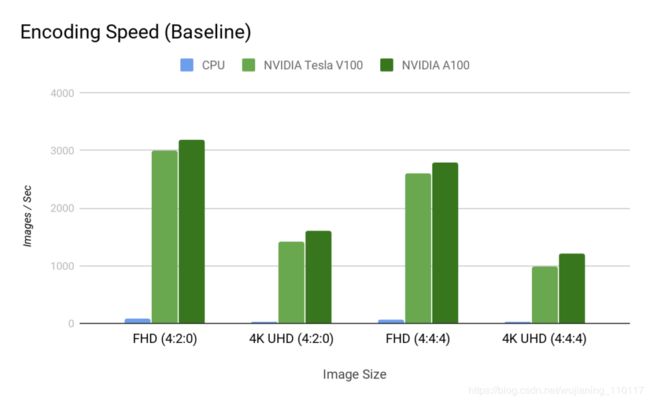
Figure 7a. JPEG baseline encoding throughput comparison between CPU, CUDA (V100, A100) for an image size of 1920×1080 (2K FHD), 3840×2160 (4K UHD).
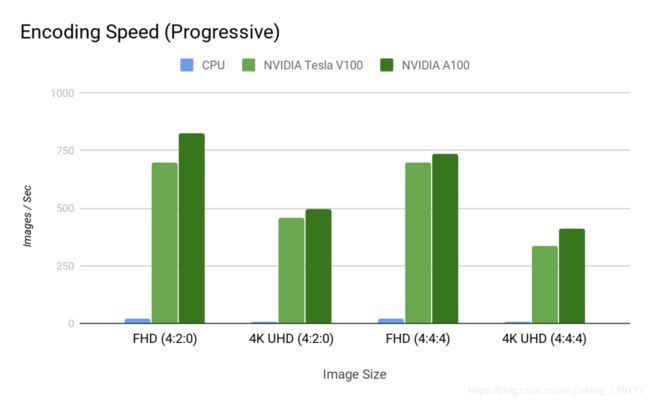
Figure 7b. JPEG progressive encoding throughput comparison between CPU, CUDA (V100, A100) for an image size of
1920×1080 (2K FHD), 3840×2160 (4K UHD).
Image decoding example
下面是一个使用nvJPEG库的图像解码示例。此示例显示了在A100 GPU上使用硬件解码器以及对其他NVIDIA GPU使用后端回退。
//
// The following
code example shows how to use the nvJPEG library for JPEG image decoding.
//
// Libraries used
// nvJPEG decoding
int main()
{
...

//
create nvJPEG decoder and decoder state
nvjpegDevAllocator_t dev_allocator ={&dev_malloc, &dev_free};
nvjpegPinnedAllocator_t pinned_allocator={&host_malloc, &host_free};
// Selecting A100 Hardware decoder
nvjpegStatus_t status = nvjpegCreateE
(NVJPEG_BACKEND_HARDWARE,
&dev_allocator,
&pinned_allocator,
NVJPEG_FLAGS_DEFAULT,
params.nvjpeg_handle);
params.hw_decode_available = true;
if( status == NVJPEG_STATUS_ARCH_MISMATCH)
{
std::cout<<“Hardware Decoder // GPU SW decoder selected nvjpegCreateEx(NVJPEG_BACKEND_DEFAULT, &pinned_allocator, ¶ms.nvjpeg_handle); params.hw_decode_available = false; } // create JPEG decoder state nvjpegJpegStateCreate(params.nvjpeg_handle, // extract bitstream metadata to figure out nvjpegJpegStreamParseHeader(params.nvjpeg_handle, (const unsigned char // decode Batch images batched_bitstreams.data(), … } $ git clone $ cd $ mkdir build $ cd build $ cmake … $ make // Running nvJPEG decoder $ Decoding images Processing: …/input_images/cat_baseline.jpg Image is 3 channels. Channel #0 size: 64 x 64 Channel #1 size: 64 x 64 Channel #2 size: 64 x 64 YUV 4:4:4 chroma subsampling Done writing decoded image to file:/tmp/cat_baseline.bmp Processing: …/input_images/img8.jpg Image is 3 channels. Channel #0 size: 480 x 640 Channel #1 size: 240 x 320 Channel #2 size: 240 x 320 YUV 4:2:0 chroma subsampling Done writing decoded image to file:/tmp/img8.bmp Processing: …/input_images/img5.jpg Image is 3 channels. Channel #0 size: 640 x 480 Channel #1 size: 320 x 240 Channel #2 size: 320 x 240 YUV 4:2:0 chroma subsampling Done writing decoded image to file:/tmp/img5.bmp Processing: …/input_images/img7.jpg Image is 3 channels. Channel #0 size: 480 x 640 Channel #1 size: 240 x 320 Channel #2 size: 240 x 320 YUV 4:2:0 chroma subsampling Done writing decoded image to file:/tmp/img7.bmp Processing: …/input_images/img2.jpg Image is 3 channels. Channel #0 size: 480 x 640 Channel #1 size: 240 x 320 Channel #2 size: 240 x 320 YUV 4:2:0 chroma subsampling Done writing decoded image to file: /tmp/img2.bmp Processing: …/input_images/img4.jpg Image is 3 channels. Channel #0 size: 640 x 426 Channel #1 size: 320 x 213 Channel #2 size: 320 x 213 YUV 4:2:0 chroma subsampling Done writing decoded image to file:/tmp/img4.bmp Processing: …/input_images/cat.jpg Image is 3 channels. Channel #0 size: 64 x 64 Channel #1 size: 64 x 64 Channel #2 size: 64 x 64 YUV 4:4:4 chroma subsampling Done writing decoded image to file:/tmp/cat.bmp Processing: …/input_images/cat_grayscale.jpg Image is 1 channels. Channel #0 size: 64 x 64 Grayscale JPEG Done writing decoded image to file:/tmp/cat_grayscale.bmp Processing: …/input_images/img1.jpg Image is 3 channels. Channel #0 size: 480 x 640 Channel #1 size: 240 x 320 Channel #2 size: 240 x 320 YUV 4:2:0 chroma subsampling Done writing decoded image to file: /tmp/img1.bmp Processing: …/input_images/img3.jpg Image is 3 channels. Channel #0 size: 640 x 426 Channel #1 size: 320 x 213 Channel #2 size: 320 x 213 YUV 4:2:0 chroma subsampling Done writing decoded image to file:/tmp/img3.bmp Processing: …/input_images/img9.jpg Image is 3 channels. Channel #0 size: 640 x 480 Channel #1 size: 320 x 240 Channel #2 size: 320 x 240 YUV 4:2:0 chroma subsampling Done writing decoded image to file:/tmp/img9.bmp Processing: …/input_images/img6.jpg Image is 3 channels. Channel #0 size: 640 x 480 Channel #1 size: 320 x 240 Channel #2 size: 320 x 240 YUV 4:2:0 chroma subsampling Done writing decoded image to file:/tmp/img6.bmp Total decoding time: 14.8286 Avg decoding time per image: 1.23571 Avg images per sec: 0.809248 Avg decoding time per batch: 1.23571 Image resizing example 此图像大小调整和水印示例根据客户机的请求生成图像的缩放版本。图8显示了图像大小调整和水印的典型工作流程。 下面的代码示例演示如何调整图像大小并用徽标图像对其进行水印。 //// The following code example shows how to resize images and watermark them with a logo image.// Summary Download the latest version of prebuilt DALI binaries with NVIDIA Ampere architecture support. For a detailed list of new features and enhancements, see the nvJPEG Library documentation and the latest release notes. To learn more about how DALI uses nvJPEG for accelerating a deep
not supported. Falling back to default backend”<
&dev_allocator,
NVJPEG_FLAGS_DEFAULT,
¶ms.nvjpeg_state)
whether a bitstream can be decoded
*)img_data[i].data(), img_len[i], params.jpeg_streams[0]);
nvjpegDecodeBatched(params.nvjpeg_handle,
params.nvjpeg_state,
batched_bitstreams_size.data(),
atched_output.data(),
params.stream)
https://github.com/NVIDIA/CUDALibrarySamples.git
nvJPEG/nvJPEG-Decoder/
./nvjpegDecoder -i …/input_images/ -o ~/tmp
in directory: …/input_images/, total 12, batchsize 1
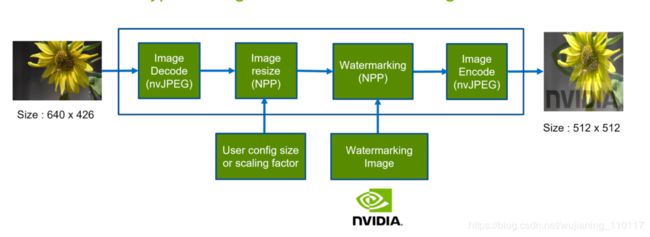
Figure 8. Image resizing and watermarking pipeline employing a parallel utilization of GPU software and CUDA.
// Libraries used
// nvJPEG decoding, NPP Resize, NPP watermarking, nvJPEG encoding
int main(){ … // nvJPEG decoder nReturnCode = nvjpegDecode(nvjpeg_handle, nvjpeg_decoder_state, dpImage, nSize, oformat, &imgDesc, NULL); // NPP image resize
st = nppiResize_8u_C3R_Ctx(imgDesc.channel[0], imgDesc.pitch[0], srcSize, srcRoi, imgResize.channel[0], imgResize.pitch[0], dstSize, dstRoi, NPPI_INTER_LANCZOS, nppStreamCtx);
st = nppiResize_8u_C3R_Ctx(imgDescW.channel[0], imgDescW.pitch[0], srcSizeW, srcRoiW,imgResizeW.channel[0], imgResizeW.pitch[0], dstSize, dstRoi, NPPI_INTER_LANCZOS, nppStreamCtx);
// Alpha Blending watermarking
st = nppiAlphaCompC_8u_C3R_Ctx(imgResize.channel[0], imgResize.pitch[0], 255, imgResizeW.channel[0], imgResizeW.pitch[0], ALPHA_BLEND, imgResize.channel[0], imgResize.pitch[0], dstSize, NPPI_OP_ALPHA_PLUS, nppStreamCtx);
// nvJPEG encoding
nvjpegEncodeImage(nvjpeg_handle, nvjpeg_encoder_state, nvjpeg_encode_params, &imgResize, iformat, dstSize.width, dstSize.height,NULL)); … }
$ git clone https://github.com/NVIDIA/CUDALibrarySamples.git
$ cd nvJPEG/Image-Resize-WaterMark/
$ mkdir build$ cd build
$ cmake …
$ make // Running Image resizer and watermarking
$ ./imageResizeWatermark -i …/input_images/ -o resize_images -q 85 -rw 512 -rh 512
learning data pipeline, see Loading Data Fast with DALI and the New Hardware JPEG Decoder in NVIDIA A100 GPUs.