android组件定位小技巧
初学者在使用android layout时,会遇到view组件定位不准确的问题(我也是),下面就来分析一下常见的layout(LinearLayout和RelativeLayout)的属性和用法。
首先是一个layout的布局,如下:

其中,margin是外边距,规定了该layout的外边距,也就是该layout和其父组件的间隔,常用的相关属性有layout_marginLeft,layout_marginRight,layout_marginTop,layout_marginBottom,分别表示左右上下的外边距。下面是一个小例子:
<LinearLayout
    android:orientation="vertical"
    android:paddingLeft="50px"
    android:paddingTop="100px"
    android:paddingRight="150px"
    android:paddingBottom="200px"
    android:layout_width="match_parent"
    android:layout_height="match_parent">
    <LinearLayout
        android:layout_width="match_parent"
        android:layout_height="match_parent"
        android:background="#000000"
        >
        <LinearLayout
            android:layout_width="match_parent"
            android:layout_height="match_parent"
            android:layout_marginLeft="200px"
            android:layout_marginTop="150px"
            android:layout_marginRight="100px"
            android:layout_marginBottom="50px"
            android:background="#FFFFFF">
        LinearLayout>
    LinearLayout>
LinearLayout>
这里对于width和height的属性也稍作解释,除了具体的数字定义大小,还可以用两种参数,分别是match_parent和wrap_content,前者强制性的使组件扩展,以填充布局单元内尽可能多的空间。后者将强制性的使视图扩展以显示全部内容。
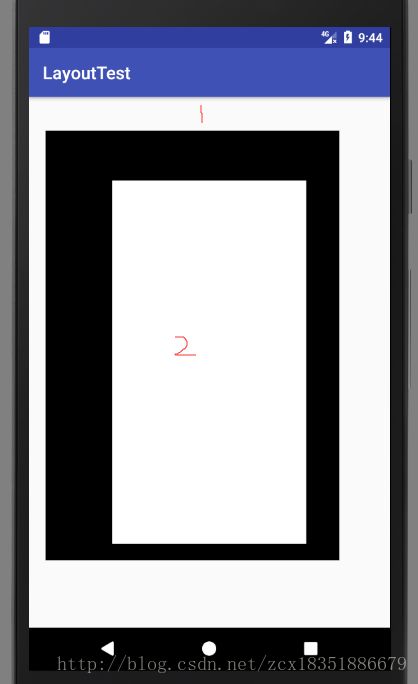
如图,我构建了3个嵌套的LinearLayout,其中layout1设置了各方向的padding属性,layout2设置各方向的margin属性,结果和预期一致。
除了上述属性控制边距,也可使用比例的方式对画面进行分块,用到的属性是父组件的weightSum和子组件的layout_weight属性,先看例子:
<LinearLayout
    android:orientation="horizontal"
    android:layout_width="match_parent"
    android:layout_height="match_parent"
    android:weightSum="5"
    >
    <LinearLayout
        android:layout_width="0px"
        android:layout_height="match_parent"
        android:layout_weight="1"
        android:background="#000000"
        >
    LinearLayout>
    <LinearLayout
        android:layout_width="0px"
        android:layout_height="match_parent"
        android:layout_weight="1"
        android:background="#0000FF"
        >
    LinearLayout>
    <LinearLayout
        android:layout_width="0px"
        android:layout_height="match_parent"
        android:layout_weight="1"
        android:background="#00FF00"
        >
    LinearLayout>
    <LinearLayout
        android:layout_width="0px"
        android:layout_height="match_parent"
        android:layout_weight="2"
        android:background="#FF0000"
        >
    LinearLayout>
LinearLayout>

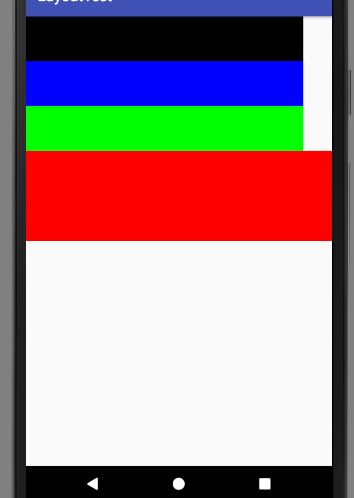
我写了一个LinearLayout(设为组件水平排列,后面只关注宽度),并在里面水平放了5个layout,并设置了父layout的weightSum和子layout的layout_weight,结果是,里面的layout都按照外layout_weight占weightSum的比例来分配空间。我试着给某些子layout加了margin属性,结果是,margin生效了,但是所有字layout的宽度比例依然是layout_weight的比例,如图:

我又把父layout的weightSum改为了10,结果:

总结了一下规律:
子layout的宽度之和占父layout的比例是layout_weight之和与weightNum的比例,子layout之间的比例是layout_weight的比例。尝试了一下orientation=”vertical”,效果也一样。
好了,那么使用这两个属性,就可以完成某个方向(横向或者竖向)的块布局,通过嵌套的layout可以实现横向或竖向的块布局。如图(代码不放了,就是嵌套的layout):

如图:通过设置layout之间的距离,可以完成简单的块布局。
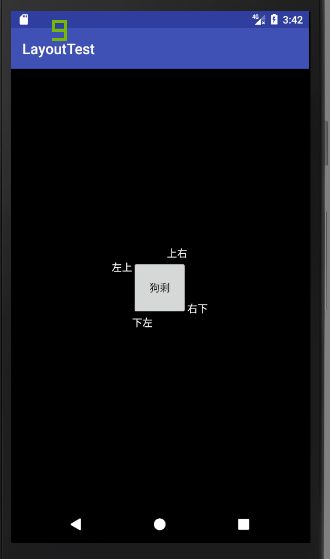
通过以上的方法,可以实现需要界面按比例划分的布局。但是对于每一块中的小组件的定位,我们可能希望用一些更简单的办法来实现布局。下面继续说说最常用的另外一种布局,RelativeLayout。先看图:

如图,我在一个RelativeLayout中放了一个按钮,并设置按钮的layout_centerInParent = “true”(相对于父组件的位置,这里不细说)使得它位于整个屏幕的中间。现在我想在按钮附近放一些其他的组件,但又不想重新计算该组件的位置,这时候就可以使用相对位置。即设置相对于已存在组件的位置。可用的属性有:
1.
android:layout_below 在某元素的下方
android:layout_above 在某元素的的上方
android:layout_toLeftOf 在某元素的左边
android:layout_toRightOf 在某元素的右边
2.
android:layout_alignTop 本元素的上边缘和某元素的的上边缘对齐
android:layout_alignLeft 本元素的左边缘和某元素的的左边缘对齐
android:layout_alignBottom 本元素的下边缘和某元素的的下边缘对齐
android:layout_alignRight 本元素的右边缘和某元素的的右边缘对齐
android:layout_marginBottom 离某元素底边缘的距离
android:layout_marginLeft 离某元素左边缘的距离
android:layout_marginRight 离某元素右边缘的距离
android:layout_marginTop 离某元素上边缘的距离
这些属性的值都是某组件的id。
看一个例子:
"match_parent"
android:layout_height="match_parent"
android:background="#000000">
通过1,2类的属性组合来确定相对位置,对于一些组件如按钮(比如密码框下的登录按钮)标签,输入框等小组件应该很常用。
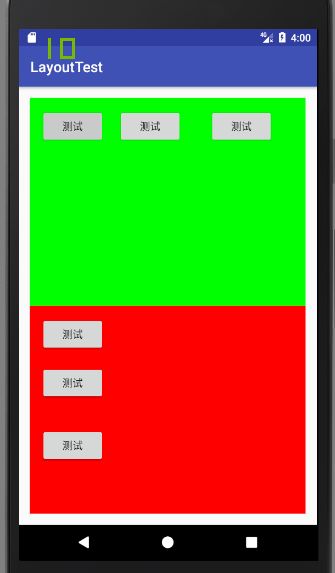
最后补充layout_marginBottom layout_marginTop layout_marginLeft layout_marginRight
属性对于同级组件的作用效果。(对于计算器按钮类的布局应该很好用),附上一个例子:
<LinearLayout
    android:orientation="vertical"
    android:layout_width="match_parent"
    android:layout_height="match_parent"
    android:padding="40px"
    android:weightSum="2"
    >
    <LinearLayout
        android:orientation="horizontal"
        android:layout_width="match_parent"
        android:layout_height="0px"
        android:layout_weight="1"
        android:background="#00FF00"
        android:padding="40px"
        >
        <Button
            android:layout_width="wrap_content"
            android:layout_height="wrap_content"
            android:layout_marginRight="50px"
            android:text="测试"
            />
        <Button
            android:layout_width="wrap_content"
            android:layout_height="wrap_content"
            android:layout_marginRight="100px"
            android:text="测试"
            />
        <Button
            android:layout_width="wrap_content"
            android:layout_height="wrap_content"
            android:text="测试"
            />
    LinearLayout>
    <LinearLayout
        android:orientation="vertical"
        android:layout_width="match_parent"
        android:layout_height="0px"
        android:layout_weight="1"
        android:background="#FF0000"
        android:padding="40px"
        >
        <Button
            android:layout_width="wrap_content"
            android:layout_height="wrap_content"
            android:layout_marginBottom="50px"
            android:text="测试"
            />
        <Button
            android:layout_width="wrap_content"
            android:layout_height="wrap_content"
            android:layout_marginBottom="100px"
            android:text="测试"
            />
        <Button
            android:layout_width="wrap_content"
            android:layout_height="wrap_content"
            android:text="测试"
            />
    LinearLayout>
LinearLayout>