Android Jetpack 之 Navigation
1. Navigation 的定义
Navigation 是指支持用户导航、进入和退出应用中不同内容片段的交互。Android Jetpack 的导航组件可帮助实现导航,无论是简单的按钮点击,还是应用栏和抽屉式导航栏等更为复杂的模式,该组件均可应对。导航组件还通过遵循一套既定原则来确保一致且可预测的用户体验。
导航组件由以下三个关键部分组成:
- 导航图:在一个集中位置包含所有导航相关信息的 XML 资源。这包括应用内所有单个内容区域(称为目标)以及用户可以通过应用获取的可能路径。
NavHost:显示导航图中目标的空白容器。导航组件包含一个默认NavHost实现 (NavHostFragment),可显示 Fragment 目标。NavController:在NavHost中管理应用导航的对象。当用户在整个应用中移动时,NavController会安排NavHost中目标内容的交换。
导航组件提供各种其他优势,包括以下内容:
- 处理 Fragment 事务。
- 默认情况下,正确处理往返操作。
- 为动画和转换提供标准化资源。
- 实现和处理深层链接。
- 包括导航界面模式(例如抽屉式导航栏和底部导航),用户只需完成极少的额外工作。
- Safe Args - 可在目标之间导航和传递数据时提供类型安全的 Gradle 插件。
ViewModel支持 - 可以将ViewModel的范围限定为导航图,以在图表的目标之间共享与界面相关的数据。
2. Navigation 的使用
a. 创建所需要的 fragment
b. 创建导航图
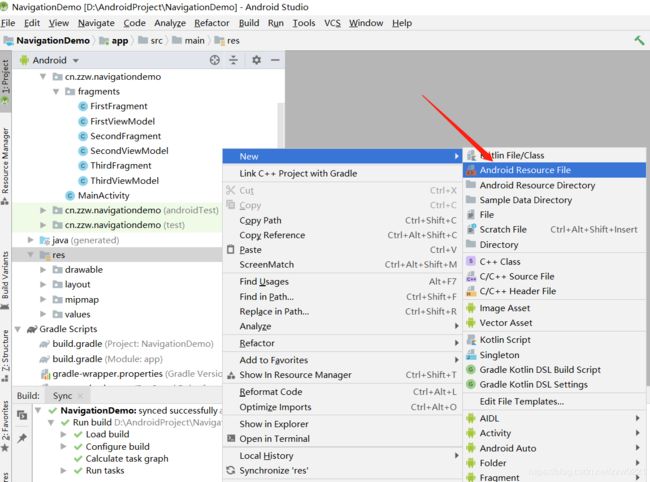
在 res 文件夹选择右键 → New → Android Resource File
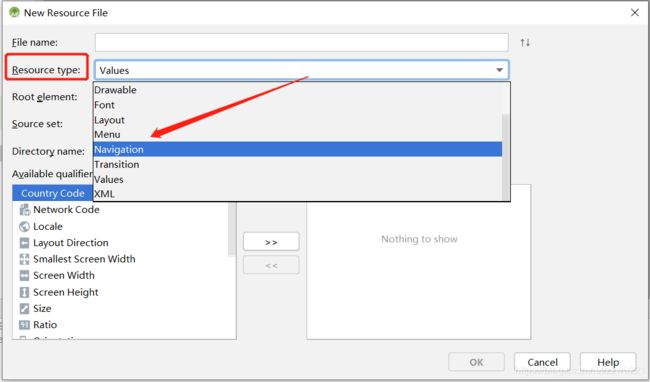
在打开的页面中 Resource type 选择 Navigation,创建导航图文件:
这时候会弹出对话框提示导入所需要的库:
这时候在模块的 build.gradle 下新增添加了如下依赖:
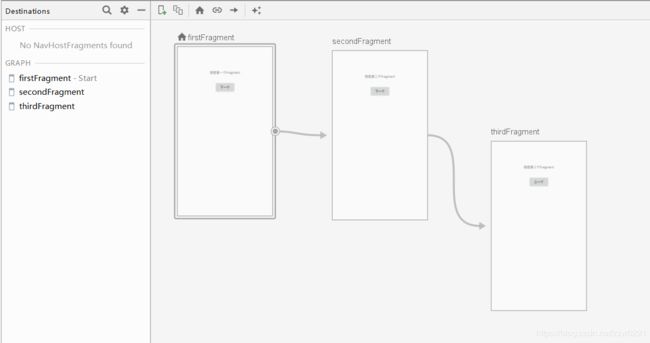
c. 添加 fragment 到导航图中
d. Activity布局文件添加fragment
fragment 中,name 属性是固定, app:navGraph 为导航图文件。
导航图的xml:
Action 标签为 fragment 切换的事件,app:destination 为事件操作后,跳转的目标 fragment。
e. fragment 中的行为
在 第1,2个 fragment 中 存在一颗按钮,用于跳转到下一个 fragment,第3个 fragment 中的按钮用于跳转到前一个 fragment:
FirstFragment 的布局文件:
FirstFragment:
package cn.zzw.navigationdemo.fragments;

import androidx.lifecycle.ViewModelProviders;

import android.os.Bundle;

import androidx.annotation.NonNull;
import androidx.annotation.Nullable;
import androidx.fragment.app.Fragment;
import androidx.navigation.Navigation;

import android.util.Log;
import android.view.LayoutInflater;
import android.view.View;
import android.view.ViewGroup;

import cn.zzw.navigationdemo.R;


public class FirstFragment extends Fragment {

    private FirstViewModel mViewModel;

    public static FirstFragment newInstance() {
        return new FirstFragment();
    }

    @Override
    public View onCreateView(@NonNull LayoutInflater inflater, @Nullable ViewGroup container,
                             @Nullable Bundle savedInstanceState) {
        Log.e("zzw", "FirstFragment:    onCreateView()");
        View rootView = inflater.inflate(R.layout.first_fragment, container, false);
        rootView.findViewById(R.id.mBtnNext).setOnClickListener(new View.OnClickListener() {
            @Override
            public void onClick(View view) {
                Navigation.findNavController(view).navigate(R.id.action_firstFragment_to_secondFragment);
            }
        });
        return rootView;
    }

    @Override
    public void onActivityCreated(@Nullable Bundle savedInstanceState) {
        super.onActivityCreated(savedInstanceState);
        mViewModel = ViewModelProviders.of(this).get(FirstViewModel.class);
    }

}
ThirdFragment 的布局文件:
ThirdFragment:
package cn.zzw.navigationdemo.fragments;

import androidx.lifecycle.ViewModelProviders;

import android.os.Bundle;

import androidx.annotation.NonNull;
import androidx.annotation.Nullable;
import androidx.fragment.app.Fragment;
import androidx.navigation.Navigation;

import android.util.Log;
import android.view.LayoutInflater;
import android.view.View;
import android.view.ViewGroup;

import cn.zzw.navigationdemo.R;

public class ThirdFragment extends Fragment {

    private ThirdViewModel mViewModel;

    public static ThirdFragment newInstance() {
        return new ThirdFragment();
    }

    @Override
    public View onCreateView(@NonNull LayoutInflater inflater, @Nullable ViewGroup container,
                             @Nullable Bundle savedInstanceState) {
        Log.e("zzw","ThirdFragment:    onCreateView()");
        View rootView = inflater.inflate(R.layout.third_fragment, container, false);
        rootView.findViewById(R.id.mBtnNext).setOnClickListener(new View.OnClickListener() {
            @Override
            public void onClick(View view) {
                Navigation.findNavController(view).navigateUp();
            }
        });
        return rootView;
    }

    @Override
    public void onActivityCreated(@Nullable Bundle savedInstanceState) {
        super.onActivityCreated(savedInstanceState);
        mViewModel = ViewModelProviders.of(this).get(ThirdViewModel.class);
        // TODO: Use the ViewModel
    }

}
方法 Navigation.findNavController(view).navigateUp() 用于调回上一个 fragment。
方法 Navigation.findNavController(view).navigate(R.id.action_firstFragment_to_secondFragment) 用于执行 Action 事件。
f. 加载 Fragment 的 Activity
在此 Activity 中,必须重写方法 onSupportNavigateUp,意味着 Activity 将它的 back键点击事件的委托出去,如果当前并非栈中顶部的Fragment, 那么点击back键,返回上一个Fragment。
package cn.zzw.navigationdemo;

import androidx.appcompat.app.AppCompatActivity;
import androidx.fragment.app.Fragment;
import androidx.navigation.fragment.NavHostFragment;

import android.os.Bundle;

public class MainActivity extends AppCompatActivity {

    @Override
    protected void onCreate(Bundle savedInstanceState) {
        super.onCreate(savedInstanceState);
        setContentView(R.layout.activity_main);
    }

    @Override
    public boolean onSupportNavigateUp() {
        Fragment fragment = getSupportFragmentManager().findFragmentById(R.id.nav_host_fragment);
        return NavHostFragment.findNavController(fragment).navigateUp();
    }
}
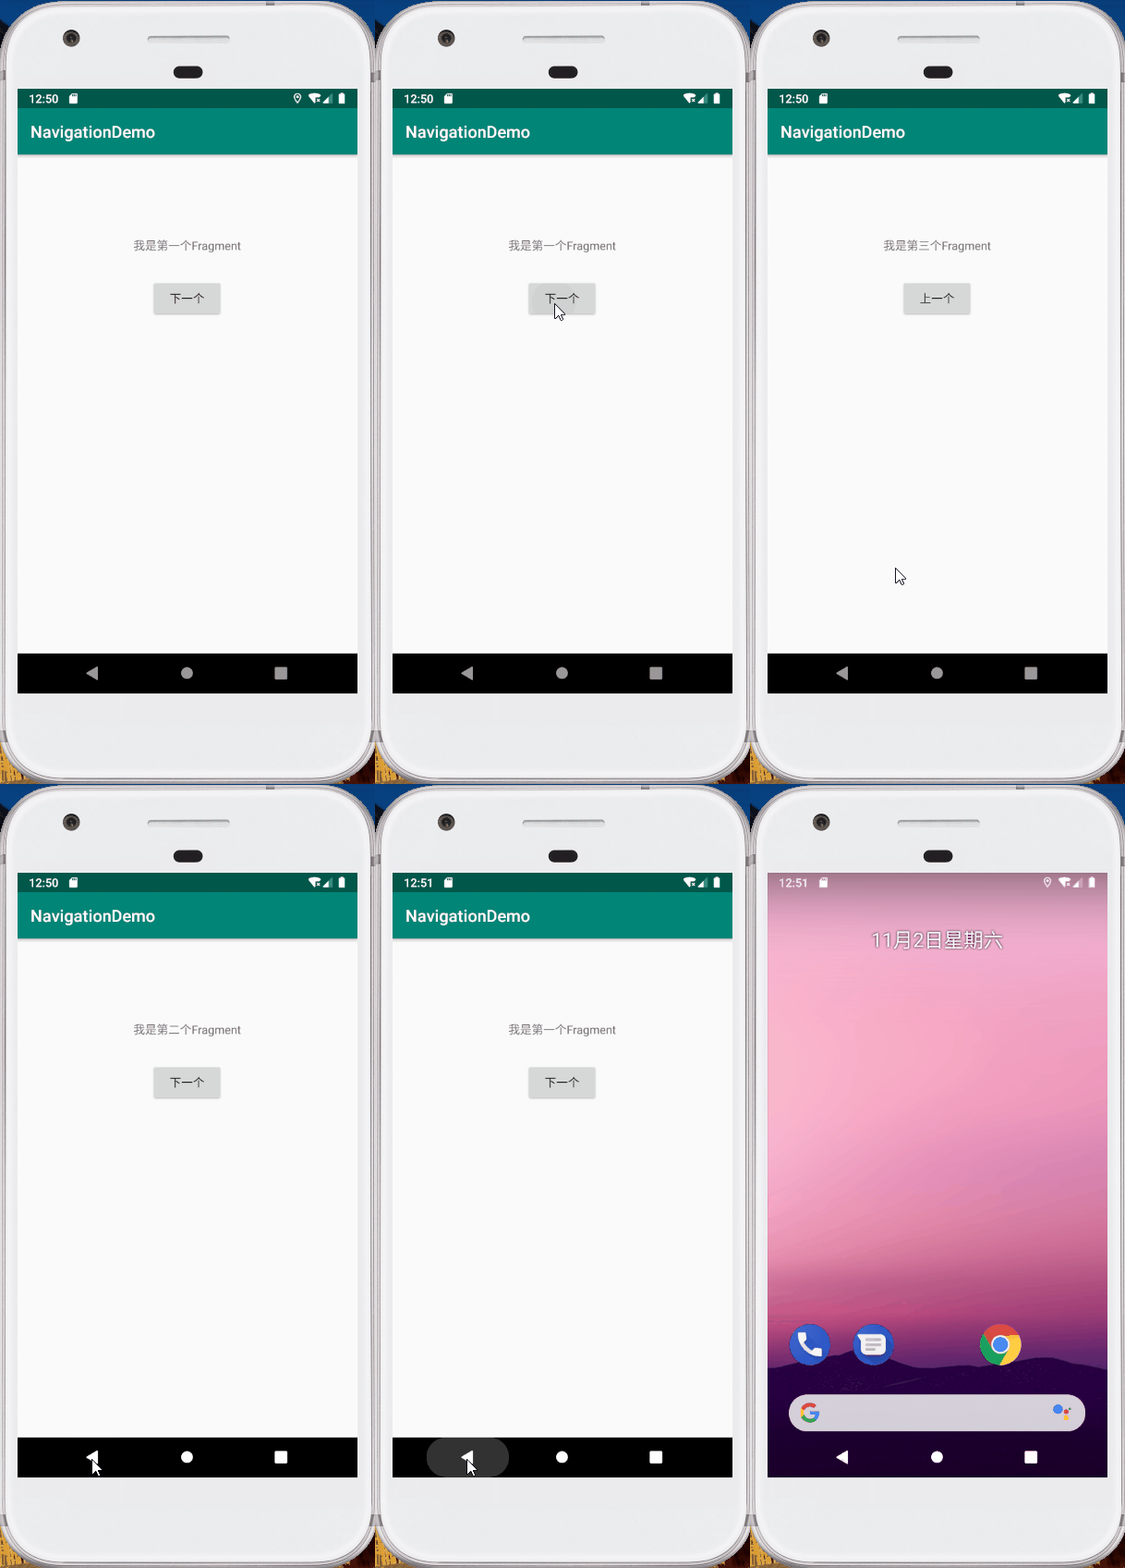
g. 实际效果
对应的log:
2019-11-02 08:52:39.306 5906-5906/cn.zzw.navigationdemo E/zzw: FirstFragment:    onCreateView()
2019-11-02 08:52:43.483 5906-5906/cn.zzw.navigationdemo E/zzw: SecondFragment:    onCreateView()
2019-11-02 08:52:45.149 5906-5906/cn.zzw.navigationdemo E/zzw: ThirdFragment:    onCreateView()
2019-11-02 08:52:47.076 5906-5906/cn.zzw.navigationdemo E/zzw: SecondFragment:    onCreateView()
2019-11-02 08:52:48.775 5906-5906/cn.zzw.navigationdemo E/zzw: ThirdFragment:    onCreateView()
2019-11-02 08:52:52.394 5906-5906/cn.zzw.navigationdemo E/zzw: SecondFragment:    onCreateView()
2019-11-02 08:52:54.103 5906-5906/cn.zzw.navigationdemo E/zzw: FirstFragment:    onCreateView()
从 log看,fragment 每出现一次都会重新走 onCreateView 方法,就算返回也是会走 onCreateView。在很多人看来这是个 bug,我觉得这并不是 bug,Google 的意图是 view销毁,viewmodel 保存 data,view 自身保存视图状态,视图重建时再恢复。
3. 源码解析
在以上的流程中,NavHostFragment 作为一个容器,用于包含导航。
public class NavHostFragment extends Fragment implements NavHost {
    ...
    ...
}
NavHostFragment 就是一个 Fragment,它必然有 Fragment 该有的生命周期,如果 Fragment 通过 xml 实例化的,那么第一个收到的回调将是 onInflate 方法:
    public void onInflate(@NonNull Context context, @NonNull AttributeSet attrs,
            @Nullable Bundle savedInstanceState) {
        super.onInflate(context, attrs, savedInstanceState);

        final TypedArray a = context.obtainStyledAttributes(attrs, R.styleable.NavHostFragment);
        final int graphId = a.getResourceId(R.styleable.NavHostFragment_navGraph, 0);
        final boolean defaultHost = a.getBoolean(R.styleable.NavHostFragment_defaultNavHost, false);

        if (graphId != 0) {
            mGraphId = graphId;
        }
        if (defaultHost) {
            mDefaultNavHost = true;
        }
        a.recycle();
    }
在回头看看 xml :
mGraphId 以及 mDefaultNavHost 就是在 xml 中设置,这样就能获取到了 xml 中设置的导航文件。接着继续看 onCreate 方法:
    public void onCreate(@Nullable Bundle savedInstanceState) {
        super.onCreate(savedInstanceState);
        final Context context = requireContext();

        mNavController = new NavController(context);
        mNavController.getNavigatorProvider().addNavigator(createFragmentNavigator());

        ...
        ...

        if (mGraphId != 0) {
            // Set from onInflate()
            mNavController.setGraph(mGraphId);
        } else {
            // See if it was set by NavHostFragment.create()
            final Bundle args = getArguments();
            final int graphId = args != null ? args.getInt(KEY_GRAPH_ID) : 0;
            final Bundle startDestinationArgs = args != null
                    ? args.getBundle(KEY_START_DESTINATION_ARGS)
                    : null;
            if (graphId != 0) {
                mNavController.setGraph(graphId, startDestinationArgs);
            }
        }
    }
在 onCreate 生命周期中创建了 NavController,从上面的方法中 mGraphId 不为空,所以执行的代码是 mNavController.setGraph(mGraphId)。
    public void setGraph(@NavigationRes int graphResId) {
        setGraph(graphResId, null);
    }

    public void setGraph(@NavigationRes int graphResId, @Nullable Bundle startDestinationArgs) {
        setGraph(getNavInflater().inflate(graphResId), startDestinationArgs);
    }

    public void setGraph(@NonNull NavGraph graph) {
        setGraph(graph, null);
    }

    @CallSuper
    public void setGraph(@NonNull NavGraph graph, @Nullable Bundle startDestinationArgs) {
        if (mGraph != null) {
            // Pop everything from the old graph off the back stack
            popBackStackInternal(mGraph.getId(), true);
        }
        mGraph = graph;
        onGraphCreated(startDestinationArgs);
    }
如果设置的 mGraphId 不为 null,它执行了popBackStackInternal 方法,从注释看,此方法将旧的导航图全部出栈。
而切换 Fragment 调用的是 Navigation.findNavController(view).navigate() 方法,而在 NavController 中,navigate 存在几个不同参数的 navigate 方法,最终调用的是:
    private void navigate(@NonNull NavDestination node, @Nullable Bundle args,
            @Nullable NavOptions navOptions, @Nullable Navigator.Extras navigatorExtras) {
        ...
        ...

        Navigator navigator = mNavigatorProvider.getNavigator(
                node.getNavigatorName());
        Bundle finalArgs = node.addInDefaultArgs(args);
        NavDestination newDest = navigator.navigate(node, finalArgs,
                navOptions, navigatorExtras);
        ...
        ...
    }
调用的是 Navigator 的 navigate 方法,而 Navigator 却是个抽象类,它的子类是 FragmentNavigator,navigate 方法如下:
    public NavDestination navigate(@NonNull Destination destination, @Nullable Bundle args,
            @Nullable NavOptions navOptions, @Nullable Navigator.Extras navigatorExtras) {
        if (mFragmentManager.isStateSaved()) {
            Log.i(TAG, "Ignoring navigate() call: FragmentManager has already"
                    + " saved its state");
            return null;
        }
        String className = destination.getClassName();
        if (className.charAt(0) == '.') {
            className = mContext.getPackageName() + className;
        }
        final Fragment frag = instantiateFragment(mContext, mFragmentManager,
                className, args);
        frag.setArguments(args);
        final FragmentTransaction ft = mFragmentManager.beginTransaction();

        int enterAnim = navOptions != null ? navOptions.getEnterAnim() : -1;
        int exitAnim = navOptions != null ? navOptions.getExitAnim() : -1;
        int popEnterAnim = navOptions != null ? navOptions.getPopEnterAnim() : -1;
        int popExitAnim = navOptions != null ? navOptions.getPopExitAnim() : -1;
        if (enterAnim != -1 || exitAnim != -1 || popEnterAnim != -1 || popExitAnim != -1) {
            enterAnim = enterAnim != -1 ? enterAnim : 0;
            exitAnim = exitAnim != -1 ? exitAnim : 0;
            popEnterAnim = popEnterAnim != -1 ? popEnterAnim : 0;
            popExitAnim = popExitAnim != -1 ? popExitAnim : 0;
            ft.setCustomAnimations(enterAnim, exitAnim, popEnterAnim, popExitAnim);
        }

        ft.replace(mContainerId, frag);
        ft.setPrimaryNavigationFragment(frag);

        final @IdRes int destId = destination.getId();
        final boolean initialNavigation = mBackStack.isEmpty();
        // TODO Build first class singleTop behavior for fragments
        final boolean isSingleTopReplacement = navOptions != null && !initialNavigation
                && navOptions.shouldLaunchSingleTop()
                && mBackStack.peekLast() == destId;

        boolean isAdded;
        if (initialNavigation) {
            isAdded = true;
        } else if (isSingleTopReplacement) {
            // Single Top means we only want one instance on the back stack
            if (mBackStack.size() > 1) {
                // If the Fragment to be replaced is on the FragmentManager's
                // back stack, a simple replace() isn't enough so we
                // remove it from the back stack and put our replacement
                // on the back stack in its place
                mFragmentManager.popBackStack(
                        generateBackStackName(mBackStack.size(), mBackStack.peekLast()),
                        FragmentManager.POP_BACK_STACK_INCLUSIVE);
                ft.addToBackStack(generateBackStackName(mBackStack.size(), destId));
                mIsPendingBackStackOperation = true;
            }
            isAdded = false;
        } else {
            ft.addToBackStack(generateBackStackName(mBackStack.size() + 1, destId));
            mIsPendingBackStackOperation = true;
            isAdded = true;
        }
        if (navigatorExtras instanceof Extras) {
            Extras extras = (Extras) navigatorExtras;
            for (Map.Entry sharedElement : extras.getSharedElements().entrySet()) {
                ft.addSharedElement(sharedElement.getKey(), sharedElement.getValue());
            }
        }
        ft.setReorderingAllowed(true);
        ft.commit();
        // The commit succeeded, update our view of the world
        if (isAdded) {
            mBackStack.add(destId);
            return destination;
        } else {
            return null;
        }
    }
在这里,看到了 Navigation 是可以处理进出场动画的,而且 Fragment 之间的切换是通过 replace 方法,这也是为什么上面打印的 Log 中,Fragment 每次都会走 onCreateView() 方法的原因。


