iOS-加速计 传感器 蓝牙
一.加速计
加速计的作用
● 用于检测设备的运动(比如摇晃)
加速计的经典应用场景
● 摇一摇
● 计步器
加速计的原理
●检测设备在X、Y、Z轴上的加速度 (哪个方向有力的作用,哪个方向运动了)
●根据加速度数值,就可以判断出在各个方向上的作用力度
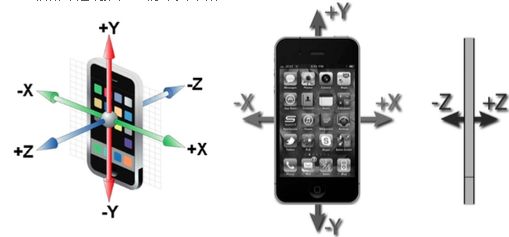
各个方向上,加速度的大小如下( 加速度的取值在 (-1,1) 之间

加速计程序的开发
●加速计程序的开发
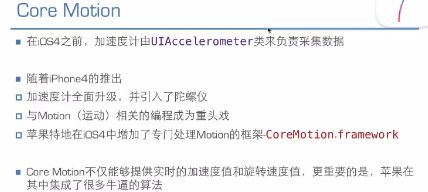
● 在iOS5以前:使用UIAccelerometer,用法非常简单
●从iOS5开始:CoreMotion.framework
●虽然UIAccelerometer已经过期,但由于其用法极其简单,很多程序里面都还有残留
1.使用UIAccelerometer实现手机晃动的时候,小球的位置都是跟着重力的往下掉,并且碰到屏幕边缘回弹
UIAccelerometer的使用代码如下:
//  HMViewController.m

#import "HMViewController.h"
#import "UIView+Extension.h"

@interface HMViewController ()
@property (weak, nonatomic) IBOutlet UIImageView *ball;
@property (nonatomic, assign) CGPoint velocity;
@end

@implementation HMViewController

- (void)viewDidLoad
{
    [super viewDidLoad];

    // 1.获得单例对象(过期:不再更新,并不一定代表不能用)
    UIAccelerometer *accelerometer = [UIAccelerometer sharedAccelerometer];

    // 2.设置代理
    accelerometer.delegate = self;

    // 3.设置采样间隔(每隔多少秒采样一次数据)
    accelerometer.updateInterval = 1 / 30.0;
}

#pragma mark - UIAccelerometerDelegate
/**
 *  当采样到加速计数据时,就会调用一次(调用频率一般比较高)
 */
- (void)accelerometer:(UIAccelerometer *)accelerometer didAccelerate:(UIAcceleration *)acceleration
{
    // 1.累加速度
    // v = a * t = a1 + a2 + a3 + ...... + at
    _velocity.x += acceleration.x;
    _velocity.y -= acceleration.y;

    // 2.累加位移
    // s = v * t = v1 + v2 + v3 + ...... + vt
    self.ball.x += _velocity.x;
    self.ball.y += _velocity.y;

    // 3.边界判断
    if (self.ball.x <= 0) { // x超出屏幕左边
        self.ball.x = 0;
        // 速度取反,削弱速度
        _velocity.x *= -0.5;
    }
    if (self.ball.maxX >= self.view.width) { // x超出屏幕右边
        self.ball.maxX = self.view.width;

        // 速度取反,削弱速度
        _velocity.x *= -0.5;
    }
    if (self.ball.y <= 0) { // y超出屏幕上边
        self.ball.y = 0;
        // 速度取反,削弱速度
        _velocity.y *= -0.5;
    }
    if (self.ball.maxY >= self.view.height) { // y超出屏幕下边
        self.ball.maxY = self.view.height;
        // 速度取反,削弱速度
        _velocity.y *= -0.5;
    }
}
@end

2.CoreMotion.framework的使用
①.CoreMotion简介
②.push和pull的区别

使用代码如下:
//  HMViewController.m

#import "HMViewController.h"
#import

@interface HMViewController ()
@property (nonatomic, strong) CMMotionManager *mgr;
@end

@implementation HMViewController

- (void)viewDidLoad
{
    [super viewDidLoad];

    // 1.创建motion管理者
    self.mgr = [[CMMotionManager alloc] init];

    // 2.判断加速计是否可用
    if (self.mgr.isAccelerometerAvailable) {
        [self pull];
    } else {
        NSLog(@"---加速计不可用-----");
    }
}
/**
 * ******* pull *******
 */
- (void)pull
{
    [self.mgr startAccelerometerUpdates];
}

- (void)touchesBegan:(NSSet *)touches withEvent:(UIEvent *)event
{
    CMAcceleration acceleration = self.mgr.accelerometerData.acceleration;
    NSLog(@"%f %f %f", acceleration.x, acceleration.y, acceleration.z);
}

/**
 * ******* push *******
 */
- (void)push
{
    // 3.设置采样间隔
    self.mgr.accelerometerUpdateInterval = 1 / 30.0;

    // 4.开始采样(采集加速度数据)
    [self.mgr startAccelerometerUpdatesToQueue:[NSOperationQueue mainQueue] withHandler:^(CMAccelerometerData *accelerometerData, NSError *error) {
        // 如果在block中执行较好时的操作,queue最好不是主队列
        // 如果在block中要刷新UI界面,queue最好是主队列
        NSLog(@"%f %f %f", accelerometerData.acceleration.x, accelerometerData.acceleration.y, accelerometerData.acceleration.z);
    }];
}

@end
3.摇一摇的功能实现
使用iOS自带的shake摇晃的API实现,只要是响应者就能监听这方法
代码如下:// HMViewController.m
#import "HMViewController.h"
@interface HMViewController ()
@end
@implementation HMViewController
- (void)viewDidLoad
{
[super viewDidLoad];
}
#pragma mark - 实现相应的响应者方法
/** 开始摇一摇 */
- (void)motionBegan:(UIEventSubtype)motion withEvent:(UIEvent *)event
{
NSLog(@"motionBegan");
}
/** 摇一摇结束(需要在这里处理结束后的代码) */
- (void)motionEnded:(UIEventSubtype)motion withEvent:(UIEvent *)event
{
// 不是摇一摇运动事件
if (motion != UIEventSubtypeMotionShake) return;
NSLog(@"motionEnded");
}
/** 摇一摇取消(被中断,比如突然来电) */
- (void)motionCancelled:(UIEventSubtype)motion withEvent:(UIEvent *)event
{
NSLog(@"motionCancelled");
}
@end
二.传感器
1.传感器介绍
● 传感器是一种感应 \ 检测装置 , 目前已经广泛应用于智能手机上
● 传感器的作用
● 用于感应 \ 检测设备周边的信息
● 不同类型的传感器 , 检测的信息也不一样
● iPhone 中的下面现象都是由传感器完成的
● 在地图应用中 , 能判断出手机头面向的方向
● 一关灯 , iPhone 会自动降低亮度让屏幕显得不是那么刺眼
● 打电话时 , 人脸贴近 iPhone 屏幕时 , 屏幕会自动锁屏 , 达到省电的目的
传感器的类型
● iPhone5 中内置的传感器有● 运动传感器 \ 加速度传感器 \ 加速计 ( Motion/Accelerometer Sensor )
● 环境光传感器( Ambient Light Sensor )
● 距离传感器( Proximity Sensor )
● 磁力计传感器( Magnetometer Sensor )
● 内部温度传感器( Internal Temperature Sensor )
● 湿度传感器( Moisture Sensor )
● 陀螺仪( Gyroscope )
环境光传感 (Ambient Light Sensor)
● 是 iOS 、 Mac 设备中最为古老的传感器成员● 它能够让你在使用 Mac 、 iPhone 、 iPad 时,眼睛更为舒适
● 从一个明亮的室外走入相对黑暗的室内后,iOS设备会自动调低亮度,让屏幕显得不再那么光亮刺眼
● 几乎所有的 Mac 都带有背光键盘,当周围光线弱到一定条件时,会自动开启键盘背光
距离传感 (Proximity Sensor)
● 当你打电话或接电话时将电话屏幕贴近耳边, iPhone 会自动关闭屏幕 ,好处是
● 节省电量
● 防止耳朵或面部不小心触摸屏幕而引发一些不想要的意外操作
磁力计传感 (Magnetometer Sensor)
●可以感应地球磁场, 获得方向信息, 使位置服务数据更精准●可以用于电子罗盘和导航应用
● iPad的Smart Cover盒盖睡眠操作就是基于磁力计传感器
内部温度传感 (Internal Temperature Sensor)
● 从iPad一代开始,iOS设备都加入了一个内部温度传感器,用于检测内部组件温度,当温度超过系统设定的阈值时,会出现以下提示
●内部温度传感器,对于提升iOS设备自身安全性与稳定性有很大的帮助
湿度传感 (Moisture Sensor)
● 湿度传感器跟其他基于微电子的传感器不同,是一个简单的物理传感器
●简单来说,湿度传感器就是一张遇水变红的试纸
● Apple的维修人员就是通过检测试纸是否变红,来判断设备是否进水
● 陀螺仪是随着iPhone4的上市首次出现在iOS设备上的传感器
● 陀螺仪可以用于检测设备的持握方式
● 陀螺仪的原理是检测设备在X、Y、Z轴上所旋转的角速度
● 陀螺仪在赛车类游戏中有重大作用
●模拟汽车驾驶时方向盘旋转的动作
● 使得这类游戏的操控体验更为真实
运动传感\加速度传感\加速计(Motion/Accelerometer Sensor)
●最早出现在iOS设备上的传感器之一
●加速计用于检测设备在X、Y、Z轴上的加速度 (哪个方向有力的作用)
●加速计可以用于检测设备的摇晃,经典应用场景
摇一摇 计步器
距离传感器的使用:
//  HMViewController.m

#import "HMViewController.h"

@interface HMViewController ()

@end

@implementation HMViewController

- (void)viewDidLoad
{
    [super viewDidLoad];

    // 打开距离传感器,开启距离检测功能
//    [UIApplication sharedApplication].proximitySensingEnabled = YES; 过期
    [UIDevice currentDevice].proximityMonitoringEnabled = YES;

    // 监听距离改变
    [[NSNotificationCenter defaultCenter] addObserver:self selector:@selector(proximityStateDidChange:) name:UIDeviceProximityStateDidChangeNotification object:nil];
}

- (void)dealloc
{
    [[NSNotificationCenter defaultCenter] removeObserver:self];
}

- (void)proximityStateDidChange:(NSNotification *)note
{
    if ([UIDevice currentDevice].proximityState) {
        NSLog(@"有物体靠近设备屏幕");
    } else {
        NSLog(@"有物体远离设备屏幕");
    }
}
@end
三.蓝牙
iOS中蓝牙的实现方案
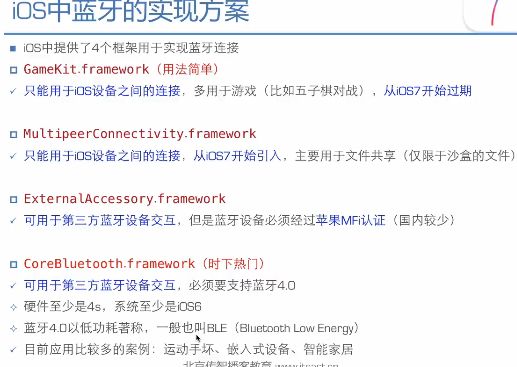
1.GameKit的使用
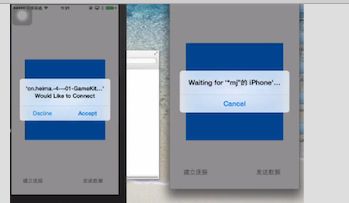
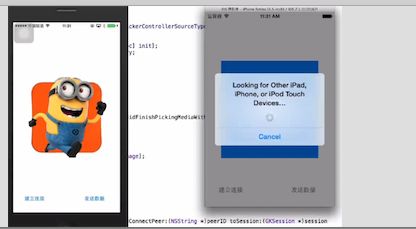
要求:在模拟器和真机家里连接,选择真机里的图片.显示到imageView上,点击发送,发送到模拟器上,模拟器把图片保存到相册
如下图:
代码如下:
//  HMViewController.m

#import "HMViewController.h"
#import

@interface HMViewController ()
@property (weak, nonatomic) IBOutlet UIImageView *imageView;
@property (nonatomic, strong) GKSession *session;
- (IBAction)buildConnect;
- (IBAction)sendData;
//点击imageView的手势
- (IBAction)selectImage:(UITapGestureRecognizer *)sender;
@end

@implementation HMViewController

- (void)viewDidLoad
{
    [super viewDidLoad];

}

//建立连接
- (IBAction)buildConnect {
    // 1.创建设备列表控制器
    GKPeerPickerController *ppc = [[GKPeerPickerController alloc] init];

    // 2.设置代理
    ppc.delegate = self;

    // 3.显示控制器
    [ppc show];
}

//发送数据
- (IBAction)sendData {
    if (self.imageView.image == nil) return;

    // 压缩图片数据
    NSData *data = UIImagePNGRepresentation(self.imageView.image);
//    Pet *p = [];
//    NSData *data = [NSKeyedArchiver archivedDataWithRootObject:p];

    // 发送数据
    [self.session sendDataToAllPeers:data withDataMode:GKSendDataReliable error:nil];
}

//点击imageView的的手势
- (IBAction)selectImage:(UITapGestureRecognizer *)sender {
    if (![UIImagePickerController isSourceTypeAvailable:UIImagePickerControllerSourceTypePhotoLibrary]) return;

    // 1.创建图片选择控制器
    UIImagePickerController *ipc = [[UIImagePickerController alloc] init];
    ipc.sourceType = UIImagePickerControllerSourceTypePhotoLibrary;

    // 2.设置代理
    ipc.delegate = self;

    // 3.显示
    [self presentViewController:ipc animated:YES completion:nil];
}

#pragma mark - 监听图片选择
- (void)imagePickerController:(UIImagePickerController *)picker didFinishPickingMediaWithInfo:(NSDictionary *)info
{
    // 1.销毁图片选择控制器
    [picker dismissViewControllerAnimated:YES completion:nil];

    // 2.显示图片
    self.imageView.image = info[UIImagePickerControllerOriginalImage];
}

#pragma mark - GKPeerPickerControllerDelegate
/**
 *  连接到某个设备就会调用
 *
 *  @param peerID  设备的蓝牙ID
 *  @param session 连接会话(通过session传输和接收数据)
 */
- (void)peerPickerController:(GKPeerPickerController *)picker didConnectPeer:(NSString *)peerID toSession:(GKSession *)session
{
    // 1.销毁显示设备的控制器
    [picker dismiss];

    // 2.保存session
    self.session = session;

    // 3.处理接收的数据(接收到蓝牙设备传输的数据时,就会调用self的receiveData:fromPeer:inSession:context:)
    [self.session setDataReceiveHandler:self withContext:nil];
}

#pragma mark - 接收到蓝牙设备传输的数据,就会调用
- (void)receiveData:(NSData *)data fromPeer:(NSString *)peer inSession:(GKSession *)session context:(void *)context
{
    self.imageView.image = [UIImage imageWithData:data];

    // 写入相册
    UIImageWriteToSavedPhotosAlbum(self.imageView.image, nil, nil, nil);
}
@end
2.CoreBluetooth的使用
①.CoreBluetooth
②.核心类
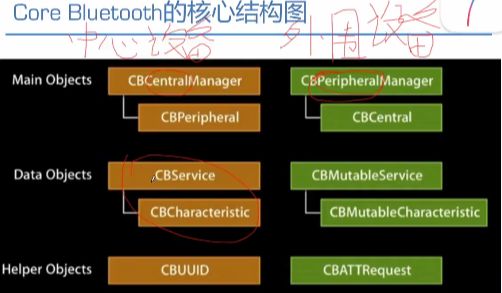
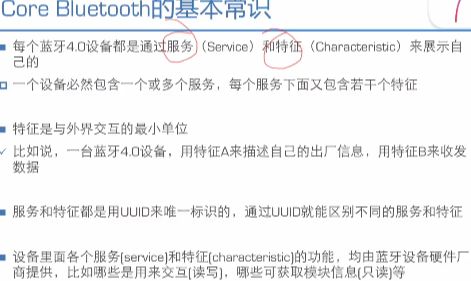
③.CoreBuletooth基本常识
④.开发步骤

代码实现步骤如下:
//  HMViewController.m

#import "HMViewController.h"
#import

@interface HMViewController ()
@property (nonatomic, strong) CBCentralManager *mgr;
@property (nonatomic, strong) NSMutableArray *peripherals;

@property (nonatomic, strong) CBCharacteristic *dataInteractCharacteristic;
@property (nonatomic, strong) CBCharacteristic *peripheralInfoCharacteristic;
@end

@implementation HMViewController

- (NSMutableArray *)peripherals
{
    if (!_peripherals) {
        self.peripherals = [NSMutableArray array];
    }
    return _peripherals;
}

- (CBCentralManager *)mgr
{
    if (!_mgr) {
        // 1.创建中心设备管理者,用来管理中心设备
        self.mgr = [[CBCentralManager alloc] initWithDelegate:self queue:nil];
    }
    return _mgr;
}

- (void)viewDidLoad
{
    [super viewDidLoad];

    // 2.扫描外设
#warning 通过传入一个存放服务UDID的数组进去,过滤掉一些不要的外设
    [self.mgr scanForPeripheralsWithServices:@[@"434", @"435435"] options:nil];
}

/**
 *  3.点击按钮,建立连接
 */
- (void)buildConnect
{
    for (CBPeripheral *peripheral in self.peripherals) {
        [self.mgr connectPeripheral:peripheral options:nil];
    }
}


#pragma mark - CBCentralManagerDelegate
/**
 *  扫描后,发现外围设备的时候调用
 */
- (void)centralManager:(CBCentralManager *)central didDiscoverPeripheral:(CBPeripheral *)peripheral advertisementData:(NSDictionary *)advertisementData RSSI:(NSNumber *)RSSI
{
    // 添加外围设备
    if (![self.peripherals containsObject:peripheral]) {
        // 设置外设的代理
        peripheral.delegate = self;
        [self.peripherals addObject:peripheral];
    }
}

/**
 *  连接到某个外设的时候调用
 */
- (void)centralManager:(CBCentralManager *)central didConnectPeripheral:(CBPeripheral *)peripheral
{
    // 查找外设中的所有服务
#warning 通过传入一个存放服务UDID的数组进去,过滤掉一些不要的服务
    [peripheral discoverServices:@[@"434", @"435435"]];
}

/**
 *  跟某个外设失去连接
 */
- (void)centralManager:(CBCentralManager *)central didDisconnectPeripheral:(CBPeripheral *)peripheral error:(NSError *)error
{

}

#pragma mark - CBPeripheralDelegate
/**
 *  外设已经查找到服务
 */
- (void)peripheral:(CBPeripheral *)peripheral didDiscoverServices:(NSError *)error
{
    // 遍历所有的服务
    for (CBService *service in peripheral.services) {
        // 过滤掉不想要的服务
        if ([service.UUID isEqual:@"123"]) {
            // 找到想要的服务

            // 扫描服务下面的特征
#warning 通过传入一个存放特征UDID的数组进去,过滤掉一些不要的特征
            [peripheral discoverCharacteristics:@[@"435", @"6456"] forService:service];
        }
    }
}
//查找到特征的时候调用
- (void)peripheral:(CBPeripheral *)peripheral didDiscoverCharacteristicsForService:(CBService *)service error:(NSError *)error
{
    // 遍历所有的特征
    for (CBCharacteristic *characteristic in service.characteristics) {
        // 过滤掉不想要的特征
        if ([characteristic.UUID isEqual:@"456"]) {
            // 找到想要的特征
            self.dataInteractCharacteristic = characteristic;
        } else if ([characteristic.UUID isEqual:@"789"]) {
            self.peripheralInfoCharacteristic = characteristic;
        }
    }
}
@end
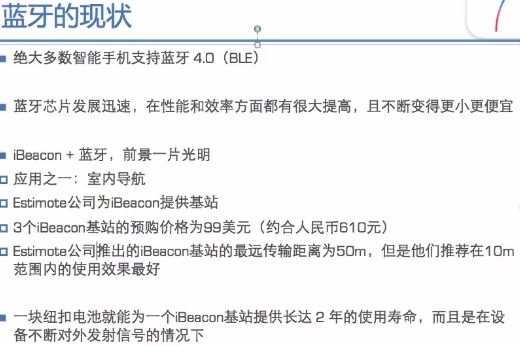
补充:蓝牙现状