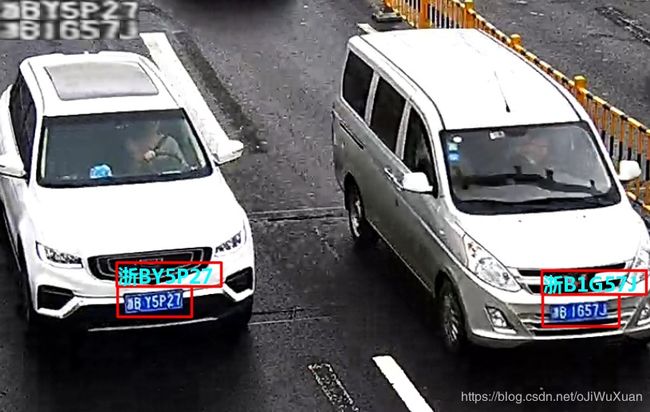
HyperLPR 对图片和视频中车牌的识别
一、概要
在上一篇文章中,主要介绍了HyperLPR开源车牌识别系统的配置和使用(链接:https://blog.csdn.net/oJiWuXuan/article/details/107332668),目前这个系统是我用过的开源车牌识别程序中最精准最稳定的,很多模糊的、角度倾斜的、恶劣天气下的车牌都能识别清楚,作为开源程序来说已经非常优秀了。但是上一篇文章主要是在虚拟环境中的配置及HyperLPR的简单使用,并没有涉及HyperLPR在实际场景中的应用,如对具体图片或者视频中车牌的识别并输出识别后的图片或视频。在这一篇文章中,对HyperLPR 对图片和视频中车牌的识别进行详细的介绍。
二、配置
这里不再具体的在虚拟环境中配置HyperLPR了,而是将HyperLPR中程序的主文件直接放到固定的文件夹中,好处就是后续需要结合业务场景优化功能时,方便直接在源码上进行修改来实现。当然,虚拟环境中的其他模块还是要安装好的,比如TensorFlow、opencv-python、keras等,而且要注意这些模块的版本。这里用的模型是HyperLPR官方直接训练好的模型,对识别国内一般的车牌而言已经足够了。
我们先从github上下载下来完整的HyperLPR文件并解压缩。
github:https://github.com/zeusees/HyperLPR。
然后新建一个文件夹,我这里命名为HyperLPR-V0.1,接着将HyperLPR中的hyperlpr_py3、model、font三个文件夹复制过来,再将我们要用的一些图片啊视频啊放到data文件夹下,文件夹目录如下图所示。
三、图片识别
首先是对图片的识别,车牌识别程序的核心代码主要是在hyperlpr_3中的pipline.py文件中,这里要对pipline.py中的def SimpleRecognizePlate函数进行部分修改,如下:
## 识别图片中的车牌
def SimpleRecognizePlate(image, save_path):
    t0 = time.time()
    # 读取图片
    image = cv2.imread(image)

    images = detect.detectPlateRough(image,image.shape[0],top_bottom_padding_rate=0.1)

    res_set = []
    for j,plate in enumerate(images):
        plate, rect, origin_plate  =plate
        # plate = cv2.cvtColor(plate, cv2.COLOR_RGB2GRAY)
        plate  =cv2.resize(plate,(136,36*2))
        t1 = time.time()

        ptype = td.SimplePredict(plate)
        if ptype>0 and ptype<5:
            plate = cv2.bitwise_not(plate)

        image_rgb = fm.findContoursAndDrawBoundingBox(plate)

        image_rgb = fv.finemappingVertical(image_rgb)
        cache.verticalMappingToFolder(image_rgb)
        print("e2e:", e2e.recognizeOne(image_rgb))
        image_gray = cv2.cvtColor(image_rgb,cv2.COLOR_RGB2GRAY)

        # image_gray = horizontalSegmentation(image_gray)
        # cv2.imshow("image_gray",image_gray)   # 显示分割出来的灰色车牌截图
        # cv2.waitKey()

        # cv2.imwrite("./"+str(j)+".jpg",image_gray)   # 保存分割出来的灰色车牌截图
        # cv2.imshow("image",image_gray)
        # cv2.waitKey(0)
        print("校正",time.time() - t1,"s")
        # cv2.imshow("image,",image_gray)
        # cv2.waitKey(0)
        t2 = time.time()
        val = segmentation.slidingWindowsEval(image_gray)
        # print val
        print("分割和识别",time.time() - t2,"s")
        if len(val)==3:
            blocks, res, confidence = val
            print('--------------------{}--------------------'.format(res))

            if confidence/7>0.7:
                image = drawRectBox(image, rect, res)
                res_set.append(res)
                for i,block in enumerate(blocks):

                    block_ = cv2.resize(block,(25,25))
                    block_ = cv2.cvtColor(block_,cv2.COLOR_GRAY2BGR)
                    image[j * 25:(j * 25) + 25, i * 25:(i * 25) + 25] = block_

                    if image[j*25:(j*25)+25,i*25:(i*25)+25].shape == block_.shape:

                        pass

            if confidence>0:
                print("车牌:",res,"置信度:",confidence/7)
            else:
                pass

                # print "不确定的车牌:", res, "置信度:", confidence

    # 显示车牌识别结果的图片
    cv2.imshow("image", image)
    k = cv2.waitKey(0)
    if k == 27:  # 按下esc时,退出
        cv2.destroyAllWindows()
    elif k == ord('s'):  # 按下s键时保存并退出
        cv2.imwrite(save_path, image)
        cv2.destroyAllWindows()

    # print(time.time() - t0,"s")
    # return image,res_set
然后在我们建立的lpr_image.py文件中写入调用上述函数的代码:
from hyperlpr_py3 import pipline as pp
import cv2

image = 'data/009.jpg'
save_path = 'output-image/MySaveImage.jpg'
pp.SimpleRecognizePlate(image, save_path)

print('-------------')
执行后就可在output-image文件夹中生成车牌识别后的图片了,下面是车牌识别的结果。可见识别效果还是不错的。
四、视频识别
接下来是对视频文件中车牌的识别,我们还是在hyperlpr_3中的pipline.py文件中进行修改,这里新建一个def SimpleRecognizePlate_video的函数,代码如下所示。
# 识别视频中的车牌
def SimpleRecognizePlate_video(video, save_path):
    # t0 = time.time()
    # 读取视频
    cap = cv2.VideoCapture(video)
    time.sleep(2.0)

    # 获取窗口大小

    size = (int(cap.get(cv2.CAP_PROP_FRAME_WIDTH)), int(cap.get(cv2.CAP_PROP_FRAME_HEIGHT)))

    # 设置帧率
    fps = 60
    # 调用VideoWrite()函数,保存处理后的视频

    videoWrite = cv2.VideoWriter(save_path, cv2.VideoWriter_fourcc(*'DIVX'), fps, size)

    # 从视频读取数据, 读取成功 ret为True,否则为False,frame里面就是一个三维数组保存图像
    ret, frame = cap.read()

    while True:
        for iii in range(1):
            ret, frame = cap.read()  # 每5帧取一次 加速计算
        # grab the frame from the threaded video stream
        # ret, frame = cap.read()
        if ret is False:
            print('No data, break.')
            break
        image = frame

        # 对图片中的车牌进行识别

        images = detect.detectPlateRough(image,image.shape[0],top_bottom_padding_rate=0.1)

        res_set = []
        for j,plate in enumerate(images):
            plate, rect, origin_plate = plate
            # plate = cv2.cvtColor(plate, cv2.COLOR_RGB2GRAY)
            plate  =cv2.resize(plate,(136,36*2))
            # t1 = time.time()

            ptype = td.SimplePredict(plate)
            if ptype>0 and ptype<5:
                plate = cv2.bitwise_not(plate)

            image_rgb = fm.findContoursAndDrawBoundingBox(plate)

            image_rgb = fv.finemappingVertical(image_rgb)
            cache.verticalMappingToFolder(image_rgb)
            # print("e2e:", e2e.recognizeOne(image_rgb))
            image_gray = cv2.cvtColor(image_rgb,cv2.COLOR_RGB2GRAY)

            # print("校正",time.time() - t1,"s")
            # cv2.imshow("image,",image_gray)
            # cv2.waitKey(0)
            # t2 = time.time()
            val = segmentation.slidingWindowsEval(image_gray)
            # print val
            # print("分割和识别",time.time() - t2,"s")
            if len(val)==3:
                blocks, res, confidence = val
                print('--------------------{}--------------------'.format(res))

                if confidence/7>0.7:
                    # 绘制车牌识别框
                    image = drawRectBox(image, rect, res)
                    res_set.append(res)
                    for i,block in enumerate(blocks):

                        block_ = cv2.resize(block,(25,25))
                        block_ = cv2.cvtColor(block_,cv2.COLOR_GRAY2BGR)

                        image[j * 25:(j * 25) + 25, i * 25:(i * 25) + 25] = block_

                        if image[j*25:(j*25)+25,i*25:(i*25)+25].shape == block_.shape:

                            pass

                if confidence>0:
                    print("车牌:",res,"置信度:",confidence/7)
                else:
                    pass

                    # print "不确定的车牌:", res, "置信度:", confidence

        cv2.imshow("Frame", image)
        key = cv2.waitKey(1) & 0xFF

        # if the `q` key was pressed, break from the loop
        if key == ord("q"):
            break

        # 保存帧为视频
        videoWrite.write(image)

    cv2.destroyAllWindows()
    cap.release()

    # print(time.time() - t0,"s")
然后在我们建立的lpr_video.py文件中写入调用上述函数的代码:
from hyperlpr_py3 import pipline as pp
import cv2

video = 'data/test.mp4'
save_path = 'output-video/MySaveVideo.avi'
pp.SimpleRecognizePlate_video(video, save_path)

print('-------------')
执行后就可在output-video文件夹中生成车牌识别后的视频了,下面是视频中的截图。由于视频质量着实堪忧,所以识别效果有时候会有一些误差,但总体识别情况还是挺好的。
本文的详细代码已上传至 github: https://github.com/jiwuxuan/HyperLPR-Meow。
可供参考。


