springcloud服务注册与发现eureka
springcloud服务注册与发现eureka
接下来,我们一块进入springcloud系列的学习中,关于springcloud微服务的理论知识这里不在描述。
- eureka-server服务搭建
- 服务提供者搭建,服务注册
- 注册中心高可用
1.eureka-server服务搭建
- 在idea中创建新的工程 工程名 例: eureka-server
- 关于springcloud与springboot版本请参考另一篇博客
springcloud与springboot版本配置 - pom.xml依赖配置包含加入如下配置(前提是已经加入 springcloud与springboot版本配置的依赖配置)
<dependency>
   <groupId>org.springframework.cloud</groupId>
   <artifactId>spring-cloud-starter-netflix-eureka-server</artifactId>
</dependency>
- 在resources资源文件下创建 application.yml,并在该application.yml文件中加入如下配置
###服务端口号
server:
  port: 8761
###eureka 基本信息配置
eureka:
  instance:
    ###注册到eurekaip地址
    hostname: 127.0.0.1
  client:
    serviceUrl:
      defaultZone: http://${eureka.instance.hostname}:${server.port}/eureka/
    ###因为自己是为注册中心,不需要自己注册自己
    register-with-eureka: false
    ###因为自己是为注册中心,不需要检索服务
    fetch-registry: false
- 在启动类加入如下代码
import org.springframework.boot.SpringApplication;
import org.springframework.boot.autoconfigure.SpringBootApplication;
import org.springframework.cloud.netflix.eureka.server.EnableEurekaServer;

/**
 * Hello world!
 */
@SpringBootApplication
@EnableEurekaServer
public class EurekaServerApp {
    public static void main(String[] args) {
        SpringApplication.run(EurekaServerApp.class, args);
    }
}
- 启动类启动服务 看到包含如下日志输出代表成功
2019-11-15 13:59:32.577 [main] INFO  org.apache.coyote.http11.Http11NioProtocol - Starting ProtocolHandler ["http-nio-8761"]
2019-11-15 13:59:32.577 [Thread-36] INFO  c.n.eureka.registry.PeerAwareInstanceRegistryImpl - Changing status to UP
2019-11-15 13:59:32.588 [Thread-36] INFO  o.s.c.n.e.s.EurekaServerInitializerConfiguration - Started Eureka Server
2019-11-15 13:59:32.591 [main] INFO  org.apache.tomcat.util.net.NioSelectorPool - Using a shared selector for servlet write/read
2019-11-15 13:59:32.608 [main] INFO  o.s.boot.web.embedded.tomcat.TomcatWebServer - Tomcat started on port(s): 8761 (http) with context path ''
2019-11-15 13:59:32.609 [main] INFO  o.s.c.n.e.s.EurekaAutoServiceRegistration - Updating port to 8761
2019-11-15 13:59:32.611 [main] INFO  com.example.csnd.demo.EurekaServerApp - Started EurekaServerApp in 13.051 seconds (JVM running for 14.795)
- 我们根据配置的服务端口号在浏览器里访问一下服务,我这里配置的端口号是8761
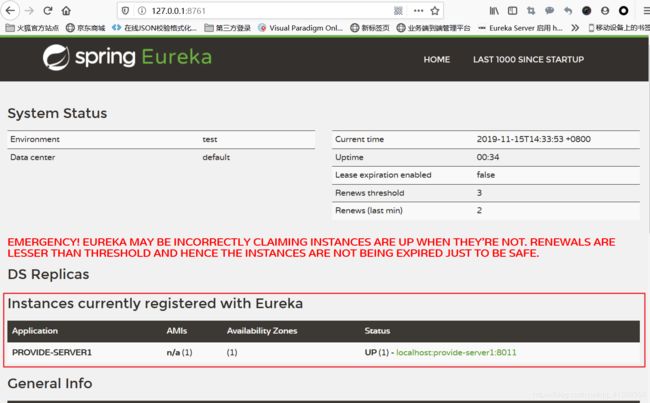
 至此,我们已经把eureka服务起来了,从图中下方红框我们可以发现,目前还没有可用的服务,接下来,我们再创建一个服务注册到eureka
2. 服务提供者搭建,服务注册
- 在idea中创建新的工程 工程名 例: provide-server1
- 关于springcloud与springboot版本请参考另一篇博客
springcloud与springboot版本配置 - pom.xml依赖配置包含加入如下配置(前提是已经加入 springcloud与springboot版本配置的依赖配置)
<!-- SpringBoot整合Web组件 -->
<dependency>
   <groupId>org.springframework.boot</groupId>
   <artifactId>spring-boot-starter-web</artifactId>
</dependency>
<!-- SpringBoot整合eureka客户端 -->
<dependency>
   <groupId>org.springframework.cloud</groupId>
   <artifactId>spring-cloud-starter-netflix-eureka-client</artifactId>
</dependency>
- 在resources资源文件下创建 application.yml,并在该application.yml文件中加入如下配置
###服务启动端口号
server:
  port: 8011
spring:
  application:
    ###服务名称(服务注册到eureka名称)
    name: provide-server1
###服务注册到eureka地址
eureka:
  client:
    service-url:
      defaultZone: http://127.0.0.1:8761/eureka #这里是注册中心的ip和端口号
    ###注册到注册中心
    register-with-eureka: true
    ###是否需要从eureka上获取注册信息
    fetch-registry: true
- 在启动类加入如下代码
import org.springframework.boot.SpringApplication;
import org.springframework.boot.autoconfigure.SpringBootApplication;
import org.springframework.cloud.netflix.eureka.EnableEurekaClient;

/**
 * Hello world!
 */
@SpringBootApplication
@EnableEurekaClient
public class ProvideServer1App {
    public static void main(String[] args) {
        SpringApplication.run(ProvideServer1App.class, args);
    }
}
- 启动类启动服务 看到包含如下日志输出代表配置成功
2019-11-15 14:32:28.673 [main] INFO  org.apache.coyote.http11.Http11NioProtocol - Starting ProtocolHandler ["http-nio-8011"]
2019-11-15 14:32:28.682 [main] INFO  org.apache.tomcat.util.net.NioSelectorPool - Using a shared selector for servlet write/read
2019-11-15 14:32:28.708 [main] INFO  o.s.boot.web.embedded.tomcat.TomcatWebServer - Tomcat started on port(s): 8011 (http) with context path ''
2019-11-15 14:32:28.708 [main] INFO  o.s.c.n.e.s.EurekaAutoServiceRegistration - Updating port to 8011
2019-11-15 14:32:28.711 [main] INFO  com.example.csnd.demo.ProvideServer1App - Started ProvideServer1App in 11.14 seconds (JVM running for 12.557)
2019-11-15 14:32:28.740 [DiscoveryClient-InstanceInfoReplicator-0] INFO  com.netflix.discovery.DiscoveryClient - DiscoveryClient_PROVIDE-SERVER1/localhost:provide-server1:8011 - registration status: 204
紧急!EUREKA可能错误地声明实例已经启动,而实际上它们并没有。续订低于阈值,因此不会为了安全而终止实例。
这是因为Eureka进入了自我保护机制,默认情况下,如果EurekaServer在一定时间内没有接收到某个微服务实例的心跳时,EurekaServer将会注销该实例(默认90s)。但是当网络发生故障时,微服务与EurekaServer之间无法通信,这样就会很危险了,因为微服务本身是很健康的,此时就不应该注销这个微服务,而Eureka通过自我保护机制来预防这种情况,当网络健康后,该EurekaServer节点就会自动退出自我保护模式;
如果服务没停止就不会出现这个提示
可以在 eureka-server 服务中的application.yml文件中加入如下配置来解决
eureka:
  server:
    enable-self-preservation:false#关闭自我保护模式(默认为打开)
- 至此服务的注册与发现已经搭建完毕
3. 注册中心高可用
Eureka Server可通过运行多台实例并相互注册的方式来实现高可用,各实例是平等的,没有master和slave之分,不像zookeeper一样有选举机制。
eureka集群高可用原理其实很简单,简单来说就是让注册中心服务相互注册一下,接下来我们来试一下。我们只是在本地环境模拟一下三台注册中心
- windows环境请修改hosts文件
C:\Windows\System32\drivers\etc\hosts
- 增加如下内容
127.0.0.1     eureka1
127.0.0.1     eureka2
127.0.0.1     eureka3
- 然后保存
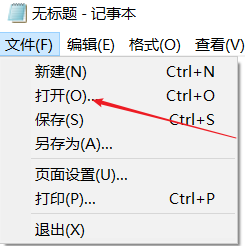
如果保存的时候提示权限不足,请重新以下列方式打开hosts文件
1、按 win键
2、输入 记事本 (可能没输入框,直接按键盘打字就行了)
3、右键 选择 以管理员身份打开
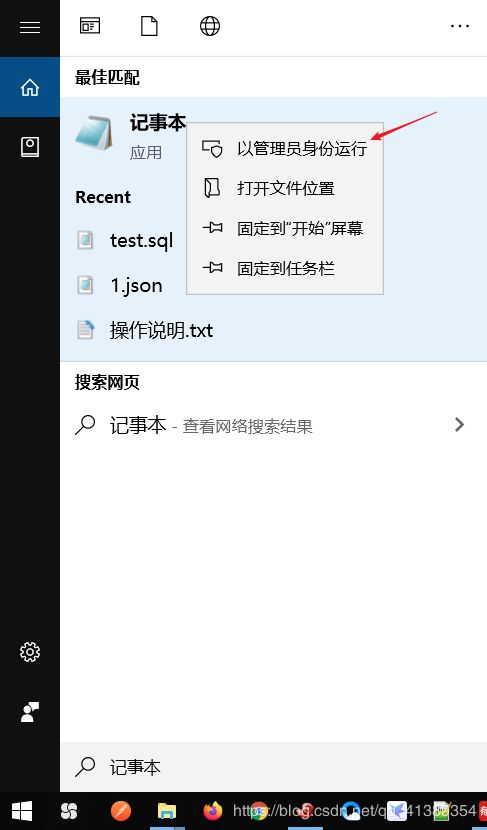
4、然后打开hosts文件修改即可
- 使用教程1搭建的eureka-server工程,把配置文件复制三份,而且只要这三个配置文件,分别为
application-server1.yml
application-server2.yml
application-server3.yml
application-server1.yml
###服务端口号
server:
  port: 8761
spring:
  application:
    name: eureka-server
###eureka 基本信息配置
eureka:
  instance:
    ###注册到eurekaip地址
    hostname: eureka1
  client:
    serviceUrl:
      defaultZone: http://eureka2:8762/eureka,http://eureka3:8763/eureka
    ###因为自己是为注册中心,不需要自己注册自己
    register-with-eureka: true
    ###因为自己是为注册中心,不需要检索服务
    fetch-registry: true
application-server2.yml
###服务端口号
server:
  port: 8762
spring:
  application:
    name: eureka-server
###eureka 基本信息配置
eureka:
  instance:
    ###注册到eurekaip地址
    hostname: eureka2
  client:
    serviceUrl:
      defaultZone: http://eureka1:8761/eureka,http://eureka3:8763/eureka
    ###因为自己是为注册中心,不需要自己注册自己
    register-with-eureka: true
    ###因为自己是为注册中心,不需要检索服务
    fetch-registry: true
application-server3.yml
###服务端口号
server:
  port: 8763
spring:
  application:
    name: eureka-server
###eureka 基本信息配置
eureka:
  instance:
    ###注册到eurekaip地址
    hostname: eureka3
  client:
    serviceUrl:
      defaultZone: http://eureka1:8761/eureka,http://eureka2:8762/eureka
    ###因为自己是为注册中心,不需要自己注册自己
    register-with-eureka: true
    ###因为自己是为注册中心,不需要检索服务
    fetch-registry: true
- 从上面的修改中我们可以看出
有服务 eureka-8761, eureka-8762, eureka-8763
eureka-8761 注册到 eureka-8762, eureka-8763
eureka-8762 注册到 eureka-8761, eureka-8763
eureka-8763 注册到 eureka-8761, eureka-8762
完成了相互注册 - 启动三个服务
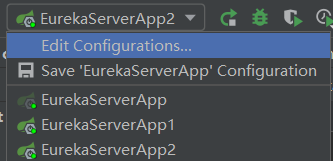
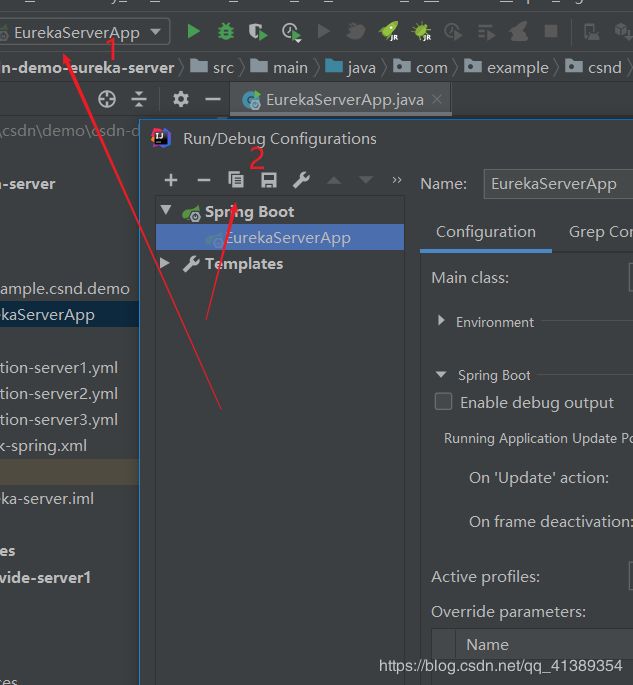
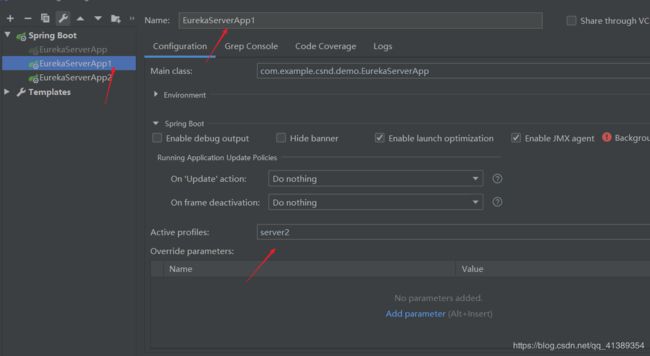
因为启动顺序的不一样会导致已经起来的服务注册到未启动的服务,会抛出异常,这是正常现象,稍等半分钟左右打开浏览器访问 http://127.0.0.1:8761/
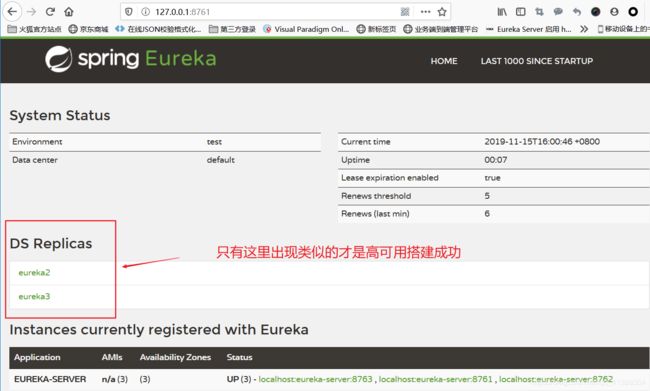
此时可以试着访问另外的两个服务,可以发现也是类似的,这时就已经搭建成功了
那么,我们的向注册中心注册的服务也要修改 - 这里还使用第2步创建的provide-server工程,修改注册中心地址为如下
defaultZone: http://eureka1:8761/eureka,http://eureka2:8762/eureka,http://eureka3:8763/eureka
注意,如果eureka高可用搭建失败,请检查三台eureka相互的注册关系,而且在本地跑请配置hosts文件
整理不易,如果对你有帮助请记得点个
