OpenCV 数字验证码识别
更新后代码下载链接在此!!!
点我下载
本文针对OpenCv入门人士,因为我也不是专门做图像的,只是为了完成一次模式识别的小作业。
主要完成的功能就是自动识别图片中的数字,图片包括正常图片,有划痕图像和有噪点图像。分别如下
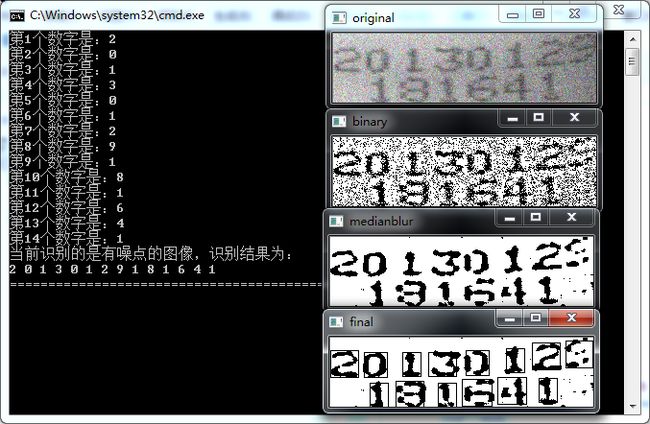
先上图,看识别效果!
接下来开始来点干货了:
- opencv的安装与配置:这个要是展开讲可以再写一篇博文了,我当时什么都不会配个opencv麻烦死了,最后参考网上studio2012的配置方法成功了,在此略过。看到这里你的opencv还不能用的话,赶紧别往下看了,先把opencv配好再来吧!
- opencv基本图片操作:
- 因为opencv有2.0 和 3.0 的版本区别,所以网上搜到的函数或类型都是两种格式,建议用新版的,什么impImage* 类型的都是2.0版本的写法,我全部使用的是Mat。一定要统一好,不要一会新的一会旧的,会报错的。
- 读图片imread,显示imshow,等待waitKey等等,这些要先熟悉
- opencv的强大之处在于几乎所有的图像操作它都有现成的函数可供调用,非常方便。多谷歌,一定会有函数已经实现了你想完成的功能。
- 二值化:不论是原图还是有划痕或噪点的图,背景都不干净,这对识别的影响还是挺不好的,所以要先二值化,把黑白像素点区分的开一些。但是图片右侧明显要比左侧更暗,所以在阈值选取的时候比较难办,很难用一个固定的值将两部分图像都二值化得很理想,所以就用到了逼格更高的自适应二值化(adaptiveThreshold),tips:二值化前先直方图均衡一下效果会更好。
- 中值滤波:针对有噪点和有划痕的图像,中值滤波是非常好的处理方案,中值的参数可调,可以很好的消除噪音的影响。缺点就是参数不好调啊,调的想死。。
- 模板匹配:模板的来源可以是自己从待识别的图片中抠图,不过我们作业提供了模板图片,所以这一步就可以省掉了。opencv提供了非常强大的matchTemplate函数,可以将给定图片与模板按照你规定的计算方法计算一个相似度的值,并将对应的坐标存储下来,你需要做的只是将值比较大(或小,与你规定计算相似度的函数有关)的图像框出来即可
- 窗口扫描:为了提高识别率,我设定了一个窗口对原图进行扫描,扫描窗口的移动设定了一点规则,就是如果前一个窗口没有匹配到数字就微调窗口位置,如果匹配到数字就将窗口左轴移动到匹配到的数字的右侧,再重复扫描。
基本干货就这么多了,剩下的就是不断的调参数和扫描窗口的位置了,这个方法的缺陷就是针对不同的图片,参数和扫描窗都要变,比如来一张一行或三行的数字,那就必须修改扫描窗口的函数了,还有每一步的步长之类的,还是相当蛋疼的!
下面是部分核心代码
预处理,包括自适应二值化和中值滤波
void preProcess(){          //自适应二值化&中值滤波
        Mat out;
        //自适应二值化
        adaptiveThreshold(source, source, 255, CV_ADAPTIVE_THRESH_MEAN_C, CV_THRESH_BINARY, adaptiveBiSize, adaptiveBiParam);
        //中值滤波
        namedWindow("binary");
        imshow("binary",source);
        waitKey(0);
        medianBlur( source, out, medianBlurSize);
        namedWindow("medianblur");
        imshow("medianblur",out);
        waitKey(0);
        source = out;
        srcResult = out;  //用来显示
    }
匹配
bool match(Mat src){
        int srcW,srcH,templatW, templatH, curtemplatW,curtemplatH,resultH, resultW;
        Mat templat,result;
        srcW = src.cols;
        srcH = src.rows;
        double currentMin = 1;
        int    currentIndex=0;
        double minValue, maxValue;
        Point minLoc, maxLoc,matchLoc;
        /*
        ** 相似度计算方法
        ** 0:CV_TM_SQDIFF        平方差匹配法,最好的匹配值为0;匹配越差,匹配值越大
        ** 1:CV_TM_SQDIFF_NORMED 归一化平方差匹配法
        ** 2:CV_TM_CCORR         相关匹配法:该方法采用乘法操作;数值越大表明匹配程度越好
        ** 3:CV_TM_CCORR_NORMED  归一化相关匹配法
        ** 4:CV_TM_CCOEFF        相关系数匹配法:1表示完美的匹配;-1表示最差的匹配。
        ** 5:CV_TM_CCOEFF_NORMED 归一化相关系数匹配法
        */
        int methodType=1;
        //循环判断8个数字哪个数字模板最为接近被测试图像
        for (int i=0;i<8;i++){
            templat = templatVec[i];
            templatW = templat.cols;
            templatH = templat.rows;
            if(srcW < templatW || srcH < templatH)
            {
                cout <<"模板不能比原图像大" << endl;
                return 0;
            }
            resultW = srcW - templatW + 1;
            resultH = srcH - templatH + 1;
            result = cvCreateImage(cvSize(resultW, resultH), 1, 1);

            matchTemplate(src, templat, result, methodType);

            minMaxLoc(result, &minValue, &maxValue, &minLoc, &maxLoc,Mat() );
            //如果比当前最小还小,则储存该值,下标和坐标
            if (minValuein){
                currentMin = minValue;
                currentIndex=i;
                matchLoc.x=minLoc.x+window_x;
                matchLoc.y=minLoc.y+window_y;
                curtemplatW = templatW;
                curtemplatH = templatH;
            }
        }
        //cout<<"Min:"<in<if (currentMin"第"<"个数字是:"<"左上角坐标为:("<","<")"<"右上角坐标:("<","<")"<"左下角坐标:("<","<")"<0,0,255));
            /*namedWindow("tmpresult");
            imshow("tmpresult",srcResult);
            waitKey(0);*/
            window_x =matchLoc.x+curtemplatW-1;
            return true;
        }
        //比阈值大则判定为非字符,扫描窗右移一个单位
        window_x++;
        return false;

    }
窗口扫描,虚函数需要被实现
virtual void processScan(){
        sourceW = source.cols;
        sourceH = source.rows;
        window_x = 0;
        window_y = 3;
        //加十以提高容错率
        bool last = false;
        while(window_x<sourceW-scanWindowW+5){
            if (window_x+scanWindowW>sourceW){
                window_x = sourceW - scanWindowW;
                last = true;
            }
            Mat tmp = scanWindow(window_x,window_y);
            match(tmp);
            if (last) break;
        }
        window_x = 30;
        scanWindowH = 35;
        window_y=sourceH - scanWindowH;
        while (window_x<=sourceW - scanWindowW-10){

            Mat tmp = scanWindow(window_x,window_y);
            match(tmp);
        }

    }
针对不同图片建立了不同的类来实现:
//识别有噪点的图像
class noisyPic:public Picture{
public:
    noisyPic(){
        Picture();
        threshold = 0.5;
        path="test\\noisy.bmp";
        adaptiveBiSize = 17;
        adaptiveBiParam= 19;
        medianBlurSize = 5;
        scanWindowW = 38;
        scanWindowH = 38;
    }
    void displayResult(){
        cout<<"当前识别的是有噪点的图像,识别结果为:"<for (unsigned int i=0;icout<" ";}
        cout<cout<<"====================================================="<"final");
        imshow("final", srcResult);
        waitKey(0);
    }

};

//有划痕的图像
class dirtyPic:public Picture{
public:
    dirtyPic(){
        Picture();
        threshold = 0.48;
        path="test\\dirty.bmp";
        adaptiveBiSize = 21;
        adaptiveBiParam= 23;
        medianBlurSize = 7;
        scanWindowW = 36;
        scanWindowH = 38;
    }
    virtual void displayResult(){
        cout<<"当前识别的是有划痕的图像,识别结果为:"<for (unsigned int i=0;icout<" ";}
        cout<cout<<"====================================================="<"final");
        imshow("final", srcResult);
        waitKey(0);
    }
};
主函数
int main()
{
    //正常图像,构造函数不指定参数时,默认识别第一张图
    //构造函数可以指定识别第几张图,下面以第三张为例
    Picture pic = Picture(3);
    pic.startRecognize();

    //识别有噪声图像
    noisyPic noisyPic;
    noisyPic.startRecognize();

    //识别有划痕图像
    dirtyPic dirtyPic;
    dirtyPic.startRecognize();

    //识别放大缩小图像
    scalePic scale = scalePic(1);
    scale.startRecognize();

    return 0;
} 


