【Android】Navigation实现页面跳转

Android为了推动SAA(Single Activity Application)的开发模式,在Jetpack中推出了Navigation,可以帮助大家方便地实现以往只有Activity才具备的,例如页面跳转、deeplink等。
接下来我会通过一个例子,让大家在10分钟之内掌握和完成Navigation的基本使用。

1. gradle依赖(1分钟)
dependencies {
    ....
    implementation "android.arch.navigation:navigation-fragment:1.0.0"
    implementation "android.arch.navigation:navigation-ui:1.0.0"
    implementation "android.arch.navigation:navigation-fragment-ktx:1.0.0"
    implementation "android.arch.navigation:navigation-ui-ktx:1.0.0"
}
2. 创建页面(4分钟)
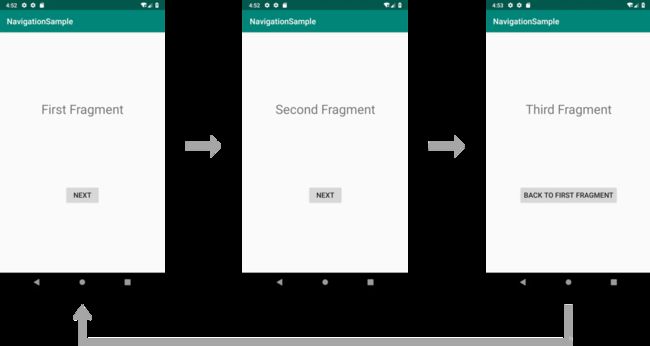
需要完成四个页面
MainActivity
kt
class MainActivity : AppCompatActivity() {
    override fun onCreate(savedInstanceState: Bundle?) {
        super.onCreate(savedInstanceState)
        setContentView(R.layout.activity_main)
    }
}
xml
<android.support.constraint.ConstraintLayout xmlns:android="http://schemas.android.com/apk/res/android"
    xmlns:app="http://schemas.android.com/apk/res-auto"
    xmlns:tools="http://schemas.android.com/tools"
    android:layout_width="match_parent"
    android:layout_height="match_parent"
    tools:context=".MainActivity">

android.support.constraint.ConstraintLayout>
FirstFragment
kt
class FirstFragment : Fragment() {
    override fun onCreateView(inflater: LayoutInflater, container: ViewGroup?, savedInstanceState: Bundle?): View? {
        val view = inflater.inflate(R.layout.fragment_first, container, false)

        return view
    }
}
xml
<android.support.constraint.ConstraintLayout xmlns:android="http://schemas.android.com/apk/res/android"
    android:layout_width="match_parent"
    android:layout_height="match_parent"
    xmlns:tools="http://schemas.android.com/tools"
    xmlns:app="http://schemas.android.com/apk/res-auto"
    tools:context=".FirstFragment">

    <TextView
        android:id="@+id/textView"
        android:layout_width="wrap_content"
        android:layout_height="wrap_content"
        android:text="First Fragment"
        android:textSize="32sp"
        app:layout_constraintTop_toTopOf="parent"
        app:layout_constraintBottom_toTopOf="@+id/button"
        app:layout_constraintStart_toStartOf="parent"
        app:layout_constraintEnd_toEndOf="parent" />

    <Button
        android:id="@+id/button"
        android:layout_width="wrap_content"
        android:layout_height="wrap_content"
        android:text="Next"
        android:textSize="18sp"
        app:layout_constraintTop_toBottomOf="@+id/textView"
        app:layout_constraintBottom_toBottomOf="parent"
        app:layout_constraintStart_toStartOf="parent"
        app:layout_constraintEnd_toEndOf="parent" />

android.support.constraint.ConstraintLayout>
SecondFragment
kt
class SecondFragment : Fragment() {
    override fun onCreateView(inflater: LayoutInflater, container: ViewGroup?, savedInstanceState: Bundle?): View? {
        val view = inflater.inflate(R.layout.fragment_second, container, false)

        return view
    }
}
xml
<android.support.constraint.ConstraintLayout xmlns:android="http://schemas.android.com/apk/res/android"
    android:layout_width="match_parent"
    android:layout_height="match_parent"
    xmlns:tools="http://schemas.android.com/tools"
    xmlns:app="http://schemas.android.com/apk/res-auto"
    tools:context=".SecondFragment">

    <TextView
        android:id="@+id/textView"
        android:layout_width="wrap_content"
        android:layout_height="wrap_content"
        android:text="Second Fragment"
        android:textSize="32sp"
        app:layout_constraintTop_toTopOf="parent"
        app:layout_constraintBottom_toTopOf="@+id/button"
        app:layout_constraintStart_toStartOf="parent"
        app:layout_constraintEnd_toEndOf="parent" />

    <Button
        android:id="@+id/button"
        android:layout_width="wrap_content"
        android:layout_height="wrap_content"
        android:text="Next"
        android:textSize="18sp"
        app:layout_constraintTop_toBottomOf="@+id/textView"
        app:layout_constraintBottom_toBottomOf="parent"
        app:layout_constraintStart_toStartOf="parent"
        app:layout_constraintEnd_toEndOf="parent" />

android.support.constraint.ConstraintLayout>
ThirdFragment
kt
class ThirdFragment : Fragment() {
    override fun onCreateView(inflater: LayoutInflater, container: ViewGroup?, savedInstanceState: Bundle?): View? {
        val view = inflater.inflate(R.layout.fragment_third, container, false)

        return view
    }
}
xml
<android.support.constraint.ConstraintLayout xmlns:android="http://schemas.android.com/apk/res/android"
    android:layout_width="match_parent"
    android:layout_height="match_parent"
    xmlns:tools="http://schemas.android.com/tools"
    xmlns:app="http://schemas.android.com/apk/res-auto"
    tools:context=".ThirdFragment">

    <TextView
        android:id="@+id/textView"
        android:layout_width="wrap_content"
        android:layout_height="wrap_content"
        android:text="Third Fragment"
        android:textSize="32sp"
        app:layout_constraintTop_toTopOf="parent"
        app:layout_constraintBottom_toTopOf="@+id/button"
        app:layout_constraintStart_toStartOf="parent"
        app:layout_constraintEnd_toEndOf="parent" />

    <Button
        android:id="@+id/button"
        android:layout_width="wrap_content"
        android:layout_height="wrap_content"
        android:text="Back to First Fragment"
        android:textSize="18sp"
        app:layout_constraintTop_toBottomOf="@+id/textView"
        app:layout_constraintBottom_toBottomOf="parent"
        app:layout_constraintStart_toStartOf="parent"
        app:layout_constraintEnd_toEndOf="parent" />

android.support.constraint.ConstraintLayout>
3. 创建navigation_graph(3分钟)
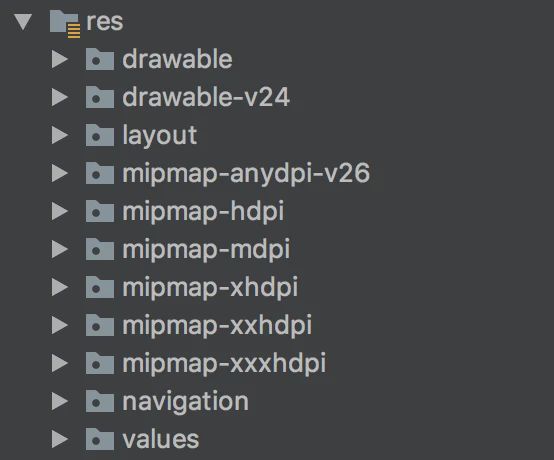
通常在navigation文件下创建xml文件来配置页面的跳转信息

右击navigation文件夹,New -> Navigation resource file 新建`navigation_graph.xml’文件:
<navigation xmlns:android="http://schemas.android.com/apk/res/android"
    xmlns:app="http://schemas.android.com/apk/res-auto"
    xmlns:tools="http://schemas.android.com/tools"
    android:id="@+id/navigation_graph"
    app:startDestination="@id/firstFragment">

    <fragment
        android:id="@+id/firstFragment"
        android:name="com.takashi.navigationsample.FirstFragment"
        android:label="fragment_first"
        tools:layout="@layout/fragment_first" >
        <action
            android:id="@+id/action_first_to_second"
            app:destination="@id/secondFragment" />
    fragment>

    <fragment
        android:id="@+id/secondFragment"
        android:name="com.takashi.navigationsample.SecondFragment"
        android:label="fragment_second"
        tools:layout="@layout/fragment_second" >
        <action
            android:id="@+id/action_second_to_third"
            app:destination="@id/thirdFragment" />
    fragment>

    <fragment
        android:id="@+id/thirdFragment"
        android:name="com.takashi.navigationsample.ThirdFragment"
        android:label="fragment_third"
        tools:layout="@layout/fragment_third">
        <action
            android:id="@+id/action_third_to_first"
            app:destination="@id/firstFragment" />
    fragment>

navigation>
android:id跳转到app:destination,navigation_graph.xml类似AndroidManifest中的作用
4. 应用navigation_graph(2分钟)
navigation_graph无法直接应用在Activity上,需要通过一个HostFragment进行配置
<android.support.constraint.ConstraintLayout xmlns:android="http://schemas.android.com/apk/res/android"
    xmlns:app="http://schemas.android.com/apk/res-auto"
    xmlns:tools="http://schemas.android.com/tools"
    android:layout_width="match_parent"
    android:layout_height="match_parent"
    tools:context=".MainActivity">

    <fragment
        android:id="@+id/nav_host_fragment"
        android:layout_height="match_parent"
        android:layout_width="match_parent"
        android:name="androidx.navigation.fragment.NavHostFragment"
        app:navGraph="@navigation/navigation_graph"
        app:defaultNavHost="true" />

android.support.constraint.ConstraintLayout>
经过以上配置后,就可以在各个Fragment中实现页面跳转
//FirstFragment
class FirstFragment : Fragment() {
    override fun onCreateView(inflater: LayoutInflater, container: ViewGroup?, savedInstanceState: Bundle?): View? {
        val view = inflater.inflate(R.layout.fragment_first, container, false)

        view.button.setOnClickListener {
            findNavController().navigate(R.id.action_first_to_second)
        }
        return view
    }
}

//SecondFragment
class SecondFragment : Fragment() {
    override fun onCreateView(inflater: LayoutInflater, container: ViewGroup?, savedInstanceState: Bundle?): View? {
        val view = inflater.inflate(R.layout.fragment_second, container, false)

        view.button.setOnClickListener {
            findNavController().navigate(R.id.action_second_to_third)
        }
        return view
    }
}

//ThirdFragment
class ThirdFragment : Fragment() {
    override fun onCreateView(inflater: LayoutInflater, container: ViewGroup?, savedInstanceState: Bundle?): View? {
        val view = inflater.inflate(R.layout.fragment_third, container, false)

        view.button.setOnClickListener {
            findNavController().navigate(R.id.action_third_to_first)
        }
        return view
    }
}
10分钟完成了基本的页面跳转。
5. 跳转动画
最后我们再花点时间为页面跳转加上动画,提高使用体验
<set xmlns:android="http://schemas.android.com/apk/res/android">
    <translate android:fromYDelta="100%p" android:toYDelta="0"
        android:duration="@android:integer/config_mediumAnimTime" />
    <alpha android:fromAlpha="0.0" android:toAlpha="1.0"
        android:duration="@android:integer/config_mediumAnimTime" />
set>


<set xmlns:android="http://schemas.android.com/apk/res/android">
    <translate android:fromXDelta="-100%p" android:toXDelta="0"
        android:duration="@android:integer/config_mediumAnimTime" />
    <alpha android:fromAlpha="0.0" android:toAlpha="1.0"
        android:duration="@android:integer/config_mediumAnimTime" />
set>


<set xmlns:android="http://schemas.android.com/apk/res/android">
    <translate android:fromXDelta="100%p" android:toXDelta="0"
        android:duration="@android:integer/config_mediumAnimTime" />
    <alpha android:fromAlpha="0.0" android:toAlpha="1.0"
        android:duration="@android:integer/config_mediumAnimTime" />
set>


<set xmlns:android="http://schemas.android.com/apk/res/android">
    <translate android:fromXDelta="0" android:toXDelta="-100%p"
        android:duration="@android:integer/config_mediumAnimTime" />
    <alpha android:fromAlpha="1.0" android:toAlpha="0.0"
        android:duration="@android:integer/config_mediumAnimTime" />
set>


<set xmlns:android="http://schemas.android.com/apk/res/android">
    <translate android:fromXDelta="0" android:toXDelta="100%p"
        android:duration="@android:integer/config_mediumAnimTime" />
    <alpha android:fromAlpha="1.0" android:toAlpha="0.0"
        android:duration="@android:integer/config_mediumAnimTime" />
set>


<set xmlns:android="http://schemas.android.com/apk/res/android">
    <translate android:fromYDelta="0" android:toYDelta="-100%p"
        android:duration="@android:integer/config_mediumAnimTime" />
    <alpha android:fromAlpha="1.0" android:toAlpha="0.0"
        android:duration="@android:integer/config_mediumAnimTime" />
set>
navigation_graph.xml内
<navigation xmlns:android="http://schemas.android.com/apk/res/android"
    xmlns:app="http://schemas.android.com/apk/res-auto"
    xmlns:tools="http://schemas.android.com/tools"
    android:id="@+id/navigation_graph"
    app:startDestination="@id/firstFragment">

    <fragment
        android:id="@+id/firstFragment"
        android:name="com.takashi.navigationsample.FirstFragment"
        android:label="fragment_first"
        tools:layout="@layout/fragment_first" >
        <action
            android:id="@+id/action_first_to_second"
            app:enterAnim="@anim/slide_from_right"
            app:exitAnim="@anim/slide_to_left"
            app:destination="@id/secondFragment" />
    fragment>

    <fragment
        android:id="@+id/secondFragment"
        android:name="com.takashi.navigationsample.SecondFragment"
        android:label="fragment_second"
        tools:layout="@layout/fragment_second" >
        <action
            android:id="@+id/action_second_to_third"
            app:enterAnim="@anim/slide_from_bottom"
            app:exitAnim="@anim/slide_to_top"
            app:destination="@id/thirdFragment" />
    fragment>

    <fragment
        android:id="@+id/thirdFragment"
        android:name="com.takashi.navigationsample.ThirdFragment"
        android:label="fragment_third"
        tools:layout="@layout/fragment_third">
        <action
            android:id="@+id/action_third_to_first"
            app:enterAnim="@anim/slide_from_left"
            app:exitAnim="@anim/slide_to_right"
            app:destination="@id/firstFragment" />
    fragment>

navigation>
也可以通过配置app:popEnterAnim、app:popExitAnim实现Dialog弹出的效果
6. popBackStack
navigation使用FragmentManager的stack管理页面的回退,点击back键后可以回退前一个页面,我们也可以通过popBackStack方法从ThirdFragment直接回到FirstFragment
class ThirdFragment : Fragment() {
    override fun onCreateView(inflater: LayoutInflater, container: ViewGroup?, savedInstanceState: Bundle?): View? {
        val view = inflater.inflate(R.layout.fragment_third, container, false)

        view.button.setOnClickListener {
            findNavController().popBackStack(R.id.firstFragment, false)
        }
        return view
    }
}
最后
本文简单介绍了如何使用Navigation实现页面跳转,Navigation更多用法,例如与Toolbar的配合、Deeplink等,欢迎从官网进行学习查阅
The Navigation Architecture Component
