安卓UI控件-TextView、ImageView及其子类
View简介
Android应用的绝大部分UI组件都放在android.widget包及其子包、android.view包及其子包中,android应用的所有UI组件都继承了View类,View的子类很繁杂。
这是网上的一张图片,表示了View及其子类的继承关系,红色的代表常用的控件。

TextView及其子类
TextView
从上图可以看出TextView最直接继承了View,还是EditText、Button这两个常用UI控件的父类。TextView最主要的作用就是在界面上显示文本,类似于Swing编程中的JLabel。

从官网API文档可以看出TextView的继承关系
这里是常用的属性方法
android:text 设置文本的内容
android:textColor 设置文本的颜色
android:textSize 设置文本的字体大小(一般使用sp)
android:height 设置文本的高度(一般使用dp)
android:width 设置文本的宽度(一般使用dp)
android:inputType 设置文本的类型,默认为普通文本,可选text、Password等类型(通常在EditText中使用)
android:hint 设置默认显示字体(输入提示,类似于HTML中的placeholder属性)
android:textStyle设置字形,斜体,粗体等,多个属性用“ | ”隔开
android:singleLine 设置文本是否单行显示
android:gravity 设置文本框的内容相对于文本框的位置(可以使用多个属性 中间用 “ | ”分割)
android:maxLength:限制文本 的长度,超出部分将会不显示
android:ellipsize 设置当文字过长的时候该控件如何显示。 (EditText不支持marquee)
android:ems 设置该组件的宽度,以em为单位
android:drawableLeft 用于在文本框左侧绘制图片
android:drawableRight 用于在文本框右侧绘制图片
android:drawableTop 用于在文本框顶部绘制图片
android:drawableBottom 用于在文本框底部绘制图片
在android studio中写实例
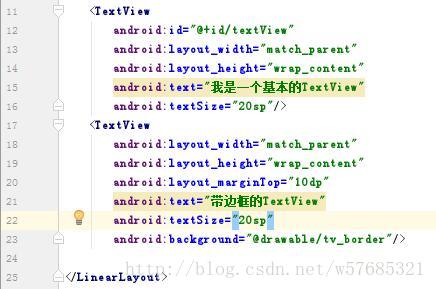
在布局文件中加入TextView控件,写一个基本的TextView
activity_main.xml

效果截图

这里的背景使用的自定义的资源文件
tv_border.xml
<shape xmlns:android="http://schemas.android.com/apk/res/android">
    <stroke android:width="2dp" android:color="#f00" />
    <corners android:radius="5dp"/>
    <solid android:color="#b4000000" />
shape>
关于shape的详解
在android studio中,在res文件夹点右键,新建一个资源文件

然后输入相关信息创建即可,注意文件名不能有大写字母

下面是网上资料关于shape的详细描述
<shape xmlns:android="http://schemas.android.com/apk/res/android"
        android:shape="rectangle">


    <corners
            android:radius="8dp"
            android:topLeftRadius="5dp"
            android:topRightRadius="15dp"
            android:bottomLeftRadius="20dp"
            android:bottomRightRadius="25dp"
            />


    <gradient
            android:startColor="#FFFF0000"
            android:endColor="#80FF00FF"
            android:angle="45"
            />


    <padding
            android:left="10dp"
            android:top="10dp"
            android:right="10dp"
            android:bottom="10dp"
            />


    <size
            android:width="180dp"
            android:height="100dp"
            />


    <solid android:color="#ff65b3ff" />


    <stroke
            android:width="6dp"
            android:color="#dcdcdc"
            />
shape>
这样就可以自定义漂亮的样式了。
EditText
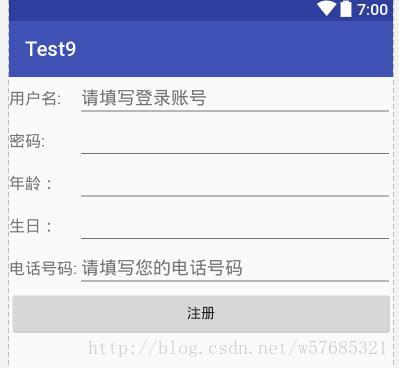
EditText与TextView非常类似,与TextView共用了绝大部分XML属性和方法,而它们的区别在于EditText可以接受用户输入,所以它有个非常重要的属性inputType,常用于登录注册以及需要用户输入的地方。
<TableLayout xmlns:android="http://schemas.android.com/apk/res/android"
    android:layout_width="match_parent"
    android:layout_height="match_parent"
    android:stretchColumns="1">
    <TableRow>
        <TextView
            android:layout_width="match_parent"
            android:layout_height="wrap_content"
            android:text="用户名:"
            android:textSize="16sp"/>
        <EditText
            android:layout_width="match_parent"
            android:layout_height="wrap_content"
            android:hint="请填写登录账号"
            android:selectAllOnFocus="true"/>

    TableRow>
    <TableRow>
        <TextView
            android:layout_width="match_parent"
            android:layout_height="wrap_content"
            android:text="密码:"
            android:textSize="16sp"/>

        <EditText
            android:layout_width="match_parent"
            android:layout_height="wrap_content"
            android:inputType="numberPassword"/>
    TableRow>
    <TableRow>
        <TextView
            android:layout_width="match_parent"
            android:layout_height="wrap_content"
            android:text="年龄:"
            android:textSize="16sp"/>

        <EditText
            android:layout_width="match_parent"
            android:layout_height="wrap_content"
            android:inputType="number"/>
    TableRow>
    <TableRow>
        <TextView
            android:layout_width="match_parent"
            android:layout_height="wrap_content"
            android:text="生日:"
            android:textSize="16sp"/>

        <EditText
            android:layout_width="match_parent"
            android:layout_height="wrap_content"
            android:inputType="date"/>
    TableRow>
    <TableRow>
        <TextView
            android:layout_width="match_parent"
            android:layout_height="wrap_content"
            android:text="电话号码:"
            android:textSize="16sp"/>

        <EditText
            android:layout_width="match_parent"
            android:layout_height="wrap_content"
            android:hint="请填写您的电话号码"
            android:selectAllOnFocus="true"
            android:inputType="phone"/>
    TableRow>
    <Button
        android:layout_width="wrap_content"
        android:layout_height="wrap_content"
        android:text="注册"/>
TableLayout>Button
Button继承了TextView,从字面上理解就是一个供用户点击的按钮,单击按钮会触发onClick事件。按钮,可以设置阴影,配置阴影方式与TextView相同,也可以设置背景,不规则的背景产生不规则形状的按钮,所以也可以用前面的方法修改按钮的样式。
还可以使用selector来自定义按钮
<selector xmlns:android="http://schemas.android.com/apk/res/android">

    <item android:state_pressed="true"
    android:drawable="@drawable/red"
    />

    <item android:state_pressed="false"
    android:drawable="@drawable/purple"
    />
selector>
这里只是简单使用一下,关于android资源文件的应用还有很多内容。
Button有个最重要的功能就是触发监听事件
实现监听事件的几种方式
1 . 通过匿名内部类的方式
//获取xml中的控件
Button btn1 = (Button)findViewById(R.id.button);
//绑定点击事件
btn1.setOnClickListener(new View.OnClickListener() {
            @Override
            public void onClick(View view) {

            }
        });
2 . 直接new一个OnClickListener
public class MainActivity extends AppCompatActivity{

    View.OnClickListener listener = new View.OnClickListener() {
        @Override
        public void onClick(View view) {

        }
    }
    @Override
    protected void onCreate(Bundle savedInstanceState) {
        super.onCreate(savedInstanceState);
        setContentView(R.layout.activity_main);
        Button btn1 = (Button)findViewById(R.id.button);
        btn1.setOnClickListener(listener);
    }
}
3 . 实现接口的方式来实现
public class MainActivity extends AppCompatActivity implements View.OnClickListener{

    @Override
    protected void onCreate(Bundle savedInstanceState) {
        super.onCreate(savedInstanceState);
        setContentView(R.layout.activity_main);
        Button btn1 = (Button)findViewById(R.id.button);
        btn1.setOnClickListener(this);
    }
    @Override
    public void onClick(View view) {
    }
}
4 .使用独立类的方式实现
首先要自定义一个外部类,实现OnClickListener接口,并重写onClick方法,在onClick方法中可以定义这个外部类想实现的处理逻辑,那么调用这个外部类实现监听事件时,都可以用super来调用这个类中的处理逻辑。这也是使用外部类实现监听事件的优势所在:可以将不同监听事件中大量重复的处理逻辑定义在这个类中,然后使用这个外部类实现监听事件时都可以使用super关键字来直接调用,而不用重复定义,减少重复代码,提高代码质量。
然后为要实现监听的对象绑定监听器,然后在setOnClickListener()方法中使用我们自定义的外部类来实现监听事件。
5 .直接绑定到标签
在布局中要发送事件源中定义一个:
android:onClick=”clickHandler”
然后在该布局对应的Activity定义一个 void clickHandler(void source)方法
RadioButton&CheckBox
单选框(RadioButton)和复选框(CheckBox)都继承了Button类,与普通Button不同的是,它们多了个android:checked属性,用来指定是否是选中状态。
实例:
<LinearLayout xmlns:android="http://schemas.android.com/apk/res/android"
    xmlns:app="http://schemas.android.com/apk/res-auto"
    xmlns:tools="http://schemas.android.com/tools"
    android:layout_width="match_parent"
    android:layout_height="match_parent"
    android:orientation="vertical"
    tools:context="com.example.admin.test3.Test2Activity">

    <LinearLayout
        android:layout_width="match_parent"
        android:layout_height="wrap_content"
        android:orientation="horizontal"
        android:layout_marginTop="10dp"
        android:layout_marginStart="10dp">

        <TextView
            android:id="@+id/tv1"
            android:layout_width="wrap_content"
            android:layout_height="wrap_content"
            android:layout_marginTop="5dp"
            android:text="选择学历:"
            android:textSize="18sp" />

        <RadioGroup
            android:id="@+id/rg1"
            android:layout_width="wrap_content"
            android:layout_height="wrap_content"
            android:layout_marginLeft="10dp">

            <RadioButton
                android:id="@+id/r1"
                android:layout_width="wrap_content"
                android:layout_height="wrap_content"
                android:text="小学及以下" />

            <RadioButton
                android:id="@+id/r2"
                android:layout_width="wrap_content"
                android:layout_height="wrap_content"
                android:text="中学" />

            <RadioButton
                android:id="@+id/r3"
                android:layout_width="wrap_content"
                android:layout_height="wrap_content"
                android:text="本科" />

            <RadioButton
                android:id="@+id/r4"
                android:layout_width="wrap_content"
                android:layout_height="wrap_content"
                android:text="硕士及以上" />

        RadioGroup>
    LinearLayout>

    <LinearLayout
        android:layout_width="match_parent"
        android:layout_height="wrap_content"
        android:layout_marginTop="10dp"
        android:layout_marginStart="10dp">
        <TextView
            android:layout_width="wrap_content"
            android:layout_height="wrap_content"
            android:text="选择爱好:"
            android:textSize="18sp"
            android:layout_marginRight="10dp"/>
        <CheckBox
            android:id="@+id/c1"
            android:layout_width="wrap_content"
            android:layout_height="wrap_content"
            android:text="音乐"/>
        <CheckBox
            android:id="@+id/c2"
            android:layout_width="wrap_content"
            android:layout_height="wrap_content"
            android:text="运动"/>
        <CheckBox
            android:id="@+id/c3"
            android:layout_width="wrap_content"
            android:layout_height="wrap_content"
            android:text="文学"/>
        <CheckBox
            android:id="@+id/c4"
            android:layout_width="wrap_content"
            android:layout_height="wrap_content"
            android:text="旅游"/>

    LinearLayout>
    <TextView
        android:id="@+id/info"
        android:layout_width="match_parent"
        android:layout_height="wrap_content"
        android:layout_marginTop="10dp"
        android:textSize="20sp"/>
LinearLayout>
效果截图:

需要注意的是单选按钮需要放在RadioButton里面。
如果在XML布局文件中默认勾选了某个单选按钮,则必须为该组单选按钮的每个按钮指定android:id属性值,否则这组单选按钮不能正常工作。
关于它们的监听事件
RadioButton
//先获取RadioGroup组件
rg = (RadioGroup) findViewById(R.id.rg1);
//然后为其绑定监听事件
rg.setOnCheckedChangeListener(new RadioGroup.OnCheckedChangeListener() {
            @Override
            //使用onCheckedChanged方法监听状态改变事件
            //参数i就是触发事件的按钮id
            public void onCheckedChanged(RadioGroup radioGroup, @IdRes int i) {
                switch (i){
                    case R.id.r1:
                        info.setText("你的学历是小学及以下,你的爱好有:");
                        break;
                    case R.id.r2:
                        info.setText("你的学历是中学,你的爱好有:");
                        break;
                    case R.id.r3:
                        info.setText("你的学历是本科,你的爱好有:");
                        break;
                    case R.id.r4:
                        info.setText("你的学历是硕士及以上,你的爱好有:");
                        break;
                }
            }
        });
CheckBox
    @Override
    public void onCheckedChanged(CompoundButton compoundButton, boolean b) {
         //如果被选中
        if(b){
           ...
        }else{
           ...
            }
        }

    }
需要注意的是RadioGroup监听用的是RadioGroup.OnCheckedChangeListener,CheckBox用的是CompoundButton.OnCheckedChangeListener。
ToggleButton和Switch
状态开关按钮(ToggleButton)和开关(Switch)也是由Button派生出来的,因它们的本质也是按钮,从功能上来看,与复选框非常类似,它们都可以提供两种状态。
实例:
    id="@+id/toggle"
        android:layout_width="wrap_content"
        android:layout_height="wrap_content" />

    id="@+id/switch1"
        android:layout_width="wrap_content"
        android:layout_height="wrap_content"
        android:text="开关"
        android:textOff="关"
        android:textOn="开" />
然后给它们绑定监听事件
toggle.setOnCheckedChangeListener(new CompoundButton.OnCheckedChangeListener() {
            @Override
            public void onCheckedChanged(CompoundButton compoundButton, boolean b) {
                if(b){
                    Toast.makeText(Test3Activity.this,"ToggleButton开",Toast.LENGTH_SHORT).show();
                }else{
                    Toast.makeText(Test3Activity.this,"ToggleButton关",Toast.LENGTH_SHORT).show();
                }
            }
});switcher.setOnCheckedChangeListener(new CompoundButton.OnCheckedChangeListener() {
@Override
public void onCheckedChanged(CompoundButton compoundButton, boolean b) {
if(b){
Toast.makeText(Test3Activity.this,"switch开",Toast.LENGTH_SHORT).show();
}else{
Toast.makeText(Test3Activity.this,"switch关",Toast.LENGTH_SHORT).show();
}
}
});ImageView及其子类
ImageView继承自View组件,它的主要功能是用于显示图片,任何Drawable对象都可以使用ImageVieew来显示。
ImageView还派生了ImageButton、ZoomButton等组件。
android:adjustViewBounds:设置ImageView是否调整自己的边界来保持所显示图片的长宽比。
android:maxHeight:设置ImageView的最大高度。
android:maxWidth:设置ImageView的最大宽度。
android:scaleType:设置所显示的图片如何缩放或移动以适应ImageView的大小。
android:src:设置ImageView所显示的Drawable对象的ID。
  对于android:scaleType属性,因为关于图像在ImageView中的显示效果,所以有如下属性值可以选择:
    matrix:使用matrix方式进行缩放。
    fitXY:横向、纵向独立缩放,以适应该ImageView,图片长宽比可能会改变。
    fitStart:保持纵横比缩放图片,直到该图片能完全适应于该ImageView,图片较长的边长与ImageView相应的边长相等,并且将图片放在ImageView的左上角。
    fitCenter:保持纵横比缩放图片,缩放完成后将图片放在ImageView的中央。
    fitEnd:保持纵横比缩放图片,缩放完成后将图片放在ImageView的右下角。
    center:把图片放在ImageView的中央,但是不进行任何缩放。
    centerCrop:保持纵横比缩放图片,以使图片能完全覆盖ImageView。
    centerInside:保持纵横比缩放图片,以使得ImageView能完全显示该图片。

为了控制ImageView显示的图片,ImageView提供了如下方法:
setImageBitmap(Bitmap bm):使用Bitmap位图设置该ImageView显示的图片。
setImageDrawable(Drawable drawable):使用Drawable对象设置该ImageView显示的图片。
setImageResource(int resId):使用图片资源的ID设置该ImageView显示的图片。
setImageURI(Uri uri):使用图片的URI设置该ImageView显示的图片。<ImageView android:id="@+id/img"
android:src="@drawable/logo"
android:scaleType="centerInside"
android:layout_width="60dip"
android:layout_height="60dip"
android:layout_centerVertical="true"/> ImageView派生了两个子类:
ImageButton:图片按钮。
QuickContactBadge:显示关联到特定联系人的图片。
Button和ImageButton:

它们共有的特性:
都可以作为一个按钮产生点击事件
不同点:
Button有text的属性,ImageButton没有
ImageButton有src属性,Button没有
src和background的区别:
imageButton 是带图标的Button控件,有src的属性,也就是设置他的图标,也有一个所有控件公有的属性background, 这个也可以设置它的“图标”。
其实,src才是设置图标,而background只是设置背景。
src属性和background是可以同时存在的
如果控件的大小是100*100 图片资源是80*80的话,那么用src,图片就会居中显示,如果使用background那么图片就会被拉伸充满控件。
重要的是,background是底层的图片资源,src是覆盖在background上面的资源,他们可以叠加使用,实现选中的效果。在ActivityGroup用到。
src和background可以同时存在 image button
src添加后不会变形,而bg会变形
QuickContactBadge:
QuickContactBadge继承了ImageView,因此它的本质也是图片按钮,也可以通过src属性指定它显示的图片。它的额外功能是可以关联到手机中指定联系人。
实例:
添加控件,并把一幅图片挂上去。
<LinearLayout xmlns:android="http://schemas.android.com/apk/res/android"
    xmlns:app="http://schemas.android.com/apk/res-auto"
    xmlns:tools="http://schemas.android.com/tools"
    android:layout_width="match_parent"
    android:layout_height="match_parent"
    android:orientation="vertical"
    tools:context="com.example.admin.test3.Test5Activity">
    <TextView
        android:id="@+id/tv1"
        android:layout_width="match_parent"
        android:layout_height="wrap_content"
        android:text="给我打电话"/>
    <QuickContactBadge
        android:id="@+id/q1"
        android:layout_width="wrap_content"
        android:layout_height="wrap_content"
        android:adjustViewBounds="false"
        android:scaleType="center"
        android:src="@drawable/img1"/>
LinearLayout>
还得在Activity的OnCreate方法中加一行代码把控件与电话号码挂起来
    @Override
    protected void onCreate(Bundle savedInstanceState) {
        super.onCreate(savedInstanceState);
        setContentView(R.layout.activity_test5);
        QuickContactBadge badge = (QuickContactBadge)findViewById(R.id.q1);
        badge.assignContactFromPhone("123456789",false);
    }

