简介
在本文中,我将给大家介绍ios中如何运用NSURLConnection从网络上下载数据,以及解析JSON数据格式的数据,还有数据的显示和图片异步下载。
涉及到的知识点:
1.NSURLConnection的异步下载和数据请求方法的封装。
2.认识JSON格式和JSON格式的解析使用
3.数据在模拟器上的显示和图片的异步下载(使用SDWebImage异步显示图片,SDWebImage是一个库)
注意:
在ios开发中,无论是数据还是图片都是使用异步下载方法,不能使用同步。
内容
首先,要完成一个项目,你得需要素材,图片,还有网络接口(网络接口其实就一下载数据的网址URL,因为你的app数据是通过网络从服务端请求过来的)
1.网络下载基础知识介绍
(1)手机app网络应用
玩过智能手机我们都知道,手机里的app有本地应用和网络应用,说通俗点本地应用就是不需要网络也能使用,而一般微信,QQ等需要上网才能使用的就是网络应用,这些网络应用是需要网上下载数据才能运行的。这里我们只讲网络应用。
(2)网络应用的结构程序
分两种,一种是客户端,一种是服务端。需要上网下载数据才能使用的网络应用就是客户端,而为这个网络应用提供数据服务的就是服务端。
(3)常见的网络接口模式
ios网络应用的常见接口一半都是HTTP形式的URL地址,
例如爱限免应用首页的数据地址为http://iappfree.candou.com:8080/free/applications/limited?currency=rmb&page=1&category_id=
在项目中一般使用一些开源库(开源库的时候往后再讲)通过这种网址下载数据. 例如AFNetworking
(4)常见数据格式
iOS开发中常见的数据格式有两种, 一种是JSON格式, 另外种是XML格式, 相对来说, JSON格式使用的比较多
(5)app界面开发的一般流程
ios中开发一个界面,需要界面效果图,界面素材资源,网络接口这三项
开发的流程一般如下:
***1.确定你要开发的步骤,一般可以先获取数据,即从网络接口中下载数据
***2.然后把你下载的数据(JSON或XML数据)进行解析,创建数据模型model,一般用MVC这样的设计模式来编程开发
***3.使用UI控件显示这些解析后的数据,一般都需要自定义cell显示
2.具体实现步骤
1.使用异步下载数据的方法 (NSURLConnection异步下载)把这个方法封装起来,以后可以代码复用
***1.先说普通简单状态下的异步下载,网络接口以这个为例子
http://iappfree.candou.com:8080/free/applications/limited?currency=rmb&page=1&category_id=
    [self testNSURLConnectionAsyncDownloadData];

    //JSON语法
    [self jsonFormat];
}
-(void)jsonFormat
{
    //JSON
    //JavaScript Object Notation

    /*
    {
        "count":20,
        "data":[
            "zhangsan",
            "lisi",
            "wangwu"
        ]
    }
    */
    //[]    表示数组,对应NSArray
    //,     表示并列的数据
    //{}    表示字典,对应NSDictionary
    //:     表示键值对
    //"ta"  表示字符串,对应NSString
    //20    对应NSNumber

    //JSON格式格式化工具
    //  Jason
    //  Json Editor
    //  在线:  http://www.kjson.com/

}

#pragma mark - 异步下载
-(void)testNSURLConnectionAsyncDownloadData
{
    NSString *urlString = @"http://iappfree.candou.com:8080/free/applications/limited?currency=rmb&page=1&category_id="; //初始化 _data = [[NSMutableData alloc] init]; //发起了一个异步的URL连接请求 //异步: 执行了方法之后开始下载,立即返回 // 下载过程在后台(多线程)执行 _connection = [[NSURLConnection alloc] initWithRequest:[NSURLRequest requestWithURL:[NSURL URLWithString:urlString]] delegate:self startImmediately:YES]; NSLog(@"initWithRequest 执行完成"); }
当使用这个方法的时候,下载的过程就在程序后台进行,遵循 NSURLConnectionDataDelegate 这个协议就能调用相关方法了,比如下载完成后执行的方法,从而完成相关操作
***2.下面就是相关方法操作:
-(void)connection:(NSURLConnection *)connection didReceiveResponse:(NSURLResponse *)response{
    NSLog(@"接收到那个方法initWithRequest,服务器响应执行");
}
//接收到数据就执行这个方法,下载数据
-(void)connection:(NSURLConnection *)connection didReceiveData:(NSData *)data{
    [_data appendData:data];
}
//数据下载完成后使用的方法,直接看英文意思
-(void)connectionDidFinishLoading:(NSURLConnection *)connection{
    NSString *str = [[NSString alloc]initWithData:_data encoding:NSUTF8StringEncoding];
    NSLog(@"打印下载后的数据%@",str); NSDictionary *dic = [NSJSONSerialization JSONObjectWithData:_data options:NSJSONReadingMutableContainers error:nil]; NSLog(@"%@",dic); NSArray *arr = dic[@"applications"]; for (NSDictionary *dic2 in arr) { NSLog(@"name = %@",dic2[@"name"]); } }
2.通过上面那个简单的例子,我们认识了NSURLConnection异步下载,接下来就介绍下异步下载的封装
***1.创建一个继承NSObject的类
***2.定义一个保存数据的属性和处理这些数据的实例方法
#import@interface ZJHttpRequest : NSObject //保存下载的数据 @property (copy,nonatomic) NSMutableData *data; //作用:传入网址,下载完成后执行target对象中action方法 类比按钮,点击执行事件 -(void)requestWithUrl:(NSString *)url target:(id)target action:(SEL)action; @end
***3..m文件的实现步骤
#import "ZJHttpRequest.h" //消除performSelector的警告 #pragma clang diagnostic ignored "-Warc-performSelector-leaks" //类扩展 //项目实践: // 有些实例变量内部使用, 不想放在头文件中, 放在这儿 @interface ZJHttpRequest (){ NSURLConnection *_connection; NSString *_url; id _target; SEL _action; } @end @implementation ZJHttpRequest //作用: // 传入网址, 下载完成执行后执行target对象中action方法 -(void)requestWithUrl:(NSString *)url target:(id)target action:(SEL)action { _url = url; _target = target; _action = action; //发起URL请求 _data = [[NSMutableData alloc] init]; _connection = [[NSURLConnection alloc] initWithRequest:[NSURLRequest requestWithURL:[NSURL URLWithString:url]] delegate:self startImmediately:YES]; } -(void)connection:(NSURLConnection *)connection didReceiveData:(NSData *)data { [_data appendData:data]; } -(void)connectionDidFinishLoading:(NSURLConnection *)connection { //下载完成了, 执行保存的方法 if(_target && [_target respondsToSelector:_action]) { [_target performSelector:_action withObject:self]; } } @end
***4.如果不能很好的理解其中每段代码代表是意思,可以看看下面我的注释,如果有错,非常欢迎各位看官的指教
#import "ZJHttpRequest.h"
//消除performSelector的警告
#pragma clang diagnostic ignored "-Warc-performSelector-leaks"

//类扩展
//项目实践:
//有些实例变量内部使用,不想放在头文件中,放在这@interface    @end之间
@interface ZJHttpRequest (){
    NSURLConnection *_connection;
    NSString *_url;
    id _target;
    SEL _action;
}

@end

@implementation ZJHttpRequest

-(void)requestWithUrl:(NSString *)url target:(id)target action:(SEL)action{ _url = url;//把传过来的参数网址URL,赋给新创建的 NSString *_url对象 _target = target;//传过来的参数target target QFPXViewController * 0x8cea970 0x08cea970 _action = action;//传过来的参数action SEL "dealDowloadFinish:" 0x00009a4f _data = [[NSMutableData alloc]init]; //NSURLConnection异步下载,执行了这个方法就在后台下载了 _connection = [[NSURLConnection alloc]initWithRequest:[NSURLRequest requestWithURL:[NSURL URLWithString:url]] delegate:self startImmediately:YES];//_connection NSURLConnection * 0x8d79720 0x08d79720 记住,这个是异步下载,当程序执行了这个方法后,下载数据就变成在后台下载了,(多线程),所以之后requestWithUrl之后就已经在下载数据,然后创建表格,表格则遵循协议,调用那两个方法,返回数据行数,而在NSURLConnection异步下载中,也需要遵循协议,就会有你下载了数据后可以执行这个方法didReceiveData //程序走向就是,当在QFPXViewController,执行这个封装的方法的时候,会把相应的参数传过来,或者说,在QFPXViewController,调用了封装的方法,就跑到这个封装的方法中 --requestWithUrl, //然后,创建表格,而后获取数据,return _dataArray.count 后就到了下面这里didReceiveData,  } -(void)connection:(NSURLConnection *)connection didReceiveData:(NSData *)data{ //data __NSCFData * 17088 bytes 0x08d8e140 17088字节 [_data appendData:data]; //appendData 附加数据 //_data NSConcreteMutableData * 17088 bytes 0x08d67980 _data也得到了这么多字节 } -(void)connectionDidFinishLoading:(NSURLConnection *)connection{ //接收完数据了,已经下载完成,然后判断传过来的target和action这两个参数有没有赋给_target和_action,或者说_target和_action是不是空的,一个保障手段方法,如果传过来了,就符合if判断语句,则执行里面的方法,也就是程序的逻辑思维里,那边QFPXViewController传过来两个参数,然后在这里封装的类ZJHttpRequest里用异步下载,下载完数据后判断,是否传了参数过来,如果不为空的话就响应执行 //_action带过来的方法dealDowloadFinish:,也就是再跳到那个类写的方法里,处理数据,这就是封装了方法的一个作用,其实就是异步请求下载数据,下载后再来个参数判断,至于下载后的数据处理还是“仿佛“在QFPXViewController中处理,其实只不过是在QFPXViewController中写处理程序逻辑而已 //self ZJHttpRequest * 0x8c593c0 0x08c593c0 //_target QFPXViewController * 0x8ce52b0 0x08ce52b0 //_action SEL "dealDowloadFinish:" 0x00009a4f //_target是否为空并且_target能否响应_action if (_target && [_target respondsToSelector:_action]) { //判断传过来参数了则执行这里面带过来的方法,执行了带过来的方法dealDowloadFinish,则跳到这个方法里 [_target performSelector:_action withObject:self];//这段代码的意思就是让这个类QFPXViewController 执行perform这个选择的方法_action(dealDowloadFinish)用这个类self带的参数  } } @end
这样,我们就把这个异步下载的方法封装好了,下次就直接调用就可以了,引入头文件,创建该头文件对象,调用封装的实例方法,传过去参数,执行,并返回执行带过去处理数据的方法。
- (void)viewDidLoad {
    [super viewDidLoad];
    // Do any additional setup after loading the view, typically from a nib.

    //数据接口
    NSString *urlString = @"http://iappfree.candou.com:8080/free/applications/limited?currency=rmb&page=1&category_id=";

    _dataArray = [[NSMutableArray alloc] init];

    //下载
    _request = [[ZJHttpRequest alloc] init];
    [_request requestWithUrl:urlString target:self action:@selector(dealDowloadFinish:)];

    [self createTableView];
}
- (void)viewDidLoad
{
    [super viewDidLoad];
    // Do any additional setup after loading the view, typically from a nib.
    //数据接口  网络接口
    NSString *urlStr = @"http://iappfree.candou.com:8080/free/applications/limited?currency=rmb&page=1&category_id=";

    _dataArray = [[NSMutableArray alloc]init];


    //下载
    _request = [[ZJHttpRequest alloc]init];
    //self  self    QFPXViewController *    0x8cea970    0x08cea970
    //urlStr    __NSCFConstantString *    @"http://iappfree.candou.com:8080/free/applications/limited?currency=rmb&page=1&category_id="    0x000106d4
    //调用这个ZJHttpRequest类对象的请求方法,方法requestWithUrl已经是类ZJHttpRequest封装好的,所有,你在这里self    QFPXViewController *调用的话就是把当前的target,action这两个参数还有网址URL传入self  ZJHttpRequest这个类中
    [_request requestWithUrl:urlStr target:self action:@selector(dealDowloadFinish:)];


    [self createTabelView];


}
下面是处理数据的方法dealDowloadFinish
//这个方法都相当于放在viewWillAppear里面了,因为程序的走向是先下面这里的方法,再给表返回return _dataArray.count;所以刷新数据就在这里刷新
-(void)dealDowloadFinish:(ZJHttpRequest *)request{
    NSDictionary *dic = [NSJSONSerialization JSONObjectWithData:request.data options:NSJSONReadingMutableContainers error:nil];
   // NSLog(@"dic = %@",dic);
    NSArray *appList = dic[@"applications"];
    for (NSDictionary *dic in appList) {
        AppModel *model = [[AppModel alloc]init];
        model.applicationId = dic[@"applicationId"]; model.name = dic[@"name"]; model.iconUrl = dic[@"iconUrl"]; [_dataArray addObject:model]; } [_tabelView reloadData]; }
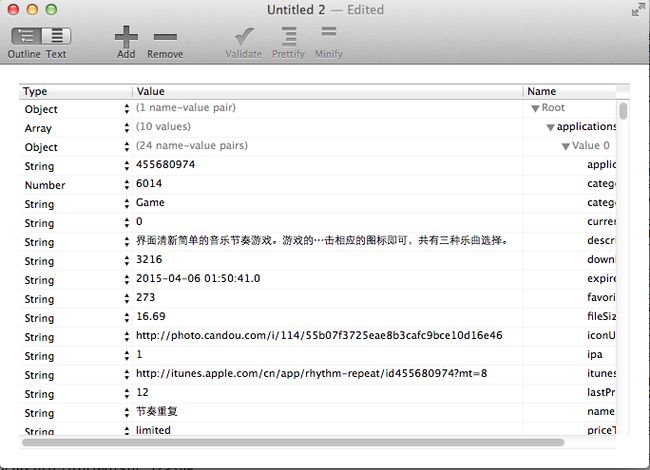
3.来到这里,就顺势说到JSON数据格式的解析
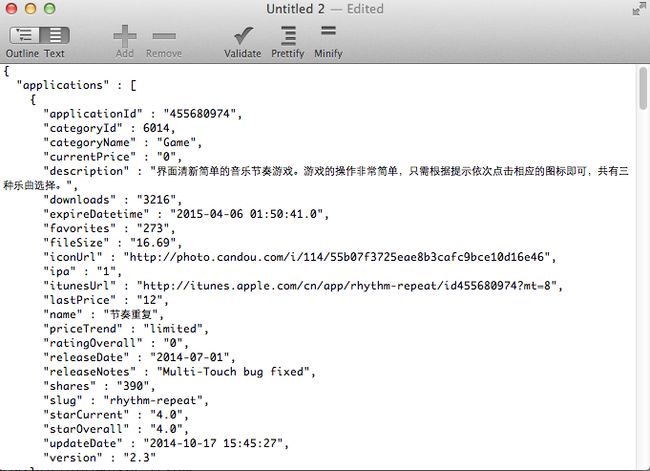
1.相信解析过JSON数据格式的朋友都知道,就有个Jason软件非常好用,使用也很简单
***1.通过网络接口得到原始数据,然后全选中这些数据,黏贴到
com+v然后就回弹出这么个窗口
接着我们点击左上角的Text就得到我们想要的格式化好后的JSON数据了
4.接下来就是认识学习JSON数据格式,这样就能完成以后的数据解析操作
    [self jsonFormat];
}
-(void)jsonFormat
{
    //JSON
    //JavaScript Object Notation

    /*
    {
        "count":20,
        "data":[
            "zhangsan",
            "lisi",
            "wangwu"
        ]
    }
    */
    //[]    表示数组,对应NSArray
    //,     表示并列的数据
    //{}    表示字典,对应NSDictionary
    //:     表示键值对
    //"ta"  表示字符串,对应NSString
    //20    对应NSNumber

    //JSON格式格式化工具
    //  Jason
    //  Json Editor
    //  在线:  http://www.kjson.com/

}
5.数据获取,解析完后就用自定义cell来显示
1.用的石MVC程序设计模式来实现,创建一个基础NSObject的数据类和基础于UITableViewCell的自定义的cell,以下是部分代码
    [self createTabelView];


}
-(void)createTabelView{
    _tabelView = [[UITableView alloc]initWithFrame:self.view.bounds style:UITableViewStylePlain];
    _tabelView.dataSource = self;
    _tabelView.delegate = self;
    [self.view addSubview:_tabelView];
}
-(CGFloat)tableView:(UITableView *)tableView heightForRowAtIndexPath:(NSIndexPath *)indexPath{ // return _dataArray.count;后返回高度,返回了_dataArray.count次 return 80; } -(NSInteger)tableView:(UITableView *)tableView numberOfRowsInSection:(NSInteger)section{ return _dataArray.count; } -(UITableViewCell *)tableView:(UITableView *)tableView cellForRowAtIndexPath:(NSIndexPath *)indexPath{ static NSString *identifer = @"cell"; //数据有10行,但是这里的判断显示是创建了7个cell,显示6个 AppCell *cell = [tableView dequeueReusableCellWithIdentifier:identifer]; if (cell == nil) { cell = [[AppCell alloc]initWithStyle:UITableViewCellStyleSubtitle reuseIdentifier:identifer]; } AppModel *model = _dataArray[indexPath.row]; //cell.textLabel.text = model.name; cell.nameLabel.text = model.name; [cell.iconImageView setImageWithURL:[NSURL URLWithString:model.iconUrl]]; return cell; }
6.完成效果图
7.图片的下载实现用的是SDWebImage这个库里的方法
1.选择工程,点Build Phases,搜索SDW,得到所有sd开头的文件
2.全选择,靠右边双击弹出一个框,输入-fno-objc-arc,使用这个模式
3.然后再在实现的类下引入头文件#import "UIImageView+WebCache.h"
4.最后,用这个方法实现图片的加载显示
[cell.iconImageView setImageWithURL:[NSURL URLWithString:model.iconUrl]];
总结:实现一个项目工程,简单的界面显示
一.拿到界面素材,网络接口
二.获取数据,解析数据
三.显示数据
其中NSURLConnection异步下载和方法封装,以及JSON数据的解析都是重点,实现的关键


