Spring Cloud微服务架构学习之Ribbon负载均衡(六)
Spring Cloud Ribbon简介:
Spring Cloud Ribbon 是一个基于Http和TCP的客服端负载均衡工具,它是基于Netflix Ribbon实现的。它不像服务注册中心、配置中心、API网关那样独立部署,但是它几乎存在于每个微服务的基础设施中。包括前面的提供的声明式服务调用也是基于该Ribbon实现的。理解Ribbon对于我们使用Spring Cloud来讲非常的重要,因为负载均衡是对系统的高可用、网络压力的缓解和处理能力扩容的重要手段之一。在上节的例子中,我们采用了声明式的方式来实现负载均衡。实际上,内部调用维护了一个RestTemplate对象,该对象会使用Ribbon的自动化配置,同时通过@LoadBalanced开启客户端负载均衡。
客户端负载均衡:
负载均衡是对系统的高可用,网络压力的缓解和处理能力扩容的重要手段之一。我们通常所说的负载均衡指的是服务端的负载均衡,其中分为硬件负载均衡和软件负载均衡,硬件负载均衡主要通过在服务节点之间安装专门的负载均衡设备,比如F5,而软件的负载均衡则是通过在服务端安装一些具有均衡负载功能或者模块的软件来完成请求的分发工作,比如Nginx。
硬件负载均衡的设备或是软件负载均衡的软件模块都会维护一个下挂可用的服务端清单,通过心跳检测来剔除故障的服务端节点以保证清单中都是可以正常访问的服务端节点。当客户端发送请求到负载均衡设备的时候,该设备按某种算法(比如线性轮询,按权重负载,按流量负载等)从维护的可用服务清单中取出一台服务端的地址,然后进行转发。
客户端负载均衡和服务端的负载均衡最大的不同点在于服务清单存储的位置。客户端负载均衡,所有的客户端节点都维护着自己要访问的服务端清单,这些清单来自于服务注册中心。客户端负载均衡也需要心跳去维护服务端清单的健康性,这个步骤需要配合注册中心去完成。在spring cloud 实现的服务治理框架中,默认会创建对各个服务治理框架的Ribbon自动化整合配置,比如Eureka中的org.springframework.cloud.netflix.ribbon.eureka.RibbonEurekaAutoConfiguration,Consul中的org.springframework.cloud.consul.discovery.RibbonConsulAutoConfiguration。在实际使用的时候,可以通过查看这两个类的实现,以找到它们的配置详情来帮助我们更好的使用它。
通过spring cloud Ribbon的封装,客户端的负载均衡只要完成以下二步:
1.服务提供者只需要启动多个服务实例并注册到注册中心
2.服务端直接通过在RestTemplate上使用@LoadBalanced注解。
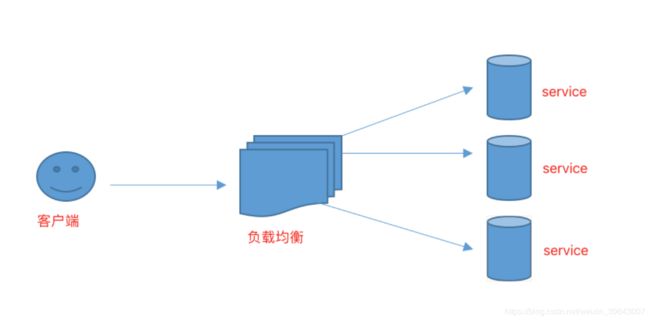
其次负载均衡主要是实现对系统的高可用、网络压力的缓解、处理能力的伸缩。对于数据流量过大,往往单一设备是无法承担的,需要多台的设计进行分流,流程如下图:
项目的搭建
1. 首先建一个springBoot项目ribbon_module,加上我们前几章见的项目目录结构如下:

2.ribbon_module项目的pom.xml文件内容如下:
    4.0.0

        org.springframework.boot
        spring-boot-starter-parent
        2.2.6.RELEASE


    com.tone
    ribbon_module
    0.0.1-SNAPSHOT
    ribbon_module
    Demo project for Spring Boot


        1.8


            org.springframework.boot
            spring-boot-starter-web


            org.springframework.cloud
            spring-cloud-starter-netflix-eureka-client
            2.2.2.RELEASE


            org.springframework.cloud
            spring-cloud-starter-netflix-ribbon
            2.2.2.RELEASE


            org.springframework.cloud
            spring-cloud-starter-netflix-hystrix
            2.2.2.RELEASE


            org.springframework.boot
            spring-boot-starter-test
            test


                org.springframework.cloud
                spring-cloud-dependencies
                ${spring-cloud.version}
                pom
                import


                org.springframework.boot
                spring-boot-maven-plugin
3.ribbon_module项目中的配置文件bootstrap.yml内容如下:
server:
  port: 8084
spring:
  application:
    name: ribbonCenter
config:
  regcenter:
    ip: 127.0.0.1
    prot: 8762
    username: admin
    password: 123456
eureka:
  client:
    register-with-eureka: true
    fetch-registry: true
    ## 注册服务中心的配置
    service-url:
      defaultZone: http://${config.regcenter.username}:${config.regcenter.password}@${config.regcenter.ip}:${config.regcenter.prot}/eureka/
4.ribbon_module项目中启动类如下:
package com.tone;

import org.springframework.boot.SpringApplication;
import org.springframework.boot.autoconfigure.SpringBootApplication;
import org.springframework.cloud.client.discovery.EnableDiscoveryClient;
import org.springframework.cloud.client.loadbalancer.LoadBalanced;
import org.springframework.cloud.netflix.hystrix.EnableHystrix;
import org.springframework.context.annotation.Bean;
import org.springframework.web.client.RestTemplate;

@SpringBootApplication
@EnableDiscoveryClient
@EnableHystrix //启动熔断降级服务
public class RibbonModuleApplication {

    public static void main(String[] args) {
        SpringApplication.run(RibbonModuleApplication.class, args);
    }
    @Bean
    @LoadBalanced //开启负载均衡
    public RestTemplate restTemplate(){
        return new RestTemplate();
    }

}
5.ribbon_module项目中建一个调用system_module项目中的服务 代码如下:
package com.tone.service;

import com.netflix.hystrix.contrib.javanica.annotation.HystrixCommand;
import org.springframework.beans.factory.annotation.Autowired;
import org.springframework.stereotype.Service;
import org.springframework.web.client.RestTemplate;

import java.util.ArrayList;
import java.util.List;

@Service
public class HelloService {
    @Autowired
    private RestTemplate restTemplate;

    @HystrixCommand(fallbackMethod = "hiError")
    public List hiService(){
        return restTemplate.getForObject("http://systemCenter/user/getUserList",List.class);
    }

    public List hiError(){
        List  list = new ArrayList();
        list.add("sorry error!");
        return list;
    }

}
以上使用使用注解的方式进行熔断降级,@HystrixCommand(fallbackMethod = "hiError")  fallbackMenthod 属性表示使用熔断降级的方法,针对具体的某个方法,该注解使用在server方法上
6.ribbon_module项目中建一个controller层 代码如下:
package com.tone.controller;

import com.tone.service.HelloService;
import org.springframework.beans.factory.annotation.Autowired;
import org.springframework.web.bind.annotation.GetMapping;
import org.springframework.web.bind.annotation.RequestMapping;
import org.springframework.web.bind.annotation.RestController;

import java.util.List;

@RestController
@RequestMapping("/ribbon")
public class HelloController {
    @Autowired
    private HelloService helloService;

    @GetMapping("/hi")
    public List hiService(){
        return helloService.hiService();
    }
}
7.以上.ribbon_module项目代码全部完成 现在ribbon_module项目结构如下:

8.接下来我们分别启动两个system_module服务 分别把bootstrap.yml中的server.port改为8080 8085 如下:
第一个:
server:
  port: 8080
spring:
  application:
    name: systemCenter
  # dev环境
  profiles:
    active: dev
  # 配置中心
  cloud:
    config:
      fail-fast: true
      name: ${spring.application.name}
      profile: ${spring.profiles.active}
      discovery:
        enabled: true
        service-id: configCenter
config:
  regcenter:
    ip: 127.0.0.1
    prot: 8762
    username: admin
    password: 123456
eureka:
  client:
    register-with-eureka: true
    fetch-registry: true
    ## 注册服务中心的配置
    service-url:
      defaultZone: http://${config.regcenter.username}:${config.regcenter.password}@${config.regcenter.ip}:${config.regcenter.prot}/eureka/
第二个:
server:
  port: 8085
spring:
  application:
    name: systemCenter
  # dev环境
  profiles:
    active: dev
  # 配置中心
  cloud:
    config:
      fail-fast: true
      name: ${spring.application.name}
      profile: ${spring.profiles.active}
      discovery:
        enabled: true
        service-id: configCenter
config:
  regcenter:
    ip: 127.0.0.1
    prot: 8762
    username: admin
    password: 123456
eureka:
  client:
    register-with-eureka: true
    fetch-registry: true
    ## 注册服务中心的配置
    service-url:
      defaultZone: http://${config.regcenter.username}:${config.regcenter.password}@${config.regcenter.ip}:${config.regcenter.prot}/eureka/
然后我们在controller层也分别写两个测试进行调用后的接口区分,代码内容如下:
第一个:
package com.tone.user.controller;

import com.tone.user.entity.User;
import com.tone.user.service.UserService;
import org.springframework.beans.factory.annotation.Autowired;
import org.springframework.web.bind.annotation.PostMapping;
import org.springframework.web.bind.annotation.RequestMapping;
import org.springframework.web.bind.annotation.RestController;

import java.util.ArrayList;
import java.util.List;

/**
 * 描述:UserController
 *
 * @author 何志鹏
 * @ClassName:UserController
 * @create 2020-04-02 13:56
 * Version 1.0
 */
@RestController
@RequestMapping("/user")
public class UserController {
    @Autowired
    private UserService userService;

    @RequestMapping("/getUserList")
    public List  getUserList(){
        List  aa = new ArrayList<>();
        User user = new User();
        user.setFullName("127.0.0.1:8080");
        aa.add(user);
         return  aa;
    }
}
第二个:
package com.tone.user.controller;

import com.tone.user.entity.User;
import com.tone.user.service.UserService;
import org.springframework.beans.factory.annotation.Autowired;
import org.springframework.web.bind.annotation.PostMapping;
import org.springframework.web.bind.annotation.RequestMapping;
import org.springframework.web.bind.annotation.RestController;

import java.util.ArrayList;
import java.util.List;

/**
 * 描述:UserController
 *
 * @author 何志鹏
 * @ClassName:UserController
 * @create 2020-04-02 13:56
 * Version 1.0
 */
@RestController
@RequestMapping("/user")
public class UserController {
    @Autowired
    private UserService userService;

    @RequestMapping("/getUserList")
    public List  getUserList(){
        List  aa = new ArrayList<>();
        User user = new User();
        user.setFullName("127.0.0.1:8085");
        aa.add(user);
         return  aa;
    }
}
注意 我们这里每改一个项目的端口号就启动项目服务 ,这里idea不能同时启动两个一样的启动类 所以我们呢需要改一下idea的配置 如下:


9.最后我们调用ribbon的接口服务进行测试 在浏览器上调用http://127.0.0.1:8084/ribbon/hi 我们发现第一次和第二次调用的项目不一样 一直会来回调用不同的接口 从而达到负载均衡的目的

