一、视频学习心得
1.深度学习的数学基础
数学基础:概率论(统计)、线性代数、最优化、信息论、微积分
机器学习中的数学基础
2.卷积神经网络
2.1绪论
2.1.1卷积神经网络的应用
应用:分类、检索、检测、分割
具体:人脸识别(检索、身份认证、识别遗传病)、人脸表情识别(分类)、图像生成(图到图、文字到图)、自动驾驶、图像风格转化
2.1.2传统神经网络vs卷积神经网络
深度学习三部曲:搭建神经网络结构、找到一个合适的损失函数、找到一个合适的优化函数、更新参数
损失函数:用来衡量吻合度
常用分类损失:交叉熵损失
常用回归损失:均方误差、平均绝对值误差(L1损失)
全连接:都有连接
为什么需要卷积神经网路?
全连接网络处理图像的问题:参数太多造成过拟合
卷积神经网络的解决方式:局部关联,参数共享
相同之处:都是层级结构(卷积层、激活层、池化层、全连接层)
2.2基本组成结构
2.2.1卷积
一维卷积
卷积是什么:卷积是对两个实变函数的数学操作
二维卷积
在图像处理中,图像是以二维矩阵的形式输入到神经网络的,因此我们需要二维卷积
卷积操作:对位相乘之和
涉及到的基本概念:input(输入)、kernel/filter(卷积核/滤波器)、stride(步长)、weights(权重:卷积核里面的参数)、receptive field(感受野)、activation map或feature map(特征图:经过卷积后的输出)、padding(零填充)、depth/channel(深度)、output(输出)
输出特征图大小:(N-F)/stride+1(无padding),N为输入维度,F为卷积核维度
(N + padding*2-F)/stride+1(有padding)
深度(depth/channel):特征图厚度,与卷积核个数保持一致
卷积的可视化理解:用来查看每一层学习的过程
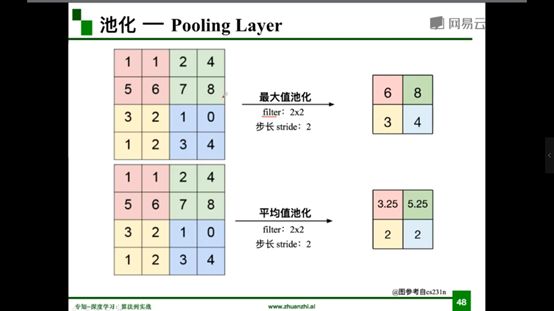
2.2.2池化
相当于一个数学操作
保留了主要特征的同时减少参数和计算量,防止过拟合,提高模型泛化能力
处于卷积层与卷积层之间,全连接层与全连接层之间
类型:Max pooling(最大值池化)、Average pooling(平均池化)
分类任务中更倾向于用最大值池化
2.2.3全连接
两层之间所有神经元都有权重链接
通常全连接层在卷积神经网络尾部
全连接层参数量通常最大
一个典型的卷积网络是由卷积层、池化层、全连接层交叉堆叠而成
2.3卷积神经网络典型结构
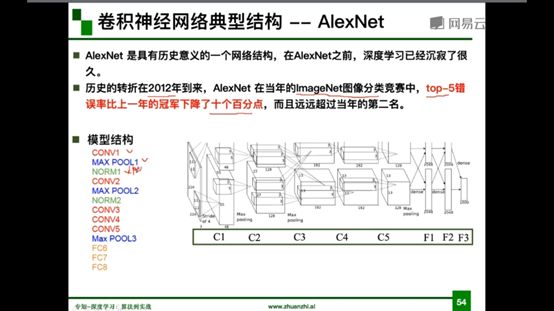
2.3.1AlexNet
成功原因:大数据训练,非线性激活函数ReLU、防止过拟合、双GPU实现
ReLU激活函数帮助
解决了梯度消失的问题(在正区间)、计算速度特别快,只需要判断输入是否大于0,收敛速度远快于sigmoid
防止过拟合(随机失活DropOut):训练时随机关闭部分神经元,测试时整合所有神经元
数据增强(data augmentation):平移、翻转、对称
改变RGB通道强度
分层解析
第一次卷积:卷积-ReLU-池化
第二次卷积:卷积-ReLU-池化
第三次卷积:卷积-ReLU
第四次卷积:卷积-ReLU
第五次卷积:卷积-ReLU-池化
第六层:全连接-ReLU-DropOut
第七层:全连接-ReLU-DropOut
第八层:全连接-SoftMax
主要参数存在于全连接层
2.3.2 ZFNet
结构与AlexNet相同
将卷积层1中的感受野大小由1111改为77,步长由4改为2
卷积层3,4,5中的滤波器个数由384,384,256改为512,512,1024
2.3.3 VGG
VGG是一个更深网络,16-19层
迁移学习:就是把为任务 A 开发的模型作为初始点,重新使用在为任务 B 开发模型的过程中
2.3.4 GoogleNet
网络总体结构:网络包含22个带参数的层(如果考虑pooling层就是27层),独立成块的层总共有约100个
参数量大概是AlexNet的1/12,没有FC层
初衷:多卷积核增加特征多样性
解决思路:插入1*1卷积核进行降维
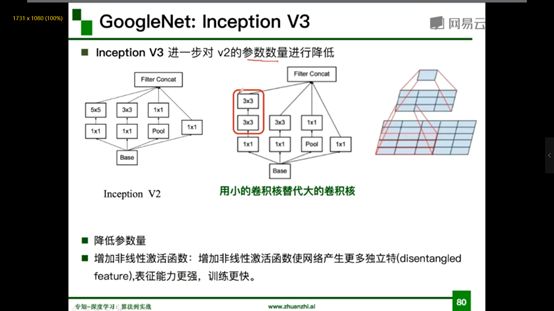
Inception V3
进一步对V2的参数数量进行降维,用小的卷积核代替大的卷积核
好处:降低参数量,增加非线性激活函数:增加非线性激活函数使网络产生更多独立特,表征能力更强,训练更快
Stem部分:卷积-池化-卷积-卷积-池化
多个Inception结构堆叠
输出:没有额外的全连接层(除了最后的类别输出层)
辅助分类器:解决由于模型深度过深导致的梯度消失问题(在早期版本V1 V2)
2.3.5 ResNet
残差学习网络(deep residual learning network)
残差学习网络结构
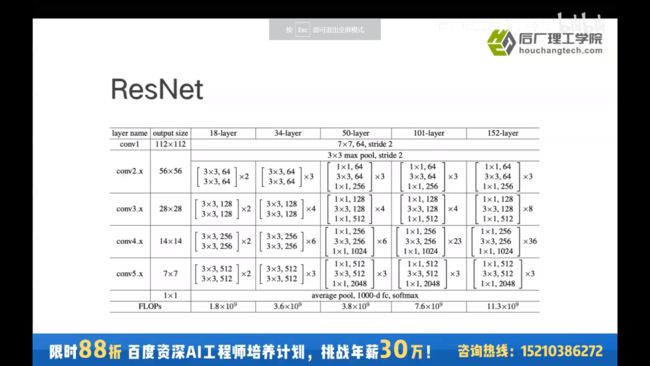
每个ResNet由5个stage组成,每个stage由若干block组成,每个block由若干卷积层组成
除了输出层没有全连接层
残差学习(Residual Learning)
残差:F(x)=H(x)-x
是一个恒等映射
虚线指特征图出现变化,不再是恒等映射
残差的思想:去掉相同的主体部分,从而突出微小的变化
残差可以被用来训练深层网络,解决梯度消失问题
深度神经网络相当于函数的拟合过程(复合函数)
CNN层数足够深可以拟合任何函数
全局平均池化:通过求平均值把整个通道变为一个数字
全局平均池化作用:替代全连接层,参数变少,防止出现过拟合
50层以上与50层以下的组成结构最大的差异:bottle neck
bottle neck作用:降维
新发展
ResNeXt:分组卷积,注意力机制,弱监督训练
分组卷积最早出现在AlexNet,解决计算力问题
二、代码练习
1、MNIST数据集分类
1.1 在小型全连接网络上训练
n_hidden = 8 # number of hidden units

model_fnn = FC2Layer(input_size, n_hidden, output_size)
model_fnn.to(device)
optimizer = optim.SGD(model_fnn.parameters(), lr=0.01, momentum=0.5)
print('Number of parameters: {}'.format(get_n_params(model_fnn)))

train(model_fnn)
test(model_fnn)
Number of parameters: 6442
Train: [0/60000 (0%)]	Loss: 2.369654
Train: [6400/60000 (11%)]	Loss: 1.870950
Train: [12800/60000 (21%)]	Loss: 0.958904
Train: [19200/60000 (32%)]	Loss: 0.576862
Train: [25600/60000 (43%)]	Loss: 0.439615
Train: [32000/60000 (53%)]	Loss: 0.799781
Train: [38400/60000 (64%)]	Loss: 0.451651
Train: [44800/60000 (75%)]	Loss: 0.458230
Train: [51200/60000 (85%)]	Loss: 0.370492
Train: [57600/60000 (96%)]	Loss: 0.375056

Test set: Average loss: 0.3669, Accuracy: 8869/10000 (89%)
1.2 在卷积神经网络上训练
n_features = 6 # number of feature maps

model_cnn = CNN(input_size, n_features, output_size)
model_cnn.to(device)
optimizer = optim.SGD(model_cnn.parameters(), lr=0.01, momentum=0.5)
print('Number of parameters: {}'.format(get_n_params(model_cnn)))

train(model_cnn)
test(model_cnn)
Number of parameters: 6422
Train: [0/60000 (0%)]	Loss: 2.311622
Train: [6400/60000 (11%)]	Loss: 1.033500
Train: [12800/60000 (21%)]	Loss: 0.658094
Train: [19200/60000 (32%)]	Loss: 0.337449
Train: [25600/60000 (43%)]	Loss: 0.329063
Train: [32000/60000 (53%)]	Loss: 0.241465
Train: [38400/60000 (64%)]	Loss: 0.351572
Train: [44800/60000 (75%)]	Loss: 0.177888
Train: [51200/60000 (85%)]	Loss: 0.383399
Train: [57600/60000 (96%)]	Loss: 0.096746

Test set: Average loss: 0.1593, Accuracy: 9500/10000 (95%)
1.3 打乱像素后在小型全连接网络上训练
perm = torch.randperm(784)
n_hidden = 8 # number of hidden units

model_fnn = FC2Layer(input_size, n_hidden, output_size)
model_fnn.to(device)
optimizer = optim.SGD(model_fnn.parameters(), lr=0.01, momentum=0.5)
print('Number of parameters: {}'.format(get_n_params(model_fnn)))

train_perm(model_fnn, perm)
test_perm(model_fnn, perm)
Number of parameters: 6442
Train: [0/60000 (0%)]	Loss: 2.321218
Train: [6400/60000 (11%)]	Loss: 1.790568
Train: [12800/60000 (21%)]	Loss: 1.241034
Train: [19200/60000 (32%)]	Loss: 0.909294
Train: [25600/60000 (43%)]	Loss: 0.699135
Train: [32000/60000 (53%)]	Loss: 0.450154
Train: [38400/60000 (64%)]	Loss: 0.469739
Train: [44800/60000 (75%)]	Loss: 0.429053
Train: [51200/60000 (85%)]	Loss: 0.525381
Train: [57600/60000 (96%)]	Loss: 0.311493

Test set: Average loss: 0.4212, Accuracy: 8751/10000 (88%)
1.4 打乱像素后在卷积神经网络上训练
perm = torch.randperm(784)
n_features = 6 # number of feature maps

model_cnn = CNN(input_size, n_features, output_size)
model_cnn.to(device)
optimizer = optim.SGD(model_cnn.parameters(), lr=0.01, momentum=0.5)
print('Number of parameters: {}'.format(get_n_params(model_cnn)))

train_perm(model_cnn, perm)
test_perm(model_cnn, perm)
Number of parameters: 6422
Train: [0/60000 (0%)]	Loss: 2.313467
Train: [6400/60000 (11%)]	Loss: 2.276608
Train: [12800/60000 (21%)]	Loss: 2.134404
Train: [19200/60000 (32%)]	Loss: 1.890606
Train: [25600/60000 (43%)]	Loss: 1.529144
Train: [32000/60000 (53%)]	Loss: 1.102085
Train: [38400/60000 (64%)]	Loss: 1.002457
Train: [44800/60000 (75%)]	Loss: 0.940360
Train: [51200/60000 (85%)]	Loss: 0.687047
Train: [57600/60000 (96%)]	Loss: 0.558924

Test set: Average loss: 0.5822, Accuracy: 8200/10000 (82%)
1.5 总结
对比打乱像素顺序前后全连接网络与CNN的训练结果,可以看到打乱像素顺序后CNN的训练效果有明显下降,而全连接网络只下降了1%。造成这种结果的原因是对于卷积神经网络CNN而言,会利用像素的局部关系,但是打乱像素顺序后,这些像素间的关系将无法得到利用,从而使训练结果大幅下降。
2、CIFAR10数据集分类
2.1 定义网络,损失函数和优化器
class Net(nn.Module):
    def __init__(self):
        super(Net, self).__init__()
        self.conv1 = nn.Conv2d(3, 6, 5)
        self.pool = nn.MaxPool2d(2, 2)
        self.conv2 = nn.Conv2d(6, 16, 5)
        self.fc1 = nn.Linear(16 * 5 * 5, 120)
        self.fc2 = nn.Linear(120, 84)
        self.fc3 = nn.Linear(84, 10)

    def forward(self, x):
        x = self.pool(F.relu(self.conv1(x)))
        x = self.pool(F.relu(self.conv2(x)))
        x = x.view(-1, 16 * 5 * 5)
        x = F.relu(self.fc1(x))
        x = F.relu(self.fc2(x))
        x = self.fc3(x)
        return x

# 网络放到GPU上
net = Net().to(device)
criterion = nn.CrossEntropyLoss()
optimizer = optim.Adam(net.parameters(), lr=0.001)
2.2 训练网络
for epoch in range(10):  # 重复多轮训练
    for i, (inputs, labels) in enumerate(trainloader):
        inputs = inputs.to(device)
        labels = labels.to(device)
        # 优化器梯度归零
        optimizer.zero_grad()
        # 正向传播 + 反向传播 + 优化
        outputs = net(inputs)
        loss = criterion(outputs, labels)
        loss.backward()
        optimizer.step()
        # 输出统计信息
        if i % 100 == 0:
            print('Epoch: %d Minibatch: %5d loss: %.3f' %(epoch + 1, i + 1, loss.item()))

print('Finished Training')
2.3 提取数据集中的8张图片进行测试
 得到一组图像
images, labels = iter(testloader).next()
# 展示图像
imshow(torchvision.utils.make_grid(images))
# 展示图像的标签
for j in range(8):
    print(classes[labels[j]])
八张图片标签分别为:cat、ship、ship、plane、frog、frog、car、frog
outputs = net(images.to(device))
_, predicted = torch.max(outputs, 1)

# 展示预测的结果
for j in range(8):
    print(classes[predicted[j]])
测试得到的标签分别为:cat、ship、ship、ship、frog、frog、car、frog
2.4 测试网络在整个数据集上的表现
correct = 0
total = 0

for data in testloader:
    images, labels = data
    images, labels = images.to(device), labels.to(device)
    outputs = net(images)
    _, predicted = torch.max(outputs.data, 1)
    total += labels.size(0)
    correct += (predicted == labels).sum().item()

print('Accuracy of the network on the 10000 test images: %d %%' % (
    100 * correct / total))
Accuracy of the network on the 10000 test images: 63 %
3、使用VGG16对CIFAR10分类
3.1 定义dataloader
device = torch.device("cuda:0" if torch.cuda.is_available() else "cpu")

transform_train = transforms.Compose([
    transforms.RandomCrop(32, padding=4),
    transforms.RandomHorizontalFlip(),
    transforms.ToTensor(),
    transforms.Normalize((0.4914, 0.4822, 0.4465), (0.2023, 0.1994, 0.2010))])

transform_test = transforms.Compose([
    transforms.ToTensor(),
    transforms.Normalize((0.4914, 0.4822, 0.4465), (0.2023, 0.1994, 0.2010))])

trainset = torchvision.datasets.CIFAR10(root='./data', train=True,  download=True, transform=transform_train)
testset  = torchvision.datasets.CIFAR10(root='./data', train=False, download=True, transform=transform_test)

trainloader = torch.utils.data.DataLoader(trainset, batch_size=128, shuffle=True, num_workers=2)
testloader = torch.utils.data.DataLoader(testset, batch_size=128, shuffle=False, num_workers=2)

classes = ('plane', 'car', 'bird', 'cat',
           'deer', 'dog', 'frog', 'horse', 'ship', 'truck')
3.2 VGG网络定义
class VGG(nn.Module):
    def __init__(self):
        super(VGG, self).__init__()
        self.cfg = [64, 'M', 128, 'M', 256, 256, 'M', 512, 512, 'M', 512, 512, 'M']
        self.features = self._make_layers(cfg)
        self.classifier = nn.Linear(2048, 10)

    def forward(self, x):
        out = self.features(x)
        out = out.view(out.size(0), -1)
        out = self.classifier(out)
        return out

    def _make_layers(self, cfg):
        layers = []
        in_channels = 3
        for x in cfg:
            if x == 'M':
                layers += [nn.MaxPool2d(kernel_size=2, stride=2)]
            else:
                layers += [nn.Conv2d(in_channels, x, kernel_size=3, padding=1),
                           nn.BatchNorm2d(x),
                           nn.ReLU(inplace=True)]
                in_channels = x
        layers += [nn.AvgPool2d(kernel_size=1, stride=1)]
        return nn.Sequential(*layers)
3.3 网络训练
for epoch in range(10):  # 重复多轮训练
    for i, (inputs, labels) in enumerate(trainloader):
        inputs = inputs.to(device)
        labels = labels.to(device)
        # 优化器梯度归零
        optimizer.zero_grad()
        # 正向传播 + 反向传播 + 优化
        outputs = net(inputs)
        loss = criterion(outputs, labels)
        loss.backward()
        optimizer.step()
        # 输出统计信息
        if i % 100 == 0:
            print('Epoch: %d Minibatch: %5d loss: %.3f' %(epoch + 1, i + 1, loss.item()))

print('Finished Training')
3.4 测试
correct = 0
total = 0

for data in testloader:
    images, labels = data
    images, labels = images.to(device), labels.to(device)
    outputs = net(images)
    _, predicted = torch.max(outputs.data, 1)
    total += labels.size(0)
    correct += (predicted == labels).sum().item()

print('Accuracy of the network on the 10000 test images: %.2f %%' % (
    100 * correct / total))
Accuracy of the network on the 10000 test images: 82.71 %
4、使用VGG模型迁移学习猫狗大战
4.1 数据处理
normalize = transforms.Normalize(mean=[0.485, 0.456, 0.406], std=[0.229, 0.224, 0.225])

vgg_format = transforms.Compose([
                transforms.CenterCrop(224),
                transforms.ToTensor(),
                normalize,
            ])

data_dir = './dogscats'

dsets = {x: datasets.ImageFolder(os.path.join(data_dir, x), vgg_format)
         for x in ['train', 'valid']}

dset_sizes = {x: len(dsets[x]) for x in ['train', 'valid']}
dset_classes = dsets['train'].classes
loader_train = torch.utils.data.DataLoader(dsets['train'], batch_size=64, shuffle=True, num_workers=6)
loader_valid = torch.utils.data.DataLoader(dsets['valid'], batch_size=5, shuffle=False, num_workers=6)


'''
valid 数据一共有2000张图,每个batch是5张,因此,下面进行遍历一共会输出到 400
同时,把第一个 batch 保存到 inputs_try, labels_try,分别查看
'''
count = 1
for data in loader_valid:
    print(count, end='\n')
    if count == 1:
        inputs_try,labels_try = data
    count +=1

print(labels_try)
print(inputs_try.shape)
tensor([0, 0, 0, 0, 0])
torch.Size([5, 3, 224, 224])
4.2 创建VGG模型
model_vgg = models.vgg16(pretrained=True)

with open('./imagenet_class_index.json') as f:
    class_dict = json.load(f)
dic_imagenet = [class_dict[str(i)][1] for i in range(len(class_dict))]

inputs_try , labels_try = inputs_try.to(device), labels_try.to(device)
model_vgg = model_vgg.to(device)

outputs_try = model_vgg(inputs_try)

print(outputs_try)
print(outputs_try.shape)

'''
可以看到结果为5行,1000列的数据,每一列代表对每一种目标识别的结果。
但是我也可以观察到,结果非常奇葩,有负数,有正数,
为了将VGG网络输出的结果转化为对每一类的预测概率,我们把结果输入到 Softmax 函数
'''
m_softm = nn.Softmax(dim=1)
probs = m_softm(outputs_try)
vals_try,pred_try = torch.max(probs,dim=1)

print( 'prob sum: ', torch.sum(probs,1))
print( 'vals_try: ', vals_try)
print( 'pred_try: ', pred_try)

print([dic_imagenet[i] for i in pred_try.data])
imshow(torchvision.utils.make_grid(inputs_try.data.cpu()),
       title=[dset_classes[x] for x in labels_try.data.cpu()])
4.3 修改最后一层,冻结前面层的参数
print(model_vgg)

model_vgg_new = model_vgg;

for param in model_vgg_new.parameters():
    param.requires_grad = False
model_vgg_new.classifier._modules['6'] = nn.Linear(4096, 2)
model_vgg_new.classifier._modules['7'] = torch.nn.LogSoftmax(dim = 1)

model_vgg_new = model_vgg_new.to(device)

print(model_vgg_new.classifier)
4.4 训练并测试全连接层
'''
第一步:创建损失函数和优化器

损失函数 NLLLoss() 的 输入 是一个对数概率向量和一个目标标签.
它不会为我们计算对数概率,适合最后一层是log_softmax()的网络.
'''
criterion = nn.NLLLoss()

# 学习率
lr = 0.001

# 随机梯度下降
optimizer_vgg = torch.optim.SGD(model_vgg_new.classifier[6].parameters(),lr = lr)

'''
第二步:训练模型
'''

def train_model(model,dataloader,size,epochs=1,optimizer=None):
    model.train()

    for epoch in range(epochs):
        running_loss = 0.0
        running_corrects = 0
        count = 0
        for inputs,classes in dataloader:
            inputs = inputs.to(device)
            classes = classes.to(device)
            outputs = model(inputs)
            loss = criterion(outputs,classes)
            optimizer = optimizer
            optimizer.zero_grad()
            loss.backward()
            optimizer.step()
            _,preds = torch.max(outputs.data,1)
            # statistics
            running_loss += loss.data.item()
            running_corrects += torch.sum(preds == classes.data)
            count += len(inputs)
            print('Training: No. ', count, ' process ... total: ', size)
        epoch_loss = running_loss / size
        epoch_acc = running_corrects.data.item() / size
        print('Loss: {:.4f} Acc: {:.4f}'.format(
                     epoch_loss, epoch_acc))


# 模型训练
train_model(model_vgg_new,loader_train,size=dset_sizes['train'], epochs=1,
            optimizer=optimizer_vgg)

def test_model(model,dataloader,size):
    model.eval()
    predictions = np.zeros(size)
    all_classes = np.zeros(size)
    all_proba = np.zeros((size,2))
    i = 0
    running_loss = 0.0
    running_corrects = 0
    for inputs,classes in dataloader:
        inputs = inputs.to(device)
        classes = classes.to(device)
        outputs = model(inputs)
        loss = criterion(outputs,classes)
        _,preds = torch.max(outputs.data,1)
        # statistics
        running_loss += loss.data.item()
        running_corrects += torch.sum(preds == classes.data)
        predictions[i:i+len(classes)] = preds.to('cpu').numpy()
        all_classes[i:i+len(classes)] = classes.to('cpu').numpy()
        all_proba[i:i+len(classes),:] = outputs.data.to('cpu').numpy()
        i += len(classes)
        print('Testing: No. ', i, ' process ... total: ', size)
    epoch_loss = running_loss / size
    epoch_acc = running_corrects.data.item() / size
    print('Loss: {:.4f} Acc: {:.4f}'.format(
                     epoch_loss, epoch_acc))
    return predictions, all_proba, all_classes

predictions, all_proba, all_classes = test_model(model_vgg_new,loader_valid,size=dset_sizes['valid'])
Loss: 0.0487 Acc: 0.9550
三、展望学习
MobileNet
1.MobileNet介绍
MobileNet是一个基于流线型的架构,它使用深度可分离的卷积来构建轻量级的深度神经网络。主要应用于移动和嵌入视觉应用
2.MobileNet构架
2.1 深度可分离卷积
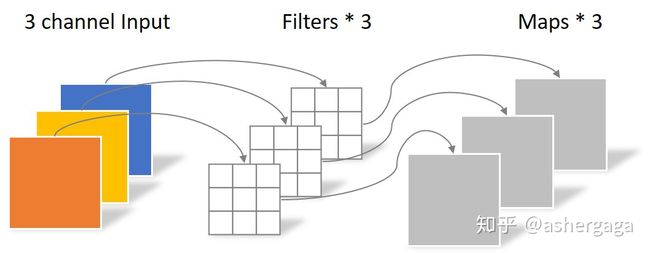
深度可分离卷积(Depthwise Separable Convolution)是将一个完整的卷积运算分为两步进行,即深度卷积(Depthwise Convolution)和点卷积(Pointwise Convolution)。深度卷积将每个卷积核应用到每一个通道,而点卷积用来组合通道卷积的输出
2.1.1 Depthwise Convolution
Depthwise Convolution的一个卷积核负责一个通道,一个通道只被一个卷积核卷积
对于一张5×5像素,三通道彩色输入图片(shape为5×5×3)
Depthwise Convolution首先经过第一次卷积运算,不同于常规卷积,DW完全是在二维平面内进行。卷积核的数量与上一层的通道数相同(通道和卷积核一一对应)。所以一个三通道的图像经过运算后生成了3个Feature map(如果有same padding则尺寸与输入层相同为5×5)
参数个数为:3 × 3 × 3 = 27
2.1.2 Pointwise Convolution
Pointwise Convolution的运算与常规卷积运算非常相似,它的卷积核的尺寸为 1×1×M,M为上一层的通道数。所以这里的卷积运算会将上一步的map在深度方向上进行加权组合,生成新的Feature map。有几个卷积核就有几个输出Feature map。
参数个数为:1 × 1 × 3 × 4 = 12
1 × 1卷积在MobileNet模型中用于升维
总的参数量为39,而对于常规卷积操作参数量为108。
2.2 网络结构
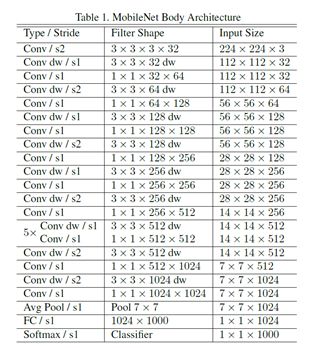
其中BN函数可以加快训练速度,提高模型精度
如上图所示,首先是一个3x3的标准卷积,然后后面就是堆积depthwise separable convolution,并且可以看到其中的部分depthwise convolution会通过strides=2(步长)进行down sampling(下采样)。然后采用average pooling(平均池化)将feature变成1x1,根据预测类别大小加上全连接层,最后是一个softmax层。如果单独计算depthwise convolution和pointwise convolution,整个网络有28层(这里Avg Pool和Softmax不计算在内)。
2.3 宽度乘数和分辨率乘数
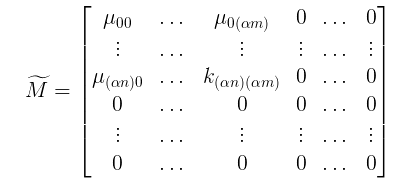
第一个参数width multiplier主要是按比例减少通道数,该参数记为α,其取值范围为(0,1],那么输入与输出通道数将变成αM和αN,对于depthwise separable convolution,其计算量变为:
其实,这相当于把M矩阵稀疏化成:
应用宽度乘数可以进一步减少计算量,大约有 α*α 的优化空间。
第二个超参数是分辨率乘数 ρ ,比如原来输入特征图是224x224,可以减少为192x192。分辨率乘数用来改变输入数据层的分辨率,同样也能减少参数。在 α 和 ρ 共同作用下,MobileNets某一层的计算量为:
要说明的是,resolution multiplier仅仅影响计算量,但是不改变参数量。其中,ρ 是隐式参数,ρ 如果为{1,6/7,5/7,4/7},则对应输入分辨率为{224,192,160,128},ρ 参数的优化空间同样是 ρ* ρ左右。
3.MobileNet性能
4. 补充
深度可分离卷积将standard convolutions(标准卷积)分解为depthwise convolution(深度卷积)和pointwise convolution(逐点卷积),它默认一种假设,使用分解后的卷积效果和标准卷积效果是近似的。举个简单的例子说明,假设我们有一个输入图片,这个输入图片的维度是11 x 11 x 3,标准卷积为3 x 3 x 3 x 6(假设stride为2,padding为1),那么可以得到输出为6 × 6 × 16(6 = (11-3+2*1)/2+1)的输出结果。现在输入图片不变,先通过一个维度是3 × 3 × 1 × 3的深度卷积(输入是3通道,这里有3个卷积核分别作用在3个通道上),得到6 × 6 × 3的中间输出,然后再通过一个维度是1 × 1 × 3 ×16的1 ×1卷积,同样得到输出为6 × 6 × 16。
简单分析一下depthwise separable convolution在计算量上与标准卷积的差别。假定输入特征图大小是:
![]()
而输出特征图大小是:
![]()
其中,DF是特征图的width和height,这是假定两者是相同的。对于标准的卷积:
其计算量将是:
而对于depthwise convolution其计算量为:
![]()
pointwise convolution计算量是:
所以depthwise separable convolution总计算量是:
可以比较depthwise separable convolution和标准卷积如下:
一般情况下 N 比较大,那么如果采用3x3卷积核的话,depthwise separable convolution相较标准卷积可以降低大约9倍的计算量。
