spring-session 原理及源码解析
1 什么是spring-session?
spring-session是spring大家庭下的一个子项目,她的出现是为了集中管理session会话,解决多应用环境下的session共享问题,虽然她是spring框架下的子项目,但是spring-session不依赖于spring框架,可以将spring-session用于其他框架下提供session管理能力。
2 为什么会出现session共享问题?
首先我们都知道,web应用开发完成后是需要部署到web容器里去运行的,而session是由web容器来管理的,用户访问web容器,web容器管理servlet生命周期,生成session,为http请求提供状态支持,web应用通过session来处理用户登录信息,这样基本上能满足一个传统的web应用的会话管理需求。但是,随着项目需求的不断壮大和并发的不断增加,单项目单web容器已无法满足我们的需求,不得不采用分布式/集群这两种部署方式,这个时候就出现了session共享问题。主要原因有以下两点:
1.在Java Servlet 3.1 规范中明确规定,HttpSession 对象必须被限定在应用(或 servlet 上下文)级别。底层的机制,如使用 cookie 建立会话,不同的上下文可以是相同,但所引用的对象,包括包括该对象中的属性,决不能在容器上下文之间共享。这就导致了单个web容器中的两个不同的应用之间无法共享session,所以部署在同一个容器中也无法解决分布式session共享的问题。
2.在不入侵web容器的前提下,大部分容器如tomcat/jetty不支持多容器之间session共享。
3 session共享问题有没有别的解决方法,为什么要用spring-session?
知道了session共享问题的成因后,我们可以提出两种主要的解决思路。
1.将session集中管理,代替web容器的session管理。
2.入侵web容器的session管理,使之支持session共享。
spring-session采用的是第一种方法,在web应用中使用过滤器将请求过滤,由spring-session来实现session的管理,spring-session提供了redis、jdbc、hazelcast等数据源的整合,使session数据的管理变得可视化,非常方便。
那么有没有别的方法解决session共享问题呢?答案是有的。tomcat-redis-session-manager使用redis来管理tomcat集群的session会话,相比于spring-session,这种方式入侵了web容器,实现起来比较复杂,耦合度较高,而且对tomcat版本支持范围不足,spring-session相比起来更加轻巧,操作更简单,耦合度低,加入到项目中框架清晰,因此更推荐使用spring-session。
4 学习spring-session的前提
4.1《Java Servlet 3.1 规范》
在学习spring-session前,必须要理解java servlet规范,因为spring-session是完全依据java servlet规范进行实现的。我们在这里通过spring-session-core简单了解一下spring-session(2.2.2)针对java servlet规范做了哪些实现。
5 spring-session 原理及源码学习
5.1 http原理
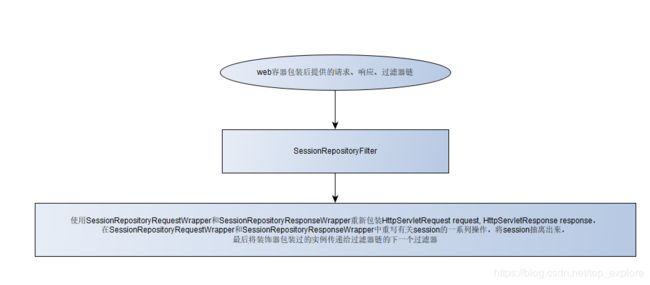
spring-session的原理是通过实现Filter创建过滤器SessionRepositoryFilter,在收到请求时采用装饰器模式重新分装HttpServletRequest和HttpServletResponse传递给FilterChain,之后对session的操作都交由SessionRepositoryRequestWrapper和SessionRepositoryResponseWrapper进行执行,以此来代替容器的session操作。请求的主流程如下图:
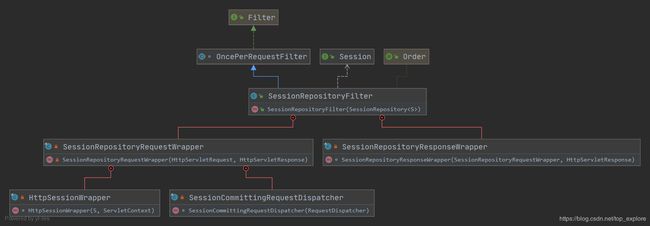
spring-session-core中org.springframework.session.web.http的uml关系图如下:
根据这个uml关系图,我们需要了解几个模块。
5.1.1 session管理模块
spring-session自定义了Session类,该Session类完全符合java servlet规范,拥有id,超时时间,是否超时,自定义属性,创建时间,最后一次访问时间等属性。以这个Session为基础,定义了两个大类的session仓库:
1.SessionRepository 包含对session的增删改查四个方法
1.1 RedisSessionRepository 内部维护了一个RedisOperations
1.2 MapSessionRepository 内部维护了一个Map
1.3 FindByIndexNameSessionRepository
1.3.1 RedisIndexedSessionRepository 内部维护了一个ReactiveRedisOperations
2.ReactiveSessionRepository 响应式的session仓库,包含对session的增删改查四个方法,借助spring 5的reacitve思想实现的响应式session管理。
2.1 ReactiveMapSessionRepository 内部维护了一个Map
2.2.ReactiveRedisSessionRepository 内部维护了一个ReactiveRedisOperations
| 基础接口 | SessionRepository 对session的增删改查四个方法 |
ReactiveSessionRepository 对session的增删改查四个方法 |
|---|---|---|
| Map管理 | MapSessionRepository 内部维护了一个Map |
ReactiveMapSessionRepository 内部维护了一个Map |
| Redis管理 | RedisSessionRepository 内部维护了一个RedisOperations |
ReactiveRedisSessionRepository 内部维护了一个ReactiveRedisOperations |
| 允许通过特殊的索引名称和值查找session的仓库管理接口 | FindByIndexNameSessionRepository | |
| 允许通过特殊的索引名称和值查找session的仓库管理 | RedisIndexedSessionRepository 实现FindByIndexNameSessionRepository |
5.1.2 SessionRepositoryFilter 核心过滤器
SessionRepositoryFilter继承了OncePerRequestFilter,具备一次请求只过滤一次的特性,不会对请求进行重复过滤。SessionRepositoryFilter的doFilterInternal做了三个操作:
1.将session管理仓库sessionRepository添加到request属性中 (一个session存储仓库)
2. 封装request /response(自定义session相关操作后的request/response),交由下个过滤器执行
3.最后提交session到指定容器。
	@Override
	protected void doFilterInternal(HttpServletRequest request, HttpServletResponse response, FilterChain filterChain)
			throws ServletException, IOException {
//将session仓库存入request的属性
		request.setAttribute(SESSION_REPOSITORY_ATTR, this.sessionRepository);
//封装request
		SessionRepositoryRequestWrapper wrappedRequest = new SessionRepositoryRequestWrapper(request, response);
//封装response
		SessionRepositoryResponseWrapper wrappedResponse = new SessionRepositoryResponseWrapper(wrappedRequest,
				response);

		try {
//交由下个过滤器处理
			filterChain.doFilter(wrappedRequest, wrappedResponse);
		}
		finally {
			wrappedRequest.commitSession();
		}
	}
5.1.2.1 SessionRepositoryRequestWrapper
SessionRepositoryRequestWrapper继承了HttpServletRequestWrapper,采用装饰器模式包装HttpServletRequest,适配器模式包装Spring Session,重写session相关方法,这种设计既实现了完全符合HttpServletRequest的规范要求,又实现了session独立操作,是spring-session的精髓所在。
1.Spring Session的包装HttpSessionWrapper
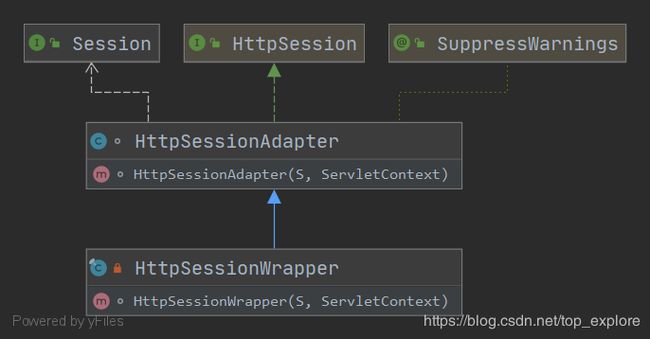
首先定义一个适配器HttpSessionAdapter,实现HttpSession,重写session相关方法。然后定义HttpSessionWrapper继承HttpSessionAdapter,重写invalidate session失效方法。
@Override
public void invalidate() {
//调用父类invalidate方法,将invalidated属性置为true
				super.invalidate();
//将SessionRepositoryRequestWrapper的requestedSessionInvalidated属性置为true
				SessionRepositoryRequestWrapper.this.requestedSessionInvalidated = true;
//移除当前session
				setCurrentSession(null);
//清除session缓存属性
				clearRequestedSessionCache();
//移除session
				SessionRepositoryFilter.this.sessionRepository.deleteById(getId());
			}
2.SessionRepositoryRequestWrapper重写的有关session的几个主要方法
2.1获取session
1.从request属性中获取当前session,
private HttpSessionWrapper getCurrentSession() {
			return (HttpSessionWrapper) getAttribute(CURRENT_SESSION_ATTR);
		}
public Object getAttribute(String name) {
        return this.request.getAttribute(name);
    }
2.
private S getRequestedSession() {
//如果当前session缓存不存在
			if (!this.requestedSessionCached) {
//那么从请求的cookie中获取sessionId集合
				List sessionIds = SessionRepositoryFilter.this.httpSessionIdResolver.resolveSessionIds(this);
//遍历sessionIds,获取第一个存在的session,填充到requestedSession,requestedSessionId属性,重置requestedSessionCached为ture
				for (String sessionId : sessionIds) {
					if (this.requestedSessionId == null) {
						this.requestedSessionId = sessionId;
					}
					S session = SessionRepositoryFilter.this.sessionRepository.findById(sessionId);
					if (session != null) {
						this.requestedSession = session;
						this.requestedSessionId = sessionId;
						break;
					}
				}
				this.requestedSessionCached = true;
			}
			return this.requestedSession;
		}
2.强制性获取session
@Override
public HttpSessionWrapper getSession() {
			return getSession(true);
		}

@Override
public HttpSessionWrapper getSession(boolean create) {
//先获取当前request中的sesion,如果存在则返回
			HttpSessionWrapper currentSession = getCurrentSession();
			if (currentSession != null) {
				return currentSession;
			}
//从session库中获取请求对应的session
			S requestedSession = getRequestedSession();
			if (requestedSession != null) {
				if (getAttribute(INVALID_SESSION_ID_ATTR) == null) {
//如果session库中存在对应的session并且当前request的session有效,那么重置session的访问时间,将requestedSessionIdValid置为true
					requestedSession.setLastAccessedTime(Instant.now());
					this.requestedSessionIdValid = true;
//将这个session重写包装到HttpSessionWrapper中,置为旧session,添加到request的当前session属性中,并返回。
					currentSession = new HttpSessionWrapper(requestedSession, getServletContext());
					currentSession.markNotNew();
					setCurrentSession(currentSession);
					return currentSession;
				}
			}
			else {
				// This is an invalid session id. No need to ask again if
				// request.getSession is invoked for the duration of this request
//如果session库中也没有对应的session,打印日志,将request的session失效属性置为true,避免重复获取session,如果不强制获取session,返回null。
				if (SESSION_LOGGER.isDebugEnabled()) {
					SESSION_LOGGER.debug(
							"No session found by id: Caching result for getSession(false) for this HttpServletRequest.");
				}
				setAttribute(INVALID_SESSION_ID_ATTR, "true");
			}
			if (!create) {
				return null;
			}
//如果强制获取session,则打印日志,通过sessionRepository.createSession()创建新的session,将新建的session重新包装,添加到当前请求中,并返回。
			if (SESSION_LOGGER.isDebugEnabled()) {
				SESSION_LOGGER.debug(
						"A new session was created. To help you troubleshoot where the session was created we provided a StackTrace (this is not an error). You can prevent this from appearing by disabling DEBUG logging for "
								+ SESSION_LOGGER_NAME,
						new RuntimeException("For debugging purposes only (not an error)"));
			}
			S session = SessionRepositoryFilter.this.sessionRepository.createSession();
			session.setLastAccessedTime(Instant.now());
			currentSession = new HttpSessionWrapper(session, getServletContext());
			setCurrentSession(currentSession);
			return currentSession;
		}
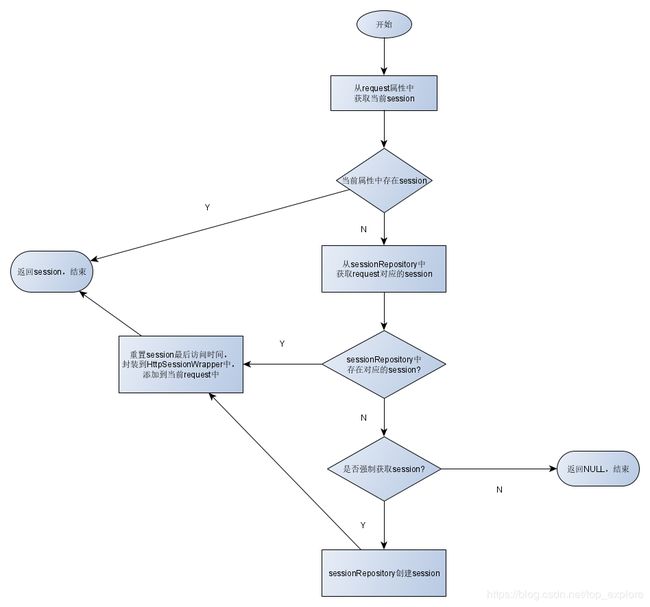
获取session的核心流程如下:
2.2 session是否有效
@Override
public boolean isRequestedSessionIdValid() {
//如果request的requestedSessionIdValid属性不为空,则直接返回该属性值
			if (this.requestedSessionIdValid == null) {
//否则从sessionRepository中获取session
				S requestedSession = getRequestedSession();
//如果session存在,则更新最后访问时间,返回该session的有效性
				if (requestedSession != null) {
					requestedSession.setLastAccessedTime(Instant.now());
				}
				return isRequestedSessionIdValid(requestedSession);
			}
			return this.requestedSessionIdValid;
}
2.3 提交session commitSession
private void commitSession() {
//首先获取当前session
			HttpSessionWrapper wrappedSession = getCurrentSession();
			if (wrappedSession == null) {
				if (isInvalidateClientSession()) {
//如果当前session已失效,那么将改cookie置为失效
					SessionRepositoryFilter.this.httpSessionIdResolver.expireSession(this, this.response);
				}
			}
			else {
//否则,清除request的session缓存
				S session = wrappedSession.getSession();
				clearRequestedSessionCache();
//保存session到sessionRepository
				SessionRepositoryFilter.this.sessionRepository.save(session);
				String sessionId = session.getId();
//将sessionId写入cookie中
				if (!isRequestedSessionIdValid() || !sessionId.equals(getRequestedSessionId())) {
					SessionRepositoryFilter.this.httpSessionIdResolver.setSessionId(this, this.response, sessionId);
				}
			}
		}
3.SessionCommittingRequestDispatcher
SessionCommittingRequestDispatcher也采用了装饰器模式,定义为SessionRepositoryRequestWrapper的内部类,包装了HttpServletRequestWrapper的RequestDispatcher,在RequestDispatcher的基础上,执行include前提添加了提交session操作,确保include前session得到保存。
5.1.2.2 SessionRepositoryRequestWrapper
SessionRepositoryRequestWrapper继承了OnCommittedResponseWrapper,OnCommittedResponseWrapper继承了HttpServletResponseWrapper,OnCommittedResponseWrapper采用装饰器模式,在HttpServletResponse的基础上添加了一些额外的功能,使得响应执行前能触发一些动作,而SessionRepositoryRequestWrapper继承了OnCommittedResponseWrapper,自然也拥有了这个属性。
我们从OnCommittedResponseWrapper的源码来入手,OnCommittedResponseWrapper有三个私有属性:
//是否触发提交的标志,true:不触发
private boolean disableOnCommitted;

//响应头内容长度,如果这个值大于0,那么一旦contentWritten的值大于或等于这个值,那么这个相应被视为已提交。
private long contentLength;

//已被写入响应体的数据量
private long contentWritten;
1.检查响应数据长度,自动触发提交事件
	private void checkContentLength(long contentLengthToWrite) {
//将要写的数据长度添加到contentWritten
		this.contentWritten += contentLengthToWrite;
		boolean isBodyFullyWritten = this.contentLength > 0 && this.contentWritten >=
		int bufferSize = getBufferSize();
		boolean requiresFlush = bufferSize > 0 && this.contentWritten >= bufferSize;
		if (isBodyFullyWritten || requiresFlush) {
//如果要写的数据长度大于等于响应头长度,同时大于等于缓冲区长度,那么触发响应提交事件
			doOnResponseCommitted();
		}
	}
2.触发提交事件
	private void doOnResponseCommitted() {
//如果允许触发
		if (!this.disableOnCommitted) {
//调用触发事件
			onResponseCommitted();
//将关闭触发功能
			disableOnResponseCommitted();
		}
	}

	private void disableOnResponseCommitted() {
		this.disableOnCommitted = true;
	}
3.在以上两个方法为基础的前提下,OnCommittedResponseWrapper采用装饰器模式,包装ServletOutputStream和PrintWriter,保证在响应完成前调用doOnResponseCommitted(),触发提交事件。而SessionRepositoryRequestWrapper继承了这些属性后,重写onResponseCommitted()方法,调用SessionRepositoryRequestWrapper的commitSession()方法,从而保证响应提交前能触发session提交事件。
private final class SessionRepositoryResponseWrapper extends OnCommittedResponseWrapper {

		private final SessionRepositoryRequestWrapper request;

		/**
		 * Create a new {@link SessionRepositoryResponseWrapper}.
		 * @param request the request to be wrapped
		 * @param response the response to be wrapped
		 */
		SessionRepositoryResponseWrapper(SessionRepositoryRequestWrapper request, HttpServletResponse response) {
			super(response);
			if (request == null) {
				throw new IllegalArgumentException("request cannot be null");
			}
			this.request = request;
		}

//重写onResponseCommitted()方法
		@Override
		protected void onResponseCommitted() {
//调用SessionRepositoryRequestWrapper的commitSession()
			this.request.commitSession();
		}

	}
以上就是spring-session的工作原理,上述解析并没有针对某个子工程(spring-session-data-redis、spring-session-hazelcast、spring-session-jdbc等)进行详细讲解,主要讲述了spring-session的主要工作原理。
对spring-session-data-redis的实现原理有兴趣的同学点这里:


