Spring boot(五) 分布式session+token+JWT
序
一般session+token+JWT多用作系统登录用户功能,接下来我们就简单的实现每一种的使用方式
一,使用spring-session
这里使用session与redis结合使用,因为单纯的使用session缓存数据的话,当一次回话结束后,session就会消失,不利于在一个成熟的系统中使用,如果结合redis使用则,不会出现数据失效的情况。
- 先创建一个springboot项目
注:前提是需要先安装redis中间件
- 引入redis相关依赖
        <dependency>
            <groupId>org.springframework.bootgroupId>
            <artifactId>spring-boot-starter-data-redisartifactId>
            <version>2.1.7.RELEASEversion>
        dependency>

        <dependency>
            <groupId>org.springframework.sessiongroupId>
            <artifactId>spring-session-data-redisartifactId>
            <version>2.4.2version>
        dependency>
- 接口实现
/**
     * spring-session
     * @param userName
     * @param pwd
     * @param session
     * @return
     */
    @GetMapping("/login")
    public String login(@RequestParam String userName, @RequestParam String pwd, HttpSession session){
        session.setAttribute("userName",userName);

        return "登录成功";
    }
    /**
     *
     * @param session
     * @return
     */
    @GetMapping("/info")
    public String info(HttpSession session){

        return "用户名:"+session.getAttribute("userName");
    }
- 在application.yml文件中配置redis相关参数
spring:
  redis:
    host: 127.0.0.1    #redis地址
    port: 6379   #redis端口
  session:
    store-type: redis   #spring-session选择类型redis
    timeout: 3600   #设置缓存时间
    redis:
      namespace: login-username   #自定义设置缓存在redis中的key值
- 注:这里博主是本地docker中安装的redis,所以地址是127.0.0.1
- 先启动redis

- 再启动项目,并请求登录接口

- 使用redis可视化工具进行查看

二,使用token
这里只有用到的就是redis中间件
在前面的使用中我们已经引入的redis与springboot的相关依赖,那么只需要创建接口进行测试
- 创建接口
- 重点使用到一个对象 StringRedisTemplate 和注解 @RequestParam(获取请求头参数)
//注入redis操作对象
 @Autowired
 private StringRedisTemplate stringRedisTemplate;

/**
     * token+redis实现缓存
     * @param userName
     * @param pwd
     * @return
     */
    @GetMapping("/tokenLogin")
    public String tokenLogin(@RequestParam String userName, @RequestParam String pwd){
        //生成一个标识token
        String token ="Token:"+ UUID.randomUUID();
        //设置redis的key 缓存的数据  缓存的时间  缓存的时间类型(时分秒)
        stringRedisTemplate.opsForValue().set(token,userName,3600, TimeUnit.SECONDS);
        return "登录成功:"+token;
    }

    /**
     * 获取数据
     * @param token  token 值
     * @return
     */
    @GetMapping("/tokenInfo")
    public String tokenInfo(@RequestHeader String token){
        String s = stringRedisTemplate.opsForValue().get(token);
        return "用户名:"+s;
    }
- 请求登录接口,返回token值

- 查看redis缓存

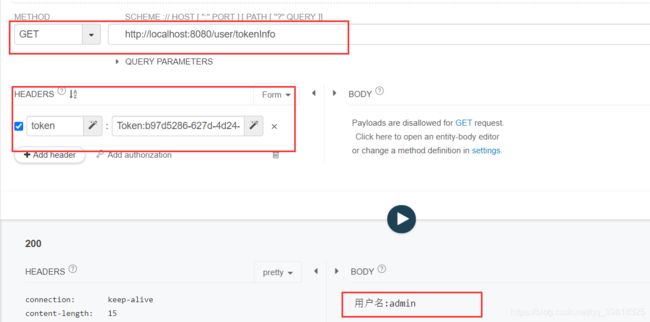
- 将token值放入请求头中,请求info接口获取用户名
三,使用JWT
- 要点:jwt不容易被篡改,但容易被解析。所以尽量避免token值被泄露
- 引入依赖
        <dependency>
            <groupId>com.auth0groupId>
            <artifactId>java-jwtartifactId>
            <version>3.12.1version>
        dependency>
- 创建接口,这里直接结合使用统一拦截器和jwt实现
- 要点:注解 @RequestAttribute (获取请求对象中存储的数据)
    /**
     *  登录实现缓存
     * @param userName
     * @param pwd
     * @return
     */
    @GetMapping("/jwtLogin")
    public String jwtLogin(@RequestParam String userName, @RequestParam String pwd){
        String token =null;
        try {
            Algorithm algorithm = Algorithm.HMAC256(KEY);
             token = JWT.create()
                    .withClaim("userName",userName)
                     .withClaim("id",1)
                    .withExpiresAt(new Date(System.currentTimeMillis()+360000))
                    .sign(algorithm);
        } catch (JWTCreationException exception){
            //Invalid Signing configuration / Couldn't convert Claims.
        }

        return "登录成功:"+token;
    }
    /**
     *
     * @param
     * @return
     */
    @GetMapping("/jwtInfo")
    public String jwtInfo(@RequestAttribute String userName){
        return "用户名:"+userName;
    }

    @GetMapping("/address")
    public String address(@RequestAttribute Integer uid){
        return "用户信息ID:"+uid;
    }
- 实现统一登录校验组件类,实现HandlerInterceptorl类型
/**
 * @program: distributed-session
 * @description:
 * @author: xf
 * @create: 2021-01-25 23:33
 **/
@Component
public class UserLoginInterceptor implements HandlerInterceptor{
    private static final String KEY ="remaindertime";
    public static final String USERNAME="userName";
    public static final String UID ="uid";

    @Override
    public boolean preHandle(HttpServletRequest request, HttpServletResponse response, Object handler) throws Exception {
        String token = request.getHeader("token");

        if(StringUtils.isEmpty(token)){
            throw new RuntimeException("token不能为空");
        }

        try {
        	//创建jwt对象并校验token
            Algorithm algorithm = Algorithm.HMAC256(KEY);
            JWTVerifier verifier = JWT.require(algorithm)
                    .build(); //Reusable verifier instance
            DecodedJWT jwt = verifier.verify(token);
            //获取jwt中登录用户变得数据表,并将数据设置到内存中
            request.setAttribute(USERNAME,jwt.getClaim("userName").asString());
            request.setAttribute(UID,jwt.getClaim("id").asInt());

        } catch (JWTVerificationException exception){
            throw new RuntimeException("token失效");
        }catch (JWTCreationException exception){
            throw new RuntimeException("用户未登录");
        }
        return true;
    }
}
- 实现统一请求拦截类
@Configuration
public class ConfigInterceptor implements WebMvcConfigurer {

    @Autowired
    private UserLoginInterceptor userLoginInterceptor;

    @Override
    public void addInterceptors(InterceptorRegistry registry) {

        registry.addInterceptor(userLoginInterceptor)
                .addPathPatterns("/user/*")  //设置拦截的请求
                .excludePathPatterns("/user/login") //设置不拦截的请求
                .excludePathPatterns("/user/tokenLogin")
                .excludePathPatterns("/user/jwtLogin");

    }
}
- 依次请求登录接口,返回token值
注:jwt中设置的数据信息越多,则生成的token中则越长

- 请求其他接口获取数据,设置请求头token

实际业务中可以结合使用来实现用户登录功能
源码地址获取:
想起一句歌词:我要一步一步往上爬,等待阳光静静看着它的脸