28-交换技术——DHCP部署和端口安全
1. DHCP技术部署
关于DHCP协议在《tcp/ip协议学习目录》一栏中已经讲过了,这里就不再进行过多介绍了,现在开始学习DHCP的实战部分——DHCP技术部署。
实验环境要求:
- 还是基于三层交换技术的网络拓扑和配置
- SW1交换机部署为DHCP服务器,然后在PC主机上开启DHCP协议,用于动态获取ip地址
配置SW1交换机为DHCP服务器,为不同VLAN提供动态IP地址:
SW1#conf t
Enter configuration commands, one per line.  End with CNTL/Z.
SW1(config)#ip dhcp pool VLAN10
SW1(dhcp-config)#network 192.168.10.0 255.255.255.0
SW1(dhcp-config)#default-router 192.168.10.254
SW1(dhcp-config)#dns-server 8.8.8.8 114.114.114.114
SW1(dhcp-config)#lease 7
SW1(dhcp-config)#
SW1(dhcp-config)#exit
SW1(config)#ip dhcp pool VLAN20
SW1(dhcp-config)#network 192.168.20.0 255.255.255.0
SW1(dhcp-config)#default-router 192.168.20.254
SW1(dhcp-config)#dns-server 8.8.8.8 114.114.114.114
SW1(dhcp-config)#lease 7
SW1(dhcp-config)#
部署DHCP技术命令说明:
ip dhcp pool VLAN10命令用于定义VLAN10的HDCP地址池,其实说白了就是定义VLAN10的网段
network 192.168.10.0 255.255.255.0命令用于定义VLAN10的网段为192.168.10.0
default-router 192.168.10.254命令:定义VLAN10的默认网关地址
dns-server 8.8.8.8 114.114.114.114命令:指定dns服务器地址,可以指定多个,一般的话指定3个就可以了,其中第一个为主dns地址
lease 7:代表ip地址的释放时间,一般获取ip地址都有一个租期时间,到期之后ip地址会自动归还给DHCP服务器
在PC1上开启DHCP协议以动态获取ip地址,配置如下:
PC1(config)#int f0/0
PC1(config-if)#ip add
PC1(config-if)#ip address dh
PC1(config-if)#ip address dhcp
PC1(config-if)#exit
PC1#
//看到下面这条信息,就说明PC1动态获取IP地址成功
*Mar  1 00:04:55.591: %DHCP-6-ADDRESS_ASSIGN: Interface FastEthernet0/0 assigned DHCP address 192.168.10.1, mask 255.255.255.0, hostname PC1
PC2同理:
PC2#conf t
PC2(config)#
PC2(config)#int f0/0
PC2(config-if)#ip address dhcp
PC2(config-if)#exit
PC2(config)#
//PC2动态获取ip地址成功
*Mar  1 00:05:37.547: %DHCP-6-ADDRESS_ASSIGN: Interface FastEthernet0/0 assigned DHCP address 192.168.20.1, mask 255.255.255.0, hostname PC2
address assign:就是地址分配的意思。
查看PC1的接口信息:
PC1#show ip interface brief
Interface                  IP-Address      OK? Method Status                Protocol
FastEthernet0/0            192.168.10.1    YES DHCP   up                    up
PC1#
我们可以看到PC1开启了DHCP协议,并从DHCP服务器上获取到了ip地址。
查看服务器的DHCP信息:
SW1#show ip dhcp pool

Pool VLAN10 :
 Utilization mark (high/low)    : 100 / 0
 Subnet size (first/next)       : 0 / 0
 Total addresses                : 254
 Leased addresses               : 1
 Pending event                  : none
 1 subnet is currently in the pool :
 Current index        IP address range                    Leased addresses
 192.168.10.2         192.168.10.1     - 192.168.10.254    1

Pool VLAN20 :
 Utilization mark (high/low)    : 100 / 0
 Subnet size (first/next)       : 0 / 0
 Total addresses                : 254
 Leased addresses               : 1
 Pending event                  : none
 1 subnet is currently in the pool :
 Current index        IP address range                    Leased addresses
 192.168.20.2         192.168.20.1     - 192.168.20.254    1
SW1#
重要的几个字段:
Total addresses:总的ip地址个数
Leased addresses:代表已经分配给PC的ip地址个数
查看DHCP协议已经分配出去的ip地址信息:
SW1#show ip dhcp binding
Bindings from all pools not associated with VRF:
IP address          Client-ID/              Lease expiration        Type
                    Hardware address/
                    User name
192.168.10.1        0063.6973.636f.2d63.    Mar 08 2002 12:04 AM    Automatic
                    6330.372e.3266.3363.
                    2e30.3030.302d.4661.
                    302f.30
192.168.20.1        0063.6973.636f.2d63.    Mar 08 2002 12:05 AM    Automatic
                    6330.382e.3335.6430.
                    2e30.3030.302d.4661.
                    302f.30
SW1#
从上面给出的DHCP信息来看,192.168.10.1和192.168.20.1地址已经分配出去了。
一般网关地址都会提前分配出去并且地址是固定的,因此需要在DHCP服务器上排除掉已经分配出去的网关ip地址,配置如下:
SW1#conf t
Enter configuration commands, one per line.  End with CNTL/Z.
SW1(config)#ip dhcp excluded-address 192.168.10.254
SW1(config)#ip dhcp excluded-address 192.168.20.254
SW1(config)#
因为对于以上的两个网关地址已经分配给VLAN10和VLAN20这两个网段了,因此需要在DHCP服务器上排除掉。
部署DHCP技术可以方便主机,各种终端,手机平板等设备接入网络,另外除了一般企业网络外,例如地铁,公交等公共场合也会部署DHCP接入技术,因此DHCP技术应用非常广泛。
2. 端口安全
端口安全技术实验是基于思科的cisco packer tracer网络模拟器。
端口安全主要是用于在局域网下实现用户安全的接入网络,主要是基于交换机接口中绑定特定数量的MAC地址来实现安全接入网络的一种安全策略技术。
默认情况下,交换机的一个接口是可以学习很多个mac地址的,因为此时没有对接口进行任何限制。在开启端口安全后,就可以对交换机的接口进行限制,例如限制接口的mac地址个数,并且当有接入交换机接口的设备违反端口安全的规则时还可以定义惩罚模式。
当违反规则时,端口安全有三种惩罚模式:
- Protect(保护模式),丢弃违规流量。
- Restrict(限制模式),丢弃流量并报警到网管平台。
- Shutdown(关闭模式),丢弃流量并关闭接口。
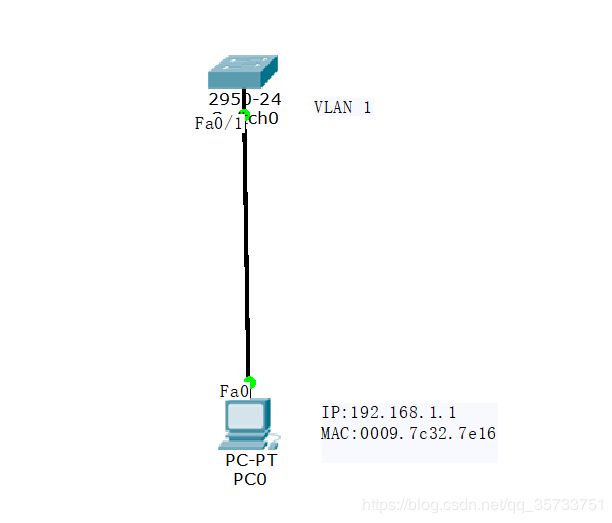
SW1交换机的f0/1接口部署端口安全技术:
Switch#
Switch#conf t
Enter configuration commands, one per line.  End with CNTL/Z.
Switch(config)#int f0/1
Switch(config-if)#
Switch(config-if)#switchport mode access
Switch(config-if)#switchport port-security
Switch(config-if)#switchport port-security mac-address sticky
Switch(config-if)#switchport port-security maximum 1
Switch(config-if)#switchport port-security violation shutdown
端口安全技术部署命令说明:
switchport mode access :因为在这个实验中,交换机的接口是要接入主机PC的,因此要设置接口为主机模式。
switchport port-security :部署端口安全技术。
switchport port-security mac-address sticky :当学习mac地址后会进行存储,并且下次重启交换机后mac地址不会丢失。
switchport port-security maximum 1:设置交换机的接口接入mac地址的数量。
switchport port-security violation shutdown :定义交换机接口的惩罚模式,当有接入主机设备违反规则时就会启动对应的惩罚,这里我们设置为关闭接口。
show running-config命令查看交换机学习到的mac地址信息:
Switch#show running-config
Building configuration...

Current configuration : 1127 bytes
!
version 12.1
no service timestamps log datetime msec
no service timestamps debug datetime msec
no service password-encryption
!
hostname Switch
!
!
spanning-tree mode pvst
!
interface FastEthernet0/1
 switchport mode access
 switchport port-security
 switchport port-security mac-address sticky
//交换机设备进行地址学习
 switchport port-security mac-address sticky 0009.7C32.7E16
!
interface FastEthernet0/2
!
 --More--
部署了端口安全技术后,交换机的f0/1学习到了MAC地址为0009.7C32.7E16的设备,当下次交换机收到数据包的源MAC地址不是0009.7C32.7E16的话,那么就会启动端口安全的惩罚模式,把该接口关闭掉。
此时我们接入一个新的主机,即PC1,然后发送一个ping数据包:
查看交换机的接口状态:
Switch#show interfaces f0/1
FastEthernet0/1 is down, line protocol is down (err-disabled)
  Hardware is Lance, address is 0060.70b9.0801 (bia 0060.70b9.0801)
由于PC1是新接入的设备,违反了端口安全的规则(新接入的PC1的mac地址不是交换机f0/1接口绑定的mac地址),因此交换机启动了惩罚模式直接把f0/1接口关闭(down)了。
交换机显示的状态信息:
%LINK-5-CHANGED: Interface FastEthernet0/1, changed state to administratively down
%LINEPROTO-5-UPDOWN: Line protocol on Interface FastEthernet0/1, changed state to down
当交换机的端口由于违反规则而关闭时,可以通过“手工启动”方式来启动接口,但是对于管理上是不方便的,一般在交换机的接口上部署自动恢复来自动启动接口。
自动恢复部署配置如下:
errdisable recovery cause psecure-violation
errdisable recovery interval 30
以上命令表示当接口由于端口安全违反规则进入errdisable状态后, 等待30秒可以自动恢复启动接口。
一般在企业网或校园网中对用户有安全接入网络的要求就可以部署端口安全技术,来实现安全接入访问网络。到此,端口安全技术实验完成。


