20-交换技术——Trunk技术详解
1. 什么是Trunk技术
在上一篇中,不同VLAN跨交换机通信有个特点:每个VLAN都要占用交换机的一个接口(链路),如果是多个VLAN的话,就需要占用更多的链路。
Trunk技术可以让一条物理上的链路(接口)传输多个VLAN的数据流量,并且每一个VLAN的数据流量都会被打上“标签”,以此来标明这是属于哪个VLAN的数据流量,说白了就是实现传输不同vlan的数据流量。
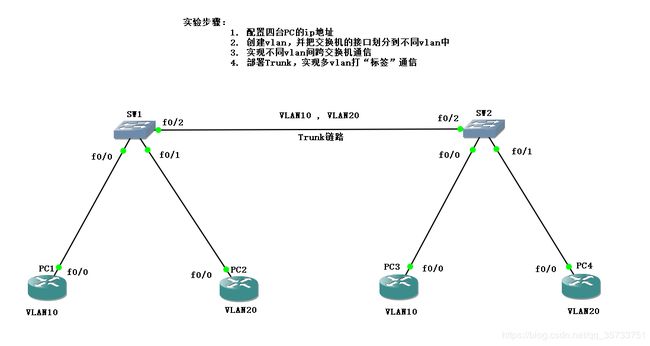
以SW1交换机为例,当PC1发送了一个数据后,SW1交换机的f0/0口收到VLAN10的数据流量,再从f0/2接口转发出去就会被打上VLAN10的“标签”,以此来标明这个数据流量是VLAN10的,然后SW2交换机收到Trunk链路上的流量,会根据其“标签”对应的接口转发出去(例如SW2交换机收到标签为“VLAN10”的数据就会从f0/0口转发出去)。
需要注意的是:被打上“标签”的数据只会在Trunk链路上出现,其他链路是看不到带有“标签”的数据流量。
2. Trunk部署实验
配置4台PC的ip地址,跳过...... 然后分别在2台交换机上创建VLAN,并部署Trunk技术。
在SW1交换机上创建VLAN,将SW1交换机的端口划分到不同的vlan:
SW1#vlan database
SW1(vlan)#vlan 10 name VLAN10
VLAN 10 added:
    Name: VLAN10
SW1(vlan)#vlan 20 name VLAN20
VLAN 20 added:
    Name: VLAN20
SW1(vlan)#exit
APPLY completed.
Exiting....
SW1#conf t
Enter configuration commands, one per line.  End with CNTL/Z.
SW1(config)#int f0/0
SW1(config-if)#switchport mode access
SW1(config-if)#switchport access vlan 10
SW1(config-if)#exit
SW1(config)#int f0/1
SW1(config-if)#switchport mode access
SW1(config-if)#switchport access vlan 20
SW1(config-if)#exit
switchport mode access:这条命令表示设置接口为主机访问模式,通常主机访问模式的接口一般是接入主机的。
在SW1交换机上部署Trunk技术,并定义802.1Q封装标准:
SW1(config)#int f0/2
//定义802.1Q封装标准
SW1(config-if)#switchport trunk encapsulation dot1q
//开启Trunk模式
SW1(config-if)#switchport mode trunk
查看SW1交换机端口的Trunk信息:
SW1#show interfaces trunk

Port      Mode         Encapsulation  Status        Native vlan
Fa0/2     on           802.1q         trunking      1

Port      Vlans allowed on trunk
Fa0/2     1-1005

Port      Vlans allowed and active in management domain
Fa0/2     1,10,20

Port      Vlans in spanning tree forwarding state and not pruned
Fa0/2     1,10,20
SW1#
Port:表示交换机的端口
Mode:端口的模式
Encapsulation:端口的标准, 802.1q是Trunk技术的一种行业标准
Status:端口的状态,如果部署了Trunk的话,状态就会改成trunking
在SW2交换机上创建VLAN,将SW2交换机的端口划分到不同的vlan:
SW2#vlan database
SW2(vlan)#vlan 10 name VLAN10
VLAN 10 added:
    Name: VLAN10
SW2(vlan)#vlan 20 name VLAN20
VLAN 20 added:
    Name: VLAN20
SW2(vlan)#exit
APPLY completed.
Exiting....
SW2#
SW2(config)#int f0/0
SW2(config-if)#switchport mode access
SW2(config-if)#switchport access vlan 10
SW2(config-if)#exit
SW2(config)#int f0/1
SW2(config-if)#switchport mode access
SW2(config-if)#switchport access vlan 20
SW2(config-if)#exit
在SW2交换机上部署Trunk技术,并定义802.1Q封装标准:
SW2(config)#int f0/2
//定义802.1Q封装标准
SW2(config-if)#switchport trunk encapsulation dot1q
//开启Trunk模式
SW2(config-if)#switchport mode trunk
SW2(config-if)#exit
查看SW2交换机的Trunk信息:
SW2#show interfaces trunk

Port      Mode         Encapsulation  Status        Native vlan
Fa0/2     on           802.1q         trunking      1

Port      Vlans allowed on trunk
Fa0/2     1-1005

Port      Vlans allowed and active in management domain
Fa0/2     1,10,20

Port      Vlans in spanning tree forwarding state and not pruned
Fa0/2     1,10,20
SW2#
测试网络连通性:
PC1#ping 192.168.1.3

Type escape sequence to abort.
Sending 5, 100-byte ICMP Echos to 192.168.1.3, timeout is 2 seconds:
.!!!!
Success rate is 80 percent (4/5), round-trip min/avg/max = 64/73/80 ms
PC1#ping 192.168.1.2

Type escape sequence to abort.
Sending 5, 100-byte ICMP Echos to 192.168.1.2, timeout is 2 seconds:
.....
Success rate is 0 percent (0/5)
PC1#
部署Trunk技术后,PC1和PC3之间仍然可以通信,但是PC1和PC2之间是不能通信的。
Wireshark抓取到的VLAN10的数据流量:
通过wireshark抓包工具发现,在网络层之间多了一个802.1Q的VLAN标签,并且其VLAN的ID号是10。
测试PC2和PC4的网络连通性:
PC2#ping 192.168.1.4

Type escape sequence to abort.
Sending 5, 100-byte ICMP Echos to 192.168.1.4, timeout is 2 seconds:
.!!!!
Success rate is 80 percent (4/5), round-trip min/avg/max = 64/68/76 ms
Wireshark抓取到的VLAN20的数据流量:
同理,PC2和PC4之间通信的数据流量也被打上了VLAN20的“标签”,VLAN的ID号是20。
3. Native VLAN
NATIVE VLAN也叫本征VLAN或自然VLAN,NATIVE VLAN在经过Trunk链路是不打“标签”的,其目的是为了优化VLAN,节省交换机的资源。
查看交换机默认的NATIVE VLAN:
SW1#show interfaces trunk

Port      Mode         Encapsulation  Status        Native vlan
Fa0/2     on           802.1q         trunking      1

Port      Vlans allowed on trunk
Fa0/2     1-1005

Port      Vlans allowed and active in management domain
Fa0/2     1

Port      Vlans in spanning tree forwarding state and not pruned
Fa0/2     1
SW1#
SW1#
需要注意的是:一个交换机只能有一个NATIVE VLAN,默认情况下VLAN 1为NATIVE VLAN。
SW1交换机配置如下:
SW1(config)#int f0/2
//设置VLAN 10为本征VLAN
SW1(config-if)#switchport trunk native vlan 10
show命令查看SW1交换机的Native VLAN信息:
SW1#show interfaces trunk

Port      Mode         Encapsulation  Status        Native vlan
Fa0/2     on           802.1q         trunking      10

Port      Vlans allowed on trunk
Fa0/2     1-1005

Port      Vlans allowed and active in management domain
Fa0/2     1,10,20

Port      Vlans in spanning tree forwarding state and not pruned
Fa0/2     20
SW1#
SW1交换机已经设置VLAN 10为Native vlan,show命令一般是用于查看设置本征vlan是否成功。
SW2交换机配置如下:
SW2(config)#int f0/2
//设置VLAN 10为本征VLAN
SW2(config-if)#switchport trunk native vlan 10
查看SW2交换机的Native VLAN信息:
SW2#show interfaces trunk

Port      Mode         Encapsulation  Status        Native vlan
Fa0/2     on           802.1q         trunking      10

Port      Vlans allowed on trunk
Fa0/2     1-1005

Port      Vlans allowed and active in management domain
Fa0/2     1,10,20

Port      Vlans in spanning tree forwarding state and not pruned
Fa0/2     1,10,20
然后PC1 ping PC3测试网络连通性:
通过wireshark抓包工具发现,当设置VLAN 10为Native VLAN时,PC1和PC3的数据流量并不会打“标签”。意味着即便pc1和pc3是不同vlan下,pc1依然是可以ping通pc3的,因此设置本征vlan后可以实现不同vlan间数据通信。
举个例子,假设pc1的vlan是10并设置本征vlan为vlan10,pc2的vlan是20并设置本征vlan为vlan20,然后pc1去ping pc2,因为pc1的vlan设置了本征vlan,因此从pc1出去的数据流量不会打标签,而pc2接收到这个没有打标签的数据会认为pc1是我本地的vlan,即vlan20,所以pc1是可以ping通pc2的,这也是为什么设置本征vlan后可以实现不同vlan间数据通信。
PC2 ping PC4测试网络连通性:
注意:由于VLAN 20不是Native VLAN,因此PC2和PC4的数据流量还是会打“标签”。
4. ALLOW VLAN
ALLOW VLAN顾名思义就是允许VLAN,默认情况下Trunk链路会允许转发所有VLAN的流量,那么其他广播或垃圾流量也会经过Trunk链路,这样会影响当前链路的网络带宽,但是通过ALLOW VLAN可以实现只有特定的VLAN流量才能允许经过Trunk链路,以此来达到优化流量的目的,换句话说ALLOW VLAN是Trunk技术的一种优化方式。
注意:一般VLAN号为1-2和1002-1005是必须允许的。
ALLOW VLAN的配置命令:
SW1(config-if)#switchport trunk allowed vlan ?
  WORD    VLAN IDs of the allowed VLANs when this port is in trunking mode
  add     add VLANs to the current list
  all     all VLANs
  except  all VLANs except the following
  remove  remove VLANs from the current list
Add表示添加允许的VLAN
All表示允许所有的VLAN
Except表示除了某一VLAN,其他VLAN都允许
Remove表示删除允许的VLAN
在SW1交换机上配置ALLOW VLAN:
SW1(config)#int f0/2
//表示只允许VLAN 10的流量经过Trunk链路
SW1(config-if)#switchport trunk allowed vlan 10,1,1002-1005
PC1 ping PC3,测试VLAN10的网络连通性:
PC1#ping 192.168.1.3

Type escape sequence to abort.
Sending 5, 100-byte ICMP Echos to 192.168.1.3, timeout is 2 seconds:
!!!!!
Success rate is 100 percent (5/5), round-trip min/avg/max = 64/66/72 ms
PC1#
PC2 ping PC4测试VLAN20网络连通性:
PC2#ping 192.168.1.4

Type escape sequence to abort.
Sending 5, 100-byte ICMP Echos to 192.168.1.4, timeout is 2 seconds:
.....
Success rate is 0 percent (0/5)
PC2#
因为Trunk链路上设置了只允许VLAN10的数据流量可以经过,因此PC2 ping PC4是无法连通的(VLAN 20的数据流量不能通过Trunk链路)。
5. 动态中继协商——DTP协议
DTP协议(Dynamic Trunking Protocol,动态中继协议)是一个属于思科私有的协议,用于动态协商Trunk链路,若接口处于主动模式desirable,则主动对外发送协商包,若处于被动模式,则处于被动监听状态。DTP可以简化Trunk的配置(有些交换机默认开启DTP),也可以防止接口假死(这个“假死”可以理解为接口处于shutdown状态)。
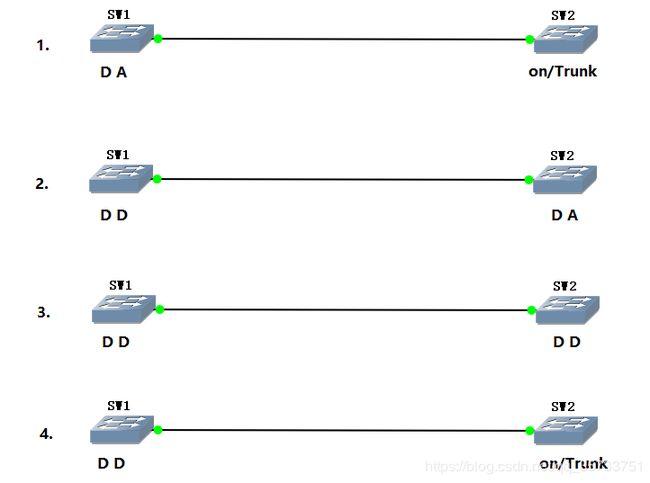
Dynamic Auto:表示被动模式,在该模式下的端口只会等待对方主动发过来DTP的hello包,简写为D D
Dynamic Desirable:表示主动模式,在该主动模式下的端口会主动发送DTP的hello包信息,简写为D A
On/trunk:表示强制开启为Trunk模式
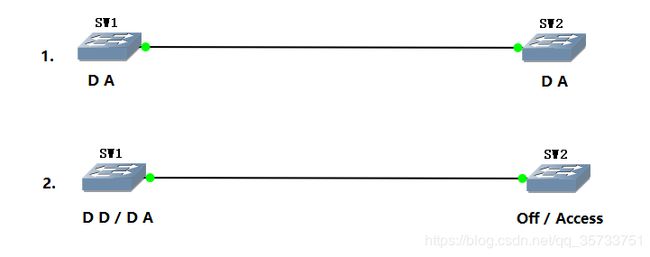
Off/access:表示access模式
一般来说,交换机之间能否自动协商Trunk链路要看交换机是处于什么状态模式,对于以下四种情况交换机是可以动态协商Trunk链路的:
以下两种情况,交换机之间是不能动态协商Trunk链路的:
一般我们可以通过命令来配置这四种工作模式:
On/trunk模式: switchport mode trunk
Off/access模式: switchport mode access
Dynamic desirable模式: switchport mode dynamic desirable
Dynamic auto模式: switchport mode dynamic auto
DTP协议部署:
注意:该实验是基于思科的模拟器cisco packet tracer实现的。
设置SW0交换机为D D模式:
SW0#conf t
Enter configuration commands, one per line.  End with CNTL/Z.
SW0(config)#int f0/1
//设置SW0交换机为D D模式
SW0(config-if)#switchport mode dynamic desirable

SW0(config-if)#
%LINEPROTO-5-UPDOWN: Line protocol on Interface FastEthernet0/1, changed state to up

%LINEPROTO-5-UPDOWN: Line protocol on Interface FastEthernet0/1, changed state to down

%LINEPROTO-5-UPDOWN: Line protocol on Interface FastEthernet0/1, changed state to up

SW0(config-if)#
设置SW1交换机为D D模式:
SW1#
SW1#conf t
Enter configuration commands, one per line.  End with CNTL/Z.
SW1(config)#int f0/1
//设置SW1交换机的f0/1端口为D D模式
SW1(config-if)#switchport mode dynamic desirable
show命令查看SW1交换机的Trunk信息:
SW1#show interfaces trunk
Port        Mode         Encapsulation  Status        Native vlan
Fa0/1       desirable    n-802.1q       trunking      1

Port        Vlans allowed on trunk
Fa0/1       1-1005

Port        Vlans allowed and active in management domain
Fa0/1       1

Port        Vlans in spanning tree forwarding state and not pruned
Fa0/1       none
SW1交换机的模式已经是改为desirable模式了,并且状态已经是trunking 。
show命令查看SW0交换机的Trunk信息:
SW0#show interfaces trunk
Port        Mode         Encapsulation  Status        Native vlan
Fa0/1       desirable    n-802.1q       trunking      1

Port        Vlans allowed on trunk
Fa0/1       1-1005

Port        Vlans allowed and active in management domain
Fa0/1       1

Port        Vlans in spanning tree forwarding state and not pruned
Fa0/1       1
SW0交换机的模式也已经设置为desirable模式了。
现在将两台交换机都改为D A模式:
设置SW0交换机的工作模式为D A模式:
SW0#conf t
Enter configuration commands, one per line.  End with CNTL/Z.
SW0(config)#int f0/1
SW0(config-if)#switchport mode dynamic auto
设置SW1交换机的工作模式为D A模式:
SW1#conf t
Enter configuration commands, one per line.  End with CNTL/Z.
SW1(config)#int f0/1
SW1(config-if)#switchport mode dynamic auto
SW1(config-if)#exit
SW1(config)#exit
SW1#show interfaces trunk

SW1#
当设置为D A模式时,两台交换机都不会主动发送DTP的hello包信息,因此通过show命令是看不到关于Trunk的信息。也就不能进行动态协商Trunk链路。
另外,可以通过一些其他命令来关闭DTP协议,强制启动Trunk模式:
//强制启动Trunk模式
switchport mode trunk
//关闭DTP协议
switchport nonegotiate
以SW0交换机为例,关闭DTP协议并且强制启动Trunk模式,配置信息如下:
SW0#conf t
Enter configuration commands, one per line.  End with CNTL/Z.
SW0(config)#int f0/1
//强制启动Trunk模式
SW0(config-if)#switchport mode trunk
SW0(config-if)#
%LINEPROTO-5-UPDOWN: Line protocol on Interface FastEthernet0/1, changed state to down

%LINEPROTO-5-UPDOWN: Line protocol on Interface FastEthernet0/1, changed state to up

//关闭DTP协议
SW0(config-if)#switchport nonegotiate
SW0(config-if)#exit
SW0(config)#exit
SW0#
%SYS-5-CONFIG_I: Configured from console by console

//此时通过show命令我们可以再次看到Trunk信息
SW0#show interfaces trunk
Port        Mode         Encapsulation  Status        Native vlan
Fa0/1       on           802.1q         trunking      1

Port        Vlans allowed on trunk
Fa0/1       1-1005

Port        Vlans allowed and active in management domain
Fa0/1       1

Port        Vlans in spanning tree forwarding state and not pruned
Fa0/1       none
SW0#
总结:
DTP协议是属于思科私有的一个协议,DTP协议适用于动态协商Trunk链路(之前是通过强制设置链路为Trunk模式),注意:DTP协议部署实验需要用Cisco Packet Tracer网络模拟器来完成。


