Android 三类框架的理解以及MVVM框架的使用
Android 三类框架的学习
- 欢迎学习Android 三类框架
- 一:android 分层框架概述
- 二、Android开发中MVC与MVP的区别
- 三、MVVM架构优势(单独讲)
- 四、深入学习MVVM组件化
- 五:android MVVM框架实现 Robobinding
- 六、android 官方databinding使用
- 七、修改Model后自动更新UI
欢迎学习Android 三类框架
一:android 分层框架概述
目前因为Controller(Activity)和View,Model没有实现解耦,造成Activity既要负责处理业务逻辑,又要负责UI显示,数据绑定,所以造成Activity里代码过多,逻辑不清楚,对代码的可读性,可维护性不是很好,所以采用一些分层模式,可以更为有效的对业务逻辑层,UI显示层,数据层进行拆分,集中分层模式有:
- 目前使用的最多的是MVC和MVP。
- 其中MVC出现与上世纪70年代,在三十多年的工程实践中,MVC充分证明了它的成功,同时在漫长的时间中演变出了许多变种,其中也包括MVP。MVC和MVP最大的差别在与控制层对于整个框架的控制力上。
- MVVM可以算是MVP的升级版,其中的VM是ViewModel的缩写,ViewModel可以理解成是View的数据模型和Presenter的合体,ViewModel和View之间的交互通过Data Binding完成,而Data Binding可以实现双向的交互,这就使得视图和控制层之间的耦合程度进一步降低,关注点分离更为彻底,同时减轻了Activity的压力
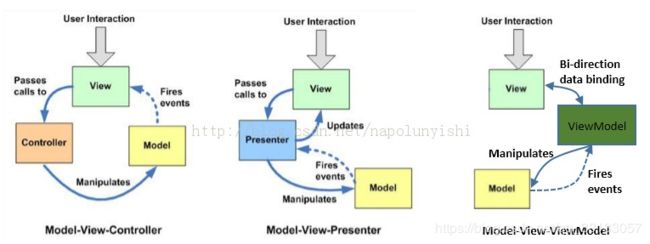
- 三者之间的差别如下:
**甘特图
**流程图
二、Android开发中MVC与MVP的区别
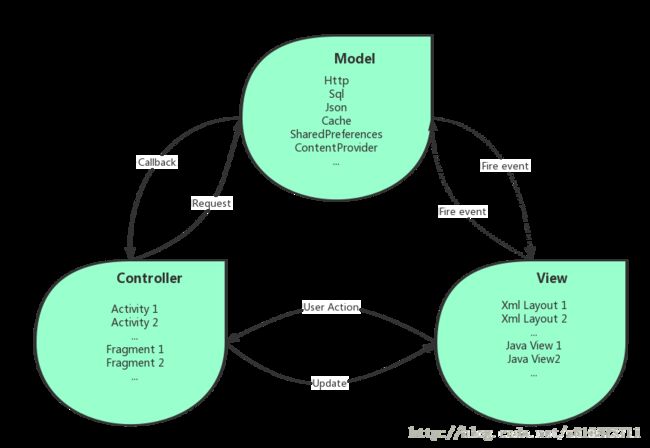
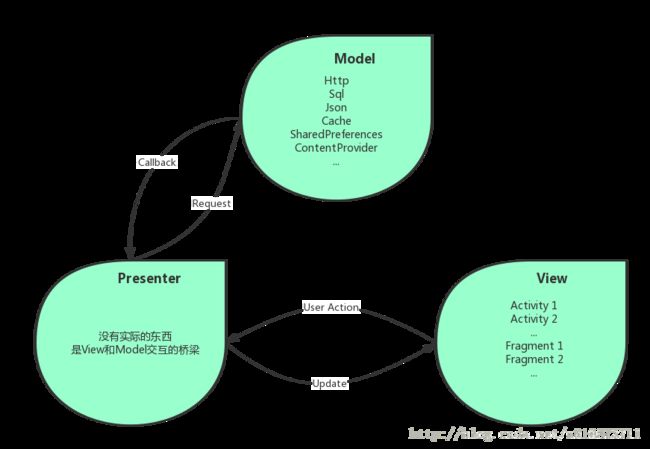
话不多说,直接上图
1.MVC架构图
| 架构类型 | 构造子 |
|---|---|
| MVP | Model, Presenter, View |
| MVC | Model, Controller ,View |
| MVVM | Model, View ,ViewModel |
3.简要分析区别
- Activity职责不同,Activity在MVP中是View层,在MVC中是Controller层,这是MVC和MVP很主要的一个区别,可以说Android从MVC转向MVP开发也主要是优化Activity的代码,避免Activity的代码臃肿庞大。
- View层不同,MVC的View层指的是XML布局文件或者是用Java自定义的View,MVP的View层是Activity或者Fragment。使用传统的MVC,其中的View,对应的是各种Layout布局文件,但是这些布局文件中并不像Web端那样强大,能做的事情非常有限。MVP的View层Activity在实际项目中,随着逻辑的复杂度越来越大,Activity臃肿的缺点仍然体现出来了,因为Activity中还是充满了大量与View层无关的代码,比如各种事件的处理派发,就如MVC中的那样View层和Controller代码耦合在一起无法自拔。
- 控制层不同,MVC的控制层是Activity,或者是Fragment,Controller对应的是Activity,而Activity中却又具有操作UI的功能,我们在实际的项目中也会有很多UI操作在这一层,也做了很多View中应该做的事情,当然Controller层Activity中也包含Controller应该做的事情,比如各种事件的派发回调,而且在一层中我们会根据事件再去调用Model层操作数据,所以这种MVC的方式在实际项目中,Activity所在的Controller是非常重的,各层次之间的耦合情况也比较严重,不方便单元测试。MVP的控制层是Presenter,里面没有很多的实际东西,主要是做Model和View层的交互。
- 关系链不同,MVP中Model层与View是没有关系的,彼此不会通讯和操作,Model与View的通讯都是Presenter层来传达的。但是在MVC中,Model层和View是曾在交互的。比如我们自定义的View控件里面肯定是要使用Model的数据的,View也要根据不同的Model数据做出不同的展现!这点尤其是体现在自定义的View中,自定义View需要设置数据,用户操作了自定义控件需要改变数据,View要操作Model怎么办?有人说把Controller传到自定义的View啊,现实是不可能没一个自定义View都去持有Controller的引用,其实在MVP中就不会这么尴尬,接口就可以完成。
- 适用范围不同,在Android中,MVP和MVC都用自己的适用情况,使用MVP可以更好的解耦三大模块,模块之间比较清晰,也很方便使用MVP来组件化架构整体项目。但是MVC也是有用武之地的,在组件化的Module或者中间件我们可以使用MVC来做,Module或者中间件不会存在很复杂的View层,使用MVC可以更加方便我们实现功能。
6.** 交互方式不同**,MVP中通讯交互基本都是通过接口的,MVC中的通讯交互很多时候都是实打实的调用对象的方法,简单粗暴! - **实现方法不同 **,MVC和MVP的Model几乎一样的,都是处理数据,只要不在Activity或者Fragment中请求数据,其他的所有控制都放在Activity或者Fragment中,这样写就基本是MVC的模式,这样写不麻烦,但是很容易把Activity写出上万行代码。用MVP的时候我们需要写很多View和Presenter接口来实现模块之间的通讯,会增加很多类。
三、MVVM架构优势(单独讲)
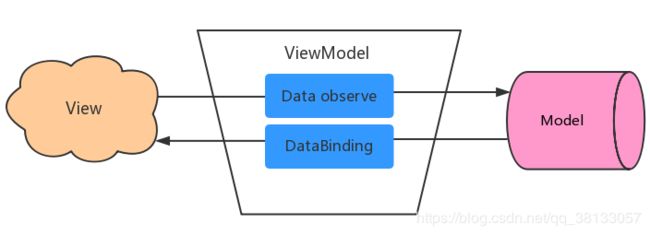
话不多说,直接上图

看上图Model和View是不会发生关系的,ViewModel是把View和Model关联起来的加工厂:
MVVM优势总结:
View和Model双向绑定,一方的改变都会影响另一方,开发者不用再去手动修改UI的数据。额,互相自动的。- 不需要
findViewById也不需要butterknife,不需要拿到具体的View去设置数据绑定监听器等等,这些都可以用DataBinding完成。是不是很舒服? View和Model的双向绑定是支持生命周期检测的,不会担心页面销毁了还有回调发生,这个由lifeCycle完成。- 不会像
MVC一样导致Activity中代码量巨大,也不会像MVP一样出现大量的View和Presenter接口。项目结构更加低耦合。 - 更低的耦合把各个模块分开开发,分开测试,可以分给不同的开发人员来完成。
四、深入学习MVVM组件化
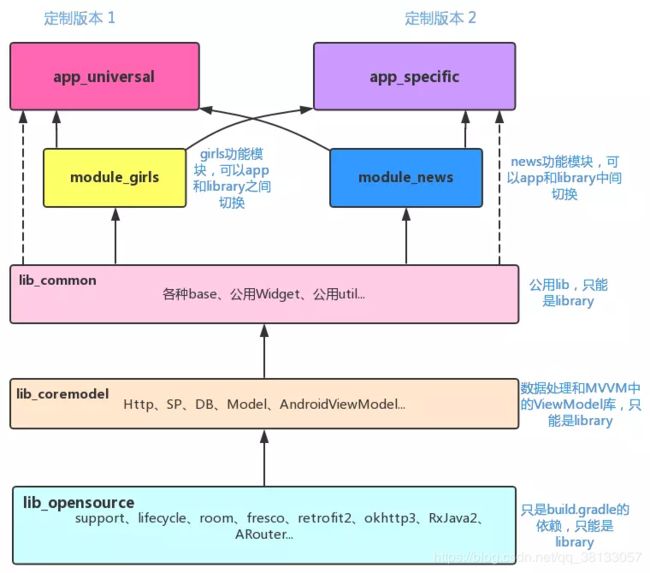
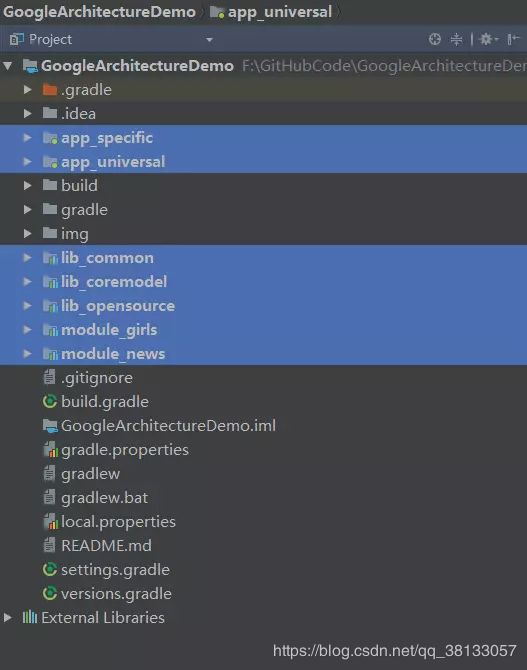
2.目录结构:
lib_opensource:第三方build.gradle依赖,本项目主要有support、lifecycle、room、fresco、retrofit、okhttp、RxJava、ARouter这些。
-lib_coremodel: 存放MVVM中的Model和ViewModel两个模块,就是数据的处理和数据与UI页面的绑定。依赖lib_opensource库。
-lib_common: 公共库,主要有各种base,各种ui组件,自定义组件,公用的Activity、公用的Fragment,和公用的utils等等。依赖lib_coremodel库。module_girls: 子功能模块,可以在library和application之间切换,自己可以是一个app也可以成为别的app的一个组件模块。组件化编译时为app,反之为module。module_news: 新闻功能模块,可以在library和application之间切换,自己可以是一个app也可以成为别的app的一个组件模块。组件化编译时为app,反之为moduleapp_universal: 定制版本的app,组件化编译时module_girls和module_news为app,所以不能把这两个作为module加进来编译,所以组件化编译时app_universal要依赖lib_common库,反之就可以把module_girls和module_news作为module加进来编译。app_specific: 定制版本的app,组件化编译时module_girls和module_news为app,所以不能把这两个作为module加进来编译,所以组件化编译时app_specific要依赖lib_common库,反之就可以把module_girls和module_news作为module加进来编译
五:android MVVM框架实现 Robobinding
-
Android平台上有一些比较好的MVVM框架,其中用的比较多的是RoboBinding,Robobinding。
-
为了精简框架,RoboBinding移除了大量不必要的代码,比如addXXListener(),findViewById()等。
-
可以将难以测试的Android代码转换为普通的JUnit测试。
-
提供对象类型Cursor来替换 - 关系类型Cursor,因为我们已经习惯于操作对象 。
-
可以很容易的为任何自定义组件,第三方组件或Android widget编写属性绑定实现,简化代码,使项目易于维护
-----------------------------------------Robobiding 简单使用示例:---------------------------------------------- -
View层(对应android xml文件)
<LinearLayout xmlns:android="http://schemas.android.com/apk/res/android"
              xmlns:bind="http://robobinding.org/android"
              xmlns:tools="http://schemas.android.com/tools"
              android:layout_width="match_parent"
              android:layout_height="match_parent"
              android:orientation="vertical"
              tools:context="org.robobinding.androidmvvm.MainActivity"
              tools:ignore="MissingPrefix">
    <TextView
        android:layout_width="wrap_content"
        android:layout_height="wrap_content"
        bind:text="{hello}"/>    //单向绑定,修改Model属性时,会自动反映到视图中(需要实体中提供相应的getHello(),setHello()方法)。
    <LinearLayout
        android:layout_width="match_parent"
        android:layout_height="wrap_content"
        android:orientation="horizontal">
       <TextView
            android:layout_width="wrap_content"
            android:layout_height="wrap_content"
            android:text="Name:"/>
        <EditText
            android:layout_width="fill_parent"
            android:layout_height="wrap_content"
            bind:text="${name}"/>  //双向绑定,修改model属性时,会自动反映到视图中;反过来,修改视图内容,也会自动更改Model的相关属性。
    </LinearLayout>
    <Button
        android:layout_width="wrap_content"
        android:layout_height="wrap_content"
        android:text="Say Hello"
        bind:onClick="sayHello"/>
</LinearLayout>
- Model层:PresentationModel()
public class PresentationModel implements HasPresentationModelChangeSupport {
   private PresentationModelChangeSupport changeSupport;
   private String name;
   public PresentationModel() {
        changeSupport = new PresentationModelChangeSupport(this);
   }
   public String getHello() {
        return name + ": hello Android MVVM(Presentation Model)!";
  }
   public String getName() {
        return name;
   }
  public void setName(String name) {
      this.name = name; Log.d("model", "setName(),name: " + name);
  }
   public void sayHello(){
      changeSupport.firePropertyChange("hello");
  }
  @Override
  public PresentationModelChangeSupport getPresentationModelChangeSupport() {
    return changeSupport;
  }
}
**Controller层: **
public class MainActivity extends Activity {
    @Override
    protected void onCreate(Bundle savedInstanceState) {
        super.onCreate(savedInstanceState);
        PresentationModel presentationModel = new PresentationModel();
        ViewBinder viewBinder = createViewBinder();
        View rootView = viewBinder.inflateAndBind(R.layout.activity_main, presentationModel);//将model和view进行绑定
        setContentView(rootView);
    }
    private ViewBinder createViewBinder() {
        BinderFactory reusableBinderFactory = new BinderFactoryBuilder().build();
        return reusableBinderFactory.createViewBinder(this);
    }
}
----------------------------------------------Robobiding 简单使用结束:------------------------------------------------
六、android 官方databinding使用
android官方支持的databinding框架使用
使用条件:
- android studio 1.3及以上版本
- gradle 2.2及以上版本
- android plugin for gradle 1.3.0及以上版本
使用步骤:
- 在项目顶层build.gradle中添加以下依赖:
dependencies { classpath "com.android.databinding:dataBinder:1.0-rc1"}
- 在需要使用databinding的moudle中添加
apply plugin: 'com.android.databinding'
注意
在项目编译过程中,会出现诸如以下错误:
错误一:
Error:Application and test application id cannot be the same: both are 'com.fengjr.mobile' for qihuDebugAndroidTest
此处要求test的application id和项目id不能一致,需将test 的id(即testApplicationId “com.fengjr.mobile"修改为"com.fengjr.mobile.test”)
示例
view 文件 activity_main.xml:
<?xml version="1.0" encoding="utf-8"?>
<layout xmlns:android="http://schemas.android.com/apk/res/android">
 <data>
 <variable
 name="stu"
 type="com.fengjr.mobile.databind.Student" /> //指明该view文件要绑定的数据模型
 </data>
 <LinearLayout
 android:orientation="vertical"
 android:layout_width="match_parent"
 android:layout_height="wrap_content">
 <TextView
 android:layout_width="wrap_content"
 android:layout_height="wrap_content"
 android:text="@{stu.name}"/>
 <TextView
 android:layout_width="wrap_content"
 android:layout_height="wrap_content"
 android:text="@{stu.addr}"/>
 </LinearLayout>
</layout>
** Model文件:**
package com.fengjr.mobile.databind;
/** * Created by gaoge on 15/9/22. */
public class Student {
      private final String name;
      private final String addr;
      public Student(String name, String addr) {
           this.name = name; this.addr = addr;
      }
      public String getName() {
          return name;
       }
      public String getAddr() {return this.addr;
      }
}
** 绑定过程:TestDataBindingActivity **
public class TestDataBindingAct extends Activity{
@Override
 protected void onCreate(Bundle savedInstanceState){
    super.onCreate(savedInstanceState);
    ActivityMainBinding binding=DataBindingUtil.setContentView(this,R.layout.activity_main);
    binding.setStu(new Student("姓名", "地址")); //将Model和view(xml文件进行绑定)
 }
}
在mobile module 的build.gradle文件中声明 apply "com.android.databinding"后,android编译系统会自动根据xml文件名称"activity_main"生成一个ActivityMainBinding的class 文件(生成文件的命名格式和xml一一对应)
但是项目中目前使用到google annotation注释框架,且apt的版本是1.4,会和databinding编译过程冲突,造成databinding不能自动生成ActivityBinding文件,需要在mobile module的build.gradle文件中,将classpath 'com.neenbedankt.gradle.plugins:android-apt:1.4'改为classpath 'com.neenbedankt.gradle.plugins:android-apt:1.7'
七、修改Model后自动更新UI
更改Model后自动更新UI,可以通过两种方法实现:
- 让Model实体继承自BaseObservable,并且对相应的属性的get()方法增加
@Bindable注解,在set()方法中增加notifyPropertyChanged()属性,示例: - 对于Model属性,使用google 设计的支持监听的数据类型ObservableFields(包括
ObservableField ,ObservableBoolean ,ObservableByte ,ObservableChar ,ObservableShort ,ObservableInt ,ObservableLong,ObservableArrayMap,ObservableArrayList)
public class People {
  public ObservableField<String> name = new ObservableField<>();
  public ObservableInt age = new ObservableInt();
 public ObservableBoolean isMan = new ObservableBoolean();
 }
作者:<>曾维和
原文:原文链接
