nginx反向代理和实现apache负载均衡
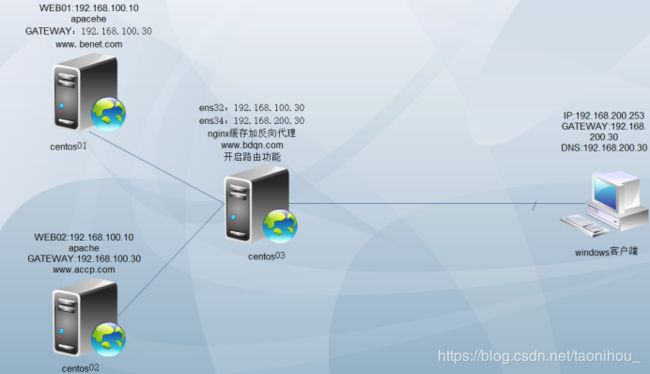
图示案例:
一,安装nginx
1,创建管理用户
[root@centos03 ~]# useradd -M -s /sbin/nologin nginx
2,安装nginx依赖程序
[root@centos03 ~]# yum -y install pcre-devel zlib-devel
3,解压缩缓存依赖工具
[root@centos03 ~]# tar zxvf ngx_cache_purge-2.0.tar.gz -C /usr/src/ngx_cache_purge
4,配置nginx,–prefix服务安装位置,–user管理用户,–with-http_stub_status_module启用server status页, --add-module=/usr/src/ngx_cache_purge-2.0加载缓存依赖工具
[root@centos03 nginx-1.6.0]# ./configure --prefix=/usr/local/nginx --user=nginx --with-http_stub_status_module --add-module=/usr/src/ngx_cache_purge-2.0
5,编译安装Nginx
[root@centos03 nginx-1.6.0]# make && make install
6,优化nginx命令
[root@centos03 ~]# ln -s /usr/local/nginx/sbin/nginx /usr/local/sbin/
二,二,配置Nginx缓存修改主配置文件
1,创建缓存目录
[root@centos03 ~]# mkdir -p /var/cache/nginx/cache_temp
[root@centos03 ~]# mkdir -p /var/cache/nginx/proxy_cache/
2,修改主配置文件
[root@centos03 ~]# vim /usr/local/nginx/conf/nginx.conf
2 user  nginx;       #管理用户
3 worker_processes  2;		#工作进程
13 events {
14     use epoll;		#使用的管理模型
15     worker_connections  2048;		#工作连接
16 }
17 worker_rlimit_nofile 2048;          #访问文件句柄数2048
23 charset utf-8; #字符编码
34 keepalive_timeouti 10; #连接保持时间
37     client_body_buffer_size 512k;		#缓存大小512k
38     proxy_connect_timeout 10;			#客户端访问代理服务器超时时间10s
39     proxy_read_timeout 30;				#客户端通过代理读取数据超时时间60s
40     proxy_send_timeout 5;				#代理服务器发送数据到客户端延迟时间5s
41     proxy_buffer_size 512k;				#缓存区大小512k
42     proxy_buffers 4 512k;				#设置四个缓存区
43     proxy_temp_file_write_size 512k;		#客户端通过代理写数据缓存512k
44     proxy_temp_path /var/cache/nginx/cache_temp;		#写缓存数据目录
45     proxy_cache_path /var/cache/nginx/proxy_cache levels=1:2 keys_zone=cache_one:200m inactive=1d max_size=10g;		#缓存客户历史数据
46 upstream backend_server {				#反向代理服务器池名字backend_server
47         server 192.168.100.10:80 weight=1 max_fails=2 fail_timeout=30s;
48         server 192.168.100.20:80 weight=1 max_fails=2 fail_timeout=30s;
49 } 					#两台web服务器设置权值=1最大失败=2失败超时=30s;
52         listen      192.168.200.30:80;			#代理监听的IP地址和端口
53         server_name  www.bdqn.com;			 	#代理监听的域名
59         location / {
56
57         #access_log  logs/host.access.log  main;
58
59         location / {
60             root   html;
61             index  index.html index.htm;
62             proxy_next_upstream http_502 http_504 error timeout;		#设置错误状态
63             proxy_cache cache_one;				#保存缓存
64             proxy_cache_valid 200 304 12h;		#缓存状态码事件12小时
65             proxy_cache_key $host$uri$is_args$args;		#定义二级缓存
66             proxy_set_header host $host;			#记录远程客户端的的IP地址
67             proxy_set_header X-Forearded-for $remote_addr;		#远程主机请求转发到集群中
68             proxy_pass http://backend_server;	#设置访问代理服务器池
69             expires 1d;							#缓存时间一天
70      }
71         location ~ /purge(/.*) {					#清理缓存数据
72                 allow 127.0.0.1;					#允许本地主机访问
73                 allow 192.168.200.0/24;			#允许192.168.200.0/24网络访问
74                 deny all;
75                 proxy_cache_purge cache_one $host$1$is_args$args;
76      }
77         location ~ .*\.(php|jsp|cgi|asp)?$ {
78                 proxy_pass http://backend_server;		#不缓存动态网站数据
79                 proxy_set_header X-Forearded-for $remote_addr;
80      }
3,检查nginx配置文件
[root@centos03 ~]# nginx -t
nginx: the configuration file /usr/local/nginx/conf/nginx.conf syntax is ok
nginx: configuration file /usr/local/nginx/conf/nginx.conf test is successful
三,客户端验证
1,启动nginx,客户端访问后,查看缓存目录下数据
[root@centos03 ~]# nginx

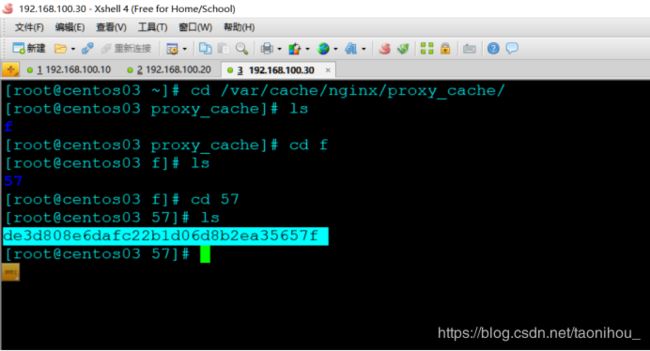
查看缓存目录下的数据
[root@centos03 ~]# cd /var/cache/nginx/proxy_cache/
手动清理缓存目录(这里不清缓存,访问的还是缓存里的第一台WEB)
[root@centos03 ~]# cd /var/cache/nginx/proxy_cache/
[root@centos03 proxy_cache]# rm -rf ./*
再次访问代理

2,添加身份验证,访问网页自动清理缓存目录
安装加密验证工具
[root@centos03 ~]# yum -y install httpd-tools
生成身份验证文件
[root@centos03 57]# htpasswd -c /usr/local/nginx/.bob bob
修改配置文件支持身份验证
[root@centos03 ~]# vim /usr/local/nginx/conf/nginx.conf
location ~ /purge(/.*) {
 72                 auth_basic "Restricted Access";
 73                 auth_basic_user_file /usr/local/nginx/.bob;
 74                 stub_status on;
 75                 access_log off;
重启服务验证加密

访问网页自动清空缓存目录
http://www.bdqn.com/purge/
