Android逆向:frida学习(1)
安卓的逆向题目在ctf中已经比较常见了。自从上次网鼎杯用了frida框架做过bang之后,感觉这个框架功能很是强大,因此打算学习一下这个框架,并记录一下学习过程以免以后忘了
frida安装
pip install frida
pip install frida-tools
我是在Windows系统上安装的,用的是python3,因为python2会报错
pyhton2安装失败结果:

frida-server启动流程
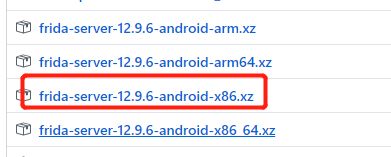
首先需要去下载一个frida-server,网址:server下载地址
因为我用的是雷电模拟器调试,因此下载的是x86的(模拟器好像一般都是x86)
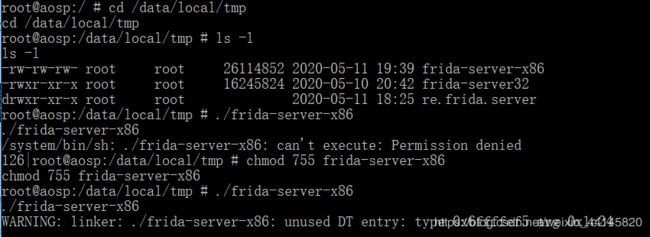
adb shell连接上去

使用adb push 把frida-server文件放到/data/local/tmp目录下
![]()
chmod 755,赋予执行权限,然后启动server:
最后还需要设置一下转发:
adb forward tcp:27043 tcp:27043
adb forward tcp:27042 tcp:27042
frida-server交互
在完成上面的操作之后,我们就可以通过python脚本与frida-server进行交互了
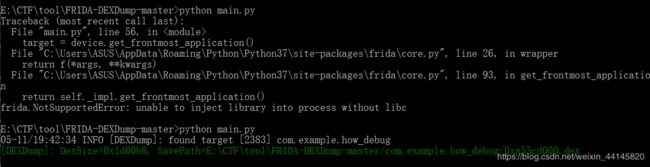
比如在之前的bang中,我们直接运行exp脱壳
接下来我们以一道seccon的题目讲解一下如何写交互脚本
该题目flag生成逻辑如下:

calc()是在so文件中,当然我们可以直接去逆向so文件,思路就和逆向c语言写的程序差不多,不过这里我们主要讲一下frida的使用,这个方法就不多讲了
如果我们能直接调用calc()函数,不就不需要去逆向它了吗?
下面是官网提供的exp:
import frida, sys

def on_message(message, data):
    if message['type'] == 'send':
        print("[*] {0}".format(message['payload']))
    else:
        print(message)

jscode = """
Java.perform(function () {
  // Function to hook is defined here
  var MainActivity = Java.use('com.example.seccon2015.rock_paper_scissors.MainActivity');

  // Whenever button is clicked
  var onClick = MainActivity.onClick;
  onClick.implementation = function (v) {
    // Show a message to know that the function got called
    send('onClick');

    // Call the original onClick handler
    onClick.call(this, v);

    // Set our values after running the original onClick handler
    this.m.value = 0;
    this.n.value = 1;
    this.cnt.value = 999;

    // Log to the console that it's done, and we should have the flag!
    console.log('Done:' + JSON.stringify(this.cnt));
  };
});
"""

process = frida.get_usb_device().attach('com.example.seccon2015.rock_paper_scissors')
script = process.create_script(jscode)
script.on('message', on_message)
print('[*] Running CTF')
script.load()
sys.stdin.read()
首先是get_usb_device()函数,可以得到当前连接的设备,它是一个Device()对象
之后使用attach方法可以根据pid连接上对应的进程
create_script可以返回一个Script类的实例化
在on方法中可以设置自定义回调函数。
 def on(self, signal, callback):
        if signal == 'message':
            self._on_message_callbacks.append(callback)
        else:
            self._impl.on(signal, callback)
下面对js代码进行分析
//通过perform执行js代码
Java.perform(function () {
  // Function to hook is defined here
  var MainActivity = Java.use('com.example.seccon2015.rock_paper_scissors.MainActivity');

  // Whenever button is clicked
  //这里可以把onClick函数hook
  var onClick = MainActivity.onClick;
  onClick.implementation = function (v) {
    // Show a message to know that the function got called
    //与用户脚本交互
    send('onClick');

    // Call the original onClick handler
    //call原有的onClick()函数
    onClick.call(this, v);

    // Set our values after running the original onClick handler
    //重新设置MainActivity中变量的值,这里看一下apk源代码就能理解
    //对于为什么能在调用了原有的onClick()之后再进行赋值,这是因为onClick()中
    //对showMessageTask的调用使用的是handler.postDelayed(this.showMessageTask, 1000)
    //这个函数会延迟一秒之后再调用showMessageTask
    this.m.value = 0;
    this.n.value = 1;
    this.cnt.value = 999;

    // Log to the console that it's done, and we should have the flag!
    console.log('Done:' + JSON.stringify(this.cnt));
  };
});


当然可以还有一种思路,就是直接把MainActivity的onCreate()函数给hook了,在里面直接调用calc()函数并计算出flag发送回来即可,代码如下:
import frida, sys

def on_message(message, data):
    if message['type'] == 'send':
        print("[*] {0}".format(message['payload']))
    else:
        print(message)

jscode = """
Java.perform(function () {
    var MainActivity = Java.use('com.example.seccon2015.rock_paper_scissors.MainActivity');
    MainActivity.onCreate.implementation = function () {
        send("Hook Start...");
        var returnValue = this.calc();
        send("Return:"+returnValue);
        var result = (1000+returnValue)*107;
        send("Flag:"+"SECCON{"+result.toString()+"}");
    }
});
"""

process = frida.get_usb_device().attach('com.example.seccon2015.rock_paper_scissors')
script = process.create_script(jscode)
script.on('message', on_message)
script.load()
sys.stdin.read()
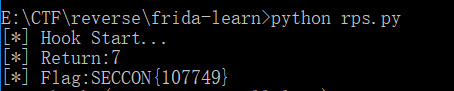
运行结果: