(讲课篇)让小白都能明白的Android开发-1. 快速的创建一个安卓应用及基本的UI
文章目录
大家好,我叫赵健,目前是一名Android开发工程师。今天开始我们一起步入Android开发的时间。本系列课程一共分为6节课,分别讲解了从事Android开发从知道到实际应用几个难点。本系列课程主要有以下几部分:
- 快速创建一个安卓应用以及基本UI的掌握
- 跨入Android大门的Kotlin语言篇
- 所有的动画都来源于这些操作
- 自定义UI及一些概念
- 快速接入第三方应用
- 分析一下优秀的开源程序
那么现在我们开始第一部分,快速创建一个安卓应用以及基本UI的掌握。开始开发之前,我们需要下载一个android开发的IDE工具Android Studio。我们可以从这个网址下载一个IDE工具。
AndroidDevTools :https://www.androiddevtools.cn/
我们也可以使用下面的链接直接下载
3.6.1正式版(windows64) https://dl.google.com/dl/android/studio/ide-zips/3.6.1.0/android-studio-ide-192.6241897-windows.zip?utm_source=androiddevtools&utm_medium=website
3.6.1正式版(mac) https://dl.google.com/dl/android/studio/ide-zips/3.6.1.0/android-studio-ide-192.6241897-mac.dmg?utm_source=androiddevtools&utm_medium=website
下载完成后,直接安装即可,如果安装有困难的朋友,也可以通过网络上搜索相应的文章进行安装
https://www.baidu.com/s?ie=UTF-8&wd=AndroidStudio 环境搭建
这里需要注意的是,我们在安装Android Studio之前需要先安装JAVA开发环境,具体操作步骤,可以参考上面的链接。
好了,最后安装好的Android Studio是这个样子的:

现在我们开始创建一个新的Android应用。点击这个界面的
Start a new Android Studio project
创建项目选择
Phone and Tablet中的Empty Activity
创建一个空的APP,选择
next
此时,我们会看见一个这样的界面:

在这里,我们填入APP的详细信息。
大家可能对这些条目不熟悉,我来给大家解释以下:
- Name:是我们APP的名称,我们改成LearningAndroid。作为我们要学习Android第一个项目的名称。
- Package name:是每一个APP标识,我们的安卓手机通过这个pakcage name认出我们的app。而且每一个手机上面不能存在同一个package name的APP。这里我们使用com.flannery.learningandroid。这里有一点需要注意的是,com.flannery可以替换成你自己域名的倒写,如果没有你自己的域名,这里可以就用我这个,不影响后边的功能。
- Save Location:顾名思义,就是我们的项目需要保存的位置。
- Language:3.6.1版本默认的语言是Kotlin,这里就是用默认的Kotlin。
点击Finish。然后经过一些不伤大雅的等待。我们终于进入了开发界面,就是这个样子的。
在简单的创建了一个Android APP后,我们就要学习一些简单的控件UI了。在开始之前,我们应该了解到,Android的界面是通过xml来进行编辑的,也就是代码编辑器区的activity_mian.xml中编辑。我们也可以创建一个新的xml文件。
就是在Android->app->java->res->layout目录下,点击右键->New->Layout Resource File创建一个新的xml文件。
好了,知道怎么创建之后,我们就开始学习下面的界面控件了。界面控件部分主要分为两部分,第一部分就是布局控件部分,由:
- 线性布局(LinearLayout)
- 相对布局(RelativeLayout)
- 帧布局(FrameLayout)
- 约束布局(ConstraintLayout)
组成,这也是我们Android开发的时候几种最常用的几种布局结构。
第二部分就是一些展示控件部分,由:
- 文本框(TextView)与编辑框(EditText)
- 按钮(Button)
- 单选按钮(RadioButton)和复选框(CheckBox)
- 图像视图(ImageView)
- 滚动视图(ScrollView)
- 列表视图(RecyclerView)
- Toast显示提示信息框
几种最常用的展示控件部分组成。这几种也是最常用的几种。
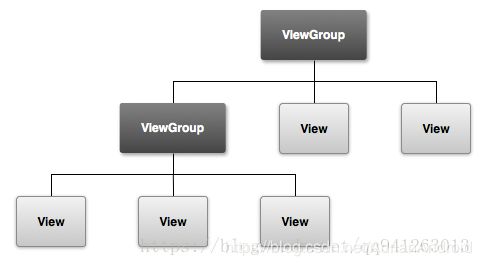
在正式开始之前,我们要先了解控件层级间的关系。如下图:这是控件之间的关系。ViewGroup就是一个容器,下边可以存放容器,也可以存放View。但View下面是没有任何东西了。
好的,知道了这些,那我们就开始了。
第一个布局就是LinearLayout,是一个线性布局,意思就是说只能横向或纵向排布View。
就像下面这个样子,就是横向布局结果。
![]()
代码中通过android:orientation="horizontal"来设置横向布局
<LinearLayout
        android:layout_width="match_parent"
        android:layout_height="wrap_content"
        android:contentDescription="横向布局"
        android:orientation="horizontal">

        <Button
            android:layout_width="wrap_content"
            android:layout_height="wrap_content"
            android:text="111" />

        <Button
            android:layout_width="wrap_content"
            android:layout_height="wrap_content"
            android:text="222" />

        <Button
            android:layout_width="wrap_content"
            android:layout_height="wrap_content"
            android:text="333" />

        <Button
            android:layout_width="wrap_content"
            android:layout_height="wrap_content"
            android:text="444" />
    LinearLayout>
同样的道理,将标签设置成这样android:orientation="vertical",就会变成纵向布局。就像下面图片这个样子。
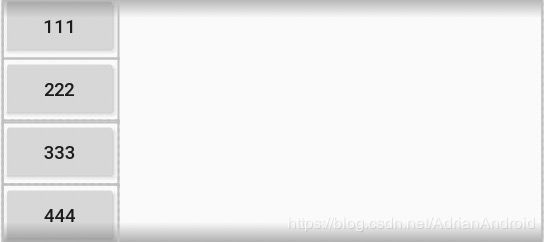
在线性布局中,我们想让内部的控件全部居中显示,而不是单单的左靠齐。这时候就会遇到android:gravity="center"标签,就像这样:

代码是这个样子的
<LinearLayout
        android:layout_width="match_parent"
        android:layout_height="100dp"
        android:contentDescription="横向布局 | 居中"
        android:gravity="center"
        android:orientation="horizontal">

        <Button
            android:layout_width="wrap_content"
            android:layout_height="wrap_content"
            android:text="111" />

        <Button
            android:layout_width="wrap_content"
            android:layout_height="wrap_content"
            android:text="222" />

        <Button
            android:layout_width="wrap_content"
            android:layout_height="wrap_content"
            android:text="333" />

        <Button
            android:layout_width="wrap_content"
            android:layout_height="wrap_content"
            android:text="444" />
LinearLayout>
这个标签还有其他的一些值,比如垂直居中(center_horizontal)、水平居中(center_vertical)。
左右两边都是图片,中间的文字的文字要充满整个空白的地方。这个时候我们就可以文字控件(TextView)中使用android:layout_weight="1"属性来进行操作。
<LinearLayout
        android:layout_width="match_parent"
        android:layout_height="50dp"
        android:gravity="center_vertical"
        android:orientation="horizontal">

        <ImageView
            android:layout_width="50dp"
            android:layout_height="50dp"
            android:src="@mipmap/ic_launcher" />

        <TextView
            android:layout_width="0dp"
            android:layout_height="match_parent"
            android:layout_weight="1"
            android:ellipsize="end"
            android:gravity="center_vertical"
            android:singleLine="true"
            android:text="中间的文字中间的文字中间的文字中间的文字中间的文字中间的文字"
            android:textSize="25sp" />

        <ImageView
            android:layout_width="50dp"
            android:layout_height="50dp"
            android:src="@mipmap/ic_launcher" />
    LinearLayout>
这时候你会问,"android:layout_weight"属性到底是怎么个原理呢。就跟下图一样:

这里面水平布局有三个控件,weight的值分别是1、2、3。当绘制屏幕的时候,系统会把几个weight加起来,然后根据权重,第一个分配到1/6的宽度,第二个分到2/6的宽度,第三个分到3/6。
这样你应该大致有些明白了。实际开发中,这个用到的机会很多,但是基本上都是扩充空白部分。所以你能明白这个道理就可以了。
下面,我们来说第二个布局:相对布局(RelativeLayout),顾名思义,就就是相对某一点。这时候,我们用一个例子来了解RelativeLayout。请看这张图:
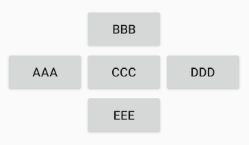
我们看到,一个十字型的排布,CCC在最中间,AAA在CCC的左边,DDD在CCC的右边,并且他们三个在同一个水平线上。同理BBB和CCC和EEE也是一样的。
这里就有相对的概念了。
怎样做到这样的呢。首先我们先将CCC的设置一个ID,也叫做ccc。然后AAA的id取名aaa。在aaa上设置android:layout_toLeftOf="@+id/ccc"标签就会看到已经在最左边了。但是这时候只是在CC的左边,而没有在同一个水平线上,这是后设置android:layout_centerVertical="true"标签,让他们都在屏幕的水平线上。同理其他的也这么做。下面些就是源码了:
<RelativeLayout
    xmlns:android="http://schemas.android.com/apk/res/android" android:layout_width="match_parent"
    android:contentDescription="https://www.jianshu.com/p/7286e1be14fa"
    android:layout_height="match_parent">

    <Button
        android:id="@+id/aaa"
        android:contentDescription="左边"
        android:layout_toLeftOf="@+id/ccc"
        android:layout_centerVertical="true"
        android:layout_width="wrap_content"
        android:layout_height="wrap_content"
        android:text="aaa"/>

    <Button
        android:contentDescription="上边"
        android:id="@+id/bbb"
        android:layout_centerHorizontal="true"
        android:layout_width="wrap_content"
        android:layout_height="wrap_content"
        android:layout_above="@+id/ccc"
        android:text="bbb"/>
    <Button
        android:id="@+id/ccc"
        android:contentDescription="居中"
        android:layout_width="wrap_content"
        android:layout_height="wrap_content"
        android:layout_centerInParent="true"
        android:text="ccc"/>
    <Button
        android:contentDescription="右边"
        android:id="@+id/ddd"
        android:layout_width="wrap_content"
        android:layout_height="wrap_content"
        android:layout_centerVertical="true"
        android:layout_toRightOf="@+id/ccc"
        android:text="ddd"/>
    <Button
        android:contentDescription="下边"
        android:id="@+id/eee"
        android:layout_centerHorizontal="true"
        android:layout_width="wrap_content"
        android:layout_height="wrap_content"
        android:layout_below="@+id/ccc"
        android:text="eee"/>
RelativeLayout>
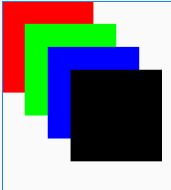
下面我们该看看帧布局了,也就是FrameLayout。这种布局没什么特别的,就是放在这个标签下的所有控件口试按层级来排列的,就像这样:
一层一层的往上摞。
最后一个是约束布局(ConstraintLayout),相对与相对布局,更加高效,功能更加强大。我从王章找到一篇文章,讲的很详细,大家有兴趣可以去看看。
一文看懂ConstraintLayout的用法(https://www.cnblogs.com/angrycode/p/9739513.html)
好了,看完布局,我们该看控件了。布局就是一个容器,决定着控件的排布。各个控件才是真正要展示功能的部分。
第一个迎面来的是TextView(文本框),这个是显示文字的一个控件,请看下面的图片:
    <TextView
        android:layout_width="match_parent"
        android:layout_height="wrap_content"
        android:layout_marginTop="10dp"
        android:text="这是一个TextView"
        android:textColor="#0000FF"
        android:textSize="24sp"
        android:textStyle="normal" />
在android:text="这是一个TextView"就可以设置要显示的文字,其中还可以设置文字大小(android:textSize="24sp")和文字颜色(android:textColor="#0000FF"),这里我们设置文字大小的时候用的是sp, 安卓官方专门给文字设置大小的一个单位。
此外,还可以设置文字位置,居中还是右对齐。也可以单排显示。具体的请看下面的代码:
<LinearLayout xmlns:android="http://schemas.android.com/apk/res/android"
    android:layout_width="match_parent"
    android:layout_height="match_parent"
    android:orientation="vertical">
    <TextView
        android:layout_width="match_parent"
        android:layout_height="60dp"
        android:layout_marginTop="10dp"
        android:background="@android:color/darker_gray"
        android:text="学习安卓"
        android:textColor="#0000FF"
        android:textSize="24sp"
        android:textStyle="normal" />

    <TextView
        android:layout_width="match_parent"
        android:layout_height="60dp"
        android:layout_marginTop="10dp"
        android:background="@android:color/darker_gray"
        android:gravity="center_vertical"
        android:text="学习安卓"
        android:textColor="#0000FF"
        android:textSize="24sp"
        android:textStyle="normal" />

    <TextView
        android:layout_width="match_parent"
        android:layout_height="60dp"
        android:layout_marginTop="10dp"
        android:background="@android:color/darker_gray"
        android:gravity="right|center_vertical"
        android:text="学习安卓"
        android:textColor="#0000FF"
        android:textSize="24sp"
        android:textStyle="normal" />

    <TextView
        android:layout_width="match_parent"
        android:layout_height="60dp"
        android:layout_marginTop="10dp"
        android:background="@android:color/darker_gray"
        android:text="学习安卓学习安卓学习安卓学习安卓学习安卓学习安卓学习安卓学习安卓学习安卓学习安卓学习安卓学习安卓学习安卓学习安卓学习安卓学习安卓学习安卓学习安卓学习安卓学习安卓学习安卓学习安卓学习安卓学习安卓学习安卓学习安卓"
        android:textColor="#0000FF"
        android:textSize="24sp"
        android:textStyle="normal" />

    <TextView
        android:layout_width="match_parent"
        android:layout_height="60dp"
        android:layout_marginTop="10dp"
        android:background="@android:color/darker_gray"
        android:ellipsize="end"
        android:maxLines="1"
        android:text="学习安卓学习安卓学习安卓学习安卓学习安卓学习安卓学习安卓学习安卓学习安卓学习安卓学习安卓学习安卓学习安卓学习安卓学习安卓学习安卓学习安卓学习安卓学习安卓学习安卓学习安卓学习安卓学习安卓学习安卓学习安卓学习安卓"
        android:textColor="#0000FF"
        android:textSize="24sp"
        android:textStyle="normal" />

LinearLayout>
结果是这个样子的:
下面我们说EditText(编辑框),也就是可以编辑文字。

上图是两个输入框,一个是输入文字,下边的是一个输入密码的EditText。有EditText是TextView的子类,所以TextView的很多属性EditText都可以用。
<LinearLayout xmlns:android="http://schemas.android.com/apk/res/android"
    android:layout_width="match_parent"
    android:layout_height="match_parent"
    android:orientation="vertical">

    <EditText
        android:id="@+id/mEtName"
        android:layout_width="match_parent"
        android:layout_height="wrap_content"
        android:contentDescription="可以显示光标"
        android:cursorVisible="true"
        android:hint="输入文字"
        android:textSize="24sp" />

    <EditText
        android:layout_width="match_parent"
        android:layout_height="wrap_content"
        android:contentDescription="可以显示光标"
        android:cursorVisible="true"
        android:hint="输入密码"
        android:inputType="textPassword"
        android:maxLength="10"
        android:textSize="24sp" />

LinearLayout>
通过android:inputType="textPassword"可以设置文字输入的类型,这个标签就是要输入密码的类型。
通过```android:hint=“输入密码”``可以设置提示文字,在输入真正文字的时候,这个提示文字就会消失。等一个输入的文字都没有的时候,就会显示出来 .
按钮,不用说,就是要点击用的,看下面集中常见的按钮:
第一个就是默认的按钮,第二个是设置了图片的按钮,第三个就是设置图片改变了位置的按钮。就是下面的代码。
不仅是按钮,像继承View的所有控件都可以设置点击时间。
在Activity中通过id,对Button进行按钮点击事件的注册。
        button.setOnClickListener { view ->
            // doSomething
        }
单选按钮(RadioButton)很少单独使用,通常是在RadioGroup下,跟很多个RadioButton共同使用。多个中选择一个。
代码是这个样子的:
        <RadioGroup
            android:id="@+id/rg"
            android:layout_width="wrap_content"
            android:layout_height="wrap_content"
            android:orientation="horizontal">

            <RadioButton
                android:id="@+id/rb1"
                android:layout_width="wrap_content"
                android:layout_height="wrap_content"
                android:checked="true"
                android:text="男" />

            <RadioButton
                android:id="@+id/rb2"
                android:layout_width="wrap_content"
                android:layout_height="wrap_content"
                android:text="女" />

            <RadioButton
                android:id="@+id/rb3"
                android:layout_width="wrap_content"
                android:layout_height="wrap_content"
                android:text="第三种" />
        RadioGroup>
想要知道按钮选中事件,只需注册setOnheckedChangeListener即可
rg.setOnCheckedChangeListener { group, checkedId ->
            when (checkedId) {
                R.id.rb1 -> {
                    Toast.makeText(this@ButtonActivity, "选中第一个", Toast.LENGTH_SHORT).show()
                }
                R.id.rb2 -> {
                    Toast.makeText(this@ButtonActivity, "选中第二个", Toast.LENGTH_SHORT).show()
                }
                else -> {
                    Toast.makeText(this@ButtonActivity, "选中其他", Toast.LENGTH_SHORT).show()
                }
            }
        }
<CheckBox
            android:layout_width="wrap_content"
            android:layout_height="wrap_content"
            android:text="喜欢" />

        <CheckBox
            android:layout_width="wrap_content"
            android:layout_height="wrap_content"
            android:checked="true"
            android:text="有用" />
ImageView是一个专门用来展示图片的一个控件,下面的图片就是通过ImageView显示出来的。

代码是这样的:
<ImageView
        android:layout_width="300dp"
        android:layout_height="300dp"
        android:src="@mipmap/breakfast004" />
你使用手机的时候会发现,APP中的内容可能一屏幕装不下,可能要往下滑,也可能左右滑。这个就会用到ScrollView和RecyclerView。
先说ScrollView是一个滚动视图,就是固定的放入一个控件,一般是LinearLayout(也可能是其他的布局控件),然后LinearLayout设置成vertical(垂直的),往里面放入好多好多东西。当内容不能在一个屏幕上显示的时候,就可以上下滚动了。
这里把代码贴到这里:
<ScrollView xmlns:android="http://schemas.android.com/apk/res/android"
    android:layout_width="match_parent"
    android:layout_height="match_parent">

    <LinearLayout
        android:layout_width="match_parent"
        android:layout_height="wrap_content"
        android:orientation="vertical">

        <TextView
            android:layout_width="match_parent"
            android:layout_height="wrap_content"
            android:text="第一个"
            android:textSize="60sp" />

        <ImageView
            android:layout_width="300dp"
            android:layout_height="300dp"
            android:src="@mipmap/breakfast004" />

        <TextView
            android:layout_width="match_parent"
            android:layout_height="wrap_content"
            android:text="第二个"
            android:textSize="60sp" />

        <ImageView
            android:layout_width="300dp"
            android:layout_height="300dp"
            android:src="@mipmap/breakfast004" />

        <TextView
            android:layout_width="match_parent"
            android:layout_height="wrap_content"
            android:text="第三个"
            android:textSize="60sp" />

        <ImageView
            android:layout_width="300dp"
            android:layout_height="300dp"
            android:src="@mipmap/breakfast004" />

        <TextView
            android:layout_width="match_parent"
            android:layout_height="wrap_content"
            android:text="第四个"
            android:textSize="60sp" />

        <ImageView
            android:layout_width="300dp"
            android:layout_height="300dp"
            android:src="@mipmap/breakfast004" />

    LinearLayout>

ScrollView>
还有一种滚动视图,RecyclerView,这个控件很强大。可以显示列表,可以显示网格,也可以显示瀑布流。下图是分别演示了三种列表样式。
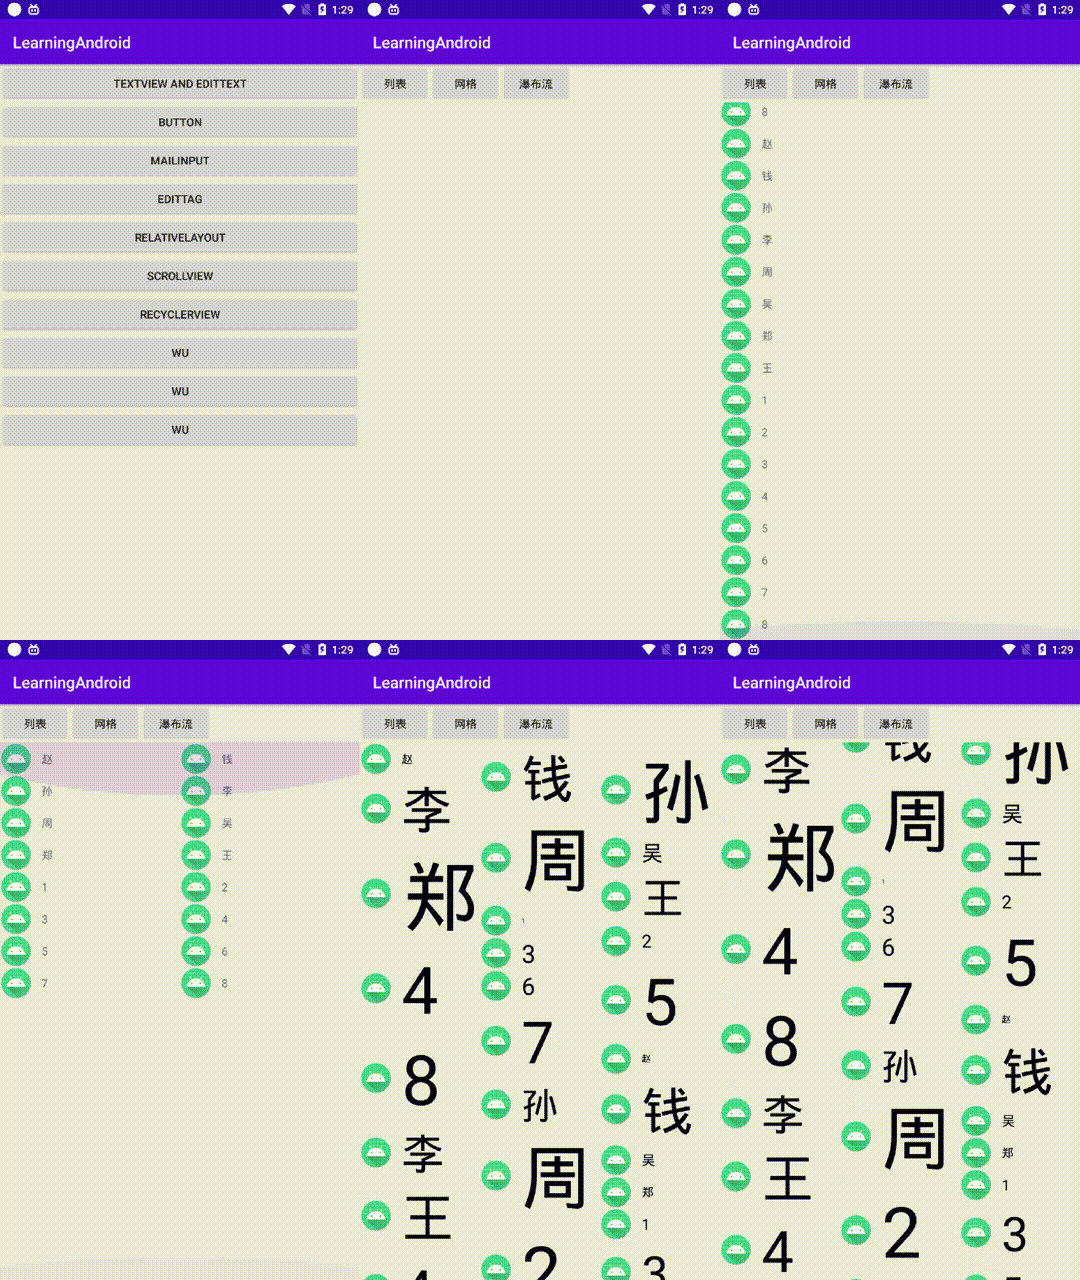
他们是怎么实现的呢。这里主要理解三部分:数据源部分、适配器部分、显示部分。
我们先在xml文件中创建一个RecyclerView标签,这就是我们要显示的部分。
  <androidx.recyclerview.widget.RecyclerView
        android:id="@+id/mRecyclerView"
        android:layout_width="match_parent"
        android:layout_height="match_parent" />
我们创建一个List的数据源:
var list = arrayListOf("赵", "钱", "孙", "李", "周", "吴", "郑", "王",
	"1", "2", "3", "4", "5", "6", "7", "8", "赵", "钱", "孙", "李", "周",
	 "吴", "郑", "王", "1", "2", "3", "4", "5", "6", "7", "8")
最后就是一个很重要的部分,适配器部分,这部分将数据源转换成要展示的条目界面,显示在RecyclerView上。我们先贴上代码:
    inner class ListHolder(itemView: View) : RecyclerView.ViewHolder(itemView) {
        var title = itemView.findViewById<TextView>(R.id.title)
    }

    inner class ListAdapter(var list: List<String>) : RecyclerView.Adapter<ListHolder>() {
        override fun onCreateViewHolder(parent: ViewGroup, viewType: Int): ListHolder {
            var itemView = LayoutInflater.from(parent.context)
                .inflate(R.layout.learning_recyclerview_item_list, parent, false)
            return ListHolder(itemView)
        }

        override fun getItemCount(): Int {
            return list.size
        }

        override fun onBindViewHolder(holder: ListHolder, position: Int) {
            holder.title.text = list.get(position)
        }

    }
其中ListHolder继承自RecyclerView.ViewHolder,是保存了每个item的View。
ListAdapter继承自RecyclerView.Viewholder,也就是那个适配器。
这里需要必须重写三个方法:
onCreateViewHolder(…)主要是将给每个条目的View创建成ViewHolder,然后绑定到Adapter中。
getItemCount() 是告诉RecyclerView要显示多少个item。
onBindViewHolder(…)是将数据源绑定到ItemView中。也就是自定义显示数据的部分。
最后,我们看最后将三个结合起来
var list = arrayListOf("赵", "钱", "孙", "李", "周", "吴", "郑", "王",
		"1", "2", "3", "4", "5", "6", "7", "8", "赵", "钱", "孙", "李", "周",
	 	"吴", "郑", "王", "1", "2", "3", "4", "5", "6", "7", "8")
            "8"
        )
mRecyclerView.adapter = ListAdapter(list)
mRecyclerView.layoutManager = LinearLayoutManager(this, LinearLayoutManager.VERTICAL, false)
这时候我们就可以看到:
- 创建数据源。
- 将数据源跟ListAdapter绑定,并设置给mRecyclerView.adapter中。
- 设置layoutManager,这是告诉RecyclerView是显示什么样的、
常见的RecylerView中的layoutManager有三种:
//列表布局
mRecyclerView.layoutManager = LinearLayoutManager(this, LinearLayoutManager.VERTICAL, false)
// 网格布局
mRecyclerView.layoutManager = GridLayoutManager(this, 2)
// 瀑布流布局
mRecyclerView.layoutManager =
            StaggeredGridLayoutManager(3, StaggeredGridLayoutManager.VERTICAL)
好了,常见控件的部分完了。
下面我们补充一个控件,Toast,是一个提示信息框。比如这样:

这个弹窗默认创建在屏幕第中下部。
最后,大家也许还不明白,这些控件是如何显示到屏幕上的。这就涉及到一个叫Activity的东西。他是能显示在手机屏幕上的主要功臣。
现在我们通过新创建一个Activity,来详细了解Activity是怎么来的。
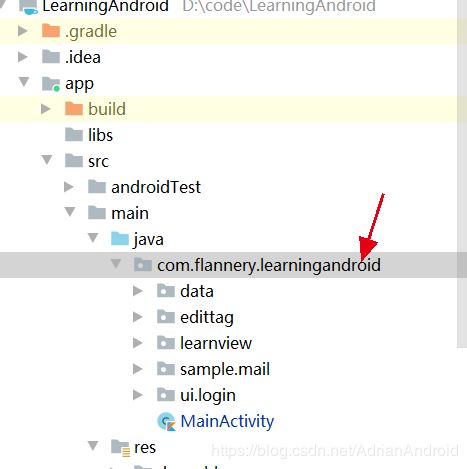
我们找到一个package下右键-New-Activity,找到一个你需要的Activity样本,这里我们选Empty Activity。
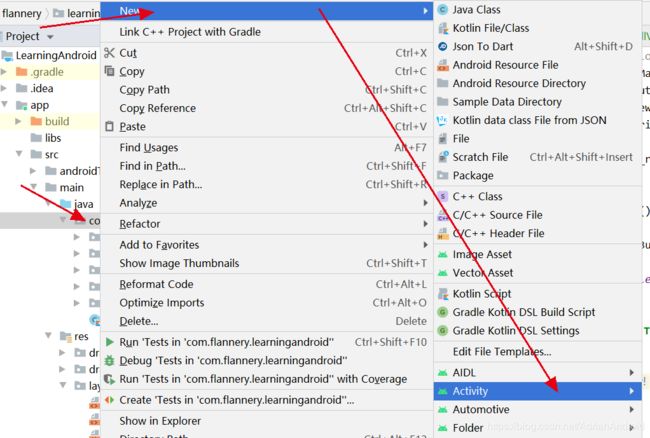
然后我们下一步下一步完成,就可以创建有个新的NewActivity了。
class NewActivity : AppCompatActivity() {

    override fun onCreate(savedInstanceState: Bundle?) {
        super.onCreate(savedInstanceState)
        setContentView(R.layout.activity_new)
    }
}
新创建的就是这个样子的,我们使用setContentView(R.layout.activity_new)将我们上边创建的布局文件显示在屏幕上。
这里需要注意的是,Activity是需要注册到AndroidManifest.xml清单文件中的,这样安卓系统才可以知道,这是一个要显示的Activity。不然的话会出错哦。
小结:
本节课程第一部分讲了如何大家环境,并创建了一个简单的APP工程。第二部分讲解了布局文件和控件的创建及应用。最后说了Activity是怎样显示到界面上的。
下面,整节课的代码全部放到的git上,链接如下:
https://gitee.com/WhatINeed/LearningAndroid

