Android 中性能优化之布局优化
概述
在Android中,layout布局的加载速度会影响到APP的性能。充满不必要的Views和可读性差的layout文件会让你的APP运行缓慢。下面我将会总结Android开发中,提升layout性能的几个常用的技巧。
1.在TextView中使用Compound drawable
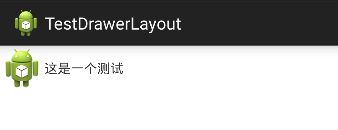
用TextView本身的属性来同时显示图片和文字。图片可以放在文字的左右上下四个方向,使用这种方式,可以减少不少的View。
如下:
    "@+id/textView"
        android:layout_width="wrap_content"
        android:layout_height="wrap_content"
        android:drawableLeft="@drawable/ic_launcher"
        android:drawablePadding="10dp"
        android:gravity="center"
        android:text="这是一个测试" />
用到的主要属性:
drawableLeft:指定drawable资源放在文字的左边。类似还有drawableRight,drawableTop,drawableBottom。
drawablePadding:指定文本和drawable之间的padding距离。
或者同样可以使用代码设置:
TextView textView = (TextView) findViewById(R.id.textView);

Drawable drawable = getResources().getDrawable(R.drawable.ic_launcher);
drawable.setBounds(0, 0, drawable.getIntrinsicWidth(), drawable.getIntrinsicHeight()); //该方法不可少

textView.setCompoundDrawables(drawable, null, null, null);2.使用include实现布局重用,避免代码重复
在一个布局中引入另外一个布局,可以实现布局的重用,方便项目后期的维护。
如下:
<LinearLayout xmlns:android="http://schemas.android.com/apk/res/android"
    android:layout_width="match_parent"
    android:layout_height="match_parent"
    android:orientation="vertical" >
    <include layout="@layout/header" />
LinearLayout>
注意:
1.findViewById 出现 NullPointerException 的情况
如果 include 一个布局时,并没有给 标签设置 id 属性,那么你直接使用 findViewById 来找 include 指定布局中控件是没有问题的。
但是,一旦你为 标签设置了 id ,就不能直接把它里面的控件当成主布局文件中的控件来直接获取了,必须先获得这个 标签指定的布局文件,再通过该布局文件 findViewById 来获得其子控件。
2.如果想在 标签中覆盖被包含布局所指定的任何 android:layout_* 属性,必须在 标签中同时指定 android:layout_width 和 android:layout_height 这两个属性。
3.使用merge标签减少布局层级结构
merge在优化UI结构时起到很重要的作用,目的是通过删减多余或者额外的层级,从而优化整个Layout的结构。
举例说明:
普通的布局文件activity_other.xml:
<LinearLayout xmlns:android="http://schemas.android.com/apk/res/android"
    xmlns:tools="http://schemas.android.com/tools"
    android:id="@+id/main_layout"
    android:layout_width="match_parent"
    android:layout_height="match_parent"
    android:orientation="vertical"
    tools:context="com.yumf.testdrawerlayout.OtherActivity" >

    <Button
        android:id="@+id/button1"
        android:layout_width="wrap_content"
        android:layout_height="wrap_content"
        android:text="Button" />

    <Button
        android:layout_width="wrap_content"
        android:layout_height="wrap_content"
        android:text="Button" />

LinearLayout>
Activity中代码:
package com.yumf.testdrawerlayout;

import android.app.Activity;
import android.os.Bundle;

public class MainActivity extends Activity {

    @Override
    public void onCreate(Bundle icicle) {
        super.onCreate(icicle);
        setContentView(R.layout.activity_other);
    }
}
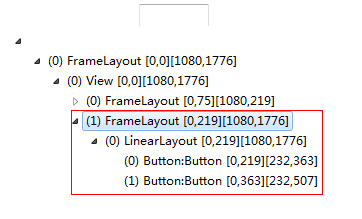
执行代码,查看层级结构图:

在红色线框中的FrameLayout是系统的R.id.content的布局,下面LinearLayout则是我们加载的布局文件。
现在我们将activity_other.xml替换为merge_layout.xml文件,如下:
<merge xmlns:android="http://schemas.android.com/apk/res/android"
    android:layout_width="match_parent"
    android:layout_height="match_parent" >

    <Button
        android:id="@+id/button1"
        android:layout_width="wrap_content"
        android:layout_height="wrap_content"
        android:text="Button1" />

    <Button
        android:layout_width="wrap_content"
        android:layout_height="wrap_content"
        android:layout_gravity="center_horizontal"
        android:text="Button2" />

merge>
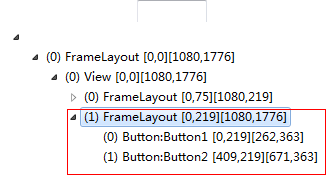
继续执行代码,查看层级结构图:

从上面我们可以看到,使用merge标签的布局,会减少一层的父布局结构,但是达到相同的显示效果。
注意:
1. 只可以作为layout 布局的根节点。
2.当需要扩充的xml layout本身是由merge作为根节点的话,需要将被导入的xml layout置于 viewGroup中,同时需要设置attachToRoot为True。
3.子视图不需要指定任何针对父视图的布局属性,例如示例中Button只需要直接添加到父视图中显示就行,这样的情况下考虑使用merge的标签。
4.merge标签下,子控件的数量不宜过多,否则造成布局不便。
4.使用LinearLayout自带的分割线
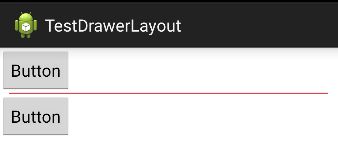
我们在开发app时,经常会使用到分割线。一般的人,都会使用一个View来实现分割线效果。但是如果一个页面中,出现非常多的分割线,那么就需要增加相对数量的View。这会导致布局文件的view很多,层级结构也变得复杂。其实我们可以利用LinearLayout自带的属性来实现分割线的效果。
我们在布局文件中进行设置:
<LinearLayout xmlns:android="http://schemas.android.com/apk/res/android"
    xmlns:tools="http://schemas.android.com/tools"
    android:layout_width="match_parent"
    android:layout_height="match_parent"
    android:divider="@drawable/divider_horizontal"
    android:dividerPadding="10dp"
    android:orientation="vertical"
    android:showDividers="middle" >

    <Button
        android:layout_width="wrap_content"
        android:layout_height="wrap_content"
        android:text="Button" />

    <Button
        android:layout_width="wrap_content"
        android:layout_height="wrap_content"
        android:text="Button" />

LinearLayout>
其中divider_horizontal.xml的资源文件:
<shape xmlns:android="http://schemas.android.com/apk/res/android" >

    <solid android:color="@android:color/holo_red_dark" />

    <size android:height="1dp" />

shape>
属性说明:
android:divider:用来定义一个drawable资源或者color作为分割线。可以设置分割线的大小宽度。
android:dividerPadding:设置分割线的padding距离大小。
android:showDividers:指定分割线的显示位置。包含:none,beginning,middle,end。
5.使用ViewStub实现延时加载
在程序运行过程中动态的根据当前条件来决定是否显示某个布局或控件。我们一般都会使用View的setVisibility()方法来控制。这里我们可以使用ViewStub来完成这一功能,ViewStub可以让我们在需要时才会去加载布局,提高了程序初始化的性能。
代码示例:
package com.yumf.testdrawerlayout;

import android.app.Activity;
import android.os.Bundle;
import android.view.View;
import android.view.ViewStub;

public class MainActivity extends Activity {

    private ViewStub viewStub;
    private boolean flag = true;

    @Override
    public void onCreate(Bundle icicle) {
        super.onCreate(icicle);
        setContentView(R.layout.activity_other);

        viewStub = (ViewStub) findViewById(R.id.viewstub);
        viewStub.inflate();

    }

    public void handClick(View view) {
        if (flag) {
            viewStub.setVisibility(View.GONE);
        } else {
            viewStub.setVisibility(View.VISIBLE);
        }
        flag = !flag;
    }
}
注意:
ViewStub 的 inflate() 方法显示了目标布局之后,不可以再次调用该方法(注意,调用了 setVisibility(View.VISIBLE) 或者 setVisibility(View.INVISIBLE) 之后也绝对不可以再调 inflate() 方法),否则提示异常信息。

