文本匹配开山之作-DSSM论文笔记及源码阅读(类似于sampled softmax训练方式思考)
文章目录
- 前言
- DSSM框架简要介绍
- 模型结构
- 输入
- Encoder层
- 相似度Score计算
- 训练方式解读
- 训练数据
- 训练目标
- 训练方式总结
- DSSM源码阅读
- 训练数据中输入有负样本的情况
- 输入数据
- 合并正负样本与计算余弦相似度
- softmax操作与计算交叉熵损失
- 使用一个batch中其他Doc构造负样本
- 输入数据
- 构造负样本并计算余弦相似度
- softmax操作与计算交叉熵损失
- 总结
前言
- 基于表征(Representation)形式的文本匹配、信息检索、向量召回的方法总结(用于召回、或者粗排)
在前面一篇文章中,我总结了Representation-Based文本匹配模型的改进方法,其中在一篇论文中提到了使用Pre-train方式来提高效果,论文连接如下:
Chang, W., Yu, F.X., Chang, Y., Yang, Y., & Kumar, S. (2020). Pre-training Tasks for Embedding-based Large-scale Retrieval. ArXiv, abs/2002.03932.[PDF]
论文中提到的预训练数据均为,relevant positive Query-Doc 对:
![]()
训练的目标为最大化当前Postive Query-Doc的Softmax条件概率:
![]()
论文中提到,softxmax分母中的 D \mathcal D D为所有可能的文档集合,这样的话候选文档集合非常大,所以论文中做了近似,训练时使用当前batch中文档这个子集来代替全集 D \mathcal D D,这种方法称为Sample Softmax。 TensorFlow中也有这个方法的API实现,但是我一直不是很能理解代码中到底应该怎么实现,突然这几天读到了文本匹配的开山之作 DSSM,我发现DSSM的训练方法与上面那篇论文非常类似,于是研究了一下源码,有一种豁然开朗的感觉,所以想分享一下,我对这种训练方式的理解。DSSM论链接如下:
Huang, Po-Sen et al. “Learning deep structured semantic models for web search using clickthrough data.” CIKM (2013).[PDF]
DSSM论文中的训练数据也是Query-Document对,训练目标也为最大化给定Query下点击Doc的条件概率,公式如下,和上面说的Pre-train任务基本一致:

极大似然估计的公式基本一样,训练都是Point-wise loss,具体各个符号我在下面仔细介绍。
DSSM框架简要介绍
作为文本匹配方向的开山之作,已经有非常多的博客介绍了这个模型,这里我就简单介绍一下,重点放在后面训练源码的阅读。
模型结构

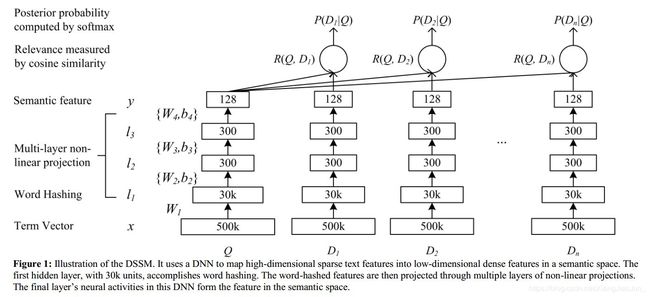
DSSM也是Representation-Based模型,其中Query端 Encoder 和 Doc端 Encoder都是使用 MLP实现,最后Score计算使用的是cosine similarity,后续模型的改进很多都是使用更好的Encoder结构。
输入
DSSM中输入并不是单纯直接使用 bag-of-word,从上面结构图可以看出,输入的时候做了Word Hashing,在进行bag-of-word映射,目的主要如下:
- 减少词典的大小,直接使用原始word词典非常大(500K),导致输入向量的维数也非常高,使用Word Hashing做分解后,可以减少词典大小,比如letter-trigram(30K)
- 一定程度解决OOV问题
- 对拼写错误也有帮助
Word Hashing的做法类似于fast-text中的子词分解,但是不同点在于
- fast-text中会取多个不同大小窗口对一个单词进行分解,比如2、3、4、5,词表是这些所有的子词构成的集合
- Word Hashing只会取一个固定大小窗口对单词进行分解,词表是这个固定大小窗口子词的集合,比如letter-bigram,letter-trigram
比如输入的词为#good#,我们选tri-gram,则Word-hashing分解后,#good#的表示则为#go,goo,ood,od#,然后就是输入的每个词都映射为tri-gram bag-of-words 向量,出现了的位置为1,否则为0。假设数据集进行tri-gram分解后,构成的词表大小为N,那么Query输入处理方式如下:
- 首先将每个词进行Word Hashing分解
- 获得每个词的表示,比如 [0,1,1,0,0,0…,0,1] ,维数为N,其中在词表中出现了的位置为1,否则为0
- 将Query中所有的词的表示向量相加可以得到一个N维向量,其实就是bag-of-word表示(只考虑有没有出现,并不考虑出现顺序位置)
Doc端输入的处理也类似于上面Query端的处理,获得Word-Hashing后的向量表示,作为整个模型的输入。
Encoder层
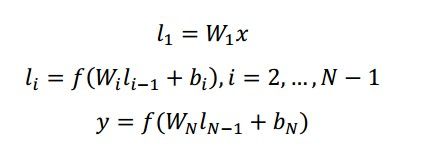
Query端和Doc端Encoder层处理很简单,就是MLP,计算公式如下:

可以看出就是标准的全连接层运算
相似度Score计算
DSSM中最后的相似度计算用的是 cosine similarity,计算公式如下:

模型训练好之后,给定一个Query我们就可以对其所有Doc按照这个计算出来的cosine similarity进行排序。
训练方式解读
训练数据
DSSM的训练方式是做Point-wise训练,论文中对于训练数据的描述如下:
The clickthrough logs consist of a list of queries and their clicked documents.
给定的是Query以及对应的点击Document,我们需要进行极大似然估计。
训练目标
DSSM首先通过获得的semantic relevance score计算在给定Query下Doc的后验概率:

其中 γ \gamma γ为softmax函数的平滑因子, D \bold D D表示所有的待排序的候选文档集合,可以看出这个目标其实和我们一开始提到的Pre-train那篇论文的目标是一样的。我们的候选文档大小可能会非常大,论文在实际训练中,做法如下:
- 我们使用 ( Q , D + ) (Q,D^+) (Q,D+)来表示一个(Query,Doc)对,其中 D + D^+ D+表示这个Doc是被点击过的
- 使用 D + D^+ D+和四个随机选取没有被点击过的Doc来近似全部文档集合 D D D,其中 { D j − ; j = 1 , . . . , 4 } \{D^-_j;j=1,...,4\} {Dj−;j=1,...,4}表示负样本
上面就是训练时候的实际做法,对于每个 ( Q , D + ) (Q,D^+) (Q,D+),我们只需要采样K个负样本(K可以自己定), ( Q , D j − ) (Q,D^-_j) (Q,Dj−),这样softxmax操作我们也只需要在 D ^ = { D + , D 1 − , . . . . D k − } \hat D =\{D^+,D^-_1,....D^-_k\} D^={D+,D1−,....Dk−}这个集合上计算即可,论文中还提到,采样负样本方式对最终结果没有太大影响
In our pilot study, we do not observe any significant difference when different sampling strategies were
used to select the unclicked documents.
训练方式总结
通过上面的分析,我的理解是DSSM和之前说的Pre-trian那篇论文,训练的时候只需要采样负样本即可,然后softmax操作只在 当前正样本 + 采样的负样本 集合上计算,最后用交叉熵损失即可。具体负样本怎么采样,我觉的有两种方法:
- 输入数据中就已经采样好负样本,输入数据直接是正样本 + 负样本,这样运算量会大些
- 输入数据batch均为正样本,负样本通过batch中其他Doc构造
DSSM源码阅读
我看的DSSM实现代码是下面两个,其中的不同点就在于上面说的负样本构造不同
- https://github.com/InsaneLife/dssm (训练数据中输入有负样本)
- https://github.com/LiangHao151941/dssm (使用一个batch中其他Doc构造负样本)
训练数据中输入有负样本的情况
- 这部分代码在
https://github.com/InsaneLife/dssm/blob/master/dssm_rnn.py
输入数据
with tf.name_scope('input'):
    # 预测时只用输入query即可,将其embedding为向量。
    query_batch = tf.placeholder(tf.int32, shape=[None, None], name='query_batch')
    doc_pos_batch = tf.placeholder(tf.int32, shape=[None, None], name='doc_positive_batch')
    doc_neg_batch = tf.placeholder(tf.int32, shape=[None, None], name='doc_negative_batch')
    query_seq_length = tf.placeholder(tf.int32, shape=[None], name='query_sequence_length')
    pos_seq_length = tf.placeholder(tf.int32, shape=[None], name='pos_seq_length')
    neg_seq_length = tf.placeholder(tf.int32, shape=[None], name='neg_sequence_length')
    on_train = tf.placeholder(tf.bool)
    drop_out_prob = tf.placeholder(tf.float32, name='drop_out_prob')
- doc_pos_batch , 即是论文中说的 D + D^+ D+,正样本输入
- doc_neg_batch,即是论文汇总说的 { D j − ; j = 1 , . . . , K } \{D^-_j;j=1,...,K\} {Dj−;j=1,...,K},负样本输入集合
def pull_batch(data_map, batch_id):
    query_in = data_map['query'][batch_id * query_BS:(batch_id + 1) * query_BS]
    query_len = data_map['query_len'][batch_id * query_BS:(batch_id + 1) * query_BS]
    doc_positive_in = data_map['doc_pos'][batch_id * query_BS:(batch_id + 1) * query_BS]
    doc_positive_len = data_map['doc_pos_len'][batch_id * query_BS:(batch_id + 1) * query_BS]
    doc_negative_in = data_map['doc_neg'][batch_id * query_BS * NEG:(batch_id + 1) * query_BS * NEG]
    doc_negative_len = data_map['doc_neg_len'][batch_id * query_BS * NEG:(batch_id + 1) * query_BS * NEG]

    # query_in, doc_positive_in, doc_negative_in = pull_all(query_in, doc_positive_in, doc_negative_in)
    return query_in, doc_positive_in, doc_negative_in, query_len, doc_positive_len, doc_negative_len
这是准备每个batch数据的代码,其中query_BS为batch_size,NEG为负样本采样个数。
合并正负样本与计算余弦相似度
从论文中可以知道,我们需要对每个Query选取 D ^ = { D + , D 1 − , . . . . D k − } \hat D =\{D^+,D^-_1,....D^-_k\} D^={D+,D1−,....Dk−}这个集合做softmax操作,所以我们计算出每个Query正负样本的Score之后,需要将同一个Query正负样本其合并到一起,Score即为softmax输入的logits。由于输入数据中直接有负样本,所以这里不需要我们构造负样本,直接把负样本输出的Score concat即可。下面代码步骤如下:
- 先把同一个Query下pos_doc和neg_doc经过Encoder之后的隐层表示concat到一起
- 计算每个Query与正负样本的similarity
计算出来的cosine similarity Tensor如下,每一行是一个Query下正样本和负样本的sim,这样我们在axis = 1上做softmax操作即可:
[[query[1]_pos,query[1]_neg[1],query[1]_neg[2],query[1]_neg[3],...],
 [query[2]_pos,query[2]_neg[1],query[2]_neg[2],query[2]_neg[3],...],
 ......,
 [query[n]_pos,query[n]_neg[1],query[n]_neg[2],query[n]_neg[3],...],
]
with tf.name_scope('Merge_Negative_Doc'):
    # 合并负样本,tile可选择是否扩展负样本。
    # doc_y = tf.tile(doc_positive_y, [1, 1])
    # 此时doc_y为单独的pos_doc的hidden representation
    doc_y = tf.tile(doc_pos_rnn_output, [1, 1])

	#下面这段代码就是把同一个Query下的neg_doc合并到pos_doc,后续才能计算score 和 softmax
    for i in range(NEG):
        for j in range(query_BS):
            # slice(input_, begin, size)切片API
            # doc_y = tf.concat([doc_y, tf.slice(doc_negative_y, [j * NEG + i, 0], [1, -1])], 0)
            doc_y = tf.concat([doc_y, tf.slice(doc_neg_rnn_output, [j * NEG + i, 0], [1, -1])], 0)

with tf.name_scope('Cosine_Similarity'):
    # Cosine similarity
    # query_norm = sqrt(sum(each x^2))
    query_norm = tf.tile(tf.sqrt(tf.reduce_sum(tf.square(query_rnn_output), 1, True)), [NEG + 1, 1])
    # doc_norm = sqrt(sum(each x^2))
    doc_norm = tf.sqrt(tf.reduce_sum(tf.square(doc_y), 1, True))

    prod = tf.reduce_sum(tf.multiply(tf.tile(query_rnn_output, [NEG + 1, 1]), doc_y), 1, True)
    norm_prod = tf.multiply(query_norm, doc_norm)

    # cos_sim_raw = query * doc / (||query|| * ||doc||)
    cos_sim_raw = tf.truediv(prod, norm_prod)
    # gamma = 20
    cos_sim = tf.transpose(tf.reshape(tf.transpose(cos_sim_raw), [NEG + 1, query_BS])) * 20
	# cos_sim 作为softmax logits输入
softmax操作与计算交叉熵损失
上一步中已经计算出各个Query对其正负样本的cosine similarity,这个将作为softmax输入的logits,然后计算交叉熵损失即可,因为只有一个正样本,而且其位置在第一个,所以我们的标签one-hot编码为:
[1,0,0,0,0,0,....,0]
所以我们计算交叉熵损失的时候,只需要取第一列的概率值即可:
with tf.name_scope('Loss'):
    # Train Loss
    # 转化为softmax概率矩阵。
    prob = tf.nn.softmax(cos_sim)
    # 只取第一列,即正样本列概率。相当于one-hot标签为[1,0,0,0,.....,0]
    hit_prob = tf.slice(prob, [0, 0], [-1, 1])
    loss = -tf.reduce_sum(tf.log(hit_prob))
    tf.summary.scalar('loss', loss)
使用一个batch中其他Doc构造负样本
上面的方法是在输入数据中直接有负样本,这样计算的时候需要多计算负样本的representation,在输入数据batch中可以只包含正样本,然后再选择同一个batch中的其他Doc构造负样本,这样可以减少计算量
- 这部分代码在
https://github.com/LiangHao151941/dssm/blob/master/single/dssm_v3.py
输入数据
with tf.name_scope('input'):
    # Shape [BS, TRIGRAM_D].
    query_batch = tf.sparse_placeholder(tf.float32, shape=query_in_shape, name='QueryBatch')
    # Shape [BS, TRIGRAM_D]
    doc_batch = tf.sparse_placeholder(tf.float32, shape=doc_in_shape, name='DocBatch')
可以看出这里的输入数据只有 ( Q , D + ) (Q,D^+) (Q,D+),并没有负样本
构造负样本并计算余弦相似度
由于输入数据中没有负样本,所以使用同一个batch中的其他Doc做为负样本,由于所有输入Doc representation在前面已经计算出来了,所以不需要额外再算一遍了,下面的代码就是通过rotate 输入 ( Q , D + ) (Q,D^+) (Q,D+),来构造负样本,比如:
- 输入为 { ( Q 1 , D 1 + ) , ( Q 2 , D 2 + ) , ( Q 3 , D 3 + ) } \{(Q_1,D^+_1),(Q_2,D^+_2),(Q_3,D^+_3)\} {(Q1,D1+),(Q2,D2+),(Q3,D3+)},对于每一个 Q i Q_i Qi,除了 D i + D^+_i Di+,这个batch中的其他Doc均为负样本
- 那么对于 Q 1 Q_1 Q1, D 2 + 、 D 3 + D^+_2、D^+_3 D2+、D3+均为视为 D 1 − D^-_1 D1−,可以构造负样本为 { ( Q 1 , D 2 + 、 D 3 + ) } \{(Q_1,D^+_2、D^+_3)\} {(Q1,D2+、D3+)}
with tf.name_scope('FD_rotate'):
    # Rotate FD+ to produce 50 FD-
    temp = tf.tile(doc_y, [1, 1])

    for i in range(NEG):
        rand = int((random.random() + i) * BS / NEG)
        doc_y = tf.concat(0,
                          [doc_y,
                           tf.slice(temp, [rand, 0], [BS - rand, -1]),
                           tf.slice(temp, [0, 0], [rand, -1])])
with tf.name_scope('Cosine_Similarity'):
    # Cosine similarity
    query_norm = tf.tile(tf.sqrt(tf.reduce_sum(tf.square(query_y), 1, True)), [NEG + 1, 1])
    doc_norm = tf.sqrt(tf.reduce_sum(tf.square(doc_y), 1, True))

    prod = tf.reduce_sum(tf.mul(tf.tile(query_y, [NEG + 1, 1]), doc_y), 1, True)
    norm_prod = tf.mul(query_norm, doc_norm)

    cos_sim_raw = tf.truediv(prod, norm_prod)
    cos_sim = tf.transpose(tf.reshape(tf.transpose(cos_sim_raw), [NEG + 1, BS])) * 20
softmax操作与计算交叉熵损失
这一步和前面说的是一样的
with tf.name_scope('Loss'):
    # Train Loss
    prob = tf.nn.softmax((cos_sim))
    hit_prob = tf.slice(prob, [0, 0], [-1, 1])
    loss = -tf.reduce_sum(tf.log(hit_prob)) / BS
    tf.scalar_summary('loss', loss)
总结
之前一直对于sampled softmax不太理解,不知道在实际训练中如何做。但是看了DSSM论文和源码之后,真的有一种拨开云雾见月明的感觉,这种训练方式的核心就在于构造负样本,这样一说感觉和Pairwise loss中构造pair又有点类似,不过这里构造的不止一个负样本,训练目标也是pointwise,这种方式应该是不需要用到TensorFlow中的tf.nn.sampled_softmax_loss这个函数。
当然上面都是个人理解,最近越来越觉得真正要弄懂一个算法不单要理解数学原理,而且需要去读懂源码,很多在论文中理解不了的信息,在源码中都会清晰的展现出来,这部分我也一直在探索中,之后有什么心得再分享给大家啦~
