设计模式:04-适配器模式 / 桥接模式 / 装饰者模式
文章目录
- 7. 适配器模式
- 7.1 类适配器模式
- 7.1.1 类适配器模式应用实例
- 7.2 对象适配器模式
- 7.2.1 类适配器模式应用实例
- 7.3 接口适配器模式(方法级别, 又叫缺省适配器模式)
- 7.3.1 接口适配器模式应用实例
- 7.4 适配器模式在 SpringMVC 框架应用的源码剖析
- 7.5 适配器模式的注意事项和细节
- 8. 桥接模式
- 8.1 应用实例(手机操作问题)
- 8.2 桥接模式解决手机操作问题
- 8.3 桥接模式在 JDBC 的源码剖析
- 8.4 桥接模式的注意事项和细节
- 9 装饰者模式
- 9.1 装饰者模式应用实例
- 9.2 装饰者模式在 JDK 应用的源码分析
- 9.3 装饰者模式的注意事项和细节
本篇博客主要是学习 韩顺平_Java设计模式 做一个学习笔记使用
7. 适配器模式
基本介绍
- 适配器模式(Adapter Pattern)将某个类的接口转换成客户端期望的另一个接口表示,主的目的是兼容性,让原本 因接口不匹配不能一起工作的两个类可以协同工作。其别名为包装器(Wrapper)
- 适配器模式属于结构型模式
- 主要分为三类:类适配器模式、对象适配器模式、接口适配器模式
7.1 类适配器模式
主要是通过泛化( 继承 )的关系发生的适配
7.1.1 类适配器模式应用实例
以生活中手机充电器的例子来讲解适配器,充电器本身相当于 Adapter,220V 交流电相当于 origin (即被适配者),我们的目 target(即 目标)是 5V 直流电
代码演示:
/**
 * 适配器模式-类适配器(通过继承的形式适配)
 *
 * @author houyu
 * @createTime 2019/11/8 9:40
 */
public class Demo1 {

    public static void main(String[] args) {
        Phone phone = new Phone();
        phone.charging(new PhoneAdapter());
        /*
         * 输出电压220V
         * 手机适配器适配之后电压:5
         * 正在给手机充电, 电压是:5V
         */
    }

}

/**
 * 电压220V (角色: 被适配的类)
 */
class Voltage220V {
    public int output220V() {
        int origin = 220;
        System.out.println("输出电压" + origin + "V");
        return origin;
    }
}

/**
 * 适配接口
 */
interface Voltage5V {
    int output5V();
}

/**
 * 手机适配器 (角色: 可用目标)
 */
class PhoneAdapter extends Voltage220V implements Voltage5V {
    @Override
    public int output5V() {
        /**
         * 由于继承了Voltage220V, 所以output220V就会获得220V
         */
        int origin = output220V();
        int target = origin / 44;
        System.out.println("手机适配器适配之后电压:" + target);
        return target;
    }
}

/**
 * 手机
 */
class Phone {
    public void charging(Voltage5V voltage5V) {
        int output5V = voltage5V.output5V();
        System.out.println("正在给手机充电, 电压是:" + output5V + "V");
    }
}
7.2 对象适配器模式
主要是通过依赖的关系发生的适配
根据“合成复用原则”,在系统中尽量使用关联关系(聚合)来替代继承关系。( 比较常用的一种方式 )
7.2.1 类适配器模式应用实例
以生活中手机充电器的例子来讲解适配器,充电器本身相当于 Adapter,220V 交流电相当于 origin (即被适配者),我们的目 target(即 目标)是 5V 直流电
代码演示:
/**
 * 适配器模式-对象适配器(通过依赖的形式适配)
 *
 * @author houyu
 * @createTime 2019/11/8 9:40
 */
public class Demo1 {

    public static void main(String[] args) {
        Phone phone = new Phone();
        phone.charging(new PhoneAdapter());
        /*
         * 输出电压220V
         * 手机适配器适配之后电压:5
         * 正在给手机充电, 电压是:5V
         */
    }

}

/**
 * 电压220V (角色: 被适配的类)
 */
class Voltage220V {
    public int output220V() {
        int origin = 220;
        System.out.println("输出电压" + origin + "V");
        return origin;
    }
}

/**
 * 适配接口
 */
interface Voltage5V {
    int output5V();
}

/**
 * 手机适配器 (角色: 可用目标)
 */
class PhoneAdapter implements Voltage5V {
    private Voltage220V voltage220V = new Voltage220V();
    @Override
    public int output5V() {
        /**
         * 持有Voltage220V的实例, 所以output220V就会获得220V
         */
        int origin = voltage220V.output220V();
        int target = origin / 44;
        System.out.println("手机适配器适配之后电压:" + target);
        return target;
    }
}

/**
 * 手机
 */
class Phone {
    public void charging(Voltage5V voltage5V) {
        int output5V = voltage5V.output5V();
        System.out.println("正在给手机充电, 电压是:" + output5V + "V");
    }
}
7.3 接口适配器模式(方法级别, 又叫缺省适配器模式)
核心思路:
当不需要全部实现接口提供的方法时,可先设计一个抽象类实现接口,并为该接口中每个方法提供 一个默认实现(空方法),那么该抽象类的子类可有选择地覆盖父类的某些方法来实现需求
…
适用于一个接口不想使用其所有的方法的情况。
7.3.1 接口适配器模式应用实例
/**
 * @author houyu
 * @createTime 2019/11/30 21:38
 */
public class Demo1 {

    public static void main(String[] args) {
        /**
         * 由于只需要使用到method2(), 所以内部类中只需要重写method2(), 而不必重写所有实现方法
         */
        MyInterface myInterface = new BaseMyInterface(){
            @Override
            public void method2() {
                System.out.println("重写method2()");
            }
        };
        myInterface.method2();
        /*
         * 重写method2()
         */
    }
}

/**
 * 很多方法的抽象接口
 */
interface MyInterface {
    void method1();
    void method2();
    void method3();
    void method4();
}

/**
 * 抽象接口的空实现(缺省实现)
 */
abstract class BaseMyInterface implements MyInterface {
    @Override
    public void method1() {
    }

    @Override
    public void method2() {
    }

    @Override
    public void method3() {
    }

    @Override
    public void method4() {
    }
}
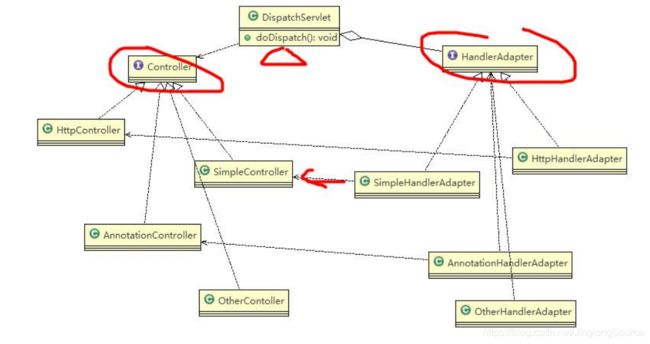
7.4 适配器模式在 SpringMVC 框架应用的源码剖析
- org.springframework.web.servlet.DispatcherServlet.doDispatch()
protected void doDispatch(HttpServletRequest request, HttpServletResponse response) throws Exception {
	// ...
	// 确定当前请求的处理程序。
	mappedHandler = getHandler(processedRequest);
	// ...
	// 确定当前请求的处理程序适配器。
	HandlerAdapter ha = getHandlerAdapter(mappedHandler.getHandler());
}
- org.springframework.web.servlet.DispatcherServlet.getHandlerAdapter()
protected HandlerAdapter getHandlerAdapter(Object handler) throws ServletException {
		if (this.handlerAdapters != null) {
			for (HandlerAdapter adapter : this.handlerAdapters) {
				if (adapter.supports(handler)) {
					return adapter;
				}
			}
		}
		throw new ServletException("No adapter for handler [" + handler +
				"]: The DispatcherServlet configuration needs to include a HandlerAdapter that supports this handler");
	}
- HandlerAdapter 的实现类
7.5 适配器模式的注意事项和细节
- 三种命名方式,是根据 src 是以怎样的形式给到 Adapter(在 Adapter 里的形式)来命名的。
- 类适配器:以类给到,在 Adapter 里,就是将 src 当做类,继承 对象适配器:以对象给到,在 Adapter 里,将 src 作为一个对象,持有 接口适配器:以接口给到,在 Adapter 里,将 src 作为一个接口,实现
- Adapter 模式最大的作用还是将原本不兼容的接口融合在一起工作。
- 实际开发中,实现起来不拘泥于我们讲解的三种经典形式
8. 桥接模式
基本介绍
- 桥接模式(Bridge 模式)是指:将实现与抽象放在两个不同的类层次中,使两个层次可以独立改变。
- 是一种结构型设计模式
- Bridge 模式基于类的最小设计原则,通过使用封装、聚合及继承等行为让不同的类承担不同的职责。它的主要 特点是把抽象(Abstraction)与行为实现(Implementation)分离开来,从而可以保持各部分的独立性以及应对他们的 功能扩展
8.1 应用实例(手机操作问题)
现在对不同手机类型的不同品牌实现操作编程(比如:开机、关机、上网,打电话等),如图:

传统方案解决手机操作问题分析
- 扩展性问题(类爆炸),如果我们再增加手机的样式(旋转式),就需要增加各个品牌手机的类,同样如果我们增加 一个手机品牌,也要在各个手机样式类下增加。
- 违反了单一职责原则,当我们增加手机样式时,要同时增加所有品牌的手机,这样增加了代码维护成本.
- 解决方案-使用桥接模式
8.2 桥接模式解决手机操作问题
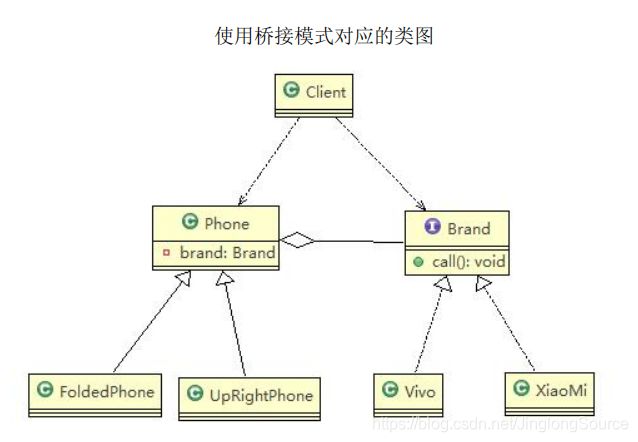
正确识别出系统中两个独立变化的维度(抽象[brand 品牌]、和实现[phone 手机])
通过依赖的关系, 形成多样化的不同组合, 从而解决了类爆炸的问题以及满足开闭原则, 可以动态扩张不同的品牌等…
/**
 * @author houyu
 * @createTime 2019/12/1 10:29
 */
public class Demo {

    public static void main(String[] args) {
        // 想要一台直立样式 + 小米品牌的手机
        Phone phone = new UpRightPhone(new XiaoMi());
        phone.open();
        phone.call();
        phone.close();
        // 想要一台直立样式 + Vivo品牌的手机
        phone = new UpRightPhone(new Vivo());
        phone.open();
        phone.call();
        phone.close();
        /*
         * XiaoMi手机开机
         * 直立样式手机
         * XiaoMi手机打电话
         * 直立样式手机
         * XiaoMi手机关机
         * 直立样式手机
         * Vivo手机开机
         * 直立样式手机
         * Vivo手机打电话
         * 直立样式手机
         * Vivo手机关机
         * 直立样式手机
         */
        /**
         * 思考:
         * 下面如果手机中新增了一个新的样式手机也很简单, 新增一个新的平台也很简单, 还可以随时搭配出想要的样式 + 品牌的手机的组合
         * 满足开闭原则
         * 解决了类爆炸问题...
         *
         * 桥接模式的注意事项和细节
         * 1) 实现了抽象和实现部分的分离,从而极大的提供了系统的灵活性,让抽象部分和实现部分独立开来,这有助于 系统进行分层设计,从而产生更好的结构化系统。
         * 2) 对于系统的高层部分,只需要知道抽象部分和实现部分的接口就可以了,其它的部分由具体业务来完成。
         * 3) 桥接模式替代多层继承方案,可以减少子类的个数,降低系统的管理和维护成本。
         * 4) 桥接模式的引入增加了系统的理解和设计难度,由于聚合关联关系建立在抽象层,要求开发者针对抽象进行设 计和编程
         * 5) 桥接模式要求正确识别出系统中两个独立变化的维度(抽象、和实现),因此其使用范围有一定的局限性,即需 要有这样的应用场景。
         *
         * 桥接模式其它应用场景 对于那些不希望使用继承或因为多层次继承导致系统类的个数急剧增加的系统,桥接模式尤为适用.
         * 常见的应用场景:
         * 1) -JDBC 驱动程序
         * 2) -银行转账系统 转账分类: 网上转账,柜台转账,AMT 转账 转账用户类型:普通用户,银卡用户,金卡用户..
         * 3) -消息管理 消息类型:即时消息,延时消息 消息分类:手机短信,邮件消息,QQ 消息...
         */
    }
}

/**
 * 品牌接口
 */
interface Brand {
    void open();
    void close();
    void call();
}

/**
 * Vivo品牌
 */
class Vivo implements Brand {

    @Override
    public void open() {
        System.out.println("Vivo手机开机");
    }

    @Override
    public void close() {
        System.out.println("Vivo手机关机");
    }

    @Override
    public void call() {
        System.out.println("Vivo手机打电话");
    }
}

/**
 * XiaoMi品牌
 */
class XiaoMi implements Brand {

    @Override
    public void open() {
        System.out.println("XiaoMi手机开机");
    }

    @Override
    public void close() {
        System.out.println("XiaoMi手机关机");
    }

    @Override
    public void call() {
        System.out.println("XiaoMi手机打电话");
    }
}
/**
 * 手机 (充当角色: 桥)
 * Phone的实现(子类)是 桥 的具体实现
 */
abstract class Phone {
    /** 组合品牌*/
    private Brand brand;

    public Phone(Brand brand) {
        this.brand = brand;
    }
    void open() {
        brand.open();
    }
    void close() {
        brand.close();
    }
    void call() {
        brand.call();
    }
}

/**
 * 直立手机
 */
class UpRightPhone extends Phone {
    public UpRightPhone(Brand brand) {
        super(brand);
    }

    @Override
    void open() {
        super.open();
        System.out.println("直立样式手机");
    }

    @Override
    void close() {
        super.close();
        System.out.println("直立样式手机");
    }

    @Override
    void call() {
        super.call();
        System.out.println("直立样式手机");
    }
}
8.3 桥接模式在 JDBC 的源码剖析
- jdbc 入口
public static void main(String[] args) throws Exception {
	// 注册驱动 (初始化com.mysql.jdbc.Driver类, 然后调用static进行注册驱动)
    Class.forName("com.mysql.jdbc.Driver");
    // 获取连接
    Connection connection = DriverManager.getConnection("url", "username", "password");
}
- com.mysql.cj.jdbc.Driver (静态注入驱动)
public class Driver extends NonRegisteringDriver implements java.sql.Driver {
    //
    // Register ourselves with the DriverManager
    //
    static {
        try {
        	// 往 DriverManager 注册具体实现的驱动信息
            java.sql.DriverManager.registerDriver(new Driver());
        } catch (SQLException E) {
            throw new RuntimeException("Can't register driver!");
        }
    }
    public Driver() throws SQLException {
        // Required for Class.forName().newInstance()
    }
}
- java.sql.DriverManager (存储驱动)
public class DriverManager {
	// 存储所有驱动信息
	private final static CopyOnWriteArrayList<DriverInfo> registeredDrivers = new CopyOnWriteArrayList<>();
	// 注册驱动方法
	public static synchronized void registerDriver(java.sql.Driver driver, DriverAction da) throws SQLException {
        /* Register the driver if it has not already been added to our list */
        if(driver != null) {
            registeredDrivers.addIfAbsent(new DriverInfo(driver, da));
        } else {
            // This is for compatibility with the original DriverManager
            throw new NullPointerException();
        }
        println("registerDriver: " + driver);
    }
}
- java.sql.DriverManager (获取驱动 [ 具体实现的驱动(mysql… ) ] )
public static Connection getConnection(String url,
    String user, String password) throws SQLException {
    java.util.Properties info = new java.util.Properties();
    if (user != null) {
        info.put("user", user);
    }
    if (password != null) {
        info.put("password", password);
    }
    return (getConnection(url, info, Reflection.getCallerClass()));
}


private static Connection getConnection(
    Stringurl, java.util.Properties info, Class<?> caller) throws SQLException {
    ClassLoader callerCL = caller != null ? caller.getClassLoader() : null;
    synchronized(DriverManager.class) {
        if (callerCL == null) {
            callerCL = Thread.currentThread().getContextClassLoader();
        }
    }
    if(url == null) {
        throw new SQLException("The url cannot be null", "08001");
    }
    println("DriverManager.getConnection(\"" + url + "\")");
    SQLException reason = null;

    for(DriverInfo aDriver : registeredDrivers) {
        if(isDriverAllowed(aDriver.driver, callerCL)) {
            try {
                println("    trying " + aDriver.driver.getClass().getName());
                Connection con = aDriver.driver.connect(url, info);
                if (con != null) {
                    println("getConnection returning " + aDriver.driver.getClass().getName());
                    return (con);
                }
            } catch (SQLException ex) {
                if (reason == null) {
                    reason = ex;
                }
            }
        } else {
            println("    skipping: " + aDriver.getClass().getName());
        }
    }
    if (reason != null)    {
        println("getConnection failed: " + reason);
        throw reason;
    }
    println("getConnection: no suitable driver found for "+ url);
    throw new SQLException("No suitable driver found for "+ url, "08001");
}
分析:
- Jdbc 的 Driver 接口,如果从桥接模式来看,Driver 就是一个接口(抽象层),下面可以有 MySQL 的 Driver,Oracle 的 Driver,这些就可以当做实现接口类
- DriverManager 充当桥角色, ( 内部 registeredDrivers 存储所有注册驱动信息, 也就是抽象的具体实现)
- DriverManager 会通过你注册了什么驱动, 然后 通过getConnection() 返回注册的驱动, 从而满足了开闭原则, 以及满足动态扩展java.sql.Driver 的具体实现
8.4 桥接模式的注意事项和细节
- 实现了抽象和实现部分的分离,从而极大的提供了系统的灵活性,让抽象部分和实现部分独立开来,这有助于 系统进行分层设计,从而产生更好的结构化系统。
- 对于系统的高层部分,只需要知道抽象部分和实现部分的接口就可以了,其它的部分由具体业务来完成。
- 桥接模式替代多层继承方案,可以减少子类的个数,降低系统的管理和维护成本。
- 桥接模式的引入增加了系统的理解和设计难度,由于聚合关联关系建立在抽象层,要求开发者针对抽象进行设 计和编程
- 桥接模式要求正确识别出系统中两个独立变化的维度(抽象、和实现),因此其使用范围有一定的局限性,即需 要有这样的应用场景。
桥接模式其它应用场景
对于那些不希望使用继承或因为多层次继承导致系统类的个数急剧增加的系统,桥接模式尤为适用常见的应用场景:
- -JDBC 驱动程序
- -银行转账系统 转账分类: 网上转账,柜台转账,AMT 转账 转账用户类型:普通用户,银卡用户,金卡用户…
- -消息管理 消息类型:即时消息,延时消息 消息分类:手机短信,邮件消息,QQ 消息…
9 装饰者模式
基本介绍
- 装饰者模式:动态的将新功能附加到对象上。在对象功能扩展方面,它比继承更有弹性,装饰者模式也体现了 开闭原则(ocp)
- 这里提到的动态的将新功能附加到对象和 ocp 原则,在后面的应用实例上会以代码的形式体现
9.1 装饰者模式应用实例
星巴克咖啡订单项目(咖啡馆):
- 咖啡种类/单品咖啡:BeiJingCoffee(北京咖啡)、ShangHaiCoffee(上海咖啡)
- 调料:Chocolate(巧克力) Milk(牛奶)
- 要求在扩展新的咖啡种类时,具有良好的扩展性、改动方便、维护方便
- 使用 OO 的来计算不同种类咖啡的费用: 客户可以点单品咖啡,也可以单品咖啡+调料组合。
/**
 * @author houyu
 * @createTime 2019/12/1 13:14
 */
public class Demo {

    public static void main(String[] args) {
        // 星巴克咖啡订单项目(咖啡馆):
        // 1) 咖啡种类/单品咖啡:BeiJingCoffee(北京咖啡)、ShangHaiCoffee(上海咖啡)
        // 2) 调料:Chocolate(巧克力) Milk(牛奶)
        // 3) 要求在扩展新的咖啡种类时,具有良好的扩展性、改动方便、维护方便
        // 4) 使用 OO 的来计算不同种类咖啡的费用: 客户可以点单品咖啡,也可以单品咖啡+调料组合。
        //
        // 北京咖啡 + 牛奶 + 巧克力
        Drink order = new BeiJingCoffee();
        order = new Milk(order);
        order = new Chocolate(order);
        System.out.println("order.getDes() = " + order.getDes());
        System.out.println("order.getPrice() = " + order.getPrice());
        //
        order = new ShangHaiCoffee();
        order = new Milk(order);
        order = new Milk(order);
        System.out.println("order.getDes() = " + order.getDes());
        System.out.println("order.getPrice() = " + order.getPrice());
        /*
         * order.getDes() = 北京咖啡 + 牛奶 + 巧克力
         * order.getPrice() = 11.5
         * order.getDes() = 上海咖啡 + 牛奶 + 牛奶
         * order.getPrice() = 12.0
         */
    }

}

/**
 * 饮料
 */
abstract class Drink {
    /**
     * 描述
     */
    private String des;
    /**
     * 价格
     */
    private float price = 0.0F;

    public String getDes() {
        return des;
    }

    public Drink setDes(String des) {
        this.des = des;
        return this;
    }

    public float getPrice() {
        return price;
    }

    public Drink setPrice(float price) {
        this.price = price;
        return this;
    }
}

/**
 * 咖啡
 */
class Coffee extends Drink {
}

/**
 * 北京咖啡
 */
class BeiJingCoffee extends Coffee {
    public BeiJingCoffee() {
        setDes("北京咖啡");
        setPrice(6.0F);
    }
}

/**
 * 上海咖啡
 */
class ShangHaiCoffee extends Coffee {
    public ShangHaiCoffee() {
        setDes("上海咖啡");
        setPrice(5.0F);
    }
}

/**
 * 装饰者(包裹着装饰品 { Drink })
 */
class Decorator extends Drink {
    /** 聚合 Drink */
    Drink drink;

    public Decorator(Drink drink) {
        this.drink = drink;
    }

    @Override
    public String getDes() {
        return drink.getDes() + " + " + super.getDes();
    }

    @Override
    public float getPrice() {
        return drink.getPrice() + super.getPrice();
    }
}

/**
 * 巧克力调味品 (巧克力装饰器)
 */
class Chocolate extends Decorator {
    public Chocolate(Drink drink) {
        super(drink);
        setDes("巧克力");
        setPrice(2.0F);
    }
}

/**
 * 牛奶调味品 (牛奶装饰器)
 */
class Milk extends Decorator {
    public Milk(Drink drink) {
        super(drink);
        setDes("牛奶");
        setPrice(3.5F);
    }
}
9.2 装饰者模式在 JDK 应用的源码分析
// JDK中使用装饰者模式
DataInputStream reader = new DataInputStream(new FileInputStream(""));
// 说明
// 1. InputStream 是抽象类, 类似我们前面讲的 Drink
// 2. FileInputStream 是 InputStream 子类,类似我们前面的 DeCaf, LongBlack
// 3. FilterInputStream 是 InputStream 子类:类似我们前面 的 Decorator 修饰者
// 4. DataInputStream 是 FilterInputStream 子类,具体的修饰者,类似前面的 Milk, Soy 等
// 5. FilterInputStream 类 有 protected volatile InputStream in; 即含被装饰者
// 6. 分析得出在 jdk 的 io 体系中,就是使用装饰者模式
- java.io.FilterInputStream
public class FilterInputStream extends InputStream {
    /**
     * The input stream to be filtered.
     */
    protected volatile InputStream in;

    /**
     * Creates a FilterInputStream
     * by assigning the  argument in
     * to the field this.in so as
     * to remember it for later use.
     *
     * @param   in   the underlying input stream, or null if
     *          this instance is to be created without an underlying stream.
     */
    protected FilterInputStream(InputStream in) {
        this.in = in;
    }
}
9.3 装饰者模式的注意事项和细节
实现步骤:
- 提取相同点部分形成一个抽象类(Drink)【被装饰者和装饰者 的 基类】
- 实现层实现抽象类Drink ( 被装饰者: BeiJingCoffee / ShangHaiCoffee )【被装饰者】
- 装饰者基类实现抽象类Drink, 并且组合一个Drink ( 包裹被装饰者, 那么自己就是装饰者了 )【装饰者基类】
- 装饰者基类需要在本类中实现组合抽象类(Drink)的一些业务逻辑
- 具体装饰者实现装饰者基类即可
装饰者模式 有一点递归的味道。。。


