SpringCloud (part8)SpringCloud Stream 微服务与消息驱动 RabbitMQ框架 Apache Kafka框架
1.SpringCloud Stream 介绍
(1)stream是一个用于构建消息驱动微服务的框架,该框架在SpringBoot的基础上整合了Spring Integration来连接消息代理中间件,它支持多个消息中间件的自定义配置,同时吸收了这些消息中间件的部分概念,例如持久化订阅,消费者分组分区等概念。
(2)SpringCloud Stream主要简化了消息应用的开发,该框架主要包括以下内容:
Stream矿建自己的应用模型。
绑定器抽象层,可以与消息代理中间件进行绑定。通过绑定器的API,可以实现插件式的绑定器。
持久化订阅的支持。
消费者组的支持。
Topic分区的支持。
(3)消费者代理中间件。
RabbitMQ,ActiveMQ,Kafka等。在使用这些矿建时,我们需要调用他们的API,接受消息。
2.什么是MQ
消息队列(Message Queue,简称MQ),从字面意思上看,本质是个队列,FIFO先入先出,只不过队列中存放的内容是message而已。
其主要用途:不同进程Process/线程Thread之间通信。
为什么会产生消息队列?有几个原因:
不同进程(process)之间传递消息时,两个进程之间耦合程度过高,改动一个进程,引发必须修改另一个进程,为了隔离这两个进程,在两进程间抽离出一层(一个模块),所有两进程之间传递的消息,都必须通过消息队列来传递,单独修改某一个进程,不会影响另一个;
不同进程(process)之间传递消息时,为了实现标准化,将消息的格式规范化了,并且,某一个进程接受的消息太多,一下子无法处理完,并且也有先后顺序,必须对收到的消息进行排队,因此诞生了事实上的消息队列;
3.AMQP(高级消息队列协议)
AMQP是advanced message queuing protocol的缩写,它定义了消息客户端与消息代理中间件之间的通信协议。基于该协议,消息客户端和消息代理中间件可以不接受任何开发语言,具体产品的约束。
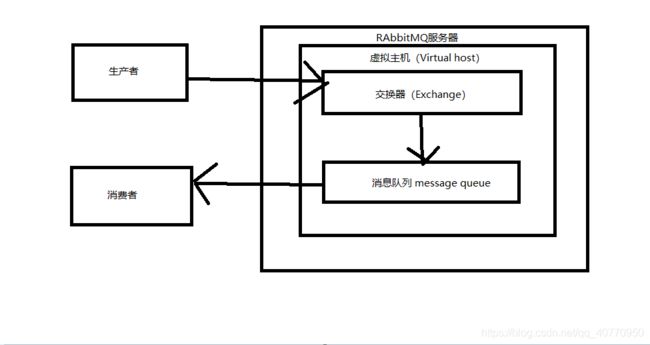
AMQP Model:
该图中,生产者将消息投递给消息代理(RabbitMQ服务器),他们之间会建立消息通道,消息由交换器先进行处理,交换器会选择把消息交给哪一个队列,最后消息队列会将消息发给消费者。
2.RabbitMQ
安装 教程https://blog.csdn.net/hellozpc/article/details/81436980#1MQ_9
编写生产者:AMQP协议不受语言限制,换言之,客户端可以使用不同的编程语言来实现。
导入依赖:
    com.rabbitmq
    amqp-client
    4.2.0


    org.slf4j
    slf4j-log4j12
    1.7.12
public class Send {
    public static void main(String[] args) throws IOException, TimeoutException {
        //创建连接
        ConnectionFactory factory=new ConnectionFactory();
        //设置主机名
        factory.setHost("localhost");
        //工厂模式得到实例
        Connection connection= factory.newConnection();
        //建立通道
        Channel channel=connection.createChannel();
        //申明队列
        String queueName= "hello";
        channel.queueDeclare(queueName,false,false,false,null);
        String message="hello RabbitMQ";
        //进行消息发布
        channel.basicPublish("",queueName,null,message.getBytes());
        //关闭通道和连接
        channel.close();
        connection.close();
    }
}
消费者:
public class Receive {
    public static void main(String[] args) throws IOException, TimeoutException {
        //创建连接
        ConnectionFactory factory=new ConnectionFactory();
        factory.setHost("localhost");
        Connection connection=factory.newConnection();
        //创建通道
        Channel channel=connection.createChannel();
        //申明队列名称
        String queueName="hello";
        channel.queueDeclare(queueName,false,false,false,null);
        //创建消费者
        Consumer consumer=new DefaultConsumer(channel){
            @Override
            public void handleDelivery(String consumerTag, Envelope envelope, AMQP.BasicProperties properties, byte[] body) throws IOException {
                String message= new String(body,"UTF-8");
                System.out.println("接收到的消息:"+message);
            }
        };
        channel.basicConsume(queueName,true,consumer);
    }
}
首先启动 RabbitMQ的本地服务,运行发送类,运行接受类。
4.开发消息微服务
SpringCloud帮我们做了一定程度的简化,只需要通过少量的代码配置就可以实现前面两个框架的功能,而不需要调用他们的API。
这个简单案例我通过多模块的方式测试
1.首先建立Eureka注册中心
eureka:
  client:
    register-with-eureka: false
    fetch-registry: false
server:
  port: 8888
@SpringBootApplication
@EnableEurekaServer
2.创建生产者服务
(1)配置注册到Eureka服务注册中心上
spring:
  application:
    name: rabbitmq-producer
server:
  port: 8001
eureka:
  client:
    service-url:
      defaultZone: http://localhost:8888/eureka
(2)定义生产者接口
public interface SendService {
    /*
        该注解表示将会创建消息队列名为myInput的消息通道
        如果@Output注解不提供参数,这使用方法名作为通道名称。
        接下来则需要让Spring容器开启绑定功能,在Application类中加入@EnableBingding注解
     */
    @Output("myInput")
    SubscribableChannel sendOrder();

}
(3)启动类中绑定消息通道
@SpringBootApplication
@EnableEurekaClient
@EnableBinding(SendService.class)
//该注解作用: 通过SendService.class 作为参数,Spring容器在启动时,会自动绑定SendService接口中定义的通道。
(4)编写控制器,发送 消息到 RabbitMQ服务上
@RestController
public class ProducerController {

    @Autowired
    private SendService sendService;//不同担心找不到子类,启动类中有注解帮我们把子类注入IOC容器了
    @RequestMapping(value = "/send",method = RequestMethod.GET)
    public String sendRequest(){
        //创建消息
        Message message= MessageBuilder.withPayload("hello Stream -- RabbitMQ test ".getBytes()).build();
        //发送消息
        sendService.sendOrder().send(message);
        //返回视图层
        return "success";
    }
}
3.创建消费者服务 ,注册到Eureka服务注册中心上,绑定RabbitMQ服务的某个消息通道,
(1)注册到Eureka服务注册中心上,
spring:
  application:
    name: rabbitmq-consumer
server:
  port: 8002
eureka:
  client:
    service-url:
      defaultZone: http://localhost:8888/eureka

(2)定义消费者接口
public interface ReceiveService {
    @Input("myInput")
    SubscribableChannel myInput();
}
(3)绑定RabbitMQ服务的某个消息通道,订阅消息
@SpringBootApplication
@EnableEurekaClient
@EnableBinding(ReceiveService.class)//绑定了ReceiveService接口中的通道
public class RibbtmqConsumnerApplication {

    public static void main(String[] args) {
        SpringApplication.run(RibbtmqConsumnerApplication.class, args);
    }

    /*
        @StreamListener("myInput")
        订阅了myInput通道中的消息 通过该注解修饰后的方法,会在消费者绑定消息通道的同时,
        自动接受消息值,并调用。
     */
    @StreamListener("myInput")
    public void receive(byte [] message){
        System.out.println("接受到的消息:"+new String(message));
    }
}
